Campaigns: Completed Campaigns
Campaigns that are completed should be grouped here.
Hosted by Richard S.
Canadian Forces Campaign
steph2102
Visit this Community
Isere, France
Joined: April 23, 2011
KitMaker: 735 posts
Armorama: 606 posts
Posted: Saturday, October 05, 2013 - 10:19 PM UTC
hello, here is my progress. this is a nice kit, but lacks a few details inside the cab.
steph
Jessie_C
Visit this Community
British Columbia, Canada
Joined: September 03, 2009
KitMaker: 6,965 posts
Armorama: 47 posts
Posted: Sunday, October 06, 2013 - 09:44 AM UTC
Monogram obviously did not intend for the airbrakes to be glued shut

I've also opened the position lights behind the brakes.
And got the base coat on in the cockpit
tinbanger
Visit this Community
Ontario, Canada
Joined: February 04, 2008
KitMaker: 2,507 posts
Armorama: 88 posts
Posted: Sunday, October 06, 2013 - 01:26 PM UTC
Here is a update on my CF-18:-

SgtRam
Staff MemberContributing Writer
AEROSCALE
#197
Visit this Community
Ontario, Canada
Joined: March 06, 2011
KitMaker: 3,971 posts
Armorama: 2,859 posts
Posted: Sunday, October 06, 2013 - 01:41 PM UTC
Yippy, starting to look more like a tracker. Here is an early set of images of the decals going on.


Lazzarus78
Visit this Community
Switzerland
Joined: January 27, 2013
KitMaker: 75 posts
Armorama: 75 posts
Posted: Wednesday, October 09, 2013 - 12:30 AM UTC
A lot of cool stuff, nice models. Made some progress too on my Grizzly. I hope i am correct with the colors. It is an early Grizzly and i decided to paint it in the three tone camo. 2 green colors and black. Washing is done, started with some streaking effects, this totally new to me and have to work on it. Wheels are not glued, just on for the pictures. If some of the canadian guys can tell me if the colors are ok or totally wrong, would be nice, thanks.


A little bit chipping was made along the sides and on the top. Not too much, new for me too.

Cheers Christoph
kruppw
Visit this Community
Texas, United States
Joined: March 17, 2006
KitMaker: 1,117 posts
Armorama: 1,115 posts
Posted: Wednesday, October 09, 2013 - 12:48 PM UTC
Well I've got the construction done on the ferret and now I'm ready to slap some paint on it. I've scratch built the fuel can rack on the back with scrap plastic and jerry cans from Tamiya. The .30cal came from afv club's centurion kit with scratch built base.


LeoCmdr
Visit this Community
Alberta, Canada
Joined: January 19, 2005
KitMaker: 4,085 posts
Armorama: 3,917 posts
Posted: Wednesday, October 09, 2013 - 02:32 PM UTC
Christoph,

Nice work on your Grizzly. The dark green and the black look accurate but the lighter green is too yellow in my opinion. It should be more of a faded olive drab shade.
Lazzarus78
Visit this Community
Switzerland
Joined: January 27, 2013
KitMaker: 75 posts
Armorama: 75 posts
Posted: Wednesday, October 09, 2013 - 04:49 PM UTC
@Christopher,looks pretty good your Ferret, i like the added parts.

@Jason, thanks for the help. I will see that i can change the color. I wasn`t sure about it.

Cheers Christoph
gcdavidson
Visit this Community
Ontario, Canada
Joined: August 05, 2003
KitMaker: 1,698 posts
Armorama: 1,563 posts
Posted: Thursday, October 10, 2013 - 02:34 AM UTC
I like the colours. One thing for sure is that the colours of that era showed a lot of fading as they aged, and were repainted, and aged some more.

If you make the colours as they are on the 1:1 scale, you will find not enough contrast between the 2 greens when you get down to 35th scale, so they are going to need some lightening-up to maintain that contrast. That being said, and as Jason said, your OD may have a bit too much yellow vice brown added to it, but I certainly would not bother changing it.

This is what happens when you don't lighten the OD, it becomes very hard to distinguish it from the Green:


Here's some reasonbly fresh paint on a real one:


How did you do the hard edge? Brush paint? If so, what paint, as it went on very nice.
bison126
Visit this Community
Correze, France
Joined: June 10, 2004
KitMaker: 5,329 posts
Armorama: 5,204 posts
Posted: Friday, October 11, 2013 - 07:20 AM UTC
Hello all,
I haven't been very active on my model lately but here is where I am so far. The paint is done and the weathering process is on going. Hopefully, crossing the finish line is a question of weeks.


I still have to add the straps which hold the fuel and water cans at the rear of the LAV and perhaps some others here and there as I noticed there were a lot of them on the pictures I used as reference.

Olivier
Lazzarus78
Visit this Community
Switzerland
Joined: January 27, 2013
KitMaker: 75 posts
Armorama: 75 posts
Posted: Friday, October 11, 2013 - 08:33 AM UTC
Hi guys,
@Graeme, i love your Grizzly, saw it on Network54(? i am not sure), great model. thanks for your help. I try to change the green a little with a brown filter or something. see what happens.
The dark green base color is sprayed with airbrush, the black and the other green is painted by hand with the brush.
the colors.... black, i am not sure, which one i used. it was the black from Lifecolor or Chaos Black from Citadel. Normal black, nothing special.
Dark green, standard Nato green primer from Vallejo.
Olive drab, Citadel, dont wonder about the names, one layer of Death World Forest base color and then Elysian Green layer color, only thin layers, not too much.
After the colors are dried i used the AK Interactive Filter for Nato Tanks. Wasnt that happy with the filter, doesent worked like i wished, but ok.

@Olivier, cool Lav, like it.

Cheers Christoph
Jessie_C
Visit this Community
British Columbia, Canada
Joined: September 03, 2009
KitMaker: 6,965 posts
Armorama: 47 posts
Posted: Friday, October 11, 2013 - 03:25 PM UTC
I've slowly been making progress. The fuselage is together

And the engine gets a polish

I faked up some Radar Warning Receiver fairings

And a test fit. Yes, it looks like a Starfighter
bison126
Visit this Community
Correze, France
Joined: June 10, 2004
KitMaker: 5,329 posts
Armorama: 5,204 posts
Posted: Sunday, October 13, 2013 - 04:37 AM UTC
Some more pictures of the LAV III. Most of the gear has been added. I still have to figure out to represent the ratchet strap that secure the spare wheel in its cage, add some more dust and I could call this one done.


Olivier
junglejim
Visit this Community
Alberta, Canada
Joined: February 18, 2003
KitMaker: 1,728 posts
Armorama: 1,629 posts
Posted: Saturday, October 19, 2013 - 11:23 AM UTC
OK, let's try this again (friggin' Photobucket and Shockwave )
Olivier - nice looking LAV-III. Other builds are coming along nicely as well!
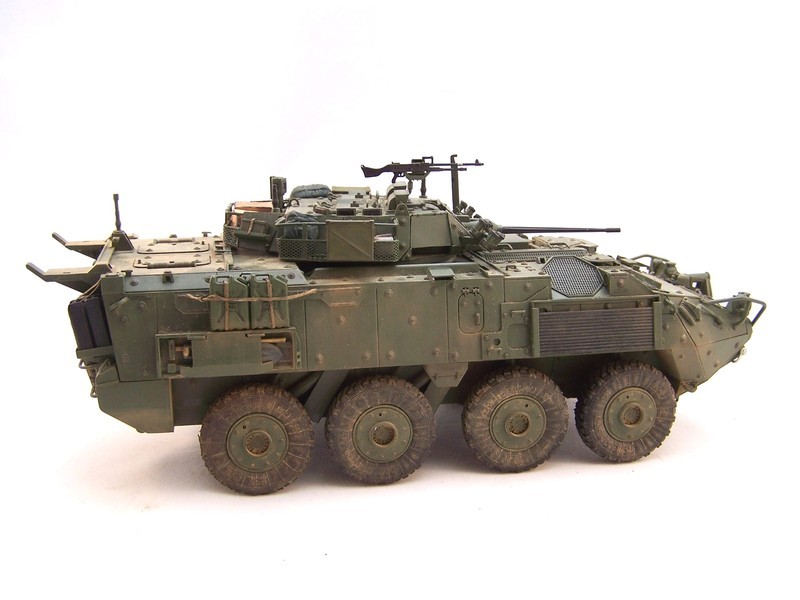
@ John - I'll be painting this one overall green; other choices would have been UN white or tan.
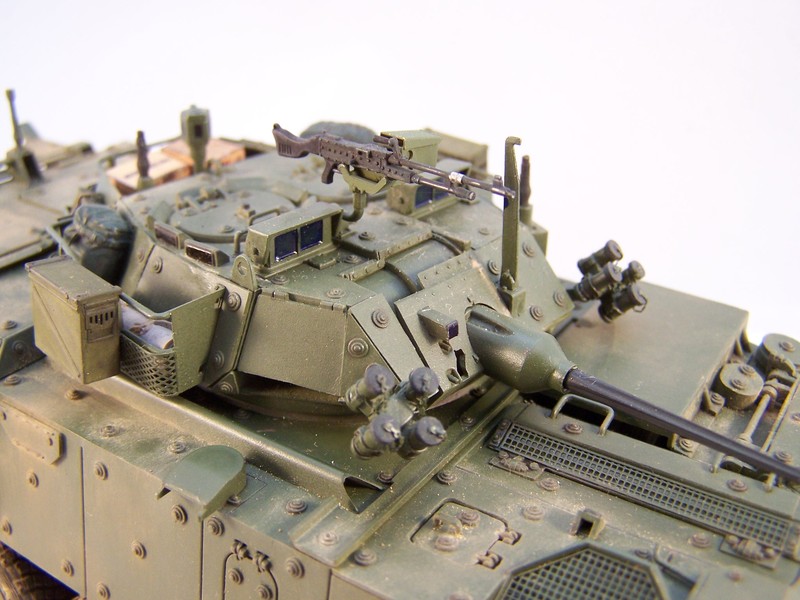
@ Alex - the Real Model conversion isn't too bad - worth it for the p.e. alone. As you'll see it's missing a few small details though.

Continuing on:

Added the rear hatch extension with sheet styrene and lots of sanding. Anti-skid texture is made by stippling on lacquer thinner until appropriate texture is achieved:


Rear data connection hatch scribed in using template (copied from LAV-III hatch):


Armour mounting bosses cut from .030" rod cut with razor blade saw in mitre box:


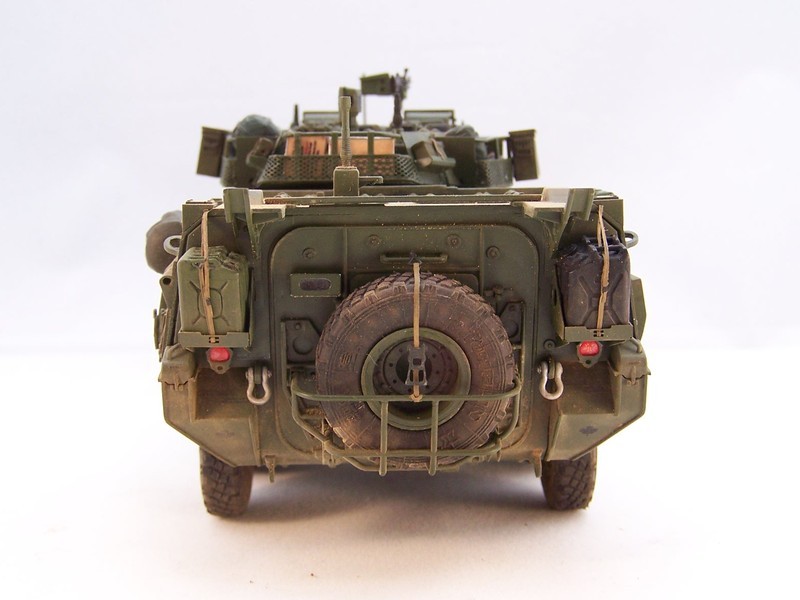
Rear upper hull details complete:


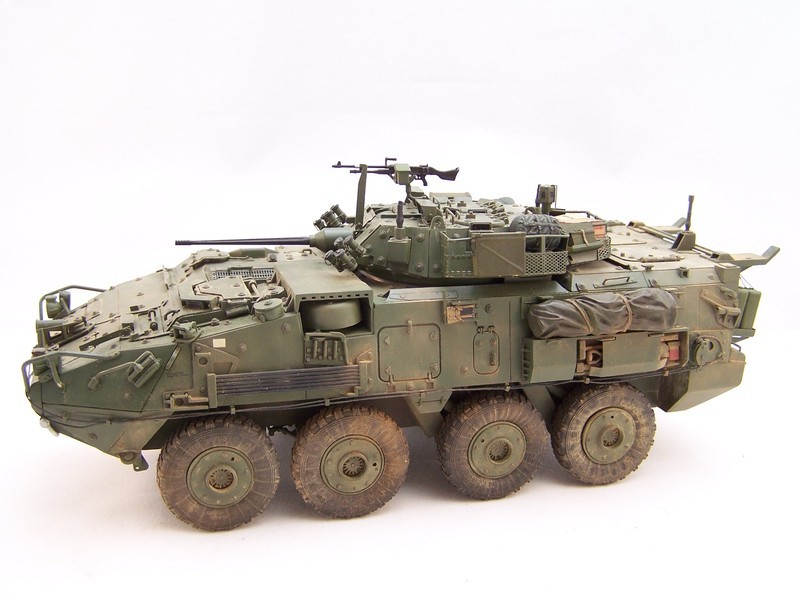
Rear end complete. I had spent considerable time scratching the guard around the service air outlets when I realized there was a p.e. one I could have used!:


Muffler spaced out from hull with tube and brass strip support:


...and guard added:


The engine deck isn't quite right (rear grill isn't 'high' enough among other things) but I'm going to let it go on this one:


Now to add the rest of the hull p.e. and mounting bosses!

Jim
gcdavidson
Visit this Community
Ontario, Canada
Joined: August 05, 2003
KitMaker: 1,698 posts
Armorama: 1,563 posts
Posted: Sunday, October 20, 2013 - 12:39 AM UTC
Some good tips there Jim!

I'm going to use your method of cutting the AoA bosses. Such a simple idea, but it works!

I've never seen Laquer Thinner use for stippling styrene. Sure is cheaper than Testors Liquid glue. Wonder it it would work for texturing weld beads?
bison126
Visit this Community
Correze, France
Joined: June 10, 2004
KitMaker: 5,329 posts
Armorama: 5,204 posts
Posted: Sunday, October 20, 2013 - 03:09 AM UTC
Thanks for your comment Jim.
I hope the pîctures of the complete model will suit you as well.
Here they are:


Pictures are in the Campaign gallery. More are available at my site as well as a comprehensive build article.

Olivier
gcdavidson
Visit this Community
Ontario, Canada
Joined: August 05, 2003
KitMaker: 1,698 posts
Armorama: 1,563 posts
Posted: Monday, October 21, 2013 - 04:02 AM UTC
Olivier, that turned out really nice! I like the details such as the ratcheting straps. Weathering looks just right too. What did you use for the optical glass? I like it.
bison126
Visit this Community
Correze, France
Joined: June 10, 2004
KitMaker: 5,329 posts
Armorama: 5,204 posts
Posted: Monday, October 21, 2013 - 05:27 AM UTC
Thank you for the kind comment Graeme.
The optical glass effect is just a black base with some layers of Tamiya clear blue.

Olivier
steph2102
Visit this Community
Isere, France
Joined: April 23, 2011
KitMaker: 735 posts
Armorama: 606 posts
Posted: Tuesday, October 22, 2013 - 09:11 AM UTC
hello, Olivier and Graeme superb work. a little more of my progress.
steph


steph2102
Visit this Community
Isere, France
Joined: April 23, 2011
KitMaker: 735 posts
Armorama: 606 posts
Posted: Thursday, October 24, 2013 - 12:09 AM UTC
hello,
here is my chevrolet finished. thank you for this campaign.
steph

Shermania
Visit this Community
California, United States
Joined: January 30, 2013
KitMaker: 537 posts
Armorama: 531 posts
Posted: Friday, November 01, 2013 - 05:40 AM UTC
I'm going to try to finish something for this campaign. Primarily because I want to add that snazzy ribbon to my profile. I have two kits with Canadian markings, a firefly hybrid DML orange box re-released in 2009 with DS tracks and some small upgrades to the turret and hull from the original 1994 release. The second one is a really intriguing option, it's a Canadian model by modelcraft of the venerable centurion. This comes with Canadian markings too. It seems this company made this kit under license from academy and that it was originall designed to be motorized. The firefly I might have a chance to finish on time if I put everything else on hold but I'm really tempted to step way outside the box (for me anyways) and go with the centurion. The kit seems simple enough with low part numbers but I know next to nothing about centurions and even less about this kit, fit problems etc. I would really appreciate any and all feedback on this kit as time is running out in this campaign. The kit I bought of all places at a fundraiser for our church that my wife dragged me to. It cost me a whopping $2 at the silent auction. I guess no other modelers where there that day . Due to time constraints either kit would be strictly OOTB.
Removed by original poster on 11/02/13 - 06:26:29 (GMT).
2002hummer
#257
Visit this Community
Ontario, Canada
Joined: October 11, 2011
KitMaker: 812 posts
Armorama: 110 posts
Posted: Friday, November 01, 2013 - 06:32 PM UTC
I am finally getting started on my kit a Miniwings Avro CF-100 Canuck. Following photos show box opening.


SgtRam
Staff MemberContributing Writer
AEROSCALE
#197
Visit this Community
Ontario, Canada
Joined: March 06, 2011
KitMaker: 3,971 posts
Armorama: 2,859 posts
Posted: Saturday, November 02, 2013 - 03:28 AM UTC
@steph - nice finish on the CMP, great looking model
steph2102
Visit this Community
Isere, France
Joined: April 23, 2011
KitMaker: 735 posts
Armorama: 606 posts
Posted: Saturday, November 02, 2013 - 06:21 AM UTC
@Kevin thank you
steph