Sao Paulo, Brazil
Joined: January 24, 2012
KitMaker: 1,054 posts
Armorama: 1,050 posts
Posted: Saturday, November 02, 2013 - 08:11 AM UTC
Hi guys!
Here to show some progress on my Snow Leo. The paint jos IS a real nightmare. But...
Second and third colors masked:

And the last color aplied:


Now is time to remove all masks and pray... Pics soon.
Cheers!
Marco
Lisboa, Portugal
Joined: March 04, 2008
KitMaker: 5,386 posts
Armorama: 4,727 posts
Posted: Saturday, November 02, 2013 - 09:21 AM UTC
@Paul
I did the same Italeri kit just before Dragon launched their terrific 234's ..
But it was a great kit.
Found a photo

@Marco
Oi Marco !!
That masking job is a nightmare.
I hope it turns out ok after take them off.

Active Builds: 0
Active Campaigns: 0
England - North East, United Kingdom
Joined: June 22, 2010
KitMaker: 1,224 posts
Armorama: 1,207 posts
Posted: Saturday, November 02, 2013 - 09:59 AM UTC
thanks Paul, very helpful. Am thinking to mount the lower body on the the chassis now so i can get all square than add all arts that will be the main colour (so not the seat, grenades etc).... then i can paint simply 2 colours for the main part then weather - same with the upper body so it can all be painted & weathered at the same time.... now all i need to find is a decent elfenbraun - think the panzerart book gives me a few options.....
England - North East, United Kingdom
Joined: June 22, 2010
KitMaker: 1,224 posts
Armorama: 1,207 posts
Posted: Sunday, November 03, 2013 - 05:32 AM UTC
next request for help.... anyone got photos of the engine for the 222? just wanna check for painting
England - East Anglia, United Kingdom
Joined: March 21, 2012
KitMaker: 1,673 posts
Armorama: 1,640 posts
Posted: Sunday, November 03, 2013 - 06:34 AM UTC
Hi Rob, glad the pics helped

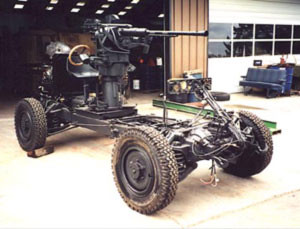
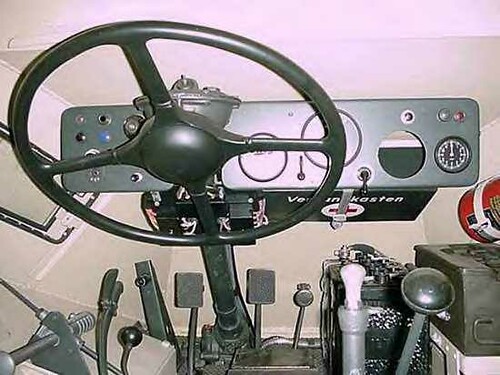
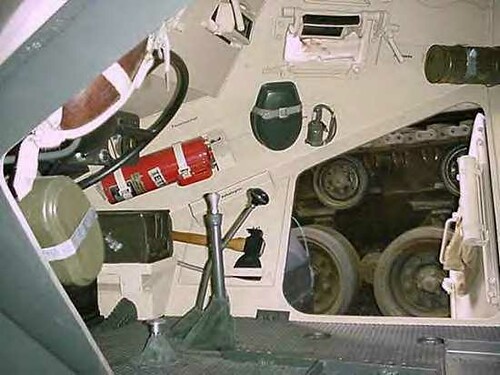
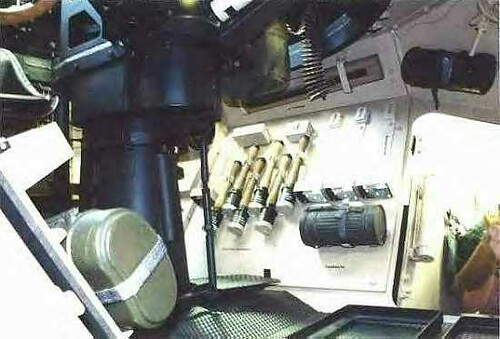
but I'm afraid I have nothing on the engine. At a guess it would be dark grey, like German Grey XF64 from Tamiya. Here a couple of pictures of a Maybach engine I took at the Overloon museum in Holland:


Here`s todays progress, basic build is almost finished just got to add some smaller bits and bobs:


little things like drilling out the exhaust tubes make a big difference on these old kits:
 John
John nice 234's there,I also built all four versions
back in the 90's. All where done at the same time, which can be seen on the camo. I'll get some pics up if nobody minds later.

Paul
"Lord Raglan wishes the cavalry to advance rapidly to the front, follow the enemy & try to prevent the enemy carrying away the guns. Troop horse artillery may accompany. French cavalry is on your left. Immediate. R Airey."
England - North East, United Kingdom
Joined: June 22, 2010
KitMaker: 1,224 posts
Armorama: 1,207 posts
Posted: Sunday, November 03, 2013 - 07:11 AM UTC
Paul, great work... and thanks for the photos. blocked it in with black already so wil switch to black-grey with black and oily steel detailing i think....
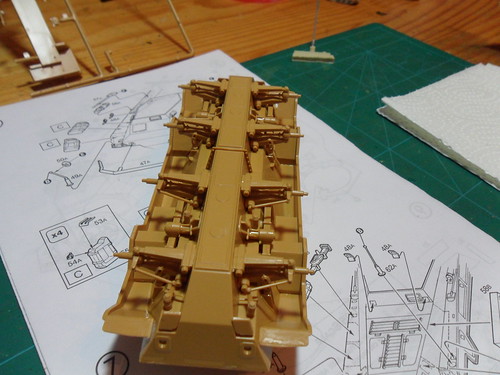
making bit and pieces of progress. want to paint the engine before i mount the lower hull half before i add all the smaller parts to that so have done the upper interior and now starting on the gun assembly.
I have 3 choices of gun (from the kit and will drill the muzzle holes)
FLAK-38
KWK-30
KWK-38
not sure which one to go for (or is correct) - doing DAK 21st Panzer Division, Libya May 41 so maybe only 1 is correct (r perhaps it doesnt matter)?
anyway, enjoying the build and looking forward to being able to do a full interior - my first (or at least first that will be visible - the Pz1a I did has an interior but you cant see it ;-))....
photos later, its all just bits and pieces being assembled before being put together...
oh yes, and am gonna have to learn welding for the PE - just seen a small "box" (ammo box perhaps) that goes in the cupola - 4 small verticals & 2 horizontal frames... I will do some practice welding before attempting (gonna try to build a fuel can frame as a test piece - if its any good i can then use it on the model (and if i learn how to weld I may look at more complex PE for later builds)....

#123
New Mexico, United States
Joined: November 17, 2008
KitMaker: 1,202 posts
Armorama: 635 posts
Posted: Sunday, November 03, 2013 - 08:48 AM UTC
Howdy Y'all

I've done a little more work on the M-8 Greyhound. This is the 1/72 Italeri kit. I put the decals over a gloss coat of Future floor wax, glossed it again and weathered with acrylics and oils. Next up: paint the exhaust, flat coat, add some "dust effects" weathering and call it done.
I painted Mig's thinned "Light Mud" over the decals. I think it looks like thinned oil paint over decals. Any suggestions on taking it to the next level? I've kind of reached a dead end here in my modeling skills, temporary I hope.


Take care,
Don "Lakota"
Working on Campaigns:
1/72 Hasegawa Ki-84 Frank
1/144 Dragon Armor
Sao Paulo, Brazil
Joined: January 24, 2012
KitMaker: 1,054 posts
Armorama: 1,050 posts
Posted: Sunday, November 03, 2013 - 10:48 AM UTC
Hi guys!
Great works so far. I just love this kind of armor.
@John: Olá companheiro! My nightmare is just starting. Thanks for your suport.
Here is the result. It is far, far, from perfect, but still eye-catching.


Now it's time to paint the details (as I know the correct color of each)
Cheers!
Marco
Louisiana, United States
Joined: March 06, 2010
KitMaker: 3,128 posts
Armorama: 2,959 posts
Posted: Sunday, November 03, 2013 - 11:31 AM UTC
@Rob W;
For the SdKfz 222... most appropriate would be the shorter 38 barrel - L/55 KwK 38
You CAN, however, swap in a standard length L/65 FlaK 38 barrel - same screw fit and folks did sometimes use these on AC when needed. The KwK 30 was found on the Pz. II and on those older 6- and 8-rad 231/2 AC, but not on the small 222.
Bob

England - North East, United Kingdom
Joined: June 22, 2010
KitMaker: 1,224 posts
Armorama: 1,207 posts
Posted: Sunday, November 03, 2013 - 07:17 PM UTC
@Marco.... thats a very neat finish..... the masking effort was well worth the effort. looking forward to seeing more
@Bob.... thanks.... will go down your suggested route
Sao Paulo, Brazil
Joined: January 24, 2012
KitMaker: 1,054 posts
Armorama: 1,050 posts
Posted: Monday, November 04, 2013 - 03:25 AM UTC
Thanks a lot Robert!
Let's see the finished beast.
Cheers!
Marco
Ontario, Canada
Joined: November 10, 2010
KitMaker: 587 posts
Armorama: 550 posts
Posted: Monday, November 04, 2013 - 03:28 PM UTC
England - North East, United Kingdom
Joined: June 22, 2010
KitMaker: 1,224 posts
Armorama: 1,207 posts
Posted: Monday, November 04, 2013 - 09:01 PM UTC
#275
Alberta, Canada
Joined: March 01, 2006
KitMaker: 174 posts
Armorama: 141 posts
Posted: Tuesday, November 05, 2013 - 06:25 AM UTC
Have the colour coat on my 222 and ready to start weathering.

Robert: I finished the engine and as you found you can see very little of it. The side access doors were often left open in hot weather to improve cooling and I believe could be closed remotely from the drivers station. The photoetched "shelf" in the turret is the mounting for the radio, one is not supplied and The one I built you can see as much of it as you can the engine when things are all put together
England - North East, United Kingdom
Joined: June 22, 2010
KitMaker: 1,224 posts
Armorama: 1,207 posts
Posted: Tuesday, November 05, 2013 - 08:10 AM UTC
Quoted Text
Have the colour coat on my 222 and ready to start weathering.
Robert: I finished the engine and as you found you can see very little of it. The side access doors were often left open in hot weather to improve cooling and I believe could be closed remotely from the drivers station. The photoetched "shelf" in the turret is the mounting for the radio, one is not supplied and The one I built you can see as much of it as you can the engine when things are all put together
cheers Cam. am guessing the only way to build the radio shelf is solder.... new skill so will have a go on a test first - thinking some sort of tool box mounted on the front where you have the oil can box, then mount my oil cans on the rear wheel arch....
and nice finish - what colour is that. I have MM RAL 8000 (theink that is what it was i used on my PzII) theat I might use or perhaps mix some desert yellow & buff to get a more "field applied" colour....
#275
Alberta, Canada
Joined: March 01, 2006
KitMaker: 174 posts
Armorama: 141 posts
Posted: Tuesday, November 05, 2013 - 08:31 AM UTC
Robert, the colour is supposed to be RAL 8020. I tried to match this by adding a bit of tamiya XF-78 "wooden Deck tan" to lighten Gunze 66 "RLM 79 Sandy Brown".
Ontario, Canada
Joined: November 10, 2010
KitMaker: 587 posts
Armorama: 550 posts
Posted: Tuesday, November 05, 2013 - 08:52 AM UTC
England - North East, United Kingdom
Joined: June 22, 2010
KitMaker: 1,224 posts
Armorama: 1,207 posts
Posted: Wednesday, November 06, 2013 - 11:07 PM UTC
nice work Alex....
for me, doing various pieces, interior I am adding all he components that will be painted the same colour - trying to be in a position that the off-white/grey is done and only things a completely different colour are added after (most like the seat + the 2 batteries - least that way I should not have glue marks on my paint ;-)
also been working on the gun mount... quite fiddly but coming on


#275
Alberta, Canada
Joined: March 01, 2006
KitMaker: 174 posts
Armorama: 141 posts
Posted: Thursday, November 07, 2013 - 09:06 AM UTC
England - North East, United Kingdom
Joined: June 22, 2010
KitMaker: 1,224 posts
Armorama: 1,207 posts
Posted: Thursday, November 07, 2013 - 10:14 AM UTC
Very nice can, inspiration for mine... One thing tho, that water skin seems to be a bit "stiff" on the door :-) .... But seriously, hope mine is half as good...
#275
Alberta, Canada
Joined: March 01, 2006
KitMaker: 174 posts
Armorama: 141 posts
Posted: Thursday, November 07, 2013 - 10:25 AM UTC
I have to agree with you Robert, also left off the fuel stains that I had planned to add. The camera shows up a lot of little faults.
England - North East, United Kingdom
Joined: June 22, 2010
KitMaker: 1,224 posts
Armorama: 1,207 posts
Posted: Thursday, November 07, 2013 - 10:43 AM UTC
Quoted Text
I have to agree with you Robert, also left off the fuel stains that I had planned to add. The camera shows up a lot of little faults.
Not wrong... I hate photos of my work... Just been surfing for photos of the 222in action, lots of variations for field mods I am gonna try, plus I like this one

Which also shows 2-tone paint scheme... Not sure on theatre tho so will look at something sort of Libya... Any thoughts on what to use for the netting?
Kildare, Ireland
Joined: November 21, 2007
KitMaker: 3,212 posts
Armorama: 2,807 posts
Posted: Thursday, November 07, 2013 - 08:02 PM UTC
South Carolina, United States
Joined: December 03, 2009
KitMaker: 2,160 posts
Armorama: 1,906 posts
Posted: Friday, November 08, 2013 - 06:02 AM UTC
Some nice looking work guys.
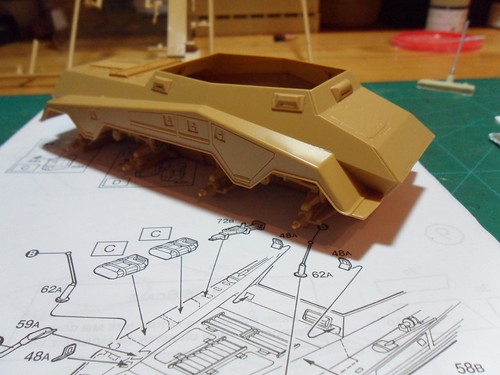
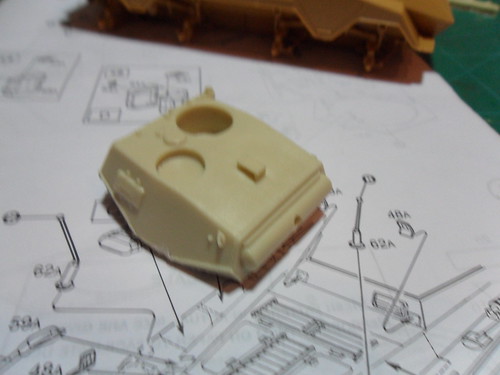
Body tub assembly was pretty straightforward. In general, the kit goes together well.

Side and rear body panels. Again, these will be pre-painted for ease.

Panels on.

Armored radiator cover, dashboard, and gun-rail. I went ahead and jumped ahead and mounted the gun-rail. I wanted to make sure the rail sat on the supports. It took a little creative clamping to get the sides to sit correctly.


Body together. I tacked the hood plates on just in case I decide to open it up to show off that engine.

And here is a look at what I am going for. That's an old ICM 45mm antitank gun. That thing has been gathering dust since the 90s and this seemed like a good way to use it.

That's it for now.
Istanbul, Turkey / Türkçe
Joined: December 05, 2007
KitMaker: 953 posts
Armorama: 705 posts
Posted: Friday, November 08, 2013 - 11:29 AM UTC
Good work Cam...