

Paul, yes the barrel is an RB models one, for some reason I thought it was an Aber one.
MY only complaint with it was it had no instructions, but luckily it's the same as Aber's so I used their instructions.
BTW, your JSU-152 looks awesome, a job well done!
Campaigns: Active Campaigns
Campaigns that are either in planning or underway should be grouped here.
Campaigns that are either in planning or underway should be grouped here.
Hosted by Richard S.
Trumpeter Campaign
Tiger1944

Joined: October 11, 2013
KitMaker: 160 posts
Armorama: 152 posts

Posted: Saturday, October 26, 2013 - 08:04 AM UTC


1721Lancers

Joined: March 21, 2012
KitMaker: 1,673 posts
Armorama: 1,640 posts
Posted: Saturday, October 26, 2013 - 08:15 AM UTC
Thanks Jason, and here's a tip for you as RB never give an instruction sheet, just check their site.
http://www.rbmodel.com/index.php?action=products&cat=c_bm&sub=35B
Just click on to the item and a new window will open in which you can see the build sequence.

Paul
http://www.rbmodel.com/index.php?action=products&cat=c_bm&sub=35B
Just click on to the item and a new window will open in which you can see the build sequence.
Paul


turkeyshot
Joined: February 06, 2012
KitMaker: 138 posts
Armorama: 133 posts
Posted: Saturday, October 26, 2013 - 10:40 AM UTC
There is some great looking progress here fellas.
Paul - great job on the SU-152. As others have already commented on, I love the subtlety of the exhaust stains.
Larry - I really like your Stryker. Well executed; whichever campaign it ends up in.
Jason - She is looking great mate. I particularly like the work that you have done on the breech assembly. I am watching this build with great interest.
As for me, I have managed a little more work here and there. I have bit the bullet and started in on some of the PE. While I love the finished result, damn this stuff is a pain in the butt to work with. The majority of these pieces are tiny! The tool rack (below the crane on the lower right) presently consists of 13 pieces. When finished there will be double that number. Meanwhile, the drivers hatch and windscreen unit (in the top right of the pic below) together contain 30 pieces!
The lower hull is largely finished, though I still need to add a few more PE pieces to the rear hatch. The upper hull is also coming along nicely, but there are still a lot of tiny little bits and pieces to add yet. Though it is kind of hard to see in the photo (apologies for the crappy photos - I'll post better ones later), I have started adding the tie down points (or whatever they are called) to the upper hull. Since these get in the way of the huge pile of stowage from Legend, I have had to cut the PE so that it all fits together and so that the stowage does not float 3-4mm off the surface of the hull (if that makes any sense). The Live Resin M240B on its articulating arm can be seen in the bottom right corner. This is a great little piece and will be mounted at the rear of the hull and manned by a crewman standing in the open hatch. Still a lot of work to go, but slowly getting there.

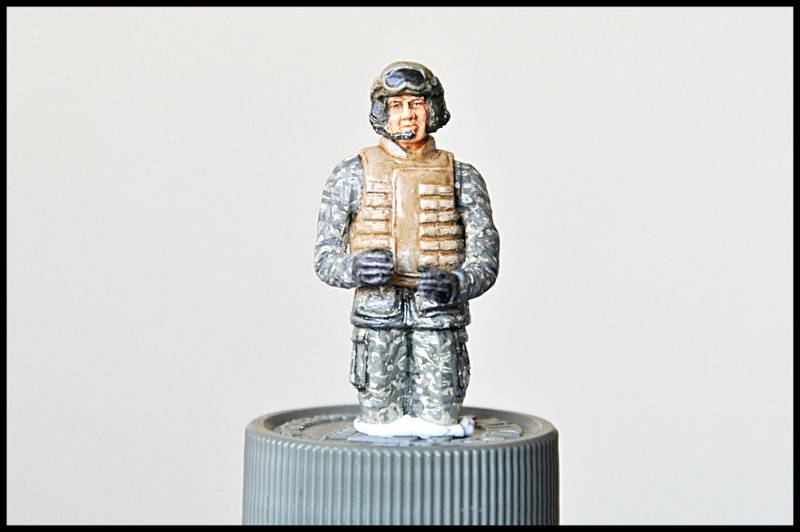
Meanwhile, I have also painted up the driver. Seeing as he will be hardly visible behind the windshield, he makes for a good guinea pig for my first attempt at painting ACU. This stuff is not easy to paint. For those of you who have not tried it, be thankful that they have abandoned the uniform. I still need to give him a light drybrush to bring out some of the details in the uniform, but it is otherwise done. While it is certainly far from great, it does look reasonably convincing from half a metre away. What do you think?
Paul - great job on the SU-152. As others have already commented on, I love the subtlety of the exhaust stains.
Larry - I really like your Stryker. Well executed; whichever campaign it ends up in.
Jason - She is looking great mate. I particularly like the work that you have done on the breech assembly. I am watching this build with great interest.
As for me, I have managed a little more work here and there. I have bit the bullet and started in on some of the PE. While I love the finished result, damn this stuff is a pain in the butt to work with. The majority of these pieces are tiny! The tool rack (below the crane on the lower right) presently consists of 13 pieces. When finished there will be double that number. Meanwhile, the drivers hatch and windscreen unit (in the top right of the pic below) together contain 30 pieces!
The lower hull is largely finished, though I still need to add a few more PE pieces to the rear hatch. The upper hull is also coming along nicely, but there are still a lot of tiny little bits and pieces to add yet. Though it is kind of hard to see in the photo (apologies for the crappy photos - I'll post better ones later), I have started adding the tie down points (or whatever they are called) to the upper hull. Since these get in the way of the huge pile of stowage from Legend, I have had to cut the PE so that it all fits together and so that the stowage does not float 3-4mm off the surface of the hull (if that makes any sense). The Live Resin M240B on its articulating arm can be seen in the bottom right corner. This is a great little piece and will be mounted at the rear of the hull and manned by a crewman standing in the open hatch. Still a lot of work to go, but slowly getting there.
Meanwhile, I have also painted up the driver. Seeing as he will be hardly visible behind the windshield, he makes for a good guinea pig for my first attempt at painting ACU. This stuff is not easy to paint. For those of you who have not tried it, be thankful that they have abandoned the uniform. I still need to give him a light drybrush to bring out some of the details in the uniform, but it is otherwise done. While it is certainly far from great, it does look reasonably convincing from half a metre away. What do you think?
Tiger1944
Joined: October 11, 2013
KitMaker: 160 posts
Armorama: 152 posts
Posted: Saturday, October 26, 2013 - 11:37 AM UTC
Paul, thanks for that link mate
Jason, the Stryker is looking great and the camo uniform is spot on. I actually bought myself a Trumpeter Stryker command vehicle online last night, I may build it for this campaign as well.
Jason, the Stryker is looking great and the camo uniform is spot on. I actually bought myself a Trumpeter Stryker command vehicle online last night, I may build it for this campaign as well.
3rdArmoredVet

Joined: August 28, 2013
KitMaker: 148 posts
Armorama: 108 posts

Posted: Saturday, October 26, 2013 - 12:44 PM UTC
Since my ASU-85 is almost finished, just waiting on the AM tracks to arrive, I decided to enter another for this campaign. 2 Trumpeter kits arrived in the mail today, a 1/35 German "Dicker Max" and a 1/72 Tiger mid production. I decided on going with the little brother to Jason's Emil that he is building. So I will be proceeding with the Dicker Max starting tonight.
631 pieces, 18 sprues, should make for a fun build and the only add-on's will be an AM barrel and maybe a PE update set.


631 pieces, 18 sprues, should make for a fun build and the only add-on's will be an AM barrel and maybe a PE update set.

PantherF
Joined: June 10, 2005
KitMaker: 6,188 posts
Armorama: 5,960 posts

Posted: Saturday, October 26, 2013 - 10:52 PM UTC
Quoted Text
Since my ASU-85 is almost finished, just waiting on the AM tracks to arrive, I decided to enter another for this campaign. 2 Trumpeter kits arrived in the mail today, a 1/35 German "Dicker Max" and a 1/72 Tiger mid production. I decided on going with the little brother to Jason's Emil that he is building. So I will be proceeding with the Dicker Max starting tonight.
THAT'S the spirit! 2 kits equals one ribbon! I love that determination!
I have the Dragon version of this kit and it will be interesting to see the comparisons!

Jeff


warreni
Joined: August 14, 2007
KitMaker: 5,926 posts
Armorama: 712 posts

Posted: Sunday, October 27, 2013 - 08:45 PM UTC
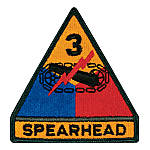
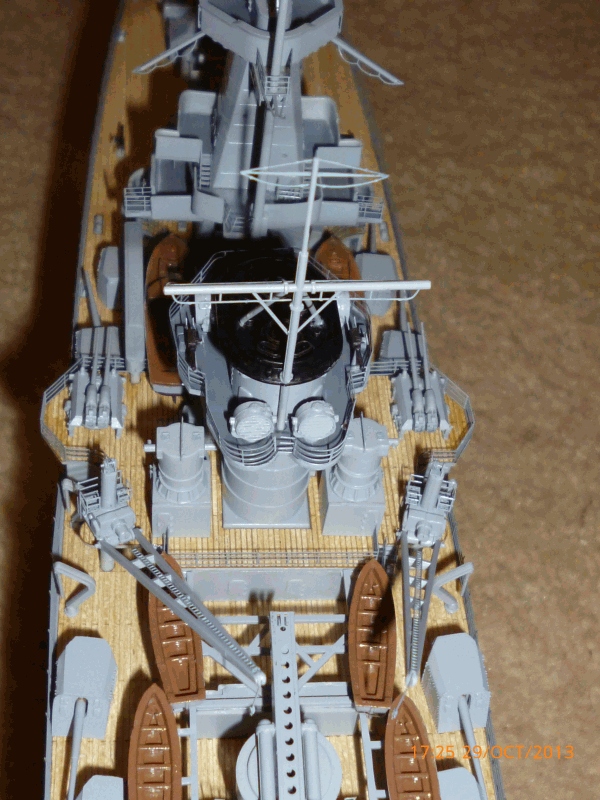
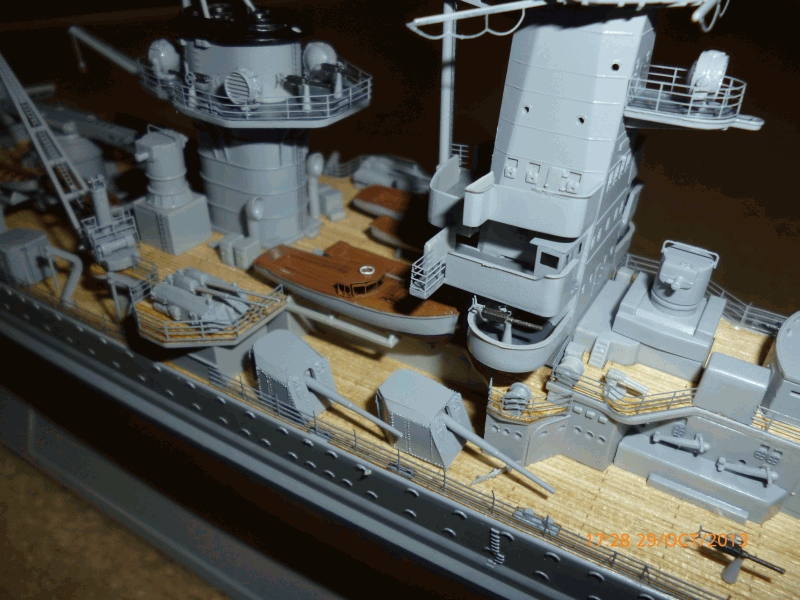
I have been so busy building my Graf Spee I forgot to post some pics!!
So here is the kit and extras I used..
Some guns..

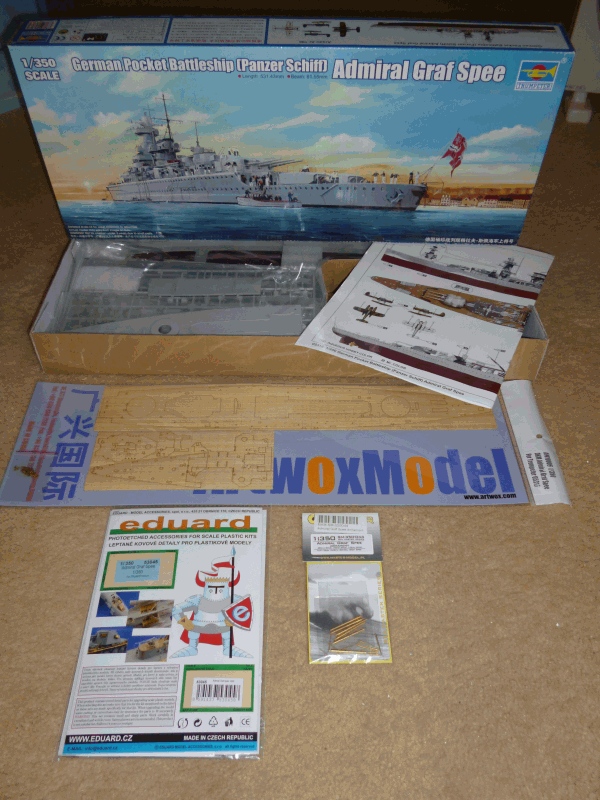
A boat..
The bow,,

The stern..
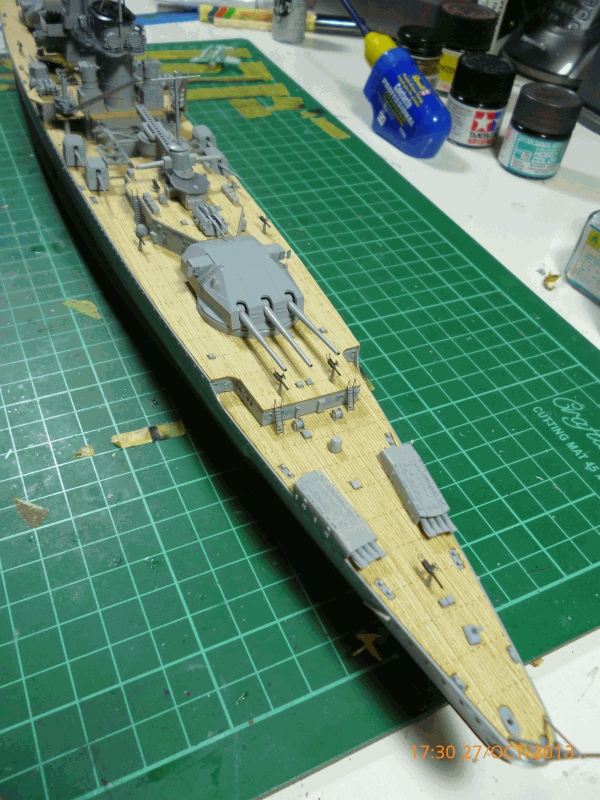
The middle bit..
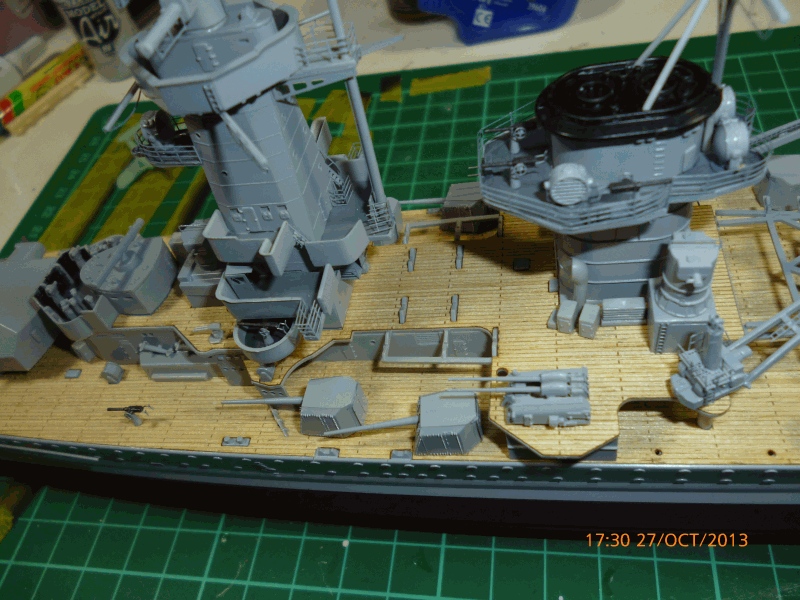
And that is all for the moment. Have been working on little boats and planes today and painting a boot topping on the ship, and trying to get realistic ones on the tenders.. Argh!!
Cheers all
Warren
So here is the kit and extras I used..
Some guns..
A boat..
The bow,,
The stern..
The middle bit..
And that is all for the moment. Have been working on little boats and planes today and painting a boot topping on the ship, and trying to get realistic ones on the tenders.. Argh!!
Cheers all
Warren

RedDuster

Joined: March 01, 2010
KitMaker: 7,078 posts
Armorama: 248 posts

Posted: Monday, October 28, 2013 - 07:49 AM UTC
Nice to see a bit more Nautical interest, Graf Spee looking great Warren.
A little bit more progress on the Kent.
Stantions for the Hanger and Funnel casing platform decks have been added, and platforms painted.

The 32 cell VLS painted and ready to add.

A general view of where the job is at the stage.

a bit more basic structure to go on the bridge section, then the detailing will start.
Si
warreni
Joined: August 14, 2007
KitMaker: 5,926 posts
Armorama: 712 posts
Posted: Monday, October 28, 2013 - 08:13 AM UTC
Oooo! I hav the Kent and the Montrose in the stash Si!! Will be watching with interest.
Looking great so far.
Looking great so far.

ianclasper
Joined: September 02, 2009
KitMaker: 227 posts
Armorama: 141 posts

Posted: Monday, October 28, 2013 - 08:22 AM UTC
Here is my entry, 1/48 MIG-21-F-13 with a generous amount of extras (Details from Eduard, SAC among others)


I am planning to post my progress as a build log on Aeroscale, but will post here once in a while.
Ian Clasper
I am planning to post my progress as a build log on Aeroscale, but will post here once in a while.
Ian Clasper
warreni
Joined: August 14, 2007
KitMaker: 5,926 posts
Armorama: 712 posts
Posted: Monday, October 28, 2013 - 08:18 PM UTC
Finished..

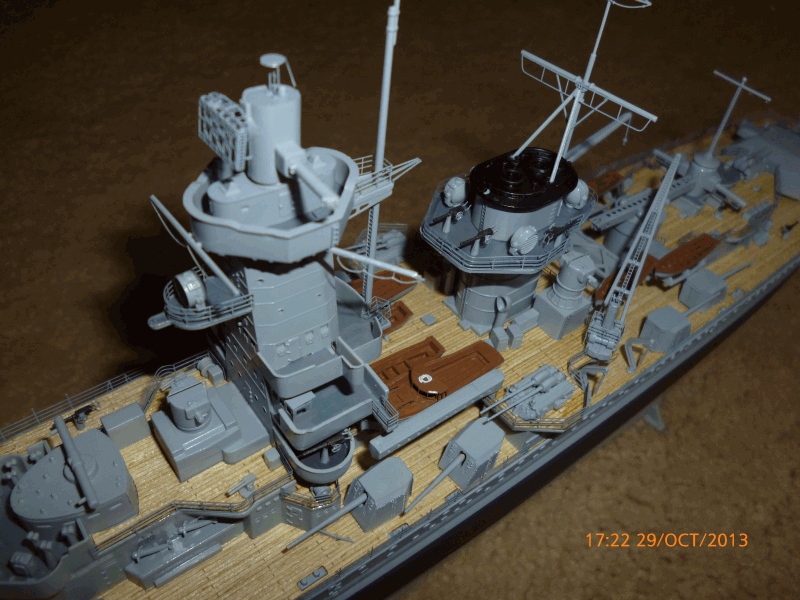
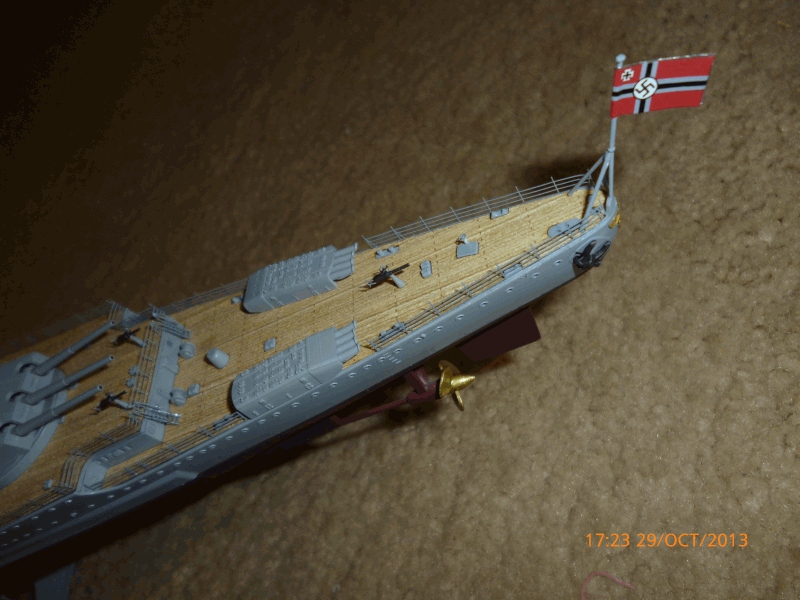
Have a look at my build log to see all the pictures.
Cheers and I will try and build another kit before the end of the campaign,
Cheers
Warren
Have a look at my build log to see all the pictures.
Cheers and I will try and build another kit before the end of the campaign,
Cheers
Warren
Cosimodo

#335

Joined: September 03, 2013
KitMaker: 1,808 posts
Armorama: 36 posts

Posted: Monday, October 28, 2013 - 10:05 PM UTC
Very impressive Warren, not only in the build but in the time to completion.
I am going to build this for the campaign and use the assorted pieces
I will do a build log at Model Shipwights and post updates here
I am going to build this for the campaign and use the assorted pieces
I will do a build log at Model Shipwights and post updates here
warreni
Joined: August 14, 2007
KitMaker: 5,926 posts
Armorama: 712 posts
Posted: Tuesday, October 29, 2013 - 04:59 AM UTC
I have this one in the stash as well Michael so I will be watching your build with interest.
Cheers
Warren
Cheers
Warren

SHAKY962

Joined: May 21, 2012
KitMaker: 765 posts
Armorama: 438 posts

Posted: Tuesday, October 29, 2013 - 05:57 AM UTC
A few update


Nito74

Joined: March 04, 2008
KitMaker: 5,386 posts
Armorama: 4,727 posts
Posted: Tuesday, October 29, 2013 - 06:16 AM UTC
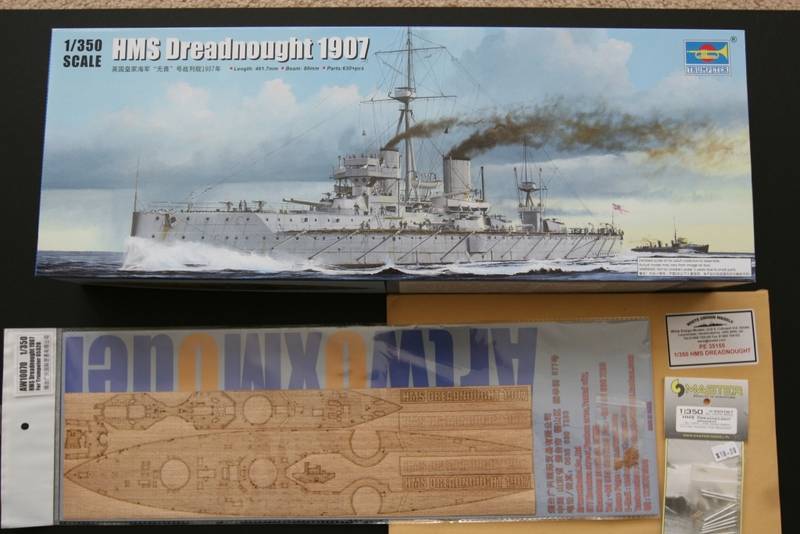
This Campaign is looking great so far, Strykers, Graf Spee, Dicker Max, a Fishbed and now HMS Dreadnought and KV-2.
Congrats Warren on doing a beautiful ship, glad you can stick around and do another kit !
Welcome Michael !
Hola Jose !
Glad to see you working on another KV !!!
I'm hoping to work on my build soon !!
Congrats Warren on doing a beautiful ship, glad you can stick around and do another kit !
Welcome Michael !
Hola Jose !
Glad to see you working on another KV !!!
I'm hoping to work on my build soon !!
PantherF
Joined: June 10, 2005
KitMaker: 6,188 posts
Armorama: 5,960 posts
Posted: Tuesday, October 29, 2013 - 06:56 AM UTC
I'm waiting on PE for the KV-122 and an aluminum barrel for the JS-3M. 
Jeff
Jeff
RedDuster
Joined: March 01, 2010
KitMaker: 7,078 posts
Armorama: 248 posts
Posted: Wednesday, October 30, 2013 - 10:47 PM UTC
Thanks Warren, very nice Graf Spee.
Hi Michael, good to see another navel subject, great choice too.
Si
Hi Michael, good to see another navel subject, great choice too.
Si
Removed by original poster on 10/31/13 - 11:23:26 (GMT).
Removed by original poster on 10/31/13 - 11:26:06 (GMT).
Nito74
Joined: March 04, 2008
KitMaker: 5,386 posts
Armorama: 4,727 posts
Posted: Thursday, October 31, 2013 - 04:52 AM UTC
Ok, started the suspension.

I've found it easier to do this way, but then the small PE part detached.. I tried another way.


As you can see it's moveable, so I tried to align it with the small holes on the PE part.

Only 9 left ...
This is going to take some time...
I've found it easier to do this way, but then the small PE part detached.. I tried another way.
As you can see it's moveable, so I tried to align it with the small holes on the PE part.
Only 9 left ...
This is going to take some time...
RedDuster
Joined: March 01, 2010
KitMaker: 7,078 posts
Armorama: 248 posts
Posted: Thursday, October 31, 2013 - 08:20 AM UTC
A bit more progress today, foredeck fittings. Unfortunately managed to drop a couple of fairleads, fortunately I had some WEM brass ones, so I used 4 for the fairleads abeam f the Harpoon launchers.

looking a bit messy, the bridge windows and funnel roof & exhausts painted. The windows will get a coat of clear green, then a tidy up with the base colour.

Lastly lower bridge platforms build at painted ready to clip off the sprue & tidy up ready for fitting.

Si

looking a bit messy, the bridge windows and funnel roof & exhausts painted. The windows will get a coat of clear green, then a tidy up with the base colour.

Lastly lower bridge platforms build at painted ready to clip off the sprue & tidy up ready for fitting.

Si
Tiger1944
Joined: October 11, 2013
KitMaker: 160 posts
Armorama: 152 posts
Posted: Thursday, October 31, 2013 - 08:09 PM UTC
Great to see all the new projects as well as fantastic progress on existing ones!
The Sturer Emil is fully assembled and in primer, awaiting it's top coat which it will get tomorrow.
I won't be going overboard with the weathering on this..well I will try not to anyway!

And a pic of my ultra high-tech spray booth, cardboard box MK II!
The Sturer Emil is fully assembled and in primer, awaiting it's top coat which it will get tomorrow.
I won't be going overboard with the weathering on this..well I will try not to anyway!
And a pic of my ultra high-tech spray booth, cardboard box MK II!
warreni
Joined: August 14, 2007
KitMaker: 5,926 posts
Armorama: 712 posts
Posted: Thursday, October 31, 2013 - 08:18 PM UTC
Quoted Text
Great to see all the new projects as well as fantastic progress on existing ones!
The Sturer Emil is fully assembled and in primer, awaiting it's top coat which it will get tomorrow.
I won't be going overboard with the weathering on this..well I will try not to anyway!
And a pic of my ultra high-tech spray booth, cardboard box MK II!
Nice spray booth!
Good to hear you are not going over board on the weathering. I doubt a prototype would have had enough time to get weathered with all the brass coming to have a look.
Cheers
Warren
SHAKY962
Joined: May 21, 2012
KitMaker: 765 posts
Armorama: 438 posts
Posted: Friday, November 01, 2013 - 10:36 AM UTC
A little more update


Tiger1944
Joined: October 11, 2013
KitMaker: 160 posts
Armorama: 152 posts
Posted: Friday, November 01, 2013 - 05:51 PM UTC
The KV is looking great Jose!
The Sturer Emil seemed to take forever to paint today!
First coat was panzer grey thinned straight from the bottle (Tamiya XF-63)
After that in a spare bottle I added some buff to the grey and tried some colour modulation, lightened the paint again and done some more. Concentrating on areas that would have faded in sunlight.
The effect is subtle and I am quite happy with how it turned out


Tomorrow I will give the sides a coat of gloss (for decals) and start some pin washes and filters and some slight dry brushing...This won't be a mud caked monster, I will save that for another build
The Sturer Emil seemed to take forever to paint today!
First coat was panzer grey thinned straight from the bottle (Tamiya XF-63)
After that in a spare bottle I added some buff to the grey and tried some colour modulation, lightened the paint again and done some more. Concentrating on areas that would have faded in sunlight.
The effect is subtle and I am quite happy with how it turned out
Tomorrow I will give the sides a coat of gloss (for decals) and start some pin washes and filters and some slight dry brushing...This won't be a mud caked monster, I will save that for another build
 |

WEB HOSTING BY


Copyright ©2021 Armorama and Kitmaker Network, a subsidiary of Silver Star Enterprises
All Rights Reserved. Please read our Conditions of Use and Privacy Policy.
All Rights Reserved. Please read our Conditions of Use and Privacy Policy.