Campaigns: Active Campaigns
Campaigns that are either in planning or underway should be grouped here.
Hosted by Richard S.
Trumpeter Campaign
1721Lancers
Visit this Community
England - East Anglia, United Kingdom
Joined: March 21, 2012
KitMaker: 1,673 posts
Armorama: 1,640 posts
Posted: Thursday, October 17, 2013 - 05:51 AM UTC
Jeff thanks for the link but I already had that plus there is one other in russian that shows some b+w pics from the war. The gap has now disappeared though

MSCorely yes you could put that way too

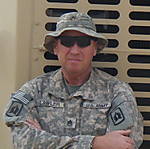
Smokey a cool ASU you have there, that reminds me I must go shopping and get mine

Mark S nice and steady build there, those wheels look cool and the build should look great when done

John I must correct my statement about the tracks, it's not the TRumpy kit it was Amusing Hobbys tracks that are a disgrace. You'll do fine with yours
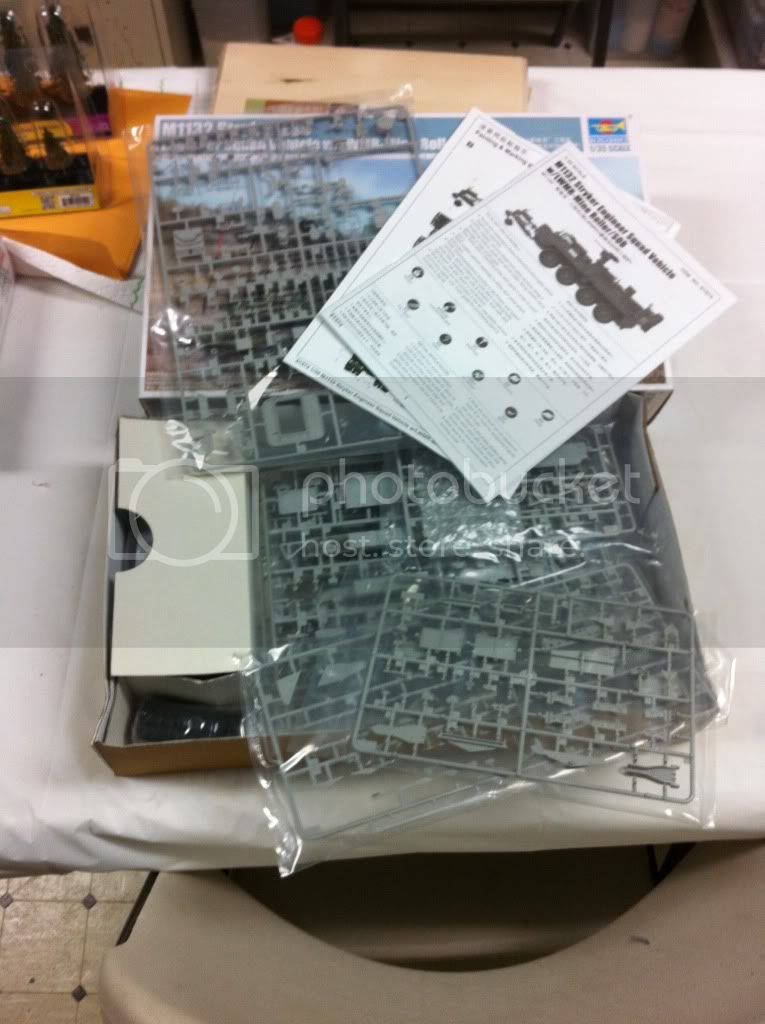
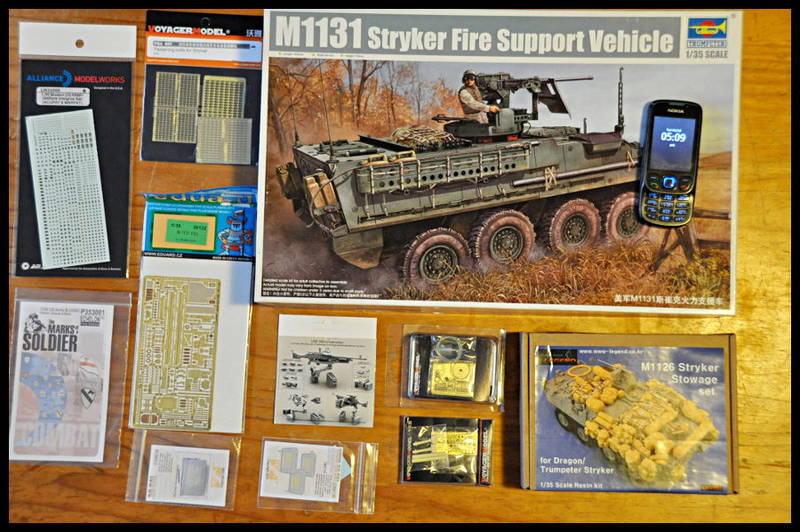
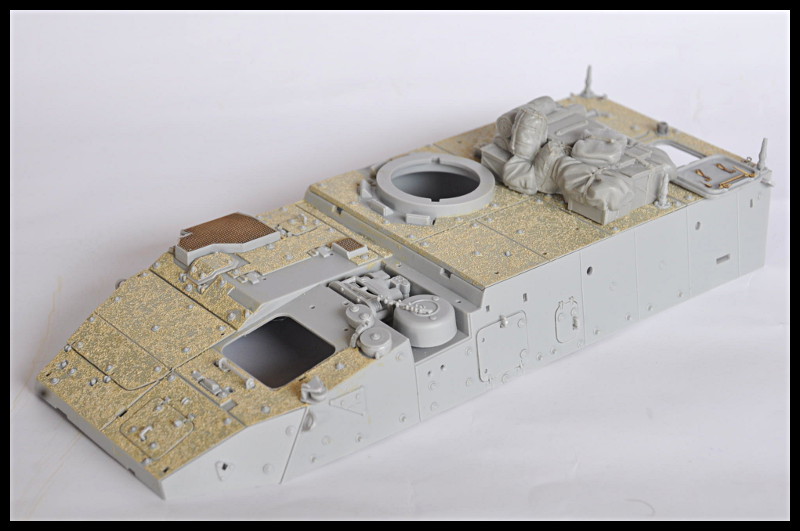
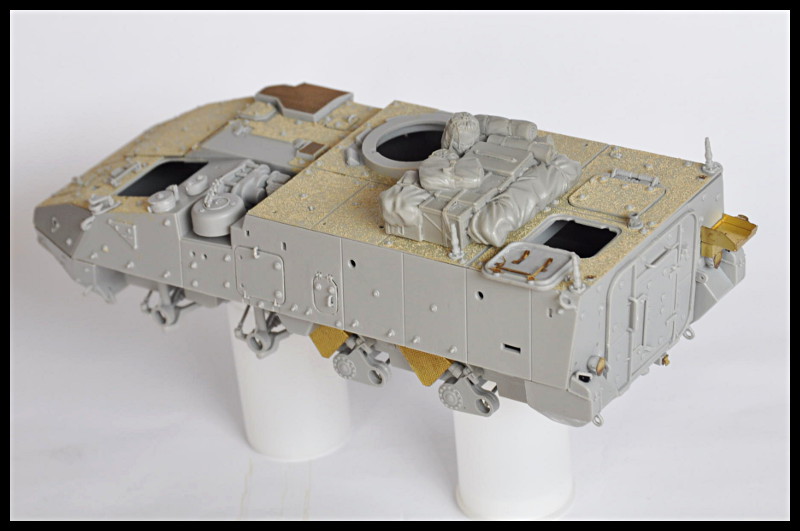
Here's my progress:

Paint shop tomorrow, the kit name starts with a T and apart from one hurdle, it goes together like the other T manufactures kits

17.10.13 001


17.10.13 002


the filled and welded gap between the hull and casematt


17.10.13 003


hope you like it


Paul
3rdArmoredVet
Visit this Community
North Carolina, United States
Joined: August 28, 2013
KitMaker: 148 posts
Armorama: 108 posts
Posted: Thursday, October 17, 2013 - 06:42 AM UTC
Paul, that is looking superb. Already ordered one for myself. That huge muzzle brake really sets it off.
Tiger1944
Visit this Community
Victoria, Australia
Joined: October 11, 2013
KitMaker: 160 posts
Armorama: 152 posts
Posted: Thursday, October 17, 2013 - 09:23 PM UTC
Well picked up an airbrush again after 20 odd years of not using one..hell I had been missing out as all my models previously had been brush painted
Before I can do anymore in the crew compartment I had to set about painting it, did some black pre-shading and then a coat of red primer for my first attempt at chipping.

After this was dry, sprayed on a coat of Vallejo chipping medium..will see tomorrow how that goes!

And some lightened panzer grey over the top of that, also painted all the wheels as well. It's actually a bit darker but the camera flash made it so lighter.


Everyone else looks as if they are progressing nicely!
Paul, the Su-152 is coming along well, love that turned metal barrel and massive muzzle brake!
Simon, you ship is starting to look great!
Bob, be interesting to see that car come along, so different to painting armour! cars have to be clean and tanks filthy LOL.
John, great work on the tank..grr I hate painting wheels!
Smokey..looking good!
LarryLawler
Visit this Community
Florida, United States
Joined: March 30, 2010
KitMaker: 139 posts
Armorama: 136 posts
Posted: Friday, October 18, 2013 - 02:57 AM UTC
Here's my project: TR 01575. It's Trumpie's rendition of the M1132 Stryker Engineer Squad Vehicle. Mine is going to be a straight out of the box build, with a bit of weathering, and maybe some stowage, but that's about it!

http://put.url.here

As usual, any comments are welcome!
Take care,
Larry
LarryLawler
Visit this Community
Florida, United States
Joined: March 30, 2010
KitMaker: 139 posts
Armorama: 136 posts
Posted: Friday, October 18, 2013 - 02:59 AM UTC
LarryLawler
Visit this Community
Florida, United States
Joined: March 30, 2010
KitMaker: 139 posts
Armorama: 136 posts
Posted: Friday, October 18, 2013 - 03:08 AM UTC
If you're planning on doing an OIF Stryker, the Duke counter RCIED antennas are good, but you'll need to add birdcage anti-RPG armor. I'm not saying that there's no such thing as Duke antennas stateside, or Europe, or Korea, but because of how the Duke system works, it's kind of unlikely, and rare at best. Now, if you have a photo reference showing Duke system antennas without the cage armor, then run with it!

I know the box art from the AFV Club Stryker upgrades kit shows them installed, but that's to illustrate the part being installed.
Take care,
Larry
LarryLawler
Visit this Community
Florida, United States
Joined: March 30, 2010
KitMaker: 139 posts
Armorama: 136 posts
Posted: Friday, October 18, 2013 - 03:09 AM UTC

Quoted Text

Hi all, I have been waiting for this campaign to get started for a while now. I was given the M1131 FSV for my birthday earlier in the year and have been dying to get started on it. As I have been waiting I have picked up a number of aftermarket accessories to add to the kit, although I may have gotten a little carried away. For instance, in a fit of inspiration I picked up a DUKE IED Jammer AND an ECM antenna to attach to the Stryker. I know that the ECM is typically found on the LAV-25; not the Stryker, and that attaching one to my build is not 100% accurate, but it looked too cool to pass up. I still haven't decided if I will included the ECM or not, but if I do it will be through the use of a little artistic license.


Parts list:
Trumpeter M1131 Stryker Fire Support Vehicle (FSV)
Eduard M1131 FSV PE kit
Voyager DUKE IED Jammer
Voyager ECM Antenna set
Voyager fastening bolts for Stryker vehicles
Legend Stryker Stowage kit
Live Resin M240 on articulating arm

I also picked up a few new decal sets to dress it up once I have assembled it all:
Echelon .30 cal ammo box decals [D356014]
Echelon .50 cal ammo box decals [D356135]
Echelon US Army and USMC insignia decals [P353001]
Alliance Modelworks US Army ACU insignia decals [LW35068]

If you're planning on doing an OIF Stryker, the Duke counter RCIED antennas are good, but you'll need to add birdcage anti-RPG armor. I'm not saying that there's no such thing as Duke antennas stateside, or Europe, or Korea, but because of how the Duke system works, it's kind of unlikely, and rare at best. Now, if you have a photo reference showing Duke system antennas without the cage armor, then run with it!

I know the box art from the AFV Club Stryker upgrades kit shows them installed, but that's to illustrate the part being installed.
Take care,
Larry


LarryLawler
Visit this Community
Florida, United States
Joined: March 30, 2010
KitMaker: 139 posts
Armorama: 136 posts
Posted: Friday, October 18, 2013 - 03:11 AM UTC
Can anyone tell me how to place a reply at the location of the post that you're actually to? The fact that the reply to a specific post ends up at the last posting is annoying....
3rdArmoredVet
Visit this Community
North Carolina, United States
Joined: August 28, 2013
KitMaker: 148 posts
Armorama: 108 posts
Posted: Friday, October 18, 2013 - 04:10 AM UTC

Quoted Text

Can anyone tell me how to place a reply at the location of the post that you're actually to? The fact that the reply to a specific post ends up at the last posting is annoying....


try using the "reply & quote" button to target a specific post to reply to. It will still put your post in the order in which it was posted but at least you will target the post you want to comment on.
LarryLawler
Visit this Community
Florida, United States
Joined: March 30, 2010
KitMaker: 139 posts
Armorama: 136 posts
Posted: Friday, October 18, 2013 - 04:38 AM UTC
Thanks Smokey, I appreciate that. Yeah, I tried that thinking that it may drop the reply in the proper location but no luck. Thanks for the reply!
Larry
Tiger1944
Visit this Community
Victoria, Australia
Joined: October 11, 2013
KitMaker: 160 posts
Armorama: 152 posts
Posted: Friday, October 18, 2013 - 06:25 PM UTC
Well spent a few hours on my project and am very happy with how the paint chipping came out:

This was the first time I had ever tried this technique and now know why it's so popular..had to be very careful not to overdo it
Next up it was time to paint the rubber onto all the road wheels, I used Panzer Aces dark rubber. Kinda matches the panzer grey at the moment. Once dried the wheels were glued to the lower hull.


Then I tackled the muffler and exhaust. This was painted with a yucky mixture of orange & black pigment & baking powder! all mixed up with paint thinners. Another technique that was a first that I had seen others do on here.


The it was back to the open topped crew compartment, bare metal scratches were added using drybrushing and a graphite pencil. I then painted on some filters and washes to make it look well weathered and "lived" in. (Washes & filters were Ak interactive's panzer grey set)


And finally a rough mock up of the complete model..minus the gun and lots of other parts.

3rdArmoredVet
Visit this Community
North Carolina, United States
Joined: August 28, 2013
KitMaker: 148 posts
Armorama: 108 posts
Posted: Friday, October 18, 2013 - 07:13 PM UTC
@Jason - Loving the way yours is coming together. I have it's little brother coming next week, the "Dicker Max" from Trumpeter, after that I will have to find the funds for an Emil like yours.

@Larry - Can't wait to see how that Styker turns out. Looks like a great kit and should be a blast to build.
1721Lancers
Visit this Community
England - East Anglia, United Kingdom
Joined: March 21, 2012
KitMaker: 1,673 posts
Armorama: 1,640 posts
Posted: Saturday, October 19, 2013 - 03:20 AM UTC
Smokey and Jason, thanks for the kind words lads , and Jason that exhaust looks fantastic .

Larry thats one big box of bits there, I hope it's also one
big box of fun too

Here's my update from yesterday and today. Base coat of Revell anthracite 09:


and then the coat of home brew russian green, it's made of
Tamiya XF62/58 and clear:


I'll add some light dirt to lower hull tonight, it'll be more
of a dust build up than mud. This I'll paint tomorrow with an earthy colour, and a second coat of russian green for the upper hull and casematt that has been lightened with XF55.


Paul
Nito74
Visit this Community
Lisboa, Portugal
Joined: March 04, 2008
KitMaker: 5,386 posts
Armorama: 4,727 posts
Posted: Saturday, October 19, 2013 - 05:52 AM UTC
@Jason

That Emil's looking very good !

@Paul

Thanks for the correction, I still have a ton of work before getting to those tracks & pins..
The Su 's looking great with that dark paintjob !!

Here's my dryfit turret on the hull.


I still need to work a few details to get the turret ready for primer.

PantherF
Visit this Community
Indiana, United States
Joined: June 10, 2005
KitMaker: 6,188 posts
Armorama: 5,960 posts
Posted: Saturday, October 19, 2013 - 08:11 AM UTC
Looking good guys!

I had to run out and buy a fridge today... won't get it 'till Tuesday so I bought a bunch of cheap coolers to put my stuff in.

Kinda feel like we're camping inside!

Maybe after I chill out later I'll feel like working on models after dropping almost 500 bucks on a cheap unit.


Jeff
hutch2336
Visit this Community
England - North, United Kingdom
Joined: May 22, 2011
KitMaker: 73 posts
Armorama: 54 posts
Posted: Saturday, October 19, 2013 - 08:16 AM UTC
Good Evening gents
This is my build for the campaign, I will be alternating it with the 1:35 Dragon Leopold that I am also building, just to make my life more complicated
The kit

The PE extras

and the bits


Now I have blogged it, I'll have to get started
regards

Steve H
PantherF
Visit this Community
Indiana, United States
Joined: June 10, 2005
KitMaker: 6,188 posts
Armorama: 5,960 posts
Posted: Saturday, October 19, 2013 - 09:25 AM UTC
Nice one Steve!

Imagine, I have this kit and forgot all about it. But yours will have all those nice goodies to work with so I can't wait!


Jeff
Toyguy
Visit this Community
Vermont, United States
Joined: July 28, 2013
KitMaker: 13 posts
Armorama: 11 posts
Posted: Saturday, October 19, 2013 - 06:14 PM UTC
Hopefully I am doing this right. I went and clicked the Enlist button on the Campaign page. Here is the startup shot of my entry for the Campaign:


Tiger1944
Visit this Community
Victoria, Australia
Joined: October 11, 2013
KitMaker: 160 posts
Armorama: 152 posts
Posted: Saturday, October 19, 2013 - 08:11 PM UTC
So many cool builds going on!
@Smokey, will you be entering the Dicker Max into this campaign?

@Paul, It's looking awesome, coming along nicely!

@John, that turret looks great, like the brass barrels.

@Steve, good to see another German SPG in the campaign!

@Dave, 1:16 nice size build, one day I intend to get a 1:16 Tiger 1.

Anyway got a couple of hours to play around with the Emil. Firstly got all the personal gear and other fiddly bits into the fighting compartment..just needs some pigment work to finish off the inside part. Yeah I know there are two big ejector pin marks under the canopy, no one will ever see them so I'm not worrying about them.


I put that aside and started on building the massive 12.8cm gun, it's massive and this part is just the breech assembly:

Hopefully the Aber turned barrel will arrive in the mail tomorrow, no way am I using the crappy plastic barrel in the kit.
3rdArmoredVet
Visit this Community
North Carolina, United States
Joined: August 28, 2013
KitMaker: 148 posts
Armorama: 108 posts
Posted: Saturday, October 19, 2013 - 11:53 PM UTC
@Jason, I probably will enter it.
1721Lancers
Visit this Community
England - East Anglia, United Kingdom
Joined: March 21, 2012
KitMaker: 1,673 posts
Armorama: 1,640 posts
Posted: Sunday, October 20, 2013 - 03:30 AM UTC
John that's only the start my friend there's plenty more to come yet . I must say I do not envy you this time, that running gear is just too much, it's worse than a Panzer IV

Steve cool choice there

Dave now that will be impressive, looking forward to seeing more

Jason she's coming along just fine, I remember painting all that gear to, it was a little annoying to say the least

Here's another update, the dirt is dried dirt from the garden
stuck in place with white glue and painted with Tamiya flat earth mixed with khaki and a light over spray with deck tan:


then came a lightened version of the russian green:


and a bit lighter:


tomorrow will be gloss and then weathering starts


Paul
Nito74
Visit this Community
Lisboa, Portugal
Joined: March 04, 2008
KitMaker: 5,386 posts
Armorama: 4,727 posts
Posted: Sunday, October 20, 2013 - 05:32 AM UTC
Paul, nice green tone on your SU.
Also the weathering is coming along great, a nice mix of dry mud & dirt.

I agree it's worse than a Panzer IV ...

I'm more worried in finishing my build for the Rapid Recon Campaign so this week I might just finish the turret and work on the wheels & suspension after I finish the other Campaign.

Cheers, J.
RedDuster
Visit this Community
England - South East, United Kingdom
Joined: March 01, 2010
KitMaker: 7,078 posts
Armorama: 248 posts
Posted: Sunday, October 20, 2013 - 08:53 AM UTC
Some cracking armour builds going on here, very impressive.

On with a ship. The basic assembly of the Hanger for the Lynx has been built, the hull and superstructure units sprayed Tamiya TS80 out of a rattle can, and the main deck TS67.


The upper hull is masked and the lower hull sprayed Halfords red plastic primer, odd but looks right to me for anti fouling red.


the boot topping masked and brushed in. A couple of issues with the narrow low tack tape, nothing that can't be put right with a bit of masking & respray.


Si
turkeyshot
Visit this Community
New South Wales, Australia
Joined: February 06, 2012
KitMaker: 138 posts
Armorama: 133 posts
Posted: Sunday, October 20, 2013 - 08:07 PM UTC
There's some great looking builds here: excellent work so far guys!

I meanwhile have made a little more headway on the M1131 FSV. I have added the non-slip texture to the upper hull using some of the Tamiya Diorama Texture paint. I was not able to find any of the Rustoleum textured paint that I have seen a number of other members use, but I think the Tamiya paint will look alright after I throw some paint at it. Most of the major elements have now been attached to the upper hull, and I now need to get started on all of the fiddly little PE parts. As you can see, I have started to add some of these to the rear hatch, although still have a lot of work ahead of me.

I also started painting the driver. I will give him an ACU uniform, although am still trying to work up the courage to start in on that.

As always, your thoughts/comments/suggestions are welcomed. Cheers.


1721Lancers
Visit this Community
England - East Anglia, United Kingdom
Joined: March 21, 2012
KitMaker: 1,673 posts
Armorama: 1,640 posts
Posted: Monday, October 21, 2013 - 03:29 AM UTC
Simon the frigate is looking great

Jason cool looking M1131, I like the anti slip.

Jeff the tracks that come with the kit are damned good, you would have no worries with them whatsoever. You only have to make sure you use "Revell Contacta" glue and nothing else.
If you use other glues you will get track shrinkage. And use 88 links on the left and 87 on the right. If you use 88 on the right as the instructions suggest you will end up with a sag that doesn't look real, way too much.

Here's todays update:

Running gear on, the metallic sheen on the road wheels and tracks is graphite from ground down pencil lead, applied with a stiff brush-

21.10.13 002


21.10.13 003


here's another coat of the russian green lightened with Tamiya sky XF21, and a coat of Revell acrylic gloss-


21.10.13 004


21.10.13 005

Now a question:

Almost all the Su 152's I have seen photos of have no markings at all, and a few carry only numbers, so should I add decals or not?


Paul