Hi Stephen & Keith, nice to have some Maritime company. Both look interesting builds.
A day of disaster recovery.
Started well, mainmast and after fire control fitted to hanger roof.
detailing of assorted platforms underway.
Then I dropped a sprue on the hanger and knocked it onto the floor, Fortunately damage was slight, but the port yard arm disappeared.
Fitted the one supplied by trumpeter, however it was so different thsat I also replaced the starboard one, I am not as happy with them as the WEM parts but at least they match.
As dislike in the extreme clear aircraft I have misted the first can grey that came to hand over the Lynx parts so I can work with it.
Si
Campaigns: Active Campaigns
Campaigns that are either in planning or underway should be grouped here.
Hosted by Richard S.
Trumpeter Campaign
RedDuster
England - South East, United Kingdom
Joined: March 01, 2010
KitMaker: 7,078 posts
Armorama: 248 posts
Joined: March 01, 2010
KitMaker: 7,078 posts
Armorama: 248 posts
Posted: Sunday, November 24, 2013 - 04:43 AM UTC
warreni
South Australia, Australia
Joined: August 14, 2007
KitMaker: 5,926 posts
Armorama: 712 posts
Joined: August 14, 2007
KitMaker: 5,926 posts
Armorama: 712 posts
Posted: Sunday, November 24, 2013 - 07:01 AM UTC
That will teach you to be more careful!
I think you will find that the Trumpeter etch is designed and manufactured so as to not make the kit too expensive, whereas the WEM etch id not so price sensitive so there is more detail.
Still looks fine, in fact I think the Trumpeter stuff may look better in this scale. The WEM stuff looked a little thick...
RedDuster
England - South East, United Kingdom
Joined: March 01, 2010
KitMaker: 7,078 posts
Armorama: 248 posts
Joined: March 01, 2010
KitMaker: 7,078 posts
Armorama: 248 posts
Posted: Sunday, November 24, 2013 - 10:51 AM UTC
True enough Warren,
Trying to too many things at once.... As usual.
Look at pictures of the real thing The yard arms are quite heavy on the 23's.
I am still happy with build, I have kept the yard arm I removed in case the other one turns up.
Si
Trying to too many things at once.... As usual.
Look at pictures of the real thing The yard arms are quite heavy on the 23's.
I am still happy with build, I have kept the yard arm I removed in case the other one turns up.
Si
warreni
South Australia, Australia
Joined: August 14, 2007
KitMaker: 5,926 posts
Armorama: 712 posts
Joined: August 14, 2007
KitMaker: 5,926 posts
Armorama: 712 posts
Posted: Sunday, November 24, 2013 - 11:58 AM UTC
Look nowhere near the sight of the crash because if it was super-glued in place the force necessary to remove the bond would have catapaulted the part somewhere else..
I had an exhaust off my DB-8A get the mach 1 syndrome and last I hard was it rattling down the side of my hobby desk never to be seen again until I replace the desk! Lucl whiel I was having a quick look for it I found a Styrene nub that was just the right diameter to replace the pipe.
I am sure it will turn up one day mate. If I had a spare I would send you one.
Tiger1944
Victoria, Australia
Joined: October 11, 2013
KitMaker: 160 posts
Armorama: 152 posts
Joined: October 11, 2013
KitMaker: 160 posts
Armorama: 152 posts
Posted: Sunday, November 24, 2013 - 09:08 PM UTC
Just popped in for a gander
Simon your frigate is looking amazing, I honestly don't think I would have the patience for all those tiny and delicate parts!
Everyone else..very impressive builds, and hopefully after I finish a braille scale Bergpanzer Tiger. I can come back and build a Stryker command vehicle.
Simon your frigate is looking amazing, I honestly don't think I would have the patience for all those tiny and delicate parts!
Everyone else..very impressive builds, and hopefully after I finish a braille scale Bergpanzer Tiger. I can come back and build a Stryker command vehicle.
Posted: Monday, November 25, 2013 - 07:17 AM UTC
Thanks Simon.
Your builds coming along very nicely. I think the Trumpeter etch looks a little more delicate then the WEM and will probably help to lend a sense of scale to the parts.
I'm just wondering if Trumpeter usually include display stands with the 1/700 ships? I bought my Zulu second-hand so I've a got suspicion that if it did, then its gone missing at some point before I got it. In the mean time, I think I have an old Airfix stand that will serve as a base to build it on at least.
RedDuster
England - South East, United Kingdom
Joined: March 01, 2010
KitMaker: 7,078 posts
Armorama: 248 posts
Joined: March 01, 2010
KitMaker: 7,078 posts
Armorama: 248 posts
Posted: Monday, November 25, 2013 - 08:17 PM UTC
Hi Stephen,
Thank you for your comments.
The Trumpy etch for the Type 23 is very fine, some of it a bit too fine (Sounds odd, but looks it to me) which also makes it very tricky to handle. WEM's etch is more user friendly.
All the Trumpy ships I have got came with a stand. The Stand HMS Kent is sitting on is the one that comes with the kit.
Good luck with the Eskimo, will you be adding maindeck railings?
Si
Posted: Tuesday, November 26, 2013 - 06:30 AM UTC
Hi Simon,
I'm undecided about going the whole hog and adding railings. Depends how much luck I have working with the small PE set. I have got a set of rails somewhere if I do feel brave. I just can't for the life of me work out how to attach the stuff neatly.
RedDuster
England - South East, United Kingdom
Joined: March 01, 2010
KitMaker: 7,078 posts
Armorama: 248 posts
Joined: March 01, 2010
KitMaker: 7,078 posts
Armorama: 248 posts
Posted: Tuesday, November 26, 2013 - 08:30 PM UTC
Hi Stephen,
Method I use, is tack with a couple of spots of CA glue and once I am happy run white glue along the length of the run.
Also if using generic railings, good tip work with short lengths, easier to handle, and if you get a bit wrong, less waste. (Also easier to get stantions, (uprights) in the right place).
Hope that helps
Si
warreni
South Australia, Australia
Joined: August 14, 2007
KitMaker: 5,926 posts
Armorama: 712 posts
Joined: August 14, 2007
KitMaker: 5,926 posts
Armorama: 712 posts
Posted: Tuesday, November 26, 2013 - 08:45 PM UTC
Quoted Text
Hi Simon,
I'm undecided about going the whole hog and adding railings. Depends how much luck I have working with the small PE set. I have got a set of rails somewhere if I do feel brave. I just can't for the life of me work out how to attach the stuff neatly.
Stephen, Gator Glue is even better than CA for a newbie as it is easy to clean up with water if you get a bit too much on there.
I use both depending on the railing and where it is located.
Cheers
Warren
Posted: Wednesday, November 27, 2013 - 09:42 AM UTC
Cheers guys. I'll keep it in mind and have a go on something.
I've heard a lot about Gator Glue but never actually seen anyone in the UK stocking it except for some online stores.
I take it this is the stuff?
http://www.scalemodelshop.co.uk/gatorglue-gator-grip-hobby-glue-1-5oz-bottle.html
I've heard a lot about Gator Glue but never actually seen anyone in the UK stocking it except for some online stores.
I take it this is the stuff?
http://www.scalemodelshop.co.uk/gatorglue-gator-grip-hobby-glue-1-5oz-bottle.html
warreni
South Australia, Australia
Joined: August 14, 2007
KitMaker: 5,926 posts
Armorama: 712 posts
Joined: August 14, 2007
KitMaker: 5,926 posts
Armorama: 712 posts
Posted: Wednesday, November 27, 2013 - 10:00 AM UTC
Quoted Text
Cheers guys. I'll keep it in mind and have a go on something.
I've heard a lot about Gator Glue but never actually seen anyone in the UK stocking it except for some online stores.
I take it this is the stuff?
http://www.scalemodelshop.co.uk/gatorglue-gator-grip-hobby-glue-1-5oz-bottle.html
Thats the stuff, but you can order it directly from the manufacturer as well, who just happens to frequent Kitmaker..
andromeda673
Wisconsin, United States
Joined: July 30, 2013
KitMaker: 584 posts
Armorama: 525 posts
Joined: July 30, 2013
KitMaker: 584 posts
Armorama: 525 posts
Posted: Thursday, November 28, 2013 - 06:47 PM UTC
made some more progress tonight, actually as a matter of fact it's pretty much done, I just have to do the decals tomorrow morning, and then put on the antenna's.
I'm not happy with the turn out of this build. This trumpeter kit was a capital B of a kit. Maybe it's just me and my lack of skill, but it seemed really over complicated and really over designed. I ran into a lot of trouble on the turret with the tool box assembly's and the rear tool box too, it was just a real pain to align and get correct.
Regardless here are some pics
RedDuster
England - South East, United Kingdom
Joined: March 01, 2010
KitMaker: 7,078 posts
Armorama: 248 posts
Joined: March 01, 2010
KitMaker: 7,078 posts
Armorama: 248 posts
Posted: Friday, November 29, 2013 - 07:31 AM UTC
On to the maindeck railings. The first fo'c'sle length in place. Tacked with superglue, and then white glue run along to seal the join (still wet in this pic)
Railings complete including the lookout platforms midships.
safety nets around the Helicopter deck, also stated building the Lynx, which is a kit in itself, and some of the parts (undercarriage etc.) are microscopic
Si
Railings complete including the lookout platforms midships.
safety nets around the Helicopter deck, also stated building the Lynx, which is a kit in itself, and some of the parts (undercarriage etc.) are microscopic
Si
warreni
South Australia, Australia
Joined: August 14, 2007
KitMaker: 5,926 posts
Armorama: 712 posts
Joined: August 14, 2007
KitMaker: 5,926 posts
Armorama: 712 posts
Posted: Friday, November 29, 2013 - 10:20 AM UTC
Erm, you forgot to paint the helicopter...
Quasimofo
New York, United States
Joined: November 30, 2012
KitMaker: 105 posts
Armorama: 87 posts
Joined: November 30, 2012
KitMaker: 105 posts
Armorama: 87 posts
Posted: Saturday, November 30, 2013 - 03:37 AM UTC
Wow....nice progress everyone! Thanks to the naval subjects, I couldn't resist the siren song and ordered my first ship model (and loads of other stuff) from the Squadron Black Friday sale: the Revell of Germany 1/144 Typ VIIC U-Boat, along with an Eduard PE set for it.
@MSCorley: Love the mantle on your ASU-85. I had been planning to try the old school tissue and glue technique when I get around to doing mine...great to see it's alive and well and looking great on your build!
My IL-76 is still stalled in the sanding stage. The poor fit and gobs of putty I've had to use and resulting sanding marathon have kind of soured it for for me, so I haven't felt like putting much tie into it.
The Panzer 38(t) on the other hand is coming along nicely albeit, with a little bit of frustration.
I thought it would be cool to try out my newly arrived AK interactive rust color set and spray a multi-hued rust coat to serve as the case to spray the AK Worn Effects fluid over, then do my Panzer gray modulation, stencils, then start chipping away. It all worked out....sort of.
All went well until I started the chipping process. In the past, I've used the AK Worn Effects over Tamiya paints, not using an intermediate clear coat. I've always been happy with the results. Not so much using it over AK paints. The paint came off in huge chunks, not the subtle, random chipping I was looking for. Not only that, but the rust coat was coming off too, exposing the primer. After pretty much trashing the turret, I stopped. The hull came out acceptable, but the turret had to be totally repainted, and stencils reapplied. Rather than strip it, I just sanded down the edges of the exposed paint with 1500 grit sandpaper. There are some edge traces of the original coat showing under the new paint, but I can use that to my advantage to represent damage or the like that was repainted by the maintenance crew.
I eventually got the turret repainted with stencils done.
As for the stencils, for my first real time using them, I'm happy. The numbers came out damned near perfect. The black in the Balkenkreuzen is a bit off center, but oh well. I'm not going to loose sleep over it.
During my after-action investigation, I remembered coming across a video tutorial on using the Worn Effects fluid a while back. In the video, the presenter tested different brands of paint with the fluid, including Tamiya and Vallejo. Tamiya gave the best results, as the surface apparently dries with slightly rougher surface than the Vallejo, diving the fluid something to grip to so it didn't come off in huge chunks. Methinks that was the issue: It's my understanding that Vallejo and AK paints are a very similar formula, hence the results I got. So, I'll try it again on the wheels but put a coat of Tamiya XF-86 Flat Clear on first, then the Worn Effects...and see what happens.
In the meantime, the hull and turret are painted and have a few applications of a couple MIG and AK filters applied.
Last night I did the sponge chipping and sprayed a satin coat to prep for washes and weathering. Maybe I'll be able to get some iupdate pics posted tomorrow.
@MSCorley: Love the mantle on your ASU-85. I had been planning to try the old school tissue and glue technique when I get around to doing mine...great to see it's alive and well and looking great on your build!
My IL-76 is still stalled in the sanding stage. The poor fit and gobs of putty I've had to use and resulting sanding marathon have kind of soured it for for me, so I haven't felt like putting much tie into it.
The Panzer 38(t) on the other hand is coming along nicely albeit, with a little bit of frustration.
I thought it would be cool to try out my newly arrived AK interactive rust color set and spray a multi-hued rust coat to serve as the case to spray the AK Worn Effects fluid over, then do my Panzer gray modulation, stencils, then start chipping away. It all worked out....sort of.
All went well until I started the chipping process. In the past, I've used the AK Worn Effects over Tamiya paints, not using an intermediate clear coat. I've always been happy with the results. Not so much using it over AK paints. The paint came off in huge chunks, not the subtle, random chipping I was looking for. Not only that, but the rust coat was coming off too, exposing the primer. After pretty much trashing the turret, I stopped. The hull came out acceptable, but the turret had to be totally repainted, and stencils reapplied. Rather than strip it, I just sanded down the edges of the exposed paint with 1500 grit sandpaper. There are some edge traces of the original coat showing under the new paint, but I can use that to my advantage to represent damage or the like that was repainted by the maintenance crew.
I eventually got the turret repainted with stencils done.
As for the stencils, for my first real time using them, I'm happy. The numbers came out damned near perfect. The black in the Balkenkreuzen is a bit off center, but oh well. I'm not going to loose sleep over it.
During my after-action investigation, I remembered coming across a video tutorial on using the Worn Effects fluid a while back. In the video, the presenter tested different brands of paint with the fluid, including Tamiya and Vallejo. Tamiya gave the best results, as the surface apparently dries with slightly rougher surface than the Vallejo, diving the fluid something to grip to so it didn't come off in huge chunks. Methinks that was the issue: It's my understanding that Vallejo and AK paints are a very similar formula, hence the results I got. So, I'll try it again on the wheels but put a coat of Tamiya XF-86 Flat Clear on first, then the Worn Effects...and see what happens.
In the meantime, the hull and turret are painted and have a few applications of a couple MIG and AK filters applied.
Last night I did the sponge chipping and sprayed a satin coat to prep for washes and weathering. Maybe I'll be able to get some iupdate pics posted tomorrow.
RedDuster
England - South East, United Kingdom
Joined: March 01, 2010
KitMaker: 7,078 posts
Armorama: 248 posts
Joined: March 01, 2010
KitMaker: 7,078 posts
Armorama: 248 posts
Posted: Saturday, November 30, 2013 - 06:03 AM UTC
Hi Warren,
I also forgot to finish building it mate
Si
I also forgot to finish building it mate
Si
andromeda673
Wisconsin, United States
Joined: July 30, 2013
KitMaker: 584 posts
Armorama: 525 posts
Joined: July 30, 2013
KitMaker: 584 posts
Armorama: 525 posts
Posted: Saturday, November 30, 2013 - 08:18 AM UTC
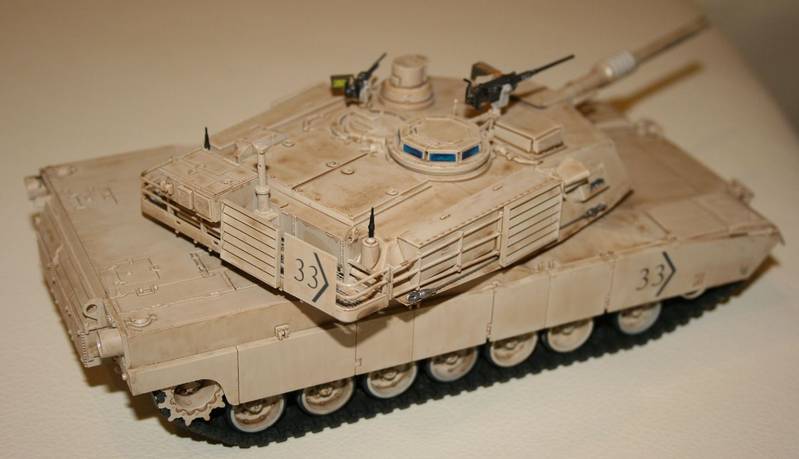
Hey guys here are the finished pictures of my Challenger 2 Op Telic. I would post these in the campaign gallery, but I'm out of space, and I don't know how to delete old photo's to make room, so if someone wants to copy these and post them for me, that would be greatly appreciated!
I know there are some inaccuracies and flaws with this build, and I'm sure there are things that are clearly wrong, but I enjoyed building it, and built it right out of the box. The kit it's self was a bit of a bear of a kit and I had a lot of problems with assembly just getting things to fit right, and line up, and not look like crap. I did tough up the antennas again so there is no white fresh styrene visible.
Thanks for allowing me to be part of this build!
warreni
South Australia, Australia
Joined: August 14, 2007
KitMaker: 5,926 posts
Armorama: 712 posts
Joined: August 14, 2007
KitMaker: 5,926 posts
Armorama: 712 posts
Posted: Saturday, November 30, 2013 - 09:23 AM UTC
Greetings!
I built this kit many moons ago and can't remember having any troubles with it.. Maybe you got a dud..
Looks interesting by the way
Cheers
Warren
I built this kit many moons ago and can't remember having any troubles with it.. Maybe you got a dud..
Looks interesting by the way
Cheers
Warren
Nito74
Lisboa, Portugal
Joined: March 04, 2008
KitMaker: 5,386 posts
Armorama: 4,727 posts
Joined: March 04, 2008
KitMaker: 5,386 posts
Armorama: 4,727 posts
Posted: Sunday, December 01, 2013 - 05:34 AM UTC
Still working on those small wheels & suspension ..
After doing this... hell I love PzIV wheels !!!
Lonewolf7usa
Michigan, United States
Joined: March 24, 2009
KitMaker: 312 posts
Armorama: 296 posts
Joined: March 24, 2009
KitMaker: 312 posts
Armorama: 296 posts
Posted: Sunday, December 01, 2013 - 01:34 PM UTC
Well Gents, Here's my ASU-85 with weathering and details added. I will metalize this week as well as get my crew figure done up. Again, all comments welcome!!
Nito74
Lisboa, Portugal
Joined: March 04, 2008
KitMaker: 5,386 posts
Armorama: 4,727 posts
Joined: March 04, 2008
KitMaker: 5,386 posts
Armorama: 4,727 posts
Posted: Monday, December 02, 2013 - 07:02 AM UTC
Great work LoneWolf7usa !
Posted: Monday, December 02, 2013 - 09:38 AM UTC
Quoted Text
Hey guys here are the finished pictures of my Challenger 2 Op Telic. I would post these in the campaign gallery, but I'm out of space, and I don't know how to delete old photo's to make room, so if someone wants to copy these and post them for me, that would be greatly appreciated!
I know there are some inaccuracies and flaws with this build, and I'm sure there are things that are clearly wrong, but I enjoyed building it, and built it right out of the box. The kit it's self was a bit of a bear of a kit and I had a lot of problems with assembly just getting things to fit right, and line up, and not look like crap. I did tough up the antennas again so there is no white fresh styrene visible.
Thanks for allowing me to be part of this build!
Looks pretty good. I like the weathering and worn paint effect. I have to admit I had issues with the Airfix rebox of Trumpeters Challanger II. Not only was the fit of most parts awful, but the plastic was hard, brittle and had a greasy feel which resisted all types of glue unless it had a light sanding at mating joints. I have to give you top marks for persisting and producing such a great model.
Stephen
ltb073
New York, United States
Joined: March 08, 2010
KitMaker: 3,662 posts
Armorama: 3,078 posts
Joined: March 08, 2010
KitMaker: 3,662 posts
Armorama: 3,078 posts
Posted: Monday, December 02, 2013 - 02:54 PM UTC
Nito74
Lisboa, Portugal
Joined: March 04, 2008
KitMaker: 5,386 posts
Armorama: 4,727 posts
Joined: March 04, 2008
KitMaker: 5,386 posts
Armorama: 4,727 posts
Posted: Monday, December 02, 2013 - 03:29 PM UTC
Quoted Text
Some cool looking work happening here those ships are outstanding great going guys
Im getting closer to starting my build, well lets say I pulled it out of the stash
Have no idea when I will actually start soon hopefully
It looks huge...
Maybe when you're done with the SturmTiger... it would be a nice starting point
You're going to finish it soon, I bet I'll be working on my build's suspension & wheel by that time..