#372
United Kingdom
Joined: March 10, 2010
KitMaker: 2,568 posts
Armorama: 423 posts
Posted: Monday, December 16, 2013 - 09:51 AM UTC
Quoted Text
Thanks Stephen,
I am sure your build will not disappoint. Will be watching with interest.
They are not same missile systems, the silos on the type 23 house 32 seawolf missiles, whilst those on the type 45 house 48 sea viper, which is the Royal Navy's name of the PAAMS (British/French/Italian collaboration, PAAMS stand fro Principle Anti Air Missile.
Si
Cheers for that. I always thought Seawolf was fired from a 6-shot turreted launcher. Learned something new.
Love the tank builds.
Bill, your 38t is going well. Sorry to hear about the problems you had but you managed to get it sorted.
Sal, your armoured train wagon looks to be a very cool model! Was it able to move under its own power or was pulled as part of a much larger train?
Alex, great looking KV1. I like the battle damage you have applied.
On the bench: 1/72 Mosquito, Lightning F.6, DH.2,
AMT Vulcan Shuttle Surak.
Cyber-Hobby 1:35 Sherman Firefly IC - still stalled.
Buenos Aires, Argentina
Joined: May 21, 2012
KitMaker: 765 posts
Armorama: 438 posts
Posted: Tuesday, December 17, 2013 - 01:39 PM UTC
Well, I just return from my holidays last week.....
I see a lot of works... Great!!!!!!!!!!!!
I restart my work on my KV-2


Those Radial Fighters Campaign: 1/72 FW 190 A5
Delta 2 Campaign: 1/48 Hobby Boss Mirage IIIC
Navy Boys on those Postage Stamps 1/72 Airfix Sea Harrier FA2
Working: Trumpeter A-5 Vigilante
Waiting: Phantom 60 Campaign
Removed by original poster on 12/18/13 - 23:59:40 (GMT).
Removed by original poster on 12/19/13 - 00:02:01 (GMT).
Maryland, United States
Joined: May 23, 2011
KitMaker: 39 posts
Armorama: 28 posts
Posted: Wednesday, December 18, 2013 - 12:05 PM UTC
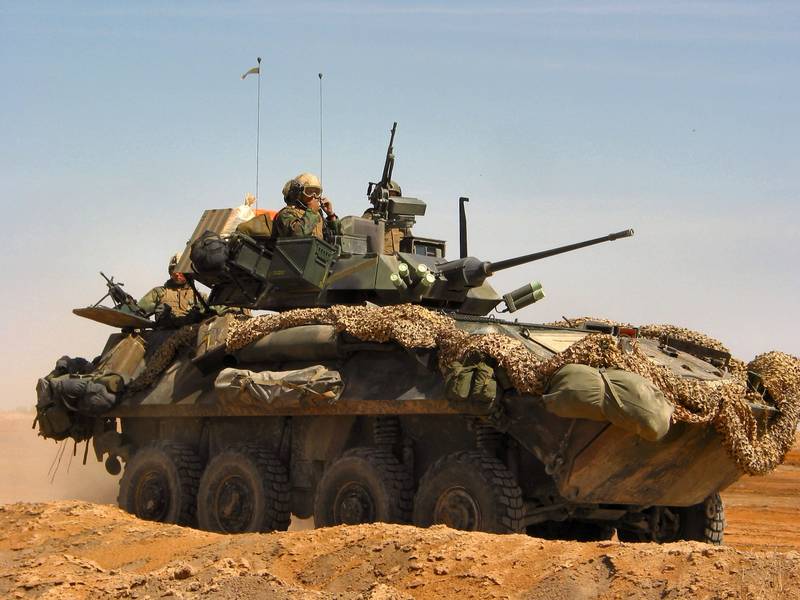
I just enlisted and here's my entry. I plan on building a USMC LAV-25 in NATO tri-color. I'm using the AFV Club Stryker upgrade set only for the Platt Mount and the M240. I'm waiting on the Eduard PE set and an RB Models barrel for the M242.
This is my first campaign and my first modern AFV. Wish me luck!
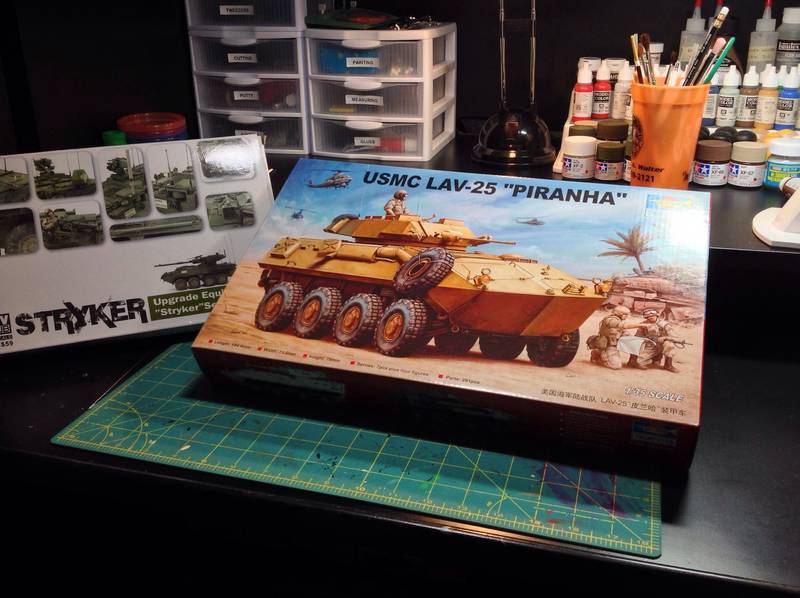
What I'm shooting for:
Michigan, United States
Joined: March 24, 2009
KitMaker: 312 posts
Armorama: 296 posts
Posted: Wednesday, December 18, 2013 - 12:52 PM UTC
Good choice! And good luck! What are you going to use for the camouflage netting?
'United States Army Special Forces! When you care enough to send the very best'
Maryland, United States
Joined: May 23, 2011
KitMaker: 39 posts
Armorama: 28 posts
Posted: Wednesday, December 18, 2013 - 01:14 PM UTC
Quoted Text
Good choice! And good luck! What are you going to use for the camouflage netting?
I haven't crossed that bridge yet but it looks like AFV Club makes a modern camouflage net. I think I'll give that a try.
New York, United States
Joined: March 08, 2010
KitMaker: 3,662 posts
Armorama: 3,078 posts
Posted: Thursday, December 19, 2013 - 08:40 AM UTC
Quoted Text
Sal, your armoured train wagon looks to be a very cool model! Was it able to move under its own power or was pulled as part of a much larger train?
Thank you It was part of a larger armored train Trumpeter sells the other cars and the locomotive too

@Jose welcome back great looking camo on your KV

Active Campaigns on the bench:
Operation Fall Gelb - Pz.Kpfw. IV Ausf. C
Engineering the Future - M-26 Recovery Vehicle
115 Campaigns completed
Buenos Aires, Argentina
Joined: May 21, 2012
KitMaker: 765 posts
Armorama: 438 posts
Posted: Thursday, December 19, 2013 - 02:17 PM UTC
@sal, Thanks for the welcome!!!!!!
the last update.... I finish it tomorrow!!


Those Radial Fighters Campaign: 1/72 FW 190 A5
Delta 2 Campaign: 1/48 Hobby Boss Mirage IIIC
Navy Boys on those Postage Stamps 1/72 Airfix Sea Harrier FA2
Working: Trumpeter A-5 Vigilante
Waiting: Phantom 60 Campaign
Lisboa, Portugal
Joined: March 04, 2008
KitMaker: 5,386 posts
Armorama: 4,727 posts
Posted: Thursday, December 19, 2013 - 02:20 PM UTC
Quoted Text
@sal, Thanks for the welcome!!!!!!
the last update.... I finish it tomorrow!!


Very nice work Jose !!
The 3 tone camo is perfect !
Active Builds: 0
Active Campaigns: 0
Victoria, Australia
Joined: October 11, 2013
KitMaker: 160 posts
Armorama: 152 posts
Posted: Thursday, December 19, 2013 - 09:52 PM UTC
@Jose, loving that Deutsch KV, looks great in 3 colour camo too!
@Mike, looks like it will be a great project!
Some more progress on my M1130 Stryker, it's starting to turn into a very complex looking machine.


And where I have it up to now, I hope those paint masks that came with the kit are good. As I don't want to stuff them up


Currently building:
Italeri M60A1 Patton - what if 4 challenge
Revell 1/25 32 Ford rat rod
Italeri 1/48 Junkers JU-87B Stuka
Bronco 1/35 Hungarian Zrinyi assault gun
Buenos Aires, Argentina
Joined: May 21, 2012
KitMaker: 765 posts
Armorama: 438 posts
Posted: Friday, December 20, 2013 - 03:44 AM UTC
@John,
Thanks my friend!!!!!!!!!!!
@Jason, thanks for your comment. I will follow your model with interest. I have one of this in my stash
Those Radial Fighters Campaign: 1/72 FW 190 A5
Delta 2 Campaign: 1/48 Hobby Boss Mirage IIIC
Navy Boys on those Postage Stamps 1/72 Airfix Sea Harrier FA2
Working: Trumpeter A-5 Vigilante
Waiting: Phantom 60 Campaign
Lisboa, Portugal
Joined: March 04, 2008
KitMaker: 5,386 posts
Armorama: 4,727 posts
Posted: Friday, December 20, 2013 - 01:49 PM UTC
Active Builds: 0
Active Campaigns: 0
Lisboa, Portugal
Joined: March 04, 2008
KitMaker: 5,386 posts
Armorama: 4,727 posts
Posted: Saturday, December 21, 2013 - 06:12 AM UTC
Main wheels & suspension... almost done.

Then I'll have to prime the PE, and will paint them before putting them on the tank.
Active Builds: 0
Active Campaigns: 0
Indiana, United States
Joined: June 10, 2005
KitMaker: 6,188 posts
Armorama: 5,960 posts
Posted: Saturday, December 21, 2013 - 06:24 AM UTC
Good gawd John.

I have reservations now on getting this kit!

Nice work and I admire you for sticking to it and hanging in there!
Jeff
Lisboa, Portugal
Joined: March 04, 2008
KitMaker: 5,386 posts
Armorama: 4,727 posts
Posted: Saturday, December 21, 2013 - 06:36 AM UTC
Quoted Text
Good gawd John.  I have reservations now on getting this kit!
Nice work and I admire you for sticking to it and hanging in there!
Jeff
Thanks Jeff !
The turret was great, 2 small metal barrels, good detailing.
But as you can see by the photos, those small wheels & suspension... and now those tracks with right & left pins..
I understand your reservations..
I can only imagine the Dragon's version


I wanted to get another one for a "WhatIf" version with a Panther turret, but after seeing this , no way.
This is my last ever Neubaufahrzeug.
I'm enjoying the variety of this Campaign so after this steel nightmare I'm doing a 2nd model

Active Builds: 0
Active Campaigns: 0
England - East Anglia, United Kingdom
Joined: March 21, 2012
KitMaker: 1,673 posts
Armorama: 1,640 posts
Posted: Saturday, December 21, 2013 - 06:38 AM UTC
Jose: a fine build you have produced there dude


she
looks real cool

Jason: looking good there, and you'll get some real cool pain t effects around all those bolt heads


John: tell me why you torture yourself this way


.
In the Trumpeter Hetzer kit there are the same style tracks, here's a tip glue them together as if there are no track pins in there. After you get the correct length add the pins. I cheated on the Hetzer and only the inside pins where you could see them

So there is an easy bit to this too, no need to go totally insane, just a little


Paul
"Lord Raglan wishes the cavalry to advance rapidly to the front, follow the enemy & try to prevent the enemy carrying away the guns. Troop horse artillery may accompany. French cavalry is on your left. Immediate. R Airey."
Buenos Aires, Argentina
Joined: May 21, 2012
KitMaker: 765 posts
Armorama: 438 posts
Posted: Saturday, December 21, 2013 - 01:04 PM UTC
Those Radial Fighters Campaign: 1/72 FW 190 A5
Delta 2 Campaign: 1/48 Hobby Boss Mirage IIIC
Navy Boys on those Postage Stamps 1/72 Airfix Sea Harrier FA2
Working: Trumpeter A-5 Vigilante
Waiting: Phantom 60 Campaign
Maryland, United States
Joined: May 23, 2011
KitMaker: 39 posts
Armorama: 28 posts
Posted: Saturday, December 21, 2013 - 03:08 PM UTC
Did some work on the lower hull of my LAV 25 this weekend. A lot of flash on the parts but they cleaned up fairly easily.
I'm kind of stuck now. I can't decide on how to do the non-slip texture on the upper hull. I'm torn between using Mr. Surfacer or trying the "terra cotta" spray paint technique.

Victoria, Australia
Joined: October 11, 2013
KitMaker: 160 posts
Armorama: 152 posts
Posted: Saturday, December 21, 2013 - 09:57 PM UTC
Everyone's builds are looking amazing, really like that KV with the rear mounted rockets..awesome!

Got the Stryker all assembled and some basic colour put onto it. Next up will be decals, weathering, stowage and yet more weathering!


Paint is Gunze H303 overall, with some then mixed 50/50 with Tamiya flat yellow. This was oversprayed on upper surfaces to break up the monotone finish.
Currently building:
Italeri M60A1 Patton - what if 4 challenge
Revell 1/25 32 Ford rat rod
Italeri 1/48 Junkers JU-87B Stuka
Bronco 1/35 Hungarian Zrinyi assault gun
New York, United States
Joined: March 08, 2010
KitMaker: 3,662 posts
Armorama: 3,078 posts
Posted: Sunday, December 22, 2013 - 02:15 AM UTC
@ John I think I will be crossing that 1 off my wish list

@ Jose Great finish looks awesome my friend


My progress
Two identical turrets too bad most of it won't be seen

Turrets dry fit to the top

Build is almost complete

Active Campaigns on the bench:
Operation Fall Gelb - Pz.Kpfw. IV Ausf. C
Engineering the Future - M-26 Recovery Vehicle
115 Campaigns completed
Buenos Aires, Argentina
Joined: May 21, 2012
KitMaker: 765 posts
Armorama: 438 posts
Posted: Sunday, December 22, 2013 - 05:29 AM UTC
@Sal:
Thanks for your kindly words....
I follow your model with special interest, I wish to buy one of this in a near future....
Those Radial Fighters Campaign: 1/72 FW 190 A5
Delta 2 Campaign: 1/48 Hobby Boss Mirage IIIC
Navy Boys on those Postage Stamps 1/72 Airfix Sea Harrier FA2
Working: Trumpeter A-5 Vigilante
Waiting: Phantom 60 Campaign
Maryland, United States
Joined: May 23, 2011
KitMaker: 39 posts
Armorama: 28 posts
Posted: Sunday, December 22, 2013 - 09:10 AM UTC
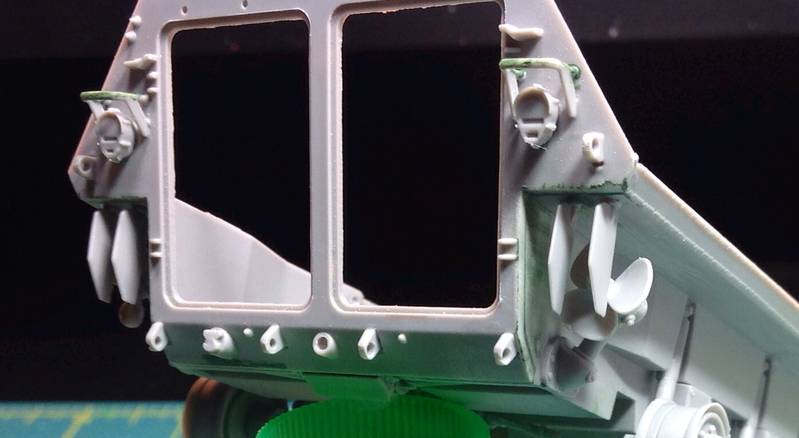
Some more progress on the lower hull of my LAV 25 today. There was a big seam where the rear plate attached to the sides of the hull. I used a product called, "Liquid Green Stuff" from Games Workshop to fill the seam. It worked pretty well. I also used the green stuff on the rear light guards to fill seams where the parts attached to the hull.
This kit goes together pretty quickly. I've been happy with it so far.

You can see the filled seam in this picture:
Lisboa, Portugal
Joined: March 04, 2008
KitMaker: 5,386 posts
Armorama: 4,727 posts
Posted: Sunday, December 22, 2013 - 11:29 AM UTC
Quoted Text
@ John I think I will be crossing that 1 off my wish list 
I understand Sal !

I love these Trumpeter's kits so this one is not kicking my building spirit down... I'm doing a second build when this one is done !

Active Builds: 0
Active Campaigns: 0
Lisboa, Portugal
Joined: March 04, 2008
KitMaker: 5,386 posts
Armorama: 4,727 posts
Posted: Monday, December 23, 2013 - 07:03 AM UTC
Last step of these Wheel/Suspension sets,

For those having this one in your stash, pay extra attention, because it's very easy to loose or break a part.

Or this might happen


Start over...

Done !

And another one
I'll stop here.. still 5 to go.
Prime the PE part and paint them...

Active Builds: 0
Active Campaigns: 0


