Thanks for the link. Funny the German sites have them before the Far East. Maybe they sent the first batch there because of the subject.
John, that would drive me insane!
Campaigns: Active Campaigns
Campaigns that are either in planning or underway should be grouped here.
Campaigns that are either in planning or underway should be grouped here.
Hosted by Richard S.
Trumpeter Campaign
35th-scale

Joined: November 21, 2007
KitMaker: 3,212 posts
Armorama: 2,807 posts

Posted: Saturday, December 28, 2013 - 10:37 AM UTC
v1kt0r

Joined: January 11, 2013
KitMaker: 43 posts
Armorama: 43 posts

Posted: Saturday, December 28, 2013 - 11:26 AM UTC
Hi, I've bought 5 of them. one for me and 4 for resale. 
Look on eBay, you can get one below 30€ + shipment.
Viktor

Look on eBay, you can get one below 30€ + shipment.
Viktor

v1kt0r

Joined: January 11, 2013
KitMaker: 43 posts
Armorama: 43 posts

Posted: Sunday, December 29, 2013 - 10:04 PM UTC
35th-scale

Joined: November 21, 2007
KitMaker: 3,212 posts
Armorama: 2,807 posts

Posted: Monday, December 30, 2013 - 12:24 AM UTC
Quoted Text
I made a slight error with the decals here
And only realized I had done so after they had set!
The red and yellow "do not overtake turning vehicle" are on the wrong sides...doh!
Guess I won't be entering this in any competitions
Nice Stryker....I'm pretty sure I have these decals in the spares box if you want another set to go over them....
That Fennek is coming along nicely. Looks like a great little kit

Tiger1944

Joined: October 11, 2013
KitMaker: 160 posts
Armorama: 152 posts

Posted: Monday, December 30, 2013 - 09:02 AM UTC
Thanks for the offer Sean, but it's OK as I found some spares I had and just have to get around to putting them on.
Nito74

Joined: March 04, 2008
KitMaker: 5,386 posts
Armorama: 4,727 posts

Posted: Wednesday, January 01, 2014 - 08:37 AM UTC
Quoted Text
John, that would drive me insane!
Well... just when things couldn't get worse.

I let the pins in place for 2 days just the be sure before cutting the sprues..
Somehow I couldn't get the tracks from the track template without damaging them... Restarted it. ( hope there are some extra links is the brown bag )

My moral and patient temper have limits so I'm starting another Trumpeter kit, this one is driving me insane, I'll be doing both.
The second one is therapy to adjust with the first one

 ( Mad plastic laughter )


PantherF

Joined: June 10, 2005
KitMaker: 6,188 posts
Armorama: 5,960 posts

Posted: Wednesday, January 01, 2014 - 11:13 AM UTC
I could just never understand why they made the guides the same material as the tracks when there was a possibility of them doing that.
Jeff
Jeff
Nito74

Joined: March 04, 2008
KitMaker: 5,386 posts
Armorama: 4,727 posts

Posted: Wednesday, January 01, 2014 - 12:59 PM UTC
Quoted Text
I could just never understand why they made the guides the same material as the tracks when there was a possibility of them doing that.
Jeff
Yup, some of the glue dropped from the links to the guides.
And I lost a few pins and damaged 3 links too..

Be happy to cross that one from your Wishlist Jeff

Petro

Joined: November 02, 2003
KitMaker: 984 posts
Armorama: 846 posts

Posted: Wednesday, January 01, 2014 - 04:09 PM UTC
Quoted Text
Quoted TextJohn, that would drive me insane!
Well... just when things couldn't get worse.
I let the pins in place for 2 days just the be sure before cutting the sprues..
Somehow I couldn't get the tracks from the track template without damaging them... Restarted it. ( hope there are some extra links is the brown bag )
My moral and patient temper have limits so I'm starting another Trumpeter kit, this one is driving me insane, I'll be doing both.
The second one is therapy to adjust with the first one

( Mad plastic laughter )
Sounds like that kit is a good candidate for Git er Done mark 10

Nito74

Joined: March 04, 2008
KitMaker: 5,386 posts
Armorama: 4,727 posts

Posted: Thursday, January 02, 2014 - 02:14 AM UTC


I know Marc... but I'm stubborn ..

I'll try to finish that one.


Quasimofo

Joined: November 30, 2012
KitMaker: 105 posts
Armorama: 87 posts

Posted: Thursday, January 02, 2014 - 02:34 AM UTC
Happy New Year, everyone! Lots of great progress on everyone's builds since my last visit...
@Sal: that armored train looks awesome! I've been wanting to do some of the 1/35 railroad stuff, but just don't have the space for it. The HobbyBoss 1/72 railroad stuff has been calling my name however...
@Jason: Your Stryker looks amazing! Great work....love the weathering!
@John: Hopefully your Su-15 will make up for the pain of the Neubaufahrzeug. Those tracks would drive me insane...but I think the HobbyBoss T-26 in my stash has a similar track build.
I built the horrid 1/72 PM Su-15, and only after I had it finished did I discover that Trumpeter makes one. Hopefully the fit on that will be better than the Il-76 I'm working on.
Speaking of which...
I've put the Panzer 38(t) on hold to get some work done on The IL-76. The Panzer is probably 90% done, but the Candid has been calling to me from the shelf or some attention, so...
I FINALLY have all the sanding and panel line rescribing done. I'm still amazed at just how poorly this kit fit together. And like some Trumpeter armor, it seems over-engineered in some places. Like the cargo doors. You are supposed to cut out the molded in rear fuselage area, and replace them with separate parts. Um....no. I know this Il-76 was molded to accommodate different versions (Like the A-50 Mainstay), but....C'MON! There HAD to have been a better way. I left mine as-is and rescribed the lines to simulate where the door panels would be.

The clear cockpit window glazing also fit poorly. To their credit, Trumpeter molded the cockpit glass as a larger part that gets blended to the fuselage. Big thumbs up for that....I prefer that in my airliner kits. But fer cryin' out loud....at least make it fit! Lots of careful sanding, filling and blending with some Mr. Surfacer took care of that. The lower window piece just isn't wide enough to properly match the edge of the fuselage so it looks a but recessed. Again, Mr. Surfacer was used to try and even it out, but it still too recessed.

Anyway, the fuselage work is done and I now have the wings and stabs mounted. The wing roots will need to be blended into the fuselage and some gaps in the joint of the stabs will need to be filled.


@Sal: that armored train looks awesome! I've been wanting to do some of the 1/35 railroad stuff, but just don't have the space for it. The HobbyBoss 1/72 railroad stuff has been calling my name however...
@Jason: Your Stryker looks amazing! Great work....love the weathering!
@John: Hopefully your Su-15 will make up for the pain of the Neubaufahrzeug. Those tracks would drive me insane...but I think the HobbyBoss T-26 in my stash has a similar track build.

I built the horrid 1/72 PM Su-15, and only after I had it finished did I discover that Trumpeter makes one. Hopefully the fit on that will be better than the Il-76 I'm working on.
Speaking of which...
I've put the Panzer 38(t) on hold to get some work done on The IL-76. The Panzer is probably 90% done, but the Candid has been calling to me from the shelf or some attention, so...
I FINALLY have all the sanding and panel line rescribing done. I'm still amazed at just how poorly this kit fit together. And like some Trumpeter armor, it seems over-engineered in some places. Like the cargo doors. You are supposed to cut out the molded in rear fuselage area, and replace them with separate parts. Um....no. I know this Il-76 was molded to accommodate different versions (Like the A-50 Mainstay), but....C'MON! There HAD to have been a better way. I left mine as-is and rescribed the lines to simulate where the door panels would be.

The clear cockpit window glazing also fit poorly. To their credit, Trumpeter molded the cockpit glass as a larger part that gets blended to the fuselage. Big thumbs up for that....I prefer that in my airliner kits. But fer cryin' out loud....at least make it fit! Lots of careful sanding, filling and blending with some Mr. Surfacer took care of that. The lower window piece just isn't wide enough to properly match the edge of the fuselage so it looks a but recessed. Again, Mr. Surfacer was used to try and even it out, but it still too recessed.

Anyway, the fuselage work is done and I now have the wings and stabs mounted. The wing roots will need to be blended into the fuselage and some gaps in the joint of the stabs will need to be filled.


1721Lancers

Joined: March 21, 2012
KitMaker: 1,673 posts
Armorama: 1,640 posts

Posted: Thursday, January 02, 2014 - 04:05 AM UTC
Quoted Text
John: tell me why you torture yourself this way
.
In the Trumpeter Hetzer kit there are the same style tracks, here's a tip glue them together as if there are no track pins in there. After you get the correct length add the pins. I cheated on the Hetzer and only added the inside pins where you could see themSo there is an easy bit to this too, no need to go totally insane, just a little

John did you miss this post of mine, or are you deliberately trying to land in the cuckoos nest. Simplify the track thing like I have said, nobody will see the difference afterwards
 and you will have plenty of sanity left to keep us campaign-a-holics in line


Paul
Nito74

Joined: March 04, 2008
KitMaker: 5,386 posts
Armorama: 4,727 posts

Posted: Thursday, January 02, 2014 - 04:22 AM UTC
Quoted Text
Quoted Text
John: tell me why you torture yourself this way
.
In the Trumpeter Hetzer kit there are the same style tracks, here's a tip glue them together as if there are no track pins in there. After you get the correct length add the pins. I cheated on the Hetzer and only added the inside pins where you could see themSo there is an easy bit to this too, no need to go totally insane, just a little

John did you miss this post of mine, or are you deliberately trying to land in the cuckoos nest. Simplify the track thing like I have said, nobody will see the difference afterwardsand you will have plenty of sanity left to keep us campaign-a-holics in line


Paul
I missed your post.


Nito74

Joined: March 04, 2008
KitMaker: 5,386 posts
Armorama: 4,727 posts

Posted: Thursday, January 02, 2014 - 04:24 AM UTC
Quoted Text
@John: Hopefully your Su-15 will make up for the pain of the Neubaufahrzeug. Those tracks would drive me insane...but I think the HobbyBoss T-26 in my stash has a similar track build.
I built the horrid 1/72 PM Su-15, and only after I had it finished did I discover that Trumpeter makes one. Hopefully the fit on that will be better than the Il-76 I'm working on.
Speaking of which...
I've put the Panzer 38(t) on hold to get some work done on The IL-76. The Panzer is probably 90% done, but the Candid has been calling to me from the shelf or some attention, so...
I FINALLY have all the sanding and panel line rescribing done. I'm still amazed at just how poorly this kit fit together. And like some Trumpeter armor, it seems over-engineered in some places. Like the cargo doors. You are supposed to cut out the molded in rear fuselage area, and replace them with separate parts. Um....no. I know this Il-76 was molded to accommodate different versions (Like the A-50 Mainstay), but....C'MON! There HAD to have been a better way. I left mine as-is and rescribed the lines to simulate where the door panels would be.
The clear cockpit window glazing also fit poorly. To their credit, Trumpeter molded the cockpit glass as a larger part that gets blended to the fuselage. Big thumbs up for that....I prefer that in my airliner kits. But fer cryin' out loud....at least make it fit! Lots of careful sanding, filling and blending with some Mr. Surfacer took care of that. The lower window piece just isn't wide enough to properly match the edge of the fuselage so it looks a but recessed. Again, Mr. Surfacer was used to try and even it out, but it still too recessed.
I tried last year to tackle the A-model Su-15... ended up in the trash bin.. I don't know why I keep buying A-model kits, it's always a nightmare.. So I got this Trumpeter's , let's see how that goes.
Nito74

Joined: March 04, 2008
KitMaker: 5,386 posts
Armorama: 4,727 posts

Posted: Thursday, January 02, 2014 - 06:53 AM UTC
Yup.. it happened again.

So I tried one last thing, just when I was about to finish the second pin side I started cutting the pins on the opposite side.
No more than 2 mins... IT WORKED !!!

well, more or less just before the photo one link just grew some wings and flew

So I tried one last thing, just when I was about to finish the second pin side I started cutting the pins on the opposite side.
No more than 2 mins... IT WORKED !!!

well, more or less just before the photo one link just grew some wings and flew

mmeier

Joined: October 22, 2008
KitMaker: 1,280 posts
Armorama: 1,015 posts

Posted: Friday, January 03, 2014 - 10:10 AM UTC
Hangelafette

Joined: April 22, 2012
KitMaker: 344 posts
Armorama: 315 posts

Posted: Saturday, January 04, 2014 - 02:43 PM UTC
I'm in with Trumpeter's T-90 Cast turret.

Holy crap is that a familiar sight John, one look at that track link jig and the memories rushed back. Assembling the track and suspension on the Neuboogerzeug was a nightmare! I ended up just gluing the tracks together, then adding the pins. Good luck!
Nate

Holy crap is that a familiar sight John, one look at that track link jig and the memories rushed back. Assembling the track and suspension on the Neuboogerzeug was a nightmare! I ended up just gluing the tracks together, then adding the pins. Good luck!
Nate

ltb073

Joined: March 08, 2010
KitMaker: 3,662 posts
Armorama: 3,078 posts

Posted: Wednesday, January 08, 2014 - 12:25 PM UTC
Quoted Text
@Sal: that armored train looks awesome! I've been wanting to do some of the 1/35 railroad stuff, but just don't have the space for it. The HobbyBoss 1/72 railroad stuff has been calling my name however...
Thanks Bill yeah they have some cool stuff too i really like the Soviet Draisine 'Krasnaja Zvezda'but i dont build 1/72 scale

Here is some progress build is completed and dunkelgelb applied


almost seems like a shame not to put some camo on this beast

@John I will definitely not be building that kit good luck the rest of the way


ceerosvk

Joined: November 25, 2013
KitMaker: 171 posts
Armorama: 170 posts

Posted: Wednesday, January 08, 2014 - 02:54 PM UTC
Quoted Text
Yup.. it happened again.
So I tried one last thing, just when I was about to finish the second pin side I started cutting the pins on the opposite side.
No more than 2 mins... IT WORKED !!!
well, more or less just before the photo one link just grew some wings and flew
easy cure for that, just cover the form for the tracks with some paper masking tape

Nito74

Joined: March 04, 2008
KitMaker: 5,386 posts
Armorama: 4,727 posts

Posted: Saturday, January 11, 2014 - 06:03 AM UTC
Thanks for the tip Michal
I've worked a bit on both my builds, added more links & pins ( not going to bother taking photos at this stage..) and worked on the cockpit of the slim Sukhoi

I've worked a bit on both my builds, added more links & pins ( not going to bother taking photos at this stage..) and worked on the cockpit of the slim Sukhoi

casualmodeler

Joined: February 04, 2009
KitMaker: 702 posts
Armorama: 665 posts

Posted: Saturday, January 11, 2014 - 06:25 AM UTC
Sorry, this goes OT but here's my 1/72 "Krasnaja Zvezda" for anyone interest:
Krasnaja Zvezda
To increase my hoarding, Trumpeter has announed more 1/35 railroad armor for this year, including also russian stuff..
Krasnaja Zvezda
To increase my hoarding, Trumpeter has announed more 1/35 railroad armor for this year, including also russian stuff..

Quasimofo

Joined: November 30, 2012
KitMaker: 105 posts
Armorama: 87 posts

Posted: Sunday, January 12, 2014 - 05:01 AM UTC
My Panzer 38(t) is more or less finished, but I'm working on a base and figure for it. I'll wait until it's all complete before posting any photos of it. I'm happy with how the tank came out and really enjoyed that kit. I always procrastinate when it comes to painting figures though...
Turning to the Il-76, it's been primed and has a base coat of light grey applied. Next, I'll do the red tips of the wings and stabs. After that, I'll mask off the wings, stabs and belly to spray the white. For airliners I normally do the white first, but I've had trouble in the past with the white getting scuffed and such during all the subsequent handling and masking. I'm thinking if I put the white on last I can alleviate some of that. At some point I need to also paint the nose and lower radome dark gray and paint a black anti-glare panel. Why, oh why didn't Trumpeter include that as a decal?


Turning to the Il-76, it's been primed and has a base coat of light grey applied. Next, I'll do the red tips of the wings and stabs. After that, I'll mask off the wings, stabs and belly to spray the white. For airliners I normally do the white first, but I've had trouble in the past with the white getting scuffed and such during all the subsequent handling and masking. I'm thinking if I put the white on last I can alleviate some of that. At some point I need to also paint the nose and lower radome dark gray and paint a black anti-glare panel. Why, oh why didn't Trumpeter include that as a decal?


turkeyshot

Joined: February 06, 2012
KitMaker: 138 posts
Armorama: 133 posts

Posted: Thursday, January 16, 2014 - 03:22 PM UTC
There is some great looking builds going on here guys.
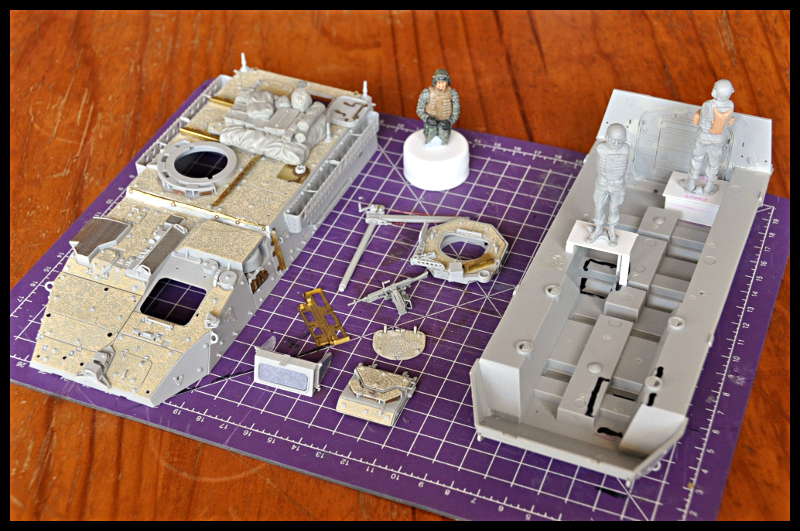
It has been a while since I have done any work on my Stryker, although looking at all of your progress you have inspired me to get a little more done. Here is a little more progress on my M-1131 Stryker FSV. She is now mostly built ... now it is just all of the little details that I still need to add. The first pic shows the anti-slip that I added using Tamiya diorama paint, and a couple of small platforms that I built inside the hull for the figures to stand on so that they will be the right height standing in their hatches in the final model.
The second pic is a close up of all of the various little bits and pieces laid out between the 2 halves of the hull.
I still have a lot of PE to add and a lot of the more fiddly smaller parts on the upper hull.


ltb073

Joined: March 08, 2010
KitMaker: 3,662 posts
Armorama: 3,078 posts

Posted: Friday, January 17, 2014 - 09:53 AM UTC
35th-scale

Joined: November 21, 2007
KitMaker: 3,212 posts
Armorama: 2,807 posts

Posted: Sunday, January 19, 2014 - 09:12 PM UTC
That train looks great Sal!
Well I finally picked up a Trumpeter kit and started last night:

WIP pics to follow....
Well I finally picked up a Trumpeter kit and started last night:

WIP pics to follow....
 |


