


Hosted by Richard S.
Desertised, don't forget your water bottle!

Nito74

Joined: March 04, 2008
KitMaker: 5,386 posts
Armorama: 4,727 posts
Posted: Thursday, August 21, 2014 - 04:18 AM UTC
Guy, Benjamin and Tat, this looks like a Panzer III Tank Show.. we have the G, L and H versions so far.

IronOwl

Joined: January 07, 2013
KitMaker: 572 posts
Armorama: 302 posts

Posted: Friday, August 22, 2014 - 05:53 AM UTC
I have already finished my Build but decided to weather some so here's a few Pics I used Tamiya weathering master kits A & B colors used are SOOT, RUST, LIGHT SAND, SAND, and MUD. I also tried a Diluted wash. 
Sascha(Ironowl)
Sascha(Ironowl)
IronOwl
Joined: January 07, 2013
KitMaker: 572 posts
Armorama: 302 posts
Posted: Friday, August 22, 2014 - 05:55 AM UTC

IronOwl
Joined: January 07, 2013
KitMaker: 572 posts
Armorama: 302 posts
Posted: Friday, August 22, 2014 - 05:57 AM UTC

Sascha(Ironowl)
Nito74
Joined: March 04, 2008
KitMaker: 5,386 posts
Armorama: 4,727 posts
Posted: Saturday, August 23, 2014 - 06:25 AM UTC
Nice job Sascha, looking good !
Here's my update,
Cleaning up the fenders,

Primer on the hull,

Painting small rollers and Filter on the wheels too,

Here's my update,
Cleaning up the fenders,
Primer on the hull,
Painting small rollers and Filter on the wheels too,

tatbaqui

#040

Joined: May 06, 2007
KitMaker: 2,713 posts
Armorama: 2,451 posts

Posted: Saturday, August 23, 2014 - 11:52 AM UTC
Thanks John -- I see you're making good progress as well, looking forward to your completion.
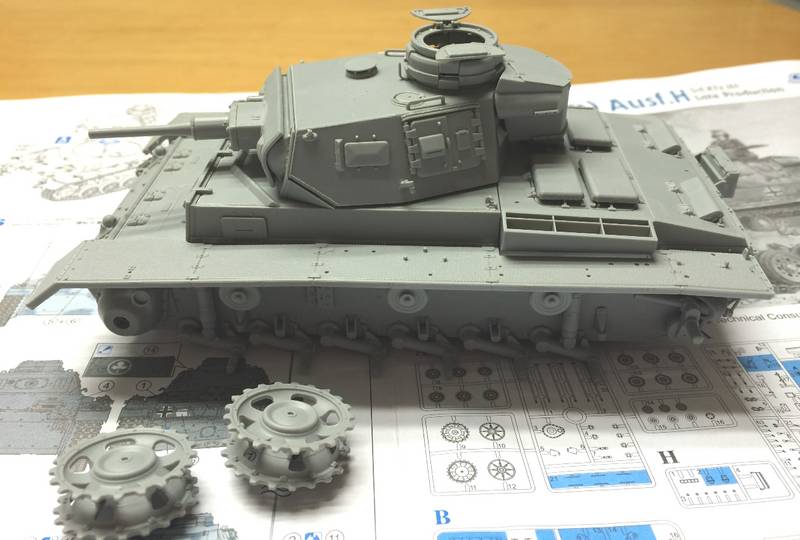
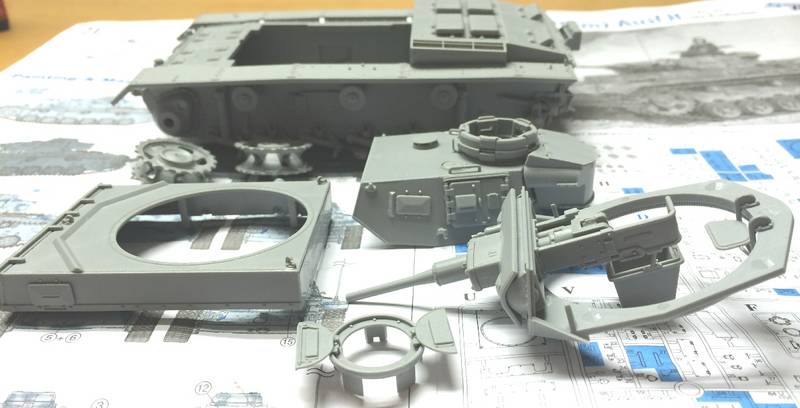
I've finished the major sub-assemblies -- will stop for now, and get some paint on before putting it all together. Typically I complete a build before doing any paintwork, will try a different tack this time.
The last part was the turret and gun assembly. Sprayed primer on the barrel just to check for unwanted seam lines:
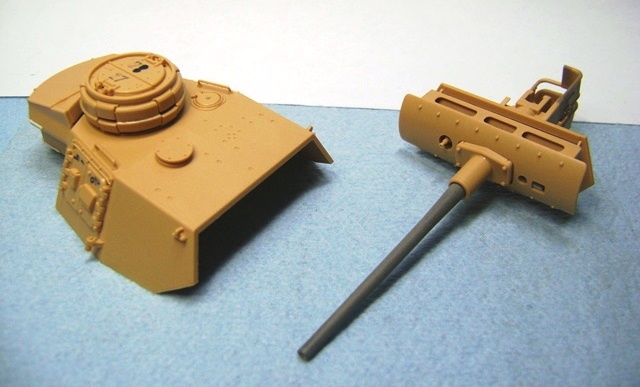
Not following instructions -- always thought left and right parts should be symmetrical. Already corrected.
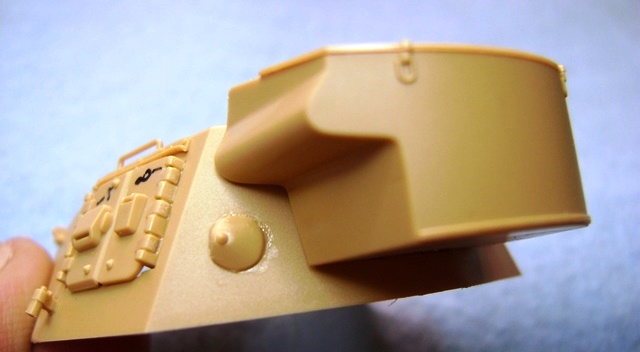
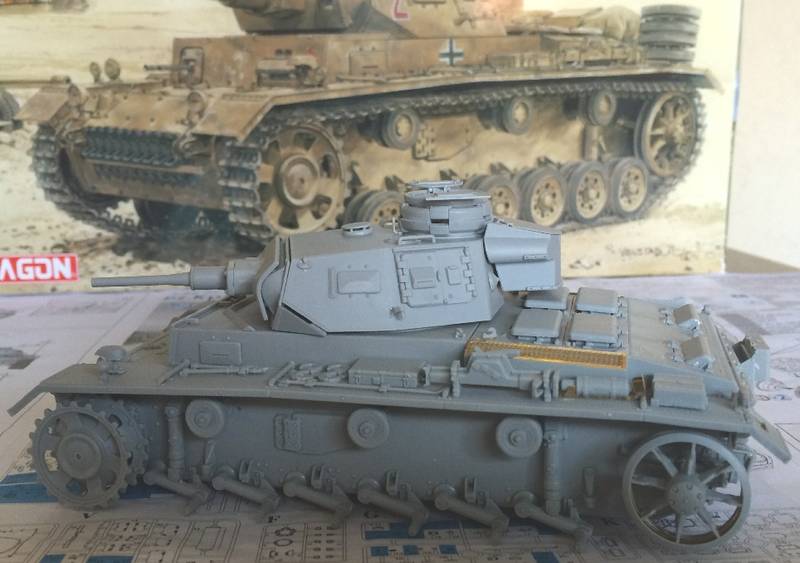
Looking through walkaround pics, I've added some detail to the bin:
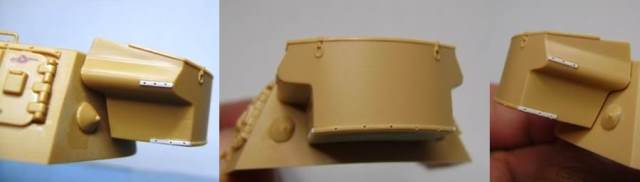
I've noticed that the bin is not symmetrical when viewed from the back. It seems to the case with the Bovington Pz III. Am thinking this kit may be modeled from that?
Till next update.
Cheers,
Tat
I've finished the major sub-assemblies -- will stop for now, and get some paint on before putting it all together. Typically I complete a build before doing any paintwork, will try a different tack this time.
The last part was the turret and gun assembly. Sprayed primer on the barrel just to check for unwanted seam lines:
Not following instructions -- always thought left and right parts should be symmetrical. Already corrected.
Looking through walkaround pics, I've added some detail to the bin:
I've noticed that the bin is not symmetrical when viewed from the back. It seems to the case with the Bovington Pz III. Am thinking this kit may be modeled from that?
Till next update.
Cheers,
Tat
tatbaqui
#040
Joined: May 06, 2007
KitMaker: 2,713 posts
Armorama: 2,451 posts
Posted: Monday, August 25, 2014 - 01:54 AM UTC
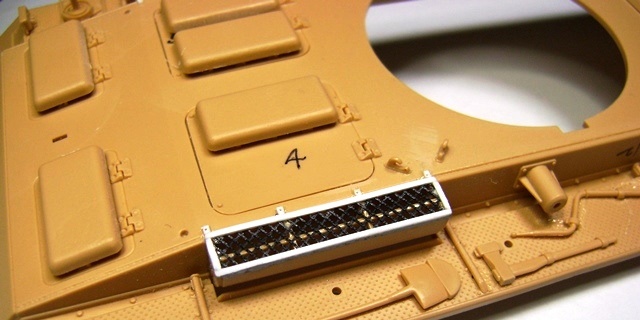
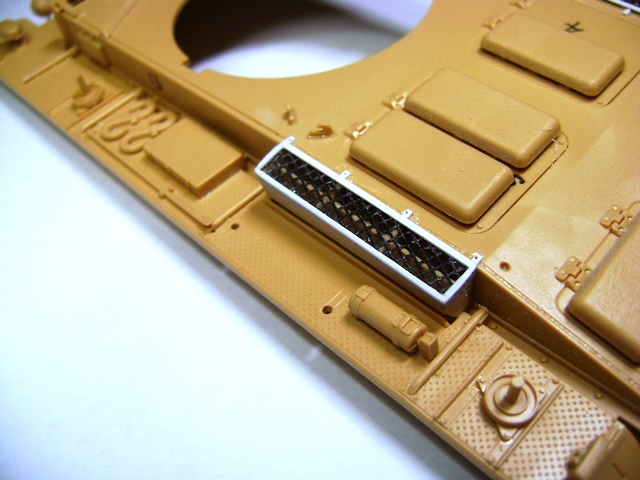
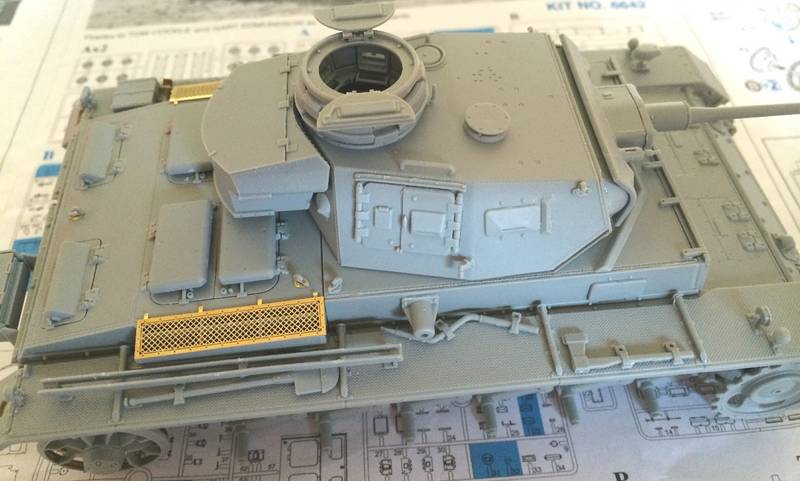
Fiddled with a DIY mesh over the weekend:
Cheers,
Tat
Cheers,
Tat

1721Lancers

Joined: March 21, 2012
KitMaker: 1,673 posts
Armorama: 1,640 posts
Posted: Monday, August 25, 2014 - 02:03 AM UTC
Sascha nice one  , you're getting better with every build
John You're telling me that you have used pure sunlight
to take those pics ?
?
Looking good even though you have a dodgy light source .
Tat A very clean and tidy build there . The mesh
looks great
Paul
, you're getting better with every build John You're telling me that you have used pure sunlight
to take those pics
?Looking good even though you have a dodgy light source
.Tat A very clean and tidy build there
. The mesh looks great
Paul

tatbaqui
#040
Joined: May 06, 2007
KitMaker: 2,713 posts
Armorama: 2,451 posts
Posted: Monday, August 25, 2014 - 02:54 AM UTC
Thanks Paul.
I have a finer mesh courtesy of a kitchen strainer. It would have looked better, but I just couldn't get it to stick even after trying a couple of different super glues. The mesh I finally settled with came from another Tamiya kit -- the Sdkfz 7 + Flakvierling. Been getting bits and pieces from that sheet, there's practically nothing left by the time I do get to build it!
Cheers, Tat
1721Lancers
Joined: March 21, 2012
KitMaker: 1,673 posts
Armorama: 1,640 posts
Posted: Monday, August 25, 2014 - 03:34 AM UTC
Quoted Text
Thanks Paul.
I have a finer mesh courtesy of a kitchen strainer. It would have looked better, but I just couldn't get it to stick even after trying a couple of different super glues. The mesh I finally settled with came from another Tamiya kit -- the Sdkfz 7 + Flakvierling. Been getting bits and pieces from that sheet, there's practically nothing left by the time I do get to build it!
By the time you get round to building the SdKfz7 you will have another to plunder for it's mesh. It's a devils circle bro
Paul
Nito74
Joined: March 04, 2008
KitMaker: 5,386 posts
Armorama: 4,727 posts
Posted: Monday, August 25, 2014 - 06:36 AM UTC
Quoted Text
John You're telling me that you have used pure sunlight
to take those pics
Looking good even though you have a dodgy light source
Paul
Just used P.A.S settings, Pure Analog Sunlight, no Digital effects...
I pay a couple of guys to be on the roof top with mirrors but it was their days off..


Avarice

Joined: February 20, 2014
KitMaker: 26 posts
Armorama: 26 posts
Posted: Tuesday, August 26, 2014 - 01:39 AM UTC
Cheers for the advice Paul! I drybrushed the figures with a pale grey, then went over the uniforms with a dry'ish brush with a lighter shade of khaki, this produced an effect I'm pretty happy with. The uniforms are lighter, with dark creases and brighter highlights on the raised sections.
Excuse the poor late night photography, 11pm will do that... will try and take some shots with better lighting soon.
Pretty sure I'm going to attempt a base for this one now.

Excuse the poor late night photography, 11pm will do that... will try and take some shots with better lighting soon.
Pretty sure I'm going to attempt a base for this one now.

Charlie-66

#186
Joined: May 24, 2006
KitMaker: 771 posts
Armorama: 750 posts
Posted: Tuesday, August 26, 2014 - 07:03 AM UTC
Ben, nice Pz III. I like the figures! Is that the Masterbox set? The tank looks cool. One thing to think about is the spare track across the front. You appear to have shown some shiny bare metal. My guess is the spare hanging across the front would be dirty and duty, but would not have rubbed on anything like the track in use that would cause that. Just a thought. Nice looking build.

Avarice
Joined: February 20, 2014
KitMaker: 26 posts
Armorama: 26 posts
Posted: Tuesday, August 26, 2014 - 11:45 AM UTC
Hi Guy,
Yeah, the figures are from Masterbox and were included in the kit from Tamiya.
Good observation on the spare tracks, I did drybrush on some silver, but you are right... they should be dirty. I'll fix this up. Cheers!
Yeah, the figures are from Masterbox and were included in the kit from Tamiya.
Good observation on the spare tracks, I did drybrush on some silver, but you are right... they should be dirty. I'll fix this up. Cheers!
Nito74
Joined: March 04, 2008
KitMaker: 5,386 posts
Armorama: 4,727 posts
Posted: Wednesday, August 27, 2014 - 05:23 AM UTC
Shading & Dark Yellow Base coat.

Charlie-66
#186
Joined: May 24, 2006
KitMaker: 771 posts
Armorama: 750 posts
Posted: Wednesday, August 27, 2014 - 08:15 AM UTC
Some pictures from last weekend's work. Managed to get most of the major assemblies done. Have some interior painting to do before I button it up.
Charlie-66
#186
Joined: May 24, 2006
KitMaker: 771 posts
Armorama: 750 posts
Posted: Wednesday, August 27, 2014 - 09:25 AM UTC
Quoted Text
Hi Guy,
Yeah, the figures are from Masterbox and were included in the kit from Tamiya.
Good observation on the spare tracks, I did drybrush on some silver, but you are right... they should be dirty. I'll fix this up. Cheers!
Ben, it does look really nice so far. I'm looking forward to seeing the finished tank!
Nito74
Joined: March 04, 2008
KitMaker: 5,386 posts
Armorama: 4,727 posts
Posted: Thursday, August 28, 2014 - 07:08 AM UTC
Filters & pinwash


Sorry for the bad lighting.
Rollers & wheels will be attached ASAP
Sorry for the bad lighting.
Rollers & wheels will be attached ASAP
Charlie-66
#186
Joined: May 24, 2006
KitMaker: 771 posts
Armorama: 750 posts
Posted: Thursday, August 28, 2014 - 08:53 AM UTC
Coming along nicely John. The Pz III flood continues!
Nito74
Joined: March 04, 2008
KitMaker: 5,386 posts
Armorama: 4,727 posts
Posted: Friday, August 29, 2014 - 05:24 AM UTC
Thanks Guy !
Last night shots, 2 a.m .


Last night shots, 2 a.m .
Charlie-66
#186
Joined: May 24, 2006
KitMaker: 771 posts
Armorama: 750 posts
Posted: Friday, August 29, 2014 - 06:35 AM UTC
Looks good John, have you done the tracks yet?
Charlie-66
#186
Joined: May 24, 2006
KitMaker: 771 posts
Armorama: 750 posts
Posted: Friday, August 29, 2014 - 11:28 AM UTC
My latest effort in the Panzer 3 rally!

Got most of the tools on. Hopefully tomorrow I can do the tracks, and start painting the road wheels.
Got most of the tools on. Hopefully tomorrow I can do the tracks, and start painting the road wheels.
tatbaqui
#040
Joined: May 06, 2007
KitMaker: 2,713 posts
Armorama: 2,451 posts
Posted: Friday, August 29, 2014 - 11:43 AM UTC
Looking great John, Guy. Am stalled at the moment -- waiting for good weather to get started on paintwork  Cheers, Tat
Cheers, TatNito74
Joined: March 04, 2008
KitMaker: 5,386 posts
Armorama: 4,727 posts
Posted: Friday, August 29, 2014 - 01:06 PM UTC
Quoted Text
Looks good John, have you done the tracks yet?
Not yet Guy.
Did you glued the fenders already ?
You might have some problems putting the tracks on.. if the idler wheel is fixed.
What kind of tracks did your kit came with ? DS or Magic ones ?
1721Lancers
Joined: March 21, 2012
KitMaker: 1,673 posts
Armorama: 1,640 posts
Posted: Saturday, August 30, 2014 - 02:10 AM UTC
Benjamin that's it bro , they really match the tank now 
Guy looking forward to seeing the paint dude
John nice now for the tricky part  matching her up to the turret
Well he she is, I'm calling her done. The MG is on, the front CIPs, some more scratching and some pastel dust;


Let me know what you think lads, there is always room for improvement
Paul
, they really match the tank now Guy looking forward to seeing the paint dude
John nice
now for the tricky part matching her up to the turret Well he she is, I'm calling her done. The MG is on, the front CIPs, some more scratching and some pastel dust;
Let me know what you think lads, there is always room for improvement
Paul
 |

WEB HOSTING BY


Copyright ©2021 Armorama and Kitmaker Network, a subsidiary of Silver Star Enterprises
All Rights Reserved. Please read our Conditions of Use and Privacy Policy.
All Rights Reserved. Please read our Conditions of Use and Privacy Policy.