Dioramas
Do you love dioramas & vignettes? We sure do.
M4A3E8 FURY (movie) Diorama
Panzermaster37
Visit this Community
United States
Joined: February 16, 2014
KitMaker: 28 posts
Armorama: 6 posts
Posted: Saturday, September 06, 2014 - 01:22 PM UTC
No problem mabey add some on the front and sides of the hull and turret?? And on green vehicals, it helps to use the sponge on a lighter green then paint the dark brown in the middle but your looks just fine the way it is
I give all of the credit to you for doing such a hard subject tomodel
kudos to you
nick_pal
Visit this Community
South Australia, Australia
Joined: July 09, 2014
KitMaker: 327 posts
Armorama: 283 posts
Posted: Saturday, September 06, 2014 - 09:02 PM UTC

Quoted Text

No problem mabey add some on the front and sides of the hull and turret?? And on green vehicals, it helps to use the sponge on a lighter green then paint the dark brown in the middle but your looks just fine the way it is
I give all of the credit to you for doing such a hard subject tomodel
kudos to you


Hi hunter, yeah my weathering is probably what I'm least confident with, but thanks once again. I only painter the edges darker green because I thought the flatter more exposed areas (not the edges) would be more vulnerable to the extremes such as sun, etc and fade quicker... Maybe not. Cheers once again.
Panzermaster37
Visit this Community
United States
Joined: February 16, 2014
KitMaker: 28 posts
Armorama: 6 posts
Posted: Sunday, September 07, 2014 - 05:08 AM UTC
Either way, it looks great to me and I like it so far (also really like the mud alot aswell) and I agree with you on the fading, will keep that in mind for my shermans
msz006c1
Visit this Community
Tokyo-to, Japan / 日本
Joined: August 14, 2005
KitMaker: 44 posts
Armorama: 48 posts
Posted: Sunday, September 07, 2014 - 02:23 PM UTC
Hello Nick.
Nice going! I love the datk color and mud effect. I want to build my Easy Eight just like yours.
How about adding some lighter color mud? IMHO, putting wet mud here, dried mud there is gonna make the model more life like.
nick_pal
Visit this Community
South Australia, Australia
Joined: July 09, 2014
KitMaker: 327 posts
Armorama: 283 posts
Posted: Sunday, September 07, 2014 - 05:10 PM UTC

Quoted Text

Either way, it looks great to me and I like it so far (also really like the mud alot aswell) and I agree with you on the fading, will keep that in mind for my shermans


Thanks Hunter. Yeah I felt as though the hull edges would be more susceptible to scratching from brushing past trees and the likes. I have just added the tank to the diorama base I have made. Although I still need to finish some accessories for the scene, the bulk of the base is finished. After/ while finishing the rest of the diorama I will start the figures next....
nick_pal
Visit this Community
South Australia, Australia
Joined: July 09, 2014
KitMaker: 327 posts
Armorama: 283 posts
Posted: Sunday, September 07, 2014 - 05:13 PM UTC

Quoted Text

Hello Nick.
Nice going! I love the datk color and mud effect. I want to build my Easy Eight just like yours.
How about adding some lighter color mud? IMHO, putting wet mud here, dried mud there is gonna make the model more life like.


Thanks Tadakatsu, I added some lighter mud underneath, but the bulk of the mud will be fresh as the diorama is depicting "FURY" driving through a muddy, deep road. Pictures of all models don't do them justice, it's better to see them in person.
hofpig
Visit this Community
England - South East, United Kingdom
Joined: March 04, 2007
KitMaker: 1,330 posts
Armorama: 1,017 posts
Posted: Monday, September 08, 2014 - 09:08 AM UTC
NEW TRAILER !!!!!!

Might be of some help to you freeze framed there are more than a few external shots.

http://www.comingsoon.net/news/movienews.php?id=122740

Paul
nick_pal
Visit this Community
South Australia, Australia
Joined: July 09, 2014
KitMaker: 327 posts
Armorama: 283 posts
Posted: Monday, September 08, 2014 - 09:25 AM UTC

Quoted Text

NEW TRAILER !!!!!!

Might be of some help to you freeze framed there are more than a few external shots.

http://www.comingsoon.net/news/movienews.php?id=122740

Paul


Hi Paul, yeah I saw this the other day. On the Fury Facebook page it was released about 3/4 days ago. Extra shots= more detail.

Bit of an update, I have added the tank to the scenery and started to add the water. I'm not happy with the first pour as some shrinkage has occurred, even though I sealed the cavity's, but its only the first pour.will need one or two more to get the effect needed.
nick_pal
Visit this Community
South Australia, Australia
Joined: July 09, 2014
KitMaker: 327 posts
Armorama: 283 posts
Posted: Tuesday, September 16, 2014 - 07:31 PM UTC
So I have almost finished my "Fury" tank, just a few accessories need to be added. I have a question regarding the aerial though, as how high should this be in 1/35?

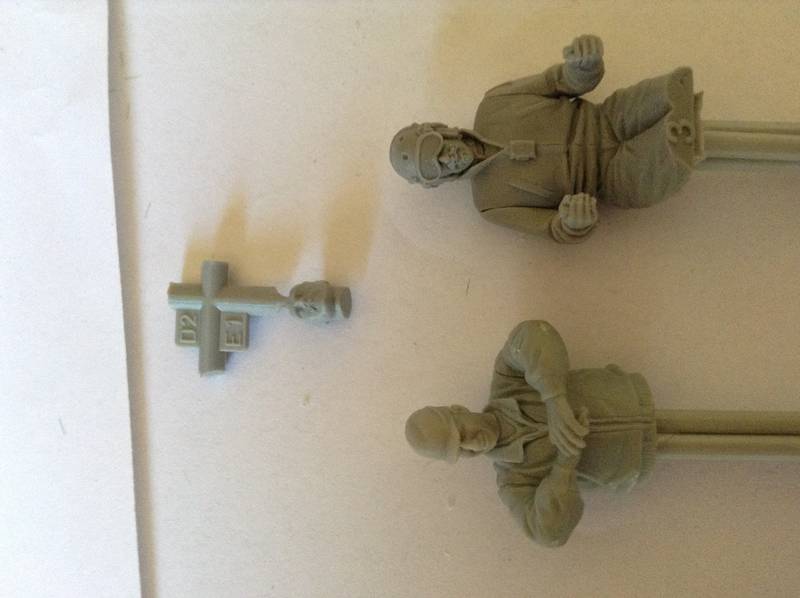
I have also started assembling the figures, here is a shot of the young machine gunner and the driver, which I have added a moustache and goatie to as seen in various images.

The figures are a mix of brands,a lot of stuff from my spares box to make natural poses. Some bodies are DML, some are resin royal models, some hornet heads etc.

I am yet to start the remaining crew, but will soon. I am about halfway through creating the diorama base itself, but am not going to post pics until completion.


The head still at attached to the sprue was a practice for making a moustache and after it has been primed. Personally I am quite happy with the rough look of the Mo!
Shermania
Visit this Community
California, United States
Joined: January 30, 2013
KitMaker: 537 posts
Armorama: 531 posts
Posted: Sunday, September 21, 2014 - 01:00 AM UTC

Quoted Text

So I have almost finished my "Fury" tank, just a few accessories need to be added. I have a question regarding the aerial though, as how high should this be in 1/35?

I have also started assembling the figures, here is a shot of the young machine gunner and the driver, which I have added a moustache and goatie to as seen in various images.

The figures are a mix of brands,a lot of stuff from my spares box to make natural poses. Some bodies are DML, some are resin royal models, some hornet heads etc.

I am yet to start the remaining crew, but will soon. I am about halfway through creating the diorama base itself, but am not going to post pics until completion.


The head still at attached to the sprue was a practice for making a moustache and after it has been primed. Personally I am quite happy with the rough look of the Mo!


Nice progress Nick, look forward to seeing it all done. The movie will be out here in less than 4 weeks!!! So I have to hurry if I want mine finished before then.
nick_pal
Visit this Community
South Australia, Australia
Joined: July 09, 2014
KitMaker: 327 posts
Armorama: 283 posts
Posted: Sunday, September 21, 2014 - 11:04 AM UTC
Hi Pedro, glad to hear alps going well after the light mishap. I'm keen to see some pics. I have just added mine to the base. And am still in the process of making the last figure.once that's done, all that's left to do is paint the figures and add the last remaining scenery accessories....so hopefully will have it done by movie release date, but I think il be cutting it too fine
nick_pal
Visit this Community
South Australia, Australia
Joined: July 09, 2014
KitMaker: 327 posts
Armorama: 283 posts
Posted: Sunday, September 21, 2014 - 11:16 AM UTC
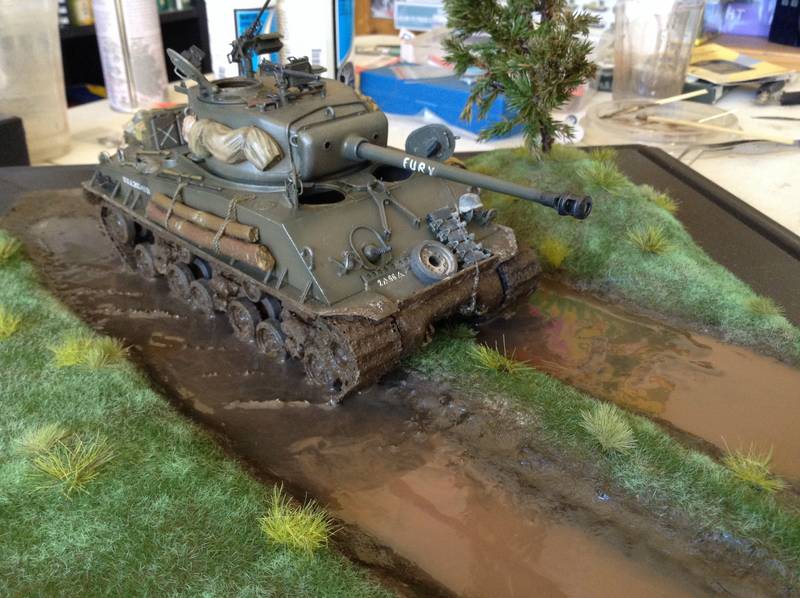
I said I wasn't going to upload a photo until full completion but I couldn't resist. I have just completed the water/mud puddles. As I said I still need to add some scene accessories and figures.

Feedback greatly appreciated

Panzermaster37
Visit this Community
United States
Joined: February 16, 2014
KitMaker: 28 posts
Armorama: 6 posts
Posted: Monday, September 22, 2014 - 09:12 AM UTC
Thats just to awesome, how did you make the mud puddles and waves???
nick_pal
Visit this Community
South Australia, Australia
Joined: July 09, 2014
KitMaker: 327 posts
Armorama: 283 posts
Posted: Monday, September 22, 2014 - 10:23 AM UTC

Quoted Text

Thats just to awesome, how did you make the mud puddles and waves???


Hi Hunter, thanks for the comment. It was actually my first time making water. It was all a bit of trial and error, and I read a lot, I mean A LOT, of forums on here regarding techniques.

I initially just poured woodland scenics "realistic water" onto the base, which when was made I left cavities for deeper puddles. The result I wasn't happy with has I poured it too deep and it stayed cloudy, not clear. So I then decided to paint over the top of it, but it was too monotone. Still wasn't happy with it (am quite fussy)

I wasn't overly happy with the lack of "motion" from the tank, as I wanted to portray it roaring through the mud. So I purchased woodland scenics "ez water" to make the waves. This is a thicker produduct and won't self level, these dried cloudy again....still wasn't happy.

So I decided to mix up woodland scenics with a light mud colour to pour a light coat over all the previous attempts. I added only 2/3 drops of light "dark mud" acrylic paint to the realistic water then mixed gently not to create bubbles. I first poured the bits in front of the tank as these wouldn't have been stirred up yet, then once I got to the front of the tank I added one drop of gloss black paint and stirred gently once again to make a darker mud.

This was the poured, using a syringe, in around the tank and tracks. The use of the syringe allowed me to control the amount and position of water. I mixed the light and dark mud at the front of the tank to show disturbance in the water.

Always allow shrinkage with these products, even though I initially sealed the cavities, shirking still occurred. The final application shrank perfectly enought to expose my previous attempts at waves.

Trial and error helps with my techniques ...sometimes it pays off, sometimes not.
justsendit
Visit this Community
Colorado, United States
Joined: February 24, 2014
KitMaker: 3,033 posts
Armorama: 2,492 posts
Posted: Monday, September 22, 2014 - 11:02 AM UTC
It paid off ... the waves are the icing on the cake! Nice work Nick!

—mike
griffontech
Visit this Community
Canada
Joined: November 21, 2007
KitMaker: 237 posts
Armorama: 231 posts
Posted: Monday, September 22, 2014 - 11:03 AM UTC
Awesome work on the mud and model!
I know you mentioned you are still adding to the scene, but make sure to add some mud spray to the adjacent grass area.
very nice work.
nick_pal
Visit this Community
South Australia, Australia
Joined: July 09, 2014
KitMaker: 327 posts
Armorama: 283 posts
Posted: Monday, September 22, 2014 - 11:50 AM UTC

Quoted Text

It paid off ... the waves are the icing on the cake! Nice work Nick!

—mike


Cheers Mike. Yeah I'm quite the perfectionist when it comes to my models, and don't sleep easy until I'm completely happy. Cheers for the comment.
nick_pal
Visit this Community
South Australia, Australia
Joined: July 09, 2014
KitMaker: 327 posts
Armorama: 283 posts
Posted: Monday, September 22, 2014 - 11:53 AM UTC

Quoted Text

Awesome work on the mud and model!
I know you mentioned you are still adding to the scene, but make sure to add some mud spray to the adjacent grass area.
very nice work.


Hi Dave, cheers for taking the time to comment. Yeah there are some mud splashes on the grass, just hard to see in certain photos, but thanks for the suggestion. Maybe I need to add some more to make it a bit more obvious.
justsendit
Visit this Community
Colorado, United States
Joined: February 24, 2014
KitMaker: 3,033 posts
Armorama: 2,492 posts
Posted: Monday, September 22, 2014 - 12:42 PM UTC

Quoted Text

... Maybe I need to add some more to make it a bit more obvious.


If you add mud, just add a very light splattering fading up and away.

If I may ... The overall color of the tufts and grassy areas seem a little bright. You might want to tone those down just a bit. Then, you might not have a need to add more mud. IMHO.

—mike
nick_pal
Visit this Community
South Australia, Australia
Joined: July 09, 2014
KitMaker: 327 posts
Armorama: 283 posts
Posted: Monday, September 22, 2014 - 06:05 PM UTC

Quoted Text


Quoted Text

... Maybe I need to add some more to make it a bit more obvious.


If you add mud, just add a very light splattering fading up and away.

If I may ... The overall color of the tufts and grassy areas seem a little bright. You might want to tone those down just a bit. Then, you might not have a need to add more mud. IMHO.

—mike


Hey Mike, cheers for the suggestion. I think I will add the remaining scenery first and see how it comes up before adding more mud. Where there are no tufts of grass (just out of picture) is where I plan to put the remaining scenery.
jrutman
Visit this Community
Pennsylvania, United States
Joined: April 10, 2011
KitMaker: 7,941 posts
Armorama: 7,934 posts
Posted: Tuesday, September 23, 2014 - 02:02 AM UTC
Really shaping up nicely. Love the mud and the puddles.
J
nick_pal
Visit this Community
South Australia, Australia
Joined: July 09, 2014
KitMaker: 327 posts
Armorama: 283 posts
Posted: Tuesday, September 23, 2014 - 08:21 AM UTC

Quoted Text

Really shaping up nicely. Love the mud and the puddles.
J


Hi Jerry, thanks for the comment. Hopefully not much longer and it will be completed.
nick_pal
Visit this Community
South Australia, Australia
Joined: July 09, 2014
KitMaker: 327 posts
Armorama: 283 posts
Posted: Tuesday, September 23, 2014 - 09:57 PM UTC
Started painting the figures today.... Have them all primed and ready to go....added some more mud to the dio aswell
Danny_506
Visit this Community
Antwerpen, Belgium
Joined: October 07, 2007
KitMaker: 254 posts
Armorama: 26 posts
Posted: Wednesday, September 24, 2014 - 12:39 AM UTC
Wawww fantastic work!!!!
nick_pal
Visit this Community
South Australia, Australia
Joined: July 09, 2014
KitMaker: 327 posts
Armorama: 283 posts
Posted: Wednesday, September 24, 2014 - 09:27 AM UTC

Quoted Text

Wawww fantastic work!!!!


Cheers Jeurissen. Hopefully more photos to follow soon.