Campaigns: Completed Campaigns
Campaigns that are completed should be grouped here.
Hosted by Richard S.
Leopardmania 50 replacement campaign
bwiber
Visit this Community
Washington, United States
Joined: August 03, 2008
KitMaker: 436 posts
Armorama: 320 posts
Posted: Saturday, February 27, 2016 - 04:48 AM UTC
A small setback with the BARV..... the end plate that I installed 8-9 years ago came off when I was working in that area. I am not sure what glue I had used....


The replacement has been glued on so that the rest of the model will fall apart before it will let go. However, that wasn't the only setback.... I screwed up the rear trunk trying to fix a small issue and ended up having to make a brand new one. That worked out as I also finished the detailing for it at the same time...


Lots and lots of Meng bolts on this one!


Also detailed the rear plate, added the reflectors and the guides for the two cables on top of the lights...


More cable guides.... need to install the bits at each end that actually hold the cables in place. That and the tow point are next on the list, then I can move up front and install lights before tackling the cabin.

Thanks for looking....
LeftyDan
Visit this Community
Illinois, United States
Joined: November 03, 2013
KitMaker: 77 posts
Armorama: 76 posts
Posted: Saturday, February 27, 2016 - 08:45 PM UTC
I'm very impressed (and jealous) of all the work you put into that BARV Bob, you make it look so easy.

I'm about done with building. There's all the tools to attach, but She's about there. I wanted to paint and weather the lower hull as one unit, but my back plate was warped and that delayed everything. More pics to come as I keep going.

Armored76
Visit this Community
Bayern, Germany
Joined: September 30, 2013
KitMaker: 1,615 posts
Armorama: 1,500 posts
Posted: Sunday, February 28, 2016 - 12:14 AM UTC
I finally managed to get started on the 1/72 Leopard 1A5 and I'm already facing the first question mark where I'd like to call out for your expert knowledge.

The rollers have what seem to be rubber segments on them but the references are suggesting there is none. Is this correct? I would hate to shave off details that should be left untouched?

This is how the parts look like:


Thank you!
mshackleton
Visit this Community
England - South East, United Kingdom
Joined: December 16, 2007
KitMaker: 559 posts
Armorama: 517 posts
Posted: Sunday, February 28, 2016 - 12:45 AM UTC
Leopard tyres do not have segments like this. This is a mistake Italeri made with their 1.35 kit from the 70s, and copied by Revell in both scales. Best bet is to fill in the grooves I would have thought.
Armored76
Visit this Community
Bayern, Germany
Joined: September 30, 2013
KitMaker: 1,615 posts
Armorama: 1,500 posts
Posted: Sunday, February 28, 2016 - 11:43 AM UTC
Thank you, Michael! I was about to sand the grooves away but you're right about filling them instead as the lost material might cause problems in this small scale.
junglejim
Visit this Community
Alberta, Canada
Joined: February 18, 2003
KitMaker: 1,728 posts
Armorama: 1,629 posts
Posted: Monday, February 29, 2016 - 10:52 PM UTC
Not much to report, got the tracks painted and installed, first coat of hairspray under the base coat to reveal the primer anti-slip areas. Next will be weathering and detail painting before another coat of hairspray and the OPFOR camo.


Some great builds, love the BARV project Bob. Keep on it everyone!

Cheers,
Jim
Armored76
Visit this Community
Bayern, Germany
Joined: September 30, 2013
KitMaker: 1,615 posts
Armorama: 1,500 posts
Posted: Monday, February 29, 2016 - 11:10 PM UTC
Very nice effect!
David1988
Visit this Community
England - East Anglia, United Kingdom
Joined: September 18, 2014
KitMaker: 91 posts
Armorama: 91 posts
Posted: Friday, March 04, 2016 - 02:09 PM UTC
Good morning all

It has been a pleasure to watch the builds in this campaign since it started.

I have decided to enlist with a Meng Leopard 1A5 which I plan to do as a Greek example. This will basically be a newbie build and brush painted, I will try to get everything done before the end of the campaign


To start with, I have a question for the experts in this thread, did the Greek Leopards have the standard engine grille or the tropical one, please? I have looked around but am having trouble finding photos of Greek 1A5s from above . . .
mshackleton
Visit this Community
England - South East, United Kingdom
Joined: December 16, 2007
KitMaker: 559 posts
Armorama: 517 posts
Posted: Friday, March 04, 2016 - 02:25 PM UTC
When starting

For those who do not realise when starting a model for the Campaign, please check the rules at the very beginning of this thread. A START photo with proof of date is very important. This goes into the Campaign Gallery https://gallery.kitmaker.net/showgallery.php/cat/30157.

On Completion

Now that people are starting to finish their models - well done Kevin and Thorsten - can I remind everyone that the rules demand start AND a FINISH photograph.

Kevin has done this, but others may not realise, so here is a friendly reminder to post a photo of your completed model with proof of date in the photo (like you did for the start photo). This should go in the same Campaign Gallery as above, please.

Happy Leoparding everyone:-)
LTMike4208
Visit this Community
Maryland, United States
Joined: May 23, 2011
KitMaker: 39 posts
Armorama: 28 posts
Posted: Sunday, March 06, 2016 - 02:06 AM UTC
I know I'm real late to this party but I'm going to join the campaign anyway. I probably won't be able to finish but at least I'll have fun!

My entry will be a Danish Leopard 1A5DK in UN markings from Bosnia 1994.

Meng Leopard 1A3/A4
Legends 1A5DK conversion kit
Leopard Workshop road wheels
Leopard Workshop UN markings
Meng D 640 A replacement tracks
Tetra Model Works PE

I just think it will be cool to paint a white tank.


Armored76
Visit this Community
Bayern, Germany
Joined: September 30, 2013
KitMaker: 1,615 posts
Armorama: 1,500 posts
Posted: Monday, March 07, 2016 - 12:02 AM UTC
Great ideas and even better builds, everyone!

I was finally able to get some more done on my 1/72 scale Leopard. The slots on the rubber wheels have been filled with some Mr. Surfacer, the gun has been drilled out and the first layer of bronze green also went on. The chassis received two sand tones for simulating accumulated dust and the wheels are on.


Next steps would be finishing the tracks, putting on the remaining two camo colors, assembly and detail painting. Keeping fingers crossed for a new attempt an free-handing the camouflage pattern
bwiber
Visit this Community
Washington, United States
Joined: August 03, 2008
KitMaker: 436 posts
Armorama: 320 posts
Posted: Monday, March 07, 2016 - 12:10 AM UTC
Have been doing a bit of detailing on the hull.... it is probably over 95% complete. Most of the rest of the details will be added after the paint job. Next up is the cabin, and its roof....


Modified front corners to correct side marker light supports, added the side marker lights. Installed the front tow points, and handrails at the corners of the work deck.


Installed access panels, various bolts and lift rings.
BlackWidow
Visit this Community
European Union
Joined: August 09, 2009
KitMaker: 1,732 posts
Armorama: 326 posts
Posted: Tuesday, March 08, 2016 - 01:19 AM UTC

Quoted Text

....Now that people are starting to finish their models - well done Kevin and Thorsten - can I remind everyone that the rules demand start AND a FINISH photograph ....

Happy Leoparding everyone:-)


I've taken some better photos than the work bench pics last weekend and will upload 2 of them to the gallery in the next few days.

Torsten
LTMike4208
Visit this Community
Maryland, United States
Joined: May 23, 2011
KitMaker: 39 posts
Armorama: 28 posts
Posted: Tuesday, March 08, 2016 - 04:55 AM UTC
@mshackleton I just saw that you aree entering a Danish 1A5DK with UN markings. I hope you don't mind that I am too!

I do have a question for you - I noticed that you added non-slip surface to your turret. I can't seem to find any good reference photos of the non-slip on a 1A5. Can you send me a pic or point me in the right direction?

Thanks!
mshackleton
Visit this Community
England - South East, United Kingdom
Joined: December 16, 2007
KitMaker: 559 posts
Armorama: 517 posts
Posted: Tuesday, March 08, 2016 - 05:17 PM UTC
Hello Mike. No problem at all with doing another UN Leo. Non-slip is difficult to make out in photos of UN Leos as most photos are poor quality and don't show top surfaces very often. I will mail you
LTMike4208
Visit this Community
Maryland, United States
Joined: May 23, 2011
KitMaker: 39 posts
Armorama: 28 posts
Posted: Thursday, March 10, 2016 - 05:22 AM UTC
Update on my 1A5DK:

Leopard Workshop road wheels and idlers are cleaned up and installed.


bwiber
Visit this Community
Washington, United States
Joined: August 03, 2008
KitMaker: 436 posts
Armorama: 320 posts
Posted: Thursday, March 10, 2016 - 10:04 AM UTC
Excellent builds going on here.... Am looking forward to seeing the painted versions, especially the UN white. I would think that would be a tough one to pull off, so I am looking forward to seeing how it is tackled.

Just some more details on my little BARV out of the way......


Now these --- I had to build 3 of them --- surprised me. I was expecting a real hassle with them, but once the basic idea hit they went together fine. At this rate, I might even have to give this white stuff another try one of these days.

In case you are wondering about the upper window blue.... it is a mistake. I cut the windows to tall, but as the blue ends up almost flush to the outer wall of the cabin I just made the window surrounds the right size and will paint over the upper blue areas. They are also hidden by the overhang on the roof... a lucky save.....


Had considered doing the escape hatches as raised 5 thou shapes, but decided to give scribing them a try. Made a template to guide the pointed scriber and then finished off with a Mission Models Micro Chisel with a scribing blade. Worked nicely, and the outline of the hatches are flat channels rather than V shaped lines.

The amount of brass work on this cabin surprised me. However, it went fairly quickly and the steps came out pretty uniform.... am pretty pleased with that.


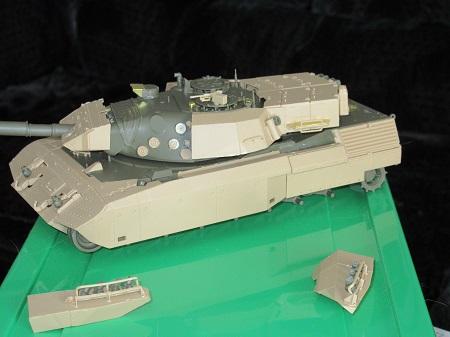
I have no idea what the fitting on the side of the nose is, but I figured that if it was there on the real thing I should at least try to put it on the model. Another hand rail and the center tow fitting and the cabin is done...... on to the roof!
bwiber
Visit this Community
Washington, United States
Joined: August 03, 2008
KitMaker: 436 posts
Armorama: 320 posts
Posted: Thursday, March 17, 2016 - 04:01 AM UTC
Major components are now in primer.....


Still a ways to go..... a lot of detail painting on this one. Not to mention sitting down and making the decals, along with some of the remaining details...

Bob
LTMike4208
Visit this Community
Maryland, United States
Joined: May 23, 2011
KitMaker: 39 posts
Armorama: 28 posts
Posted: Thursday, March 17, 2016 - 05:34 AM UTC
Looks awesome Bob
Stoker
Visit this Community
Nova Scotia, Canada
Joined: February 07, 2015
KitMaker: 58 posts
Armorama: 27 posts
Posted: Monday, March 21, 2016 - 05:26 AM UTC
Hi Everybody
I have my Leopard together and ready for painting.

I primed it and put a coat of black on it tonight. Hopefully paint it green by the weekend. The build straight forward for the most part and enjoyable. Saying that I haven't started the tracks yet
Ron
dexter059
Visit this Community
Region de Valparaiso, Chile
Joined: July 28, 2005
KitMaker: 1,569 posts
Armorama: 1,385 posts
Posted: Thursday, March 24, 2016 - 09:10 AM UTC
Hi all,

I'm in my new home now, and settled my workbench to start building again. A little change in plans, I'm going with a Meng Leo 1A3 plus a few updating items: Orange Hobby metal barrel, mantlet plugs, rear mud fenders and exhaust grilles from Leopard Workshop.


Now building lower hull and

Cheers
junglejim
Visit this Community
Alberta, Canada
Joined: February 18, 2003
KitMaker: 1,728 posts
Armorama: 1,629 posts
Posted: Thursday, March 24, 2016 - 11:59 PM UTC
Wow, I might even get it finished in time! Just started detail painting, am relatively happy how the worn OPFOR cam turned out. Next time I'll airbrush the hairspray layer as it seems to spray out rather grainy from the can, which results in the grainy look when the top layer of paint is worn through. Looks like I have a few tide marks to take care of too! Have a week off for Easter break now, so no excuses not to finish!

Cheers,
Jim


bwiber
Visit this Community
Washington, United States
Joined: August 03, 2008
KitMaker: 436 posts
Armorama: 320 posts
Posted: Monday, March 28, 2016 - 01:36 AM UTC
A bit of paint, lots of thinned Gator's Grip Glue, small animal dust (yes, you read that right) and a bit more paint and we are here.....


The small animal dust was used to make the non-slip surfaces. I used the Gator's Grip Glue to secure it, is a very popular glue among ship modelers. I like that it is water based so I can thin it, and even speed up the cure time with a blow drier....

Now I just need to work on each of the parts to finish them up, glue it all together and do what weathering I am going to do... and it will be ready for the gallery. Of course, that won't be anytime soon.... still lots of little things to do...

Bob
dexter059
Visit this Community
Region de Valparaiso, Chile
Joined: July 28, 2005
KitMaker: 1,569 posts
Armorama: 1,385 posts
Posted: Monday, March 28, 2016 - 04:56 AM UTC
Awaome job on that dutch BARV Bob congrats!!!

Moving on my Leo, almoat finished the hull with new grilles, plus getting ready the mud fenders. Also added the tracks and running gear just to see it placed, will be painted separately and the side skirts will be added after weathering the undersides. The separate links will be used for another project.

Before cutting upper hull


Current status


And a picture of my workbench where everything is


Happy modelling

Cheers
olivepython
Visit this Community
Western Australia, Australia
Joined: January 10, 2014
KitMaker: 43 posts
Armorama: 18 posts
Posted: Monday, March 28, 2016 - 10:56 AM UTC
I have to say, everyone's Leopards are looking great! Loving the BARV!
Progress so far on my Pre Production Gepard. Most of the sub assemblies (tracking radar, search radar, gun ect.) have just been placed in position for this pic and arent actually attached.


The battery hatches were a bit of a bother! OOB they sit on top of the hull, but they should sit flush with a small gap around the outside, so with a bit of chain drilling and a lot of filing the holes were cut, and a bed for the hatches to sit on was cut from styrene sheet. I also scratch built the tow cable brackets as the eduard PE ones seemed a little thin.