Leopardmania 50 replacement campaign
Nova Scotia, Canada
Joined: February 07, 2015
KitMaker: 58 posts
Armorama: 27 posts
Posted: Monday, February 08, 2016 - 06:15 AM UTC
Hi Everybody

I've just signed up with Takom's C2 MEXAS. I'm building it straight from the box with no aftermarket parts.
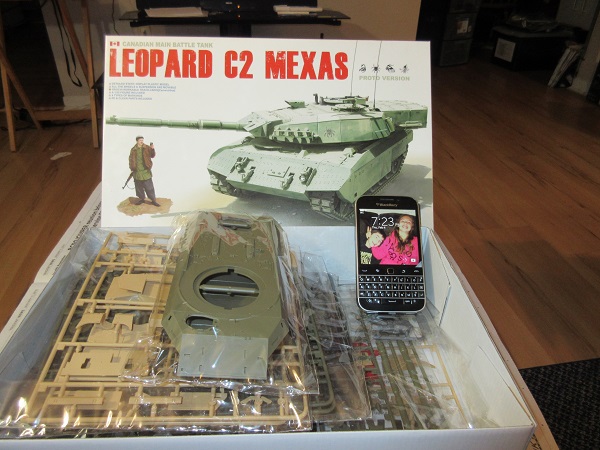
I've got a start on the hull and it looks like its going to be a fun build.
Ron
European Union
Joined: August 09, 2009
KitMaker: 1,732 posts
Armorama: 326 posts
Posted: Monday, February 08, 2016 - 09:37 PM UTC
Here's another small update from me. Yesterday evening I finished assembling the upper hull and the turret ....


.... this is just a dry fit test ....


.... if I remember correctly, this form is from 1979 and the fitting is next to perfect. No major issue yet. Next step will be the primer and afterwards Gelboliv RAL 6014 (Revell No. 42). I should be ready with the major painting this weekend.
Torsten

My campaigns for 2020:
MiGs - Done !
The Big Three - Done !
65 years Bundeswehr - Done !
40 years Leopard 2 - Done !
Land Lease - Done !
Washington, United States
Joined: August 03, 2008
KitMaker: 436 posts
Armorama: 320 posts
Posted: Tuesday, February 09, 2016 - 08:28 AM UTC
Hi all,
Well, things have progressed a bit on the BARV.... Have the running gear as done as I can without paint. Speaking of that, any suggestions for the paint color to use? My experience is mostly WWII German, but I don't think DAK Yellow will do it on this build...

Leopard Club road wheels waiting for color and to be mounted...

Frame for the section of the work platform on the side of the hull. The brass wire will be covered so that it doesn't show up, but I think the strength is needed.

There is a stiffening plastic on the back of the thin strip which also gives the PE a ledge to sit on. It is notched at the brass rods to allow it all to go together as it should. Which results in this....

Need to finish up the framing at the end closest to the camera and then move to the other side.Just hope that I don't have to order any more as it takes a while to cross the Atlantic...
Later,
Bob
European Union
Joined: August 09, 2009
KitMaker: 1,732 posts
Armorama: 326 posts
Posted: Saturday, February 13, 2016 - 04:37 PM UTC
My update for this week ....

No, it's not UN and no winter exercise, it's just white primer ....


.... Friday evening was airbrush time. RAL 6014 Gelboliv all over with Revell 42 ....


.... and another test fitting for fun ....

.... now comes the detail painting and assembling the machine gun and rear view mirror, which I want in a "laid down" position. With a little weathering with pastel chalk this Leo should be ready to roar by the end of next week ....

Torsten

My campaigns for 2020:
MiGs - Done !
The Big Three - Done !
65 years Bundeswehr - Done !
40 years Leopard 2 - Done !
Land Lease - Done !
Alberta, Canada
Joined: December 30, 2002
KitMaker: 306 posts
Armorama: 295 posts
Posted: Sunday, February 14, 2016 - 01:45 AM UTC
Looking good guys I've been meaning to update but I have some stuff going on and work prevents me. I will update as soon a I am able.
Illinois, United States
Joined: November 03, 2013
KitMaker: 77 posts
Armorama: 76 posts
Posted: Sunday, February 14, 2016 - 09:45 AM UTC
I'm in. I picked up a Meng Leopard A3/A4 off the Squadron sale. (been meaning to pick up a Meng kit)


#041
Kobenhavn, Denmark
Joined: July 20, 2006
KitMaker: 10,069 posts
Armorama: 4,677 posts
Posted: Tuesday, February 16, 2016 - 03:03 AM UTC
Some great builds in this tread.
I am considering the Gepard for this campaign. Would this be alright? I assume so, since it uses the leopard chassis?
Campaign'oholic - 252+ campaigns completed
Washington, United States
Joined: August 03, 2008
KitMaker: 436 posts
Armorama: 320 posts
Posted: Tuesday, February 16, 2016 - 03:16 AM UTC
Well, the build has moved ahead a bit more.... I finally got the work deck frame in place.... It was an interesting build, and one that I thought that this would be the hardest part to install.....

That is the front of the work deck where it goes in front of the cabin. The funny thing is that once I got it cut to size along the sides and propped up so that it was level it glued in place with no issues. It even stayed level with only 2 contact points! This is a major hurtle out of the way.... and it gives this....

Yes, I know that there is a small part of the side rail missing. It fell off when I was installing the nose piece, Nice thing is that the supports are braced with brass wire so they are really rigid, and that is a good thing.

Just another view of the front frame... the nice thing is that the push assembly will just slide in place under the work deck. Gee, it all works like is was designed this way.....


The front rail is very rigid now that the supports are in place. They were the hardest part of the build to put into place so far!
Well, I suppose I can start working on putting the actual decking in place....
Later....
England - South East, United Kingdom
Joined: December 16, 2007
KitMaker: 559 posts
Armorama: 517 posts
Posted: Tuesday, February 16, 2016 - 11:53 AM UTC
Quoted Text
Some great builds in this tread.
I am considering the Gepard for this campaign. Would this be alright? I assume so, since it uses the leopard chassis?
Yes, of course. Any version of any Leopard 1 apart from WOTIFs. Gepard is perfect.
Apparently the new Takom Gepard will be released in March.
All the best
Michael Shackleton
Leopard Workshop, Trackpad Publishing and Scorpion Miniature Models
Washington, United States
Joined: August 03, 2008
KitMaker: 436 posts
Armorama: 320 posts
Posted: Thursday, February 18, 2016 - 10:26 AM UTC
Played for a while, well a couple days, and finally got the work deck in place. That was the one part of the model that really had me worried, and for the most part it wasn't as bad as I figured it would be. Is it perfect? Not in the least, but it is adequate....


The cabin even slides in and locks into place with no issues, the push assembly slides into place and it looks the part. So I am happy....
A few final details on the work deck and then I pick an end and start working to the other end doing the missing details, etc.
Later.....
Alberta, Canada
Joined: January 19, 2005
KitMaker: 4,085 posts
Armorama: 3,917 posts
Posted: Thursday, February 18, 2016 - 10:31 AM UTC
That's some tricky looking framework Bob. Really quality work.
"We're not the public service of Canada, we're not just another department. We are the Canadian Forces, and our job is to be able to kill people."
July 2005- General R.J. Hillier (Retired), Former Chief of the Defence Staff
England - South East, United Kingdom
Joined: December 16, 2007
KitMaker: 559 posts
Armorama: 517 posts
Posted: Thursday, February 18, 2016 - 12:58 PM UTC
All the best
Michael Shackleton
Leopard Workshop, Trackpad Publishing and Scorpion Miniature Models
Washington, United States
Joined: August 03, 2008
KitMaker: 436 posts
Armorama: 320 posts
Posted: Thursday, February 18, 2016 - 10:55 PM UTC
Jason, Michael.....
Thanks for the comments, definitely helps to keep this build moving forward. Although I think it has crossed the peak and now is on the downhill slide to completion... I hope so anyway.
I do have a question.... about the color. Not sure what color to use on it. I am leaning towards the green that Jason used for his Leopard 1A2... would this be in the ballpark? Any suggestions would be helpful.
I have ordered some Vallejo - Acrylic-Polyurethane US Olive Drab Surface Primer as my experience with using rattle cans is not to good... I tend to be heavy handed and want to see color NOW!!!
Thanks again,
Bob
England - South East, United Kingdom
Joined: December 16, 2007
KitMaker: 559 posts
Armorama: 517 posts
Posted: Thursday, February 18, 2016 - 11:09 PM UTC
Hi Bob
Looking at the photos we both have, when the BARVs were introduced they seemed to be Olive Drab, or at least a brownish shade of green. I have photos of the one I saw back in 2001 which has NATO Green wheels which contrast vividly with the rest of the brownish green vehicle.
However, in later pics they all seem to be NATO Green or thereabouts.
All the best
Michael Shackleton
Leopard Workshop, Trackpad Publishing and Scorpion Miniature Models
Washington, United States
Joined: August 03, 2008
KitMaker: 436 posts
Armorama: 320 posts
Posted: Thursday, February 18, 2016 - 11:22 PM UTC
Quoted Text
Hi Bob
Looking at the photos we both have, when the BARVs were introduced they seemed to be Olive Drab, or at least a brownish shade of green. I have photos of the one I saw back in 2001 which has NATO Green wheels which contrast vividly with the rest of the brownish green vehicle.
However, in later pics they all seem to be NATO Green or thereabouts.
Michael, thanks for the information. Will be going for the earlier paint job as that is the version of Hercules I am trying to model.
Later,
Bob
SgtRam
 Contributing Writer
#197
Ontario, Canada
Joined: March 06, 2011
KitMaker: 3,971 posts
Armorama: 2,859 posts
Posted: Friday, February 19, 2016 - 08:12 AM UTC

#041
Kobenhavn, Denmark
Joined: July 20, 2006
KitMaker: 10,069 posts
Armorama: 4,677 posts
Posted: Friday, February 19, 2016 - 06:43 PM UTC
Thanks, Michael. I will dig up the Gepard in the stash then.
Kevin, great build. The foliage looks great and adds some nice contrast.
Campaign'oholic - 252+ campaigns completed
European Union
Joined: August 09, 2009
KitMaker: 1,732 posts
Armorama: 326 posts
Posted: Saturday, February 20, 2016 - 10:04 PM UTC
Looks great, Kevin! It's Canadian, right? My 1A4 is also crossing the finish line soon. This morning I sprayed Bodenglänzer (german equivalent to Future) all over for the decals. Will show photos tomorrow. Hope to finish the build within next week.
Torsten

My campaigns for 2020:
MiGs - Done !
The Big Three - Done !
65 years Bundeswehr - Done !
40 years Leopard 2 - Done !
Land Lease - Done !
Region de Valparaiso, Chile
Joined: July 28, 2005
KitMaker: 1,569 posts
Armorama: 1,385 posts
Posted: Saturday, February 20, 2016 - 11:08 PM UTC
Nice builds everyone!
I'm now on a middle of house move, so I'm not sure when I'm going to start. I'll try to start in March with a Leopard 1V, Chilean Army of course, kitbashing the new Leopard 1 from Revell, bits of old Revell Leo1A1/A1A4 (adapting the add on armour based and side skirts mainly) and a few Leopard Workshop and other aftermarket parts.
I hope to make the deadline, a lot of work to do...
Cheers

https://www.facebook.com/klauseberlmodellbau/
Uusimaa, Finland
Joined: October 22, 2012
KitMaker: 1,194 posts
Armorama: 1,077 posts
Posted: Sunday, February 21, 2016 - 12:51 AM UTC
Lots of good stuff. I'm hoping to get myself in the mix in about a month or so. At the risk of sounding slightly cheeky, if anyone is interested in a copy of the excellent Leopard Trilogy vol 1, send me a pm.
Kimmo
There is a time to laugh and a time not to laugh, and this is not one of them.
England - South East, United Kingdom
Joined: December 16, 2007
KitMaker: 559 posts
Armorama: 517 posts
Posted: Sunday, February 21, 2016 - 01:03 AM UTC
What - you don't want it??
Only joking:-)
All the best
Michael Shackleton
Leopard Workshop, Trackpad Publishing and Scorpion Miniature Models
Uusimaa, Finland
Joined: October 22, 2012
KitMaker: 1,194 posts
Armorama: 1,077 posts
Posted: Sunday, February 21, 2016 - 03:35 AM UTC
Quoted Text
What - you don't want it??
Only joking:-)
I'm loathe to part with it, the things we have to do sometimes.
Kimmo
There is a time to laugh and a time not to laugh, and this is not one of them.
European Union
Joined: August 09, 2009
KitMaker: 1,732 posts
Armorama: 326 posts
Posted: Sunday, February 21, 2016 - 09:30 PM UTC
My campaigns for 2020:
MiGs - Done !
The Big Three - Done !
65 years Bundeswehr - Done !
40 years Leopard 2 - Done !
Land Lease - Done !
European Union
Joined: August 09, 2009
KitMaker: 1,732 posts
Armorama: 326 posts
Posted: Friday, February 26, 2016 - 07:28 PM UTC
My campaigns for 2020:
MiGs - Done !
The Big Three - Done !
65 years Bundeswehr - Done !
40 years Leopard 2 - Done !
Land Lease - Done !
European Union
Joined: August 09, 2009
KitMaker: 1,732 posts
Armorama: 326 posts
Posted: Friday, February 26, 2016 - 07:42 PM UTC
No more factory fresh! After sending the tank through a dusty field (the farmer was probably not amused ...

), I declare this build finished. Later I will only add an antenna. Thanks again to Michael for sending me the snow grousers and the tow cables.
You can see some fitting problems between the upper and lower hull but on the photos it looks more dramatic than in real. Macro always kills ...


.... Hello brother! Finally a family photo with my Leopard 1A1A3 (Revell/Italeri), which I've build last year ....

First expo for my new Leo will be already next weekend. Later I will take some more proper photos and add them to the gallery. I say thanks for this great campaign and wish you all good luck for your builds.
So now, where is the Leopard 2 campaign ....?
Happy modelling!
Torsten
My campaigns for 2020:
MiGs - Done !
The Big Three - Done !
65 years Bundeswehr - Done !
40 years Leopard 2 - Done !
Land Lease - Done !










 Some went on nicely but about the half of it gave me troubles with tearing apart or sticking to the surface right where I put them first without moving. No, I was not swearing, I just spoke loud and clear ....
  Only my patience and a lot of water saved them from the bin ....


 ), I declare this build finished. Later I will only add an antenna. Thanks again to Michael for sending me the snow grousers and the tow cables.


