Campaigns: Completed Campaigns
Campaigns that are completed should be grouped here.
Hosted by Richard S.
Leopardmania 50 replacement campaign
mshackleton
Visit this Community
England - South East, United Kingdom
Joined: December 16, 2007
KitMaker: 559 posts
Armorama: 517 posts
Posted: Friday, December 18, 2015 - 05:00 PM UTC

Quoted Text

@Mike, how does the detail quality compare to the venerable Italeri kit? I haven't seen the new one in person yet.


There are two reviews here:
http://leopardclub.ca/reviews/Revell/Leopard_1_03240/KO/
http://leopardclub.ca/reviews/Revell/Leopard_1_03240/Schulz/

Compared to the old Italeri: I would say the new Revell is better apart from the running gear which is a step backwards, though Italeri wasn't perfect.
leopard_cub
Visit this Community
Bayern, Germany
Joined: December 02, 2015
KitMaker: 4 posts
Armorama: 4 posts
Posted: Friday, December 18, 2015 - 10:14 PM UTC
As per Michael's request, this is my opening post for the 1/35 Gepard by Tamiya. It will also include several spare parts from the old Italeri/Revell Leopard, the HKCW tracks (which are almost finished by now) and finally the PE set by Eduard.


What happened so far is: building the road wheels and fitting the tail box. For the latter, I decided not to change the arrangement of the stowage box hatches but what I did was to "sink" the battery hatches down to level with the upper plate:


Let's see what the holidays will bring.

Florian
bwiber
Visit this Community
Washington, United States
Joined: August 03, 2008
KitMaker: 436 posts
Armorama: 320 posts
Posted: Friday, December 18, 2015 - 10:59 PM UTC

Quoted Text


Hi Bob. Your project is coming along nicely. You could all four of them at this rate:-) Does your wife know that you are using her chopping board?


Michael..... Actually, I have not been looking to build another of the Dutch BARVS. I have been eying the Hippo actually... at least if I do that I have the excellent drawings in your book to use.

Bob
SgtRam
Staff MemberContributing Writer
AEROSCALE
#197
Visit this Community
Ontario, Canada
Joined: March 06, 2011
KitMaker: 3,971 posts
Armorama: 2,859 posts
Posted: Saturday, December 19, 2015 - 07:45 AM UTC
Alright, the bench is clearing up and time for the next build. I am building the Takom Leopard C2, and I have the Leopard Workshop barrel, antenna set, and mud guards on order. I also have the Live Resin C6 to replace the kit one.

mshackleton
Visit this Community
England - South East, United Kingdom
Joined: December 16, 2007
KitMaker: 559 posts
Armorama: 517 posts
Posted: Saturday, December 19, 2015 - 03:01 PM UTC
Welcome to the Campaign Kevin. Please don't forget to enter a start photo using the date on a mobile/computer/clock/etc in the Campaign Gallery.

As a reminder to anyone else entering, the rules (rule 9 especially) and tips of how to upload the start photo to the Campaign Gallery are at the top of the Campaign thread page 1.
SgtRam
Staff MemberContributing Writer
AEROSCALE
#197
Visit this Community
Ontario, Canada
Joined: March 06, 2011
KitMaker: 3,971 posts
Armorama: 2,859 posts
Posted: Saturday, December 19, 2015 - 07:13 PM UTC
I can upload the image to the gallery, but I don't have the image with time device, and I have now started the build. Does that disqualify me?
mshackleton
Visit this Community
England - South East, United Kingdom
Joined: December 16, 2007
KitMaker: 559 posts
Armorama: 517 posts
Posted: Saturday, December 19, 2015 - 07:28 PM UTC
Hi Kevin
Not at all. If you can take a snap with a phone - or whatever - just load it up as soon as you can. The rules say you are allowed to enter a model that is less than 50% complete, so you can carry on building in the meantime.

Unfortunately, we have to abide by Armorama's rules and I don't want to see anyone left out.
SgtRam
Staff MemberContributing Writer
AEROSCALE
#197
Visit this Community
Ontario, Canada
Joined: March 06, 2011
KitMaker: 3,971 posts
Armorama: 2,859 posts
Posted: Saturday, December 19, 2015 - 10:30 PM UTC
Here is one showing the image taken date from the camera/image information, and it is in the gallery

mshackleton
Visit this Community
England - South East, United Kingdom
Joined: December 16, 2007
KitMaker: 559 posts
Armorama: 517 posts
Posted: Saturday, December 19, 2015 - 10:43 PM UTC
Good man
ArtyG37B
Visit this Community
British Columbia, Canada
Joined: August 13, 2009
KitMaker: 420 posts
Armorama: 416 posts
Posted: Sunday, December 20, 2015 - 11:53 PM UTC
Hi everyone. here's my entry, it's going to be a Cdn rent a tank.
still need to add some detail stuff to it.


sorry for the blurry photo I didn't set up the lights so slow exposure
junglejim
Visit this Community
Alberta, Canada
Joined: February 18, 2003
KitMaker: 1,728 posts
Armorama: 1,629 posts
Posted: Tuesday, December 22, 2015 - 05:08 AM UTC
This is how my C2 is coming along with the Takom kit. First filled all the giant location slots with epoxy putty:


Used Leopard Club exhaust castings - I had assembled the lower hull and found out it would have been much easier to put them on BEFORE assembly! Also used spare Revell bins because the Takom ones are too narrow (thin):


I ended up using the kit tools, even though they are not the greatest, at least they have the proper mounts. Ultimately p.e. would be the way to go:


Some missing (or inadequate) weld beads:


Front glacis, parts are pretty good:


Rear panel. I noticed after assembly that Takom forgot the 'L'-shaped mounts for the spare track links (circled in yellow); will have to add them (Italeri got this right):


Moving on to the turret, I thought the EMES 18 doghouse looked small. Here it is on the left with an Italeri/Revell one in the middle and Legend one on the right (from the C2 MEXAS upgrade set). Think I'll go with an Italeri one:


I don't want to go all out detail on this one; it will focus more on the worn OPFOR paint scheme.

Oh yeah, my official start photo, if it works:
https://gallery.kitmaker.net/data/30157/IMAG2074_zpsr9err6ly.JPG

Cheers,
Jim
SgtRam
Staff MemberContributing Writer
AEROSCALE
#197
Visit this Community
Ontario, Canada
Joined: March 06, 2011
KitMaker: 3,971 posts
Armorama: 2,859 posts
Posted: Tuesday, December 22, 2015 - 05:18 AM UTC
I am looking to do the the paint scheme in the image, where the newer turrets were put on the older chassis. I would presume using the "textured" side skirts would be wrong? Does anyone know where I can get the standard Leopard 1 skirts that would fit the Takom kit?

SgtRam
Staff MemberContributing Writer
AEROSCALE
#197
Visit this Community
Ontario, Canada
Joined: March 06, 2011
KitMaker: 3,971 posts
Armorama: 2,859 posts
Posted: Tuesday, December 22, 2015 - 05:39 AM UTC
I was able to answer my own question, it looks like the "textured" skirts will work with this paint scheme.

LeoCmdr
Visit this Community
Alberta, Canada
Joined: January 19, 2005
KitMaker: 4,085 posts
Armorama: 3,917 posts
Posted: Tuesday, December 22, 2015 - 07:49 AM UTC

Quoted Text

I was able to answer my own question, it looks like the "textured" skirts will work with this paint scheme.


All standard Leopard side skirts have the dimpled texture. There are no smooth side skirts except for late version armoured versions. Model companies choose to or choose not to replicate it.
mshackleton
Visit this Community
England - South East, United Kingdom
Joined: December 16, 2007
KitMaker: 559 posts
Armorama: 517 posts
Posted: Tuesday, December 22, 2015 - 08:23 PM UTC
The Revell Leopard 1 progresses slowly. Since adding the Leopard Workshop Suspension Upgrade, I have now added LW Cast Exhaust Grilles (LW009). This was actually easier to do than trying to fit them to either Italeri, Meng, or Takom hulls. The only problem is that the rear lights had to be removed (to be moved inboard a little) and the outer hull edges of the hull rear plate trimmed back a touch.


As I am bulding this model, I am finding various things that could be improved - good though the basic model is. For instance, I decided I didn't like the Revell rear lights, so replacements will be found from a future LW set which will also include other improvements such a s a full set of tow cable brackets. The Revell kit has the cables in vinyl with the brackets moulded onto the cables. What a ghastly idea!!

I have also added weld beads to the hull as every one of them is missing from the Revell kit. It also has a Meng cast grating in the rear decking which will be topped with the Meng etch grille later on. The grating fits exactly after some careful cutting.


Another problem are the two front side skirt mounts on the trackguards which are the wrong pattern. At the moment I don't know how I am going to change these without destroying the treadplate pattern.
DKeu8726
Visit this Community
Denmark
Joined: December 24, 2011
KitMaker: 36 posts
Armorama: 31 posts
Posted: Wednesday, December 23, 2015 - 05:08 PM UTC
Hi
so far i hav my fotos of what im working on
on the kit maker gallery page
So my qustion is how do i get it on this page ????
mshackleton
Visit this Community
England - South East, United Kingdom
Joined: December 16, 2007
KitMaker: 559 posts
Armorama: 517 posts
Posted: Wednesday, December 23, 2015 - 06:00 PM UTC

Quoted Text

Hi
so far i hav my fotos of what im working on
on the kit maker gallery page
So my qustion is how do i get it on this page ????


It is not exactly straight-forward, but have a read through this link:
https://armorama.kitmaker.net/forums/120940&page=1

The rules (rule 9 especially) and tips of how to upload the start photo to the Campaign Gallery are at the top of the Campaign thread page 1.
DKeu8726
Visit this Community
Denmark
Joined: December 24, 2011
KitMaker: 36 posts
Armorama: 31 posts
Posted: Wednesday, December 23, 2015 - 06:40 PM UTC
Hi
Excuse me
but i can get my picturs easier on my facebook page
and on my mail.
It makes no sens that it hav to be don this way.
So my picturs of what im working on,gets on my Kit gallery page
And thats it.
Hopefully som day it will be easier.
mshackleton
Visit this Community
England - South East, United Kingdom
Joined: December 16, 2007
KitMaker: 559 posts
Armorama: 517 posts
Posted: Wednesday, December 23, 2015 - 07:12 PM UTC
What is your Kit Gallery address?

If FaceBook is what you prefer, there is a Leoparmania Facebook page here: https://www.facebook.com/groups/798668223575193/
DKeu8726
Visit this Community
Denmark
Joined: December 24, 2011
KitMaker: 36 posts
Armorama: 31 posts
Posted: Wednesday, December 23, 2015 - 08:14 PM UTC
Hi
These to.i think.

https://gallery.kitmaker.net/showgallery.php/ppuser/48382/cat/500

https://gallery.kitmaker.net/showgallery.php/cat/30186
jet
Visit this Community
Alberta, Canada
Joined: December 30, 2002
KitMaker: 306 posts
Armorama: 295 posts
Posted: Thursday, December 24, 2015 - 04:34 AM UTC
Good to see the updates fellas. I've been working on reconditioning an old electric guitar of late and started a Saturn V Revell kit, but I can post something so far.
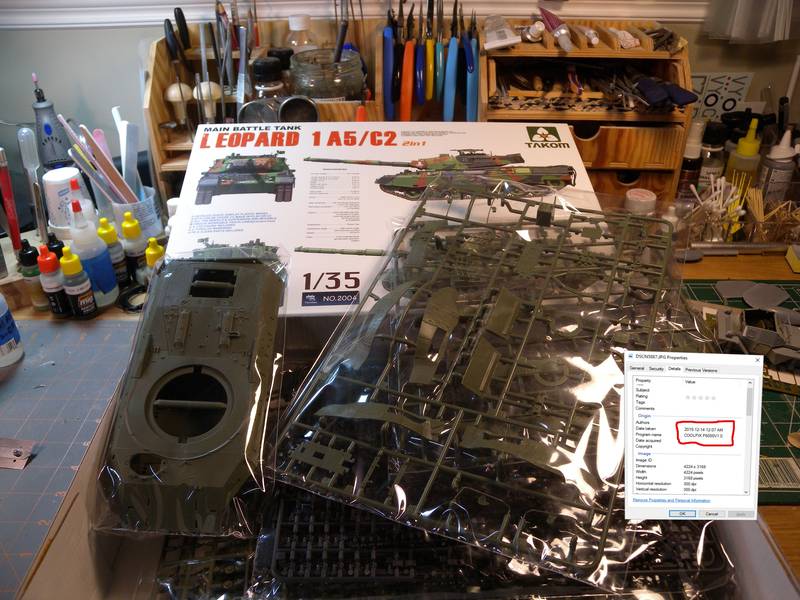
I seem to be getting into the minutia of how the Leopard is put together, and while that can tend to get things bogged down, I'm more interested in getting to really know this tank than get something done quickly.

So starting off a few weeks ago I decided to use the Meng screen in conjunction with the under-screen with the oval cut-outs from the Tetra PE set. I have the Eduard set and their screen is not up to snuff.


In doing this I felt some work was needed to make the screen fit better as the Italeri opening is a little smallish, (but not by much). So I ripped out the fan thing, (needless to say in hind sight would have better to have done all this before gluing the top to the bottom!)


I usually like solder brass parts together rather than using CA glue, so I carefully attached these two parts together. Then, looking at reference photos of the back deck it seemed to me that the four corners of this screen area was not as accurate as it could be, the thickness of the frames and I really want to make the two longer rectangular spots 3 dimensional as they are in real life. The way these are portrayed in the Italeri kit, as well as other kits, they are kinda just solid pieces. There is a rod of some sort that goes from one side to the other. Some kind of lifting lug? The corner square area don't appear as deep as they need to be as well.


Also it can be seen once the MENG screen is in place the round filler port above the screen is too close to the screen.
This will have to be cut out and moved.


SgtRam
Staff MemberContributing Writer
AEROSCALE
#197
Visit this Community
Ontario, Canada
Joined: March 06, 2011
KitMaker: 3,971 posts
Armorama: 2,859 posts
Posted: Saturday, December 26, 2015 - 07:46 AM UTC
Sitting here on Boxing Day night, doing a little work. The lower hull almost complete, then I thought the molded on tie downs looks a little silly, so why not shave them off and replace them with wire.


For the barrel, I stepped away from my standard replacement barrel, PSM, and decided to try the Leopard Workshop barrel. I am not all that pleased with the casting detail, in my opinion, the casting is a little soft. I must admit I find the PSM barrel much better cast, with cleaner details.


Work on the turret is ongoing, will have some pics up soon.
mshackleton
Visit this Community
England - South East, United Kingdom
Joined: December 16, 2007
KitMaker: 559 posts
Armorama: 517 posts
Posted: Saturday, December 26, 2015 - 02:48 PM UTC

Quoted Text

I am not all that pleased with the casting detail, in my opinion, the casting is a little soft. I must admit I find the PSM barrel much better cast, with cleaner details


If you compare the PSM barrel with photos of the real thing thing, I think you will find several inaccuracies which jump out at you. It also does not depict the Canadian sleeve.
jet
Visit this Community
Alberta, Canada
Joined: December 30, 2002
KitMaker: 306 posts
Armorama: 295 posts
Posted: Saturday, December 26, 2015 - 10:37 PM UTC
Just wondering does anybody happen to have any clear photos and/or drawings about these corner pieces on the engine deck
junglejim
Visit this Community
Alberta, Canada
Joined: February 18, 2003
KitMaker: 1,728 posts
Armorama: 1,629 posts
Posted: Sunday, December 27, 2015 - 12:12 AM UTC
Best-ish ones I could find for now:


And of course Dan's pics on Prime Portal

Cheers!
Jim