Campaigns: Completed Campaigns
Campaigns that are completed should be grouped here.
Hosted by Richard S.
Leopardmania 50 replacement campaign
bwiber
Visit this Community
Washington, United States
Joined: August 03, 2008
KitMaker: 436 posts
Armorama: 320 posts
Posted: Tuesday, January 05, 2016 - 01:31 AM UTC
Some amazing builds going on here. One thing I love about campaigns is the stuff you learn about both the vehicles and modeling from watching others working on the same vehicle. I know I am learning a lot.... and am amazed at the quality of the builds...... Carry on!


After the roof I decided that I needed to work on the push assembly on the nose of the vehicle. After all, that is the main reason for the vehicle and if I can't get it put together then the entire model is kind of a lost cause. So, with those stirring words of encouragement ringing in my ears I proceeded....


A lot of bits and pieces of plastic and some Bondo later I ended up with the actual push bumper mounted on a plate. Next comes the part where I try to assemble the various arms that hold it in place, try to keep it at the right elevation and try to maintain its vertical alignment. Of course, a jig just might come in handy at this point....


I taped the model down on an alignment jig I made for a Leopard C2 I have in progress, and built up a stack of stuff to hold the push bumper in place. As you can see the first of the arms have been glued on and they actually do match up with the lower hull. ::)


As you can see it is definitely vertical! Even have the remaining lower arms in place.


The vertical support plates on the rear of the push assembly are in place. I am going to try and assemble this so that it is free of the hull for now.... not sure I want to reach in among the various bits to do painting.

Oh, notice the red on the nose of the cab? I had it built right. Had a brain fart and cut off a section. Later on I figured out it had to be there. Found the cut off part in a pile of stuff on my modeling desk. Glued it back on and puttied it. Hurrah for keeping a messy desk..... although it is odd, I have an area of 2 foot by 2 foot and after 10 minutes I am modeling in an area just big enough for the model part I am working on. :-/

One thing that I am finding amazing with this vehicle are the amount of changes. There are 4 of these that I know of (Hercules, Samson, Goliath and Titan) and each one is a bit different. Not only that but they change over time.... so I am building an early version of Hercules, the later version has 5 push blocks rather than the 3 shown as well as other modifications.

Bob
mshackleton
Visit this Community
England - South East, United Kingdom
Joined: December 16, 2007
KitMaker: 559 posts
Armorama: 517 posts
Posted: Tuesday, January 05, 2016 - 02:12 AM UTC

Quoted Text

I needed to complete the rear light setups. These will utilize the Resin lenses from KP for the Leopard 1.


Hi Jet
Tell us more about KP lenses please. I have never heard of them.
LeoCmdr
Visit this Community
Alberta, Canada
Joined: January 19, 2005
KitMaker: 4,085 posts
Armorama: 3,917 posts
Posted: Tuesday, January 05, 2016 - 03:33 AM UTC

Quoted Text


Quoted Text

I needed to complete the rear light setups. These will utilize the Resin lenses from KP for the Leopard 1.


Hi Jet
Tell us more about KP lenses please. I have never heard of them.


Aren't those SKP Model Leopard 1 lenses?

http://www.skpmodel.eu/product.php?id_product=238
jet
Visit this Community
Alberta, Canada
Joined: December 30, 2002
KitMaker: 306 posts
Armorama: 295 posts
Posted: Tuesday, January 05, 2016 - 03:51 AM UTC
Typo -of course I meant skp
mshackleton
Visit this Community
England - South East, United Kingdom
Joined: December 16, 2007
KitMaker: 559 posts
Armorama: 517 posts
Posted: Tuesday, January 05, 2016 - 04:19 AM UTC
Of course - silly me.
jet
Visit this Community
Alberta, Canada
Joined: December 30, 2002
KitMaker: 306 posts
Armorama: 295 posts
Posted: Tuesday, January 05, 2016 - 04:29 AM UTC

Quoted Text

Of course - silly me.


Thanks for noticing, would not want to give readers a bum steer.
jet
Visit this Community
Alberta, Canada
Joined: December 30, 2002
KitMaker: 306 posts
Armorama: 295 posts
Posted: Tuesday, January 05, 2016 - 08:28 AM UTC
So now I started looking at the rear tool box. The one that is included with the kit is rather basic and the handle on the top should standoff the surface, not lie flat as this one does. I was hoping to maybe display the tool box open, and was looking at the various after market sets to see which would best suit that. And it maybe the ET Models one. But they all have good points and less good points. I have the one from Voyager, which is basically the same size as the Italeri box, perhaps a little undersize. The Tetra one is the one I've decided to use on this build. I kinda screwed up, folding the rim inward rather than outward, which is meant to represent the metal mounting plate. No biggie, as I would need to remove it in any event if I display it open. I'll have to scratch the mounting dealeeo.
The Tetra instructions call for a piece of plastic rod 1 mm diameter. I used a brass rod that was 1.12 mm. It looks thick. May remove and replace at some point with a smaller diameter piece.


This grouping with the Tetra box

So I am basically at a point with the back that I feel I can start on the interior. (Don't wanna add more stuff yet as it may get damaged with the handling ala the suspension arms!
jet
Visit this Community
Alberta, Canada
Joined: December 30, 2002
KitMaker: 306 posts
Armorama: 295 posts
Posted: Wednesday, January 06, 2016 - 07:58 AM UTC
So,next the Perfect Scale Modellbau engine bay resin parts.
On receiving this kit it was a real kick, and it is fairly good when compared to the real thing, but sadly after the initial rush of Wow Cool, I started to notice that there is room for improvement. For example there are some unsightly air bubbles here and there, and the surface of the back wall floor and front piece have a weird texture, whereas the real armour is smooth. Some of the parts are simplified, such as the calipers on the brake drums and also some details are missing like the half shells under the exhaust. I am toying with the idea of using this kit as a guide to scratching something a little more polished and comprehensive? But perhaps that might be biting off a pretty big chunk of work!

In any case here's a look at the parts in my kit. The back wall

the floor

front


Fuel tanks

brake parts

some of the PE parts


I've cut out the exhaust housing PE parts and soldered them together. Looking at some photos this is a bit simplified at the top. More on that later.
The exhaust thing (don't know the name of it sorry) is pretty cool.


test fit


Konigwolf
Visit this Community
Tasmania, Australia
Joined: November 06, 2009
KitMaker: 368 posts
Armorama: 321 posts
Posted: Friday, January 15, 2016 - 06:10 AM UTC
Some very nice work going on here, but I must withdraw my enrolment in this campaign. Keep on with the great work guys.
jet
Visit this Community
Alberta, Canada
Joined: December 30, 2002
KitMaker: 306 posts
Armorama: 295 posts
Posted: Friday, January 15, 2016 - 07:24 AM UTC
From the look of this thread you may not be the only one
Panzerkampf
Visit this Community
Colorado, United States
Joined: September 09, 2015
KitMaker: 1 posts
Armorama: 1 posts
Posted: Friday, January 15, 2016 - 07:45 AM UTC
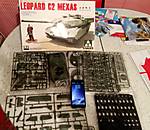
Joining in on this late. Just picked up my Leopard C2 MEXAS kit. Looking forward to getting it together and detailed. Here is a picture of it unboxed.


This is my second armor kit that I have built. The last was a Somua S35 that I am still working on, but it is in storage for now while we move. I could not resist the urge to build something else.


Thanks,
Chris
recceboy
Visit this Community
Alberta, Canada
Joined: July 20, 2006
KitMaker: 706 posts
Armorama: 665 posts
Posted: Friday, January 15, 2016 - 08:59 AM UTC
Chris

Careful with the instructions & markings with that C2 MEXAS kit, there are issues and incorrect information, if you need any help feel free to message me and will help you out to get it just right.

Cheers

Anthony
mshackleton
Visit this Community
England - South East, United Kingdom
Joined: December 16, 2007
KitMaker: 559 posts
Armorama: 517 posts
Posted: Friday, January 15, 2016 - 10:18 PM UTC
Both of my Campaign entries now have wheels!!

junglejim
Visit this Community
Alberta, Canada
Joined: February 18, 2003
KitMaker: 1,728 posts
Armorama: 1,629 posts
Posted: Saturday, January 16, 2016 - 11:17 AM UTC
We shall Persevere! Progress on the Takom lower hull. Added the lower mounts for engineering equipment which Takom missed:


Added the no-slip patches, beefed up the front lower glacis plate on top and added the inner strips by the mud guards. Also conduits for the marker lights(?) and the two posts for the turret plugs. Lift lug welds beefed up too.


Added weld beads and missing spare track link supports to the rear plate:


Been working on the tracks most of the day today, they are the Orochi links in the kit, my method was to assemble 10 links at a time; first by joining them with 9 guide teeth, then snipping off a section of 9 end connectors. Slip the end connectors on one side, then do the other. Then with a new blade, slice off the soft sprue connections.


Turret is pretty well done, need to snap some pics tomorrow!

Jim
BlackWidow
Visit this Community
European Union
Joined: August 09, 2009
KitMaker: 1,732 posts
Armorama: 326 posts
Posted: Saturday, January 16, 2016 - 09:30 PM UTC
I've spent the days around New Years Eve in beautiful Latvia, so I started in early January with my campaign build. Here are some WIP photos of my Tamiya 1A4 ....

Some primer on the lower hull and wheels ....


....and some paint with Revell 42 Gelboliv, which comes close to RAL 6014 ....


Still a long way to go and I still have one of the Focke-Wulfs lying on the bench. So slow progress, next week follows another update.

Torsten
Cam
#275
Visit this Community
Alberta, Canada
Joined: March 01, 2006
KitMaker: 174 posts
Armorama: 141 posts
Posted: Monday, January 18, 2016 - 04:01 AM UTC
Late as usual. I was going to do a Leopard C1 but there are some molding issues on my old Italeri kit so instead I am in with a Takom C2.
BlackWidow
Visit this Community
European Union
Joined: August 09, 2009
KitMaker: 1,732 posts
Armorama: 326 posts
Posted: Saturday, January 23, 2016 - 04:48 PM UTC
Another small update from me and what I did this week
Road wheels and drive sprockets are on. No glue was needed, they are held by small poly cabs ....


.... a bit of diligent work, 336 rubbers are painted by hand with Anthracite No. 9 from Revell ...

.... and glued with cyanacrylate glue, pressed together with a clamp for a few minutes ....

.... idler wheels, all return rollers and tracks are on. Some minor paint work still has to be done but this part of the build is finished ....


Now I start with the upper hull and turret. Next update soon, so stay tuned.

Torsten
SgtRam
Staff MemberContributing Writer
AEROSCALE
#197
Visit this Community
Ontario, Canada
Joined: March 06, 2011
KitMaker: 3,971 posts
Armorama: 2,859 posts
Posted: Sunday, January 24, 2016 - 05:14 AM UTC
Paint added to the C2, weathering coming up.


junglejim
Visit this Community
Alberta, Canada
Joined: February 18, 2003
KitMaker: 1,728 posts
Armorama: 1,629 posts
Posted: Sunday, January 24, 2016 - 08:53 AM UTC
Ready for paint I think, just have to get the Leopard Club road wheels on the left side. They require a 3mm spacer of tube on the axles so they will be spaced out far enough that the track is even with the sprocket center. I've primed the anti-skid areas in the hopes that the hairspray technique will show the worn through camo colours. The kit tracks made by Orochi are pretty good IMO.


Cheers,
Jim
jet
Visit this Community
Alberta, Canada
Joined: December 30, 2002
KitMaker: 306 posts
Armorama: 295 posts
Posted: Tuesday, January 26, 2016 - 07:51 AM UTC
Nice work you guys, good to see these progress reports! Wish I could add mine but things here at the ranch have been pretty busy, too busy for modelling I'm afraid. But hopefully this weekend I will get something done and upload it here. Keep us all posted!
And gotta say that Micheal guy is a real mensch got the replacement support arms in the mail today! Thanks Micheal!
jet
Visit this Community
Alberta, Canada
Joined: December 30, 2002
KitMaker: 306 posts
Armorama: 295 posts
Posted: Monday, February 01, 2016 - 08:29 AM UTC
So I successfully made a mold and cast some positives of the tow pintle, but in the end- I'm gonna redo it with the other parts added to it- this is not a full tow pintle yet. More later.


First thing I did was clean any release or other things on the resin off thoroughly and then prime it with some primer- -flat black. The paint still seemed to have problems with going on but in the end it was ok. I then sprayed a dark grey.


So then I sponged a few different greys that I have seen in references.


the floor seems to have a worn chipped Elfenbien top coat.
I replicated this using some stop out applied with small sponge like stuff.


bwiber
Visit this Community
Washington, United States
Joined: August 03, 2008
KitMaker: 436 posts
Armorama: 320 posts
Posted: Tuesday, February 02, 2016 - 06:20 AM UTC
Been watching the builds going on here and am amazed at the quality, definitely a blog to get a copy of when it is done...

As for the BARV, it has actually been moving forward so here is an actual update....


Once again the cabin and roof have been revised. As you can see the brass rod has been replaced with plastic... much easier to work with. I have also made the window surrounds and mounted semi-transparent blue plastic as window glass. I wasted to much time going in circles trying to figure out the interior and decided to just give it up on this one. The color of the blue is wrong but the windows are tinted so I am going with artistic license.

It is still sitting on the balsam platform so things are level and the push assembly doesn't fall off. A lot of it isn't glued together so that I can get to it for painting and detailing.


Push assembly and new front of cabin. The push assembly works better in relationship to the cabin now and once the work platform is on things should start to look properly busy.


A better view of the "holey" box between the cabin and the rear trunks. (Michael... thanks for the pointer to the perforated PE, it worked beautifully.)

Also, the front of the two rear trunks now has its louvers on top. When I built this originally 8-9 years ago I didn't plan for the louvers so I ended up cutting off the top of the trunk, adding a platform, gluing the louvers on top of that, sanding them flat to the surface of the trunk, and finally wrapping the entire thing in 5 thou plastic sheet. It was either that or remake the trunk..... I have had enough remakes for the moment (See the cabin for example).


The rear plate modifications and rear trunk. These were part of the original build at this vehicle... rear light boxes, rear camera box, conduits, etc. Not bad considering it was built in a motel room...

Anyway, I still have to build the work deck, install the Leopard Club road wheels, and go over the model adding all the details that I haven't added so far.... and then paint can fly.

Later,
Bob

jet
Visit this Community
Alberta, Canada
Joined: December 30, 2002
KitMaker: 306 posts
Armorama: 295 posts
Posted: Tuesday, February 02, 2016 - 07:55 AM UTC
That's some strong scratch work there Bob.

Next for my build I glued the circular PE part that surrounds the brake. This was slightly off center to accommodate the resin wall parts, but won't be noticeable compared to the outside in the final work.


Then I painted all the cast on details like tubes and such before then proceeding to glue everything together in the hull.
One of the brake drum assembly parts was also attached


Gave the fuel tanks a coat of Mr Hobby Aluminum.


These are just friction fit. These and the whole area will receive some nice grubby oily aging before its all done. I was thinking of maybe using this resin update to make a more accurate version myself but have decided to build this OOTB for now- maybe somewhere down the line I can try to do my own scratch engine bay.


mshackleton
Visit this Community
England - South East, United Kingdom
Joined: December 16, 2007
KitMaker: 559 posts
Armorama: 517 posts
Posted: Tuesday, February 02, 2016 - 03:03 PM UTC
Bob, James. Both projects are looking really good!! Keep up the great work.
Thudius
Visit this Community
Uusimaa, Finland
Joined: October 22, 2012
KitMaker: 1,194 posts
Armorama: 1,077 posts
Posted: Tuesday, February 02, 2016 - 05:16 PM UTC
Some nice work going on. We'll have to see if I can actually get in on the action or not, right now it's not looking too good though.

Kimmo