

Wow Joseph!
That looks great. Night and day from the spray to the oil wash. I'm also a novice at the airbrush, but next time, I'll have to look at going that route myself.
Kind of feels Russian to me too. Not a crisp camo pattern, but rugged and effective. Really great.
Campaigns: Active Campaigns
Campaigns that are either in planning or underway should be grouped here.
Campaigns that are either in planning or underway should be grouped here.
Hosted by Richard S.
Trumpeter Mk.II Campaign

steve-o

Joined: February 05, 2004
KitMaker: 545 posts
Armorama: 295 posts

Posted: Wednesday, August 24, 2016 - 10:18 PM UTC
SGTJKJ

#041

Joined: July 20, 2006
KitMaker: 10,069 posts
Armorama: 4,677 posts

Posted: Wednesday, August 24, 2016 - 11:04 PM UTC
Nice builds, guys. That is some really cool looking and varied kits.
Thanks for participating.
Thanks for participating.


Hudson29

#460
Joined: September 16, 2014
KitMaker: 1,156 posts
Armorama: 1,024 posts
Posted: Thursday, August 25, 2016 - 01:57 AM UTC
Tat - Great work on your little assault gun. The French origins are obvious. What tracks did you use? The sag looks good.
Joseph - I have to agree that the oils toned down the paint nicely and the whole thing looks more realistic for it. Your getting there quickly!
Joseph - I have to agree that the oils toned down the paint nicely and the whole thing looks more realistic for it. Your getting there quickly!

tatbaqui
#040

Joined: May 06, 2007
KitMaker: 2,713 posts
Armorama: 2,451 posts

Posted: Thursday, August 25, 2016 - 05:06 AM UTC
Thanks Joseph, Paul.
Joseph, your oil weathering indeed toned done the base color as Paul stated. Didn't realize your BTR was braille till I read thru it. I've just started using oils as weathering medium as well and have been quite happy with the results. For this build I've tried to shy away from a heavily stained / darkened finish that my builds usually turn into. It came out a bit clean for my standards but I decided to stop and stick with it. Still need more practice to get that balance.
Paul, the kit-supplied vinyl tracks needed to be cut to size.
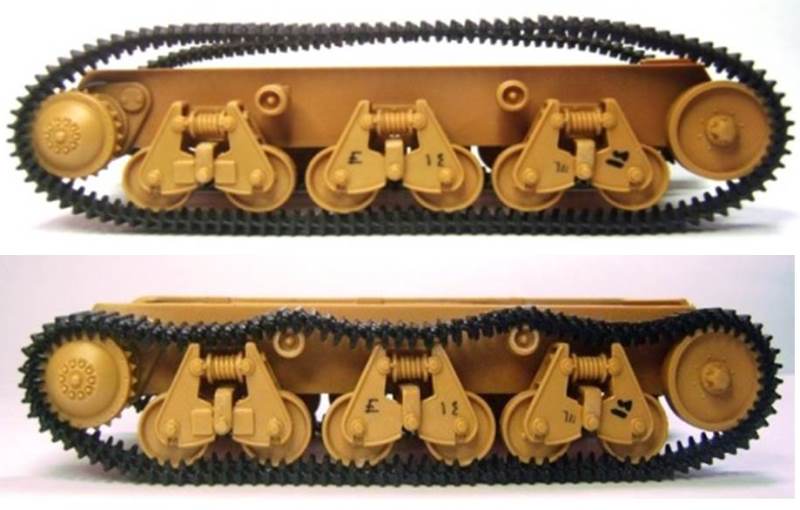
As it would also take some effort to do the sag, I went for the Hobby Boss individual link tracks -- had no issues with it. Looking back the sag turned out a bit contrived though, anyways that's that
Cheers,
Tat
Joseph, your oil weathering indeed toned done the base color as Paul stated. Didn't realize your BTR was braille till I read thru it. I've just started using oils as weathering medium as well and have been quite happy with the results. For this build I've tried to shy away from a heavily stained / darkened finish that my builds usually turn into. It came out a bit clean for my standards but I decided to stop and stick with it. Still need more practice to get that balance.
Paul, the kit-supplied vinyl tracks needed to be cut to size.
As it would also take some effort to do the sag, I went for the Hobby Boss individual link tracks -- had no issues with it. Looking back the sag turned out a bit contrived though, anyways that's that
Cheers,
Tat
Hudson29
#460
Joined: September 16, 2014
KitMaker: 1,156 posts
Armorama: 1,024 posts
Posted: Thursday, August 25, 2016 - 05:42 AM UTC
Track sag is another of those judgement issues. Sometimes I see a model and think it is overdone and then see a photo that shows the tracks really were that loose on a service vehicle at times.
I sometimes find it difficult to figure just how many links will be needed ahead of time. I recently built a set of Fruils for the Dragon T-34/85 and got them dead nuts right in a number of trial fittings. Only then did I glue the idler wheels in place.
When the time came to fit the tracks they turned out slightly tight, still well within the amount of sag shown in pictures but tighter than I expected after the trial fittings. I think the difference was not in the position fore & aft of the wheels but in the slop of the axles that squared up with glue.
The model looks fine (I'll have pictures up on Unfinished Business later on) but it was yet another lesson in the wide arena of unexpected results.

Martinvidas

Joined: February 13, 2011
KitMaker: 322 posts
Armorama: 300 posts

Posted: Thursday, August 25, 2016 - 08:22 PM UTC
Hard working on the turret replacing some parts with homemade brass rod


14 more to go 
14 more to go
Martinvidas
Joined: February 13, 2011
KitMaker: 322 posts
Armorama: 300 posts
Posted: Friday, August 26, 2016 - 10:30 AM UTC
Pre-Primer Time:


Martinvidas
Joined: February 13, 2011
KitMaker: 322 posts
Armorama: 300 posts
Posted: Friday, August 26, 2016 - 03:13 PM UTC
Primed finally:


terminators

Joined: February 20, 2012
KitMaker: 1,932 posts
Armorama: 1,907 posts
Posted: Friday, August 26, 2016 - 08:11 PM UTC
Last updates:


Scratchbuilt with Academy part for Blue Force Tracker antenna and two Blast Models parts for radio antenna mount


Scratchbuilt with Academy part for Blue Force Tracker antenna and two Blast Models parts for radio antenna mount

Ranger74
Joined: April 04, 2002
KitMaker: 1,290 posts
Armorama: 658 posts
Posted: Friday, August 26, 2016 - 08:53 PM UTC
Quoted Text
Hello,
My contribution to the campaign:
Need to move on -- 3 more campaign builds to finish in the next 30 days
Thanks for having me in this campaign, congrats to all finishers!
Cheers,
Tat


Tat, that is a nice little kit and you did a great job on it. Jeff
terminators
Joined: February 20, 2012
KitMaker: 1,932 posts
Armorama: 1,907 posts
Posted: Friday, August 26, 2016 - 09:38 PM UTC
Please, need to understand, I have uploaded photos of finished built on my own photo gallery, it's OK.
But they don't appears in the general gallery. Do I have to upload them here too ?
But they don't appears in the general gallery. Do I have to upload them here too ?
tatbaqui
#040
Joined: May 06, 2007
KitMaker: 2,713 posts
Armorama: 2,451 posts
Posted: Saturday, August 27, 2016 - 04:05 AM UTC
Quoted Text
Track sag is another of those judgement issues. Sometimes I see a model and think it is overdone and then see a photo that shows the tracks really were that loose on a service vehicle at times.
I sometimes find it difficult to figure just how many links will be needed ahead of time...
The "saggiest" I've seen were on T-34 / KV-1 period pics. When I started on armor I thought the extreme sag looked cool, but as I went on learned that it was not good practice in actual use. On determining the number of links, I'd use the number (if available) as a guide. Most often though, I'd just divide the total links in 2 giving me an allocation to work on per track run. I'd definitely be in trouble if the links seem to run out with still some amount of length to build
Never had that so far.Quoted Text
Tat, that is a nice little kit and you did a great job on it. Jeff
Thanks Jeff! I decided to keep it "clean" this time. Thought about putting chips and scratches -- still need to get the skills up for those
Quoted Text
Please, need to understand, I have uploaded photos of finished built on my own photo gallery, it's OK.
But they don't appears in the general gallery. Do I have to upload them here too ?
Congrats on your finish Alex! I like your treatment on the clear parts. You need to put up a couple of finished pics in the campaign gallery to be awarded the ribbon. Upload them here: https://gallery.kitmaker.net/showgallery.php/cat/30197
Cheers,
Tat
terminators
Joined: February 20, 2012
KitMaker: 1,932 posts
Armorama: 1,907 posts
Posted: Saturday, August 27, 2016 - 02:10 PM UTC
Quoted Text
Quoted TextTrack sag is another of those judgement issues. Sometimes I see a model and think it is overdone and then see a photo that shows the tracks really were that loose on a service vehicle at times.
I sometimes find it difficult to figure just how many links will be needed ahead of time...
The "saggiest" I've seen were on T-34 / KV-1 period pics. When I started on armor I thought the extreme sag looked cool, but as I went on learned that it was not good practice in actual use. On determining the number of links, I'd use the number (if available) as a guide. Most often though, I'd just divide the total links in 2 giving me an allocation to work on per track run. I'd definitely be in trouble if the links seem to run out with still some amount of length to buildQuoted TextTat, that is a nice little kit and you did a great job on it. Jeff
Thanks Jeff! I decided to keep it "clean" this time. Thought about putting chips and scratches -- still need to get the skills up for thoseQuoted TextPlease, need to understand, I have uploaded photos of finished built on my own photo gallery, it's OK.
But they don't appears in the general gallery. Do I have to upload them here too ?
Congrats on your finish Alex! I like your treatment on the clear parts. You need to put up a couple of finished pics in the campaign gallery to be awarded the ribbon. Upload them here: https://gallery.kitmaker.net/showgallery.php/cat/30197
Cheers,
Tat
Thanks Tat, congrats to you too you have done a nice model.
I try to upload my photos on the campaign gallery but a message says pics exceds my space. What can I do ?
tatbaqui
#040
Joined: May 06, 2007
KitMaker: 2,713 posts
Armorama: 2,451 posts
Posted: Saturday, August 27, 2016 - 04:33 PM UTC
Thanks Alex.
As I understand the standard allocation is 10MB per member. Subscribers to KitMaker have more, 500MB IIRC.
You'll need to delete pics to free up some space. I took a peek in your gallery and saw that the sizes of your pics are in excess of 1MB each so you also need to reduce the size of pics you upload. I use MS Office to edit pics, so resizing to say 640 x 480 pixels nets to an image size of about 160KB -- lesser pixels = lesser image size. I believe you can resize images using MS Paint as well.
Hope this helps.
Cheers,
Tat

Nito74

Joined: March 04, 2008
KitMaker: 5,386 posts
Armorama: 4,727 posts
Posted: Saturday, August 27, 2016 - 05:43 PM UTC
JS-4 updates


Finished shots:


Finished shots:
terminators
Joined: February 20, 2012
KitMaker: 1,932 posts
Armorama: 1,907 posts
Posted: Saturday, August 27, 2016 - 07:08 PM UTC
Quoted Text
Thanks Alex.
As I understand the standard allocation is 10MB per member. Subscribers to KitMaker have more, 500MB IIRC.
You'll need to delete pics to free up some space. I took a peek in your gallery and saw that the sizes of your pics are in excess of 1MB each so you also need to reduce the size of pics you upload. I use MS Office to edit pics, so resizing to say 640 x 480 pixels nets to an image size of about 160KB -- lesser pixels = lesser image size. I believe you can resize images using MS Paint as well.
Hope this helps.
Cheers,
Tat
Now it's OK photos are lighter. Thanks for your help.

TacFireGuru
Joined: December 25, 2004
KitMaker: 3,770 posts
Armorama: 2,263 posts

Posted: Sunday, August 28, 2016 - 01:33 AM UTC
The D-30 is done.


Mike
p.s. Base will be done later.


Mike
p.s. Base will be done later.


eMan
#298

Joined: August 08, 2002
KitMaker: 1,182 posts
Armorama: 665 posts

Posted: Sunday, August 28, 2016 - 11:47 AM UTC
Type 89 IFV update.


SGTJKJ
#041
Joined: July 20, 2006
KitMaker: 10,069 posts
Armorama: 4,677 posts
Posted: Sunday, August 28, 2016 - 11:55 AM UTC
Great result, Mike. The weathering came out just right and especially the wheels look great.
Thanks for sharing
Thanks for sharing
Scipio2010
#401
Joined: December 08, 2013
KitMaker: 323 posts
Armorama: 221 posts
Posted: Sunday, August 28, 2016 - 05:27 PM UTC
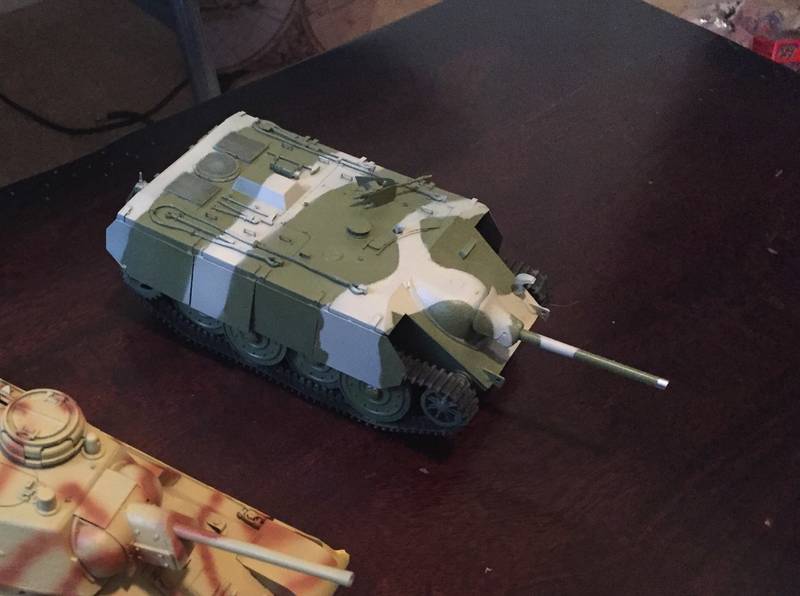
Hello everyone! I am a big fan of Trumpeter, especially the paper panzer kits they have produced. I find that the Trumpeter kits are pretty decent OOB, and relatively easy to assemble. I was in the process of building the Geschutzwagen Tiger Grille 21/210 for this campaign, however, it suffered a catastrophic accident that forced me to scrap it. I have built the E-10 kit instead, and aside from a metal barrel it was OOB.


BravoTwoZero
Joined: June 11, 2009
KitMaker: 461 posts
Armorama: 370 posts
Posted: Sunday, August 28, 2016 - 08:54 PM UTC
BTR-80 is done! After applying some more oils, then washes and pigment, I've completed the weatherin stage. I just hope it does not look over the top. Here are the shots:


Hudson29
#460
Joined: September 16, 2014
KitMaker: 1,156 posts
Armorama: 1,024 posts
Posted: Sunday, August 28, 2016 - 10:54 PM UTC
Joseph - I just love your build of the BTR-80. I was so impressed that I just ordered one in 1/35. I do not see well enough to try one smaller . . .
Hudson29
#460
Joined: September 16, 2014
KitMaker: 1,156 posts
Armorama: 1,024 posts
Posted: Sunday, August 28, 2016 - 10:59 PM UTC
John - Your JS-4 is very impressive. It must have been very intimidating to see one ion the field. You have a resin turret. Did it correct something on the model or was it to make a different version?
Nito74
Joined: March 04, 2008
KitMaker: 5,386 posts
Armorama: 4,727 posts
Posted: Sunday, August 28, 2016 - 11:52 PM UTC
Quoted Text
John - Your JS-4 is very impressive. It must have been very intimidating to see one ion the field. You have a resin turret. Did it correct something on the model or was it to make a different version?
Thanks Paul ! ir is a great kit, I recommend it !
About the turret, it's the original, plastic one, it has a metal barrel.
I didn't use any AM parts on this one.
SGTJKJ
#041
Joined: July 20, 2006
KitMaker: 10,069 posts
Armorama: 4,677 posts
Posted: Monday, August 29, 2016 - 01:57 AM UTC
Joseph, beautiful BTR. Your effects are just like the article. Awesome work and thanks again for sharing the article.
Shawn, what happened to the geschutzwagen??!!! You left it on the stove over night? Sorry to see your work ruined.
You are making good progress on the new paper panzer though.
Shawn, what happened to the geschutzwagen??!!! You left it on the stove over night? Sorry to see your work ruined.
You are making good progress on the new paper panzer though.
 |

WEB HOSTING BY


Copyright ©2021 Armorama and Kitmaker Network, a subsidiary of Silver Star Enterprises
All Rights Reserved. Please read our Conditions of Use and Privacy Policy.
All Rights Reserved. Please read our Conditions of Use and Privacy Policy.