

Well David, you taught me something I didn't know about Panzer IV's. Knew nothing of the L series! This might just inspire me to give in and build ANOTHER Pz. IV chassis!
Odd that no hobby manufacture has picked up on offering one of these distinctive Panzers?????
Hosted by Darren Baker
Conversions and Scratch Builds

165thspc

#521

Joined: April 13, 2011
KitMaker: 9,465 posts
Armorama: 8,695 posts
Posted: Wednesday, June 15, 2016 - 06:02 PM UTC

165thspc
#521
Joined: April 13, 2011
KitMaker: 9,465 posts
Armorama: 8,695 posts
Posted: Wednesday, June 15, 2016 - 07:25 PM UTC
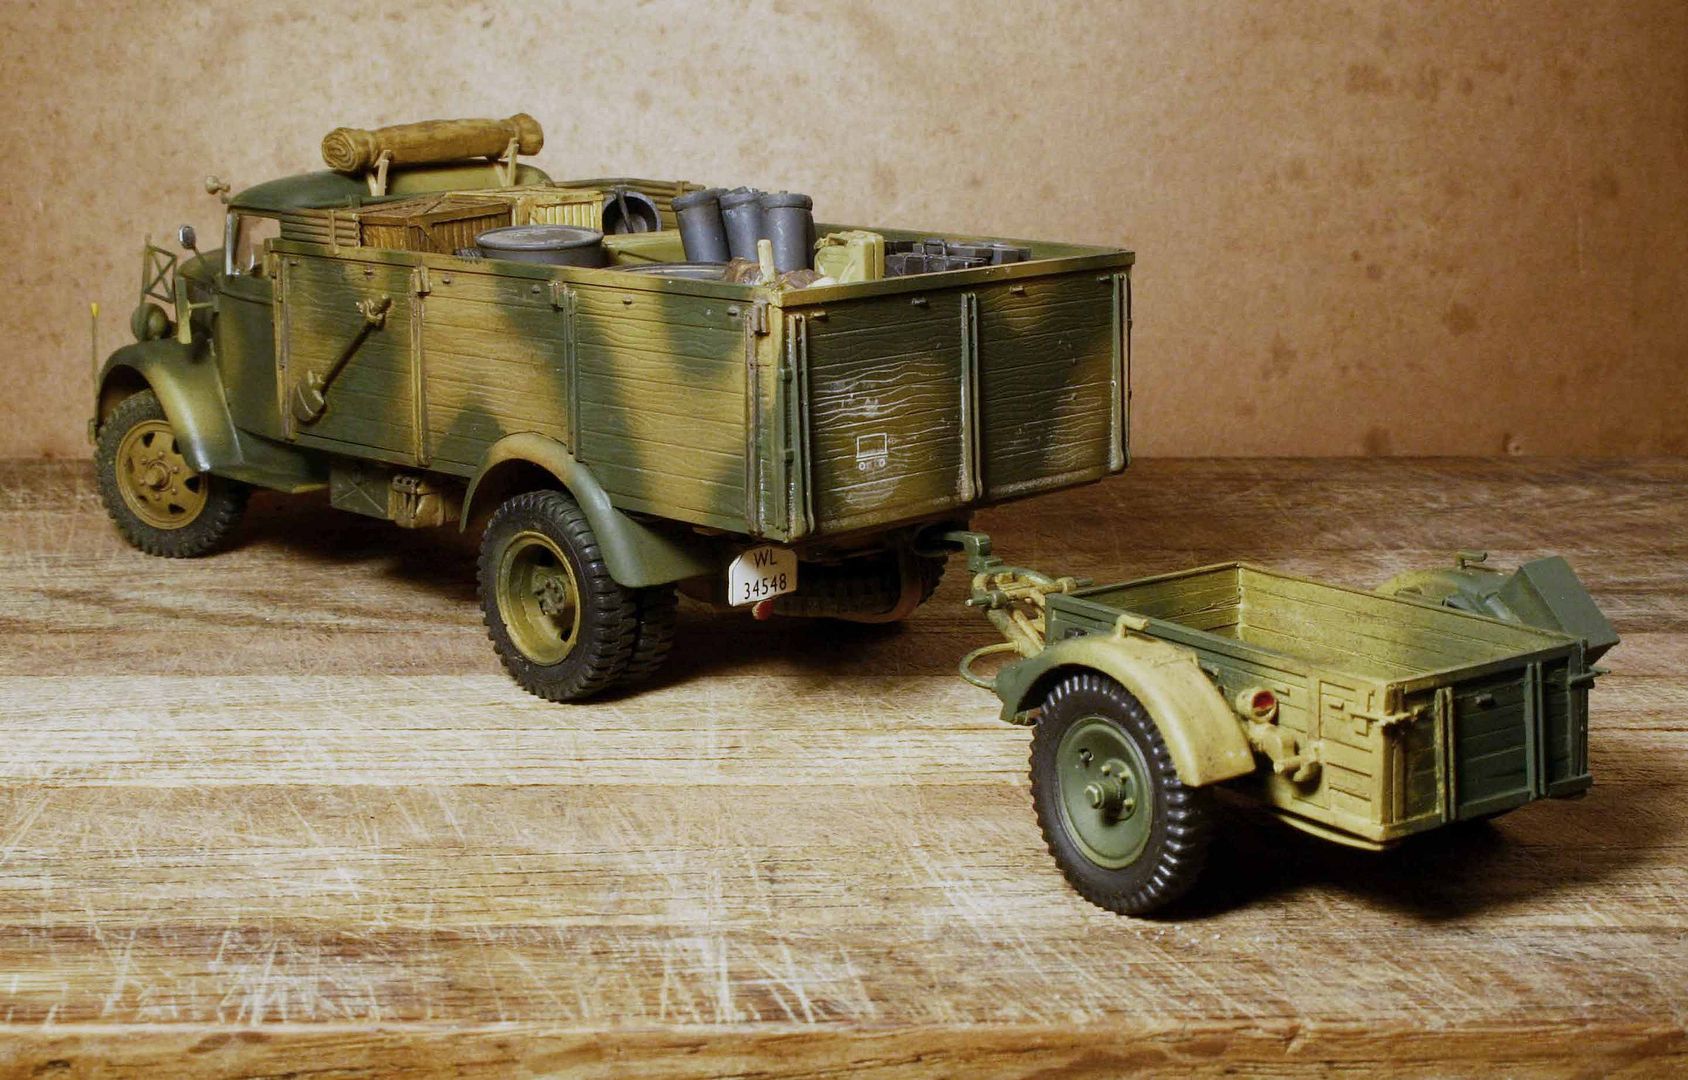
A simple small scratch project as a "starter":
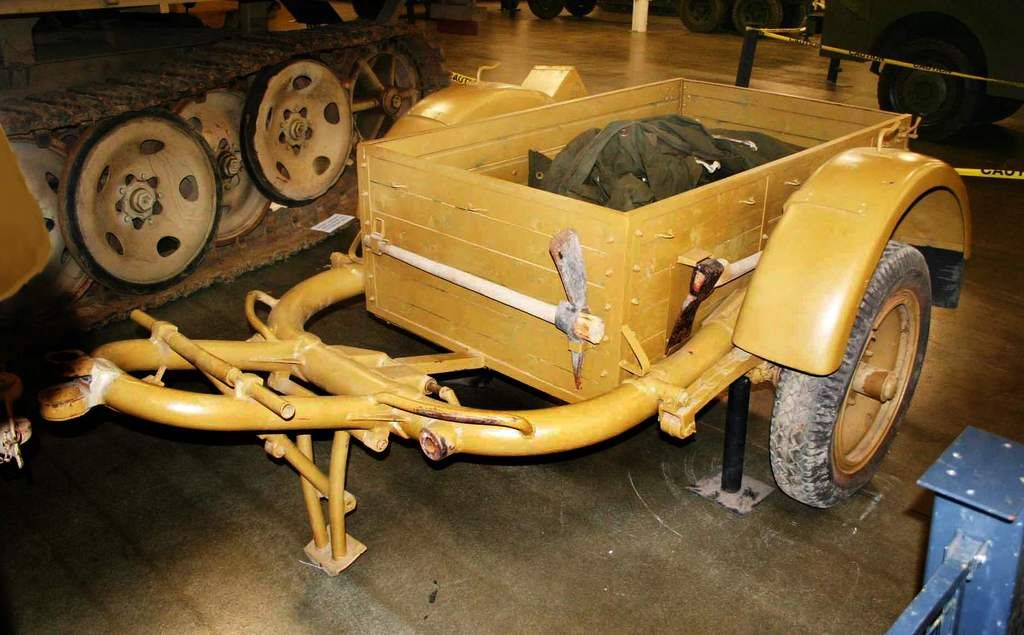
Open top German box "tool" trailer on a standard Sd. Ah. 51 flak carriage. Maximum load capacity rating 3/4 ton.
Reference photo from Victory Museum, Auburn, IN. ( Copyright Michael Koenig 2005 )
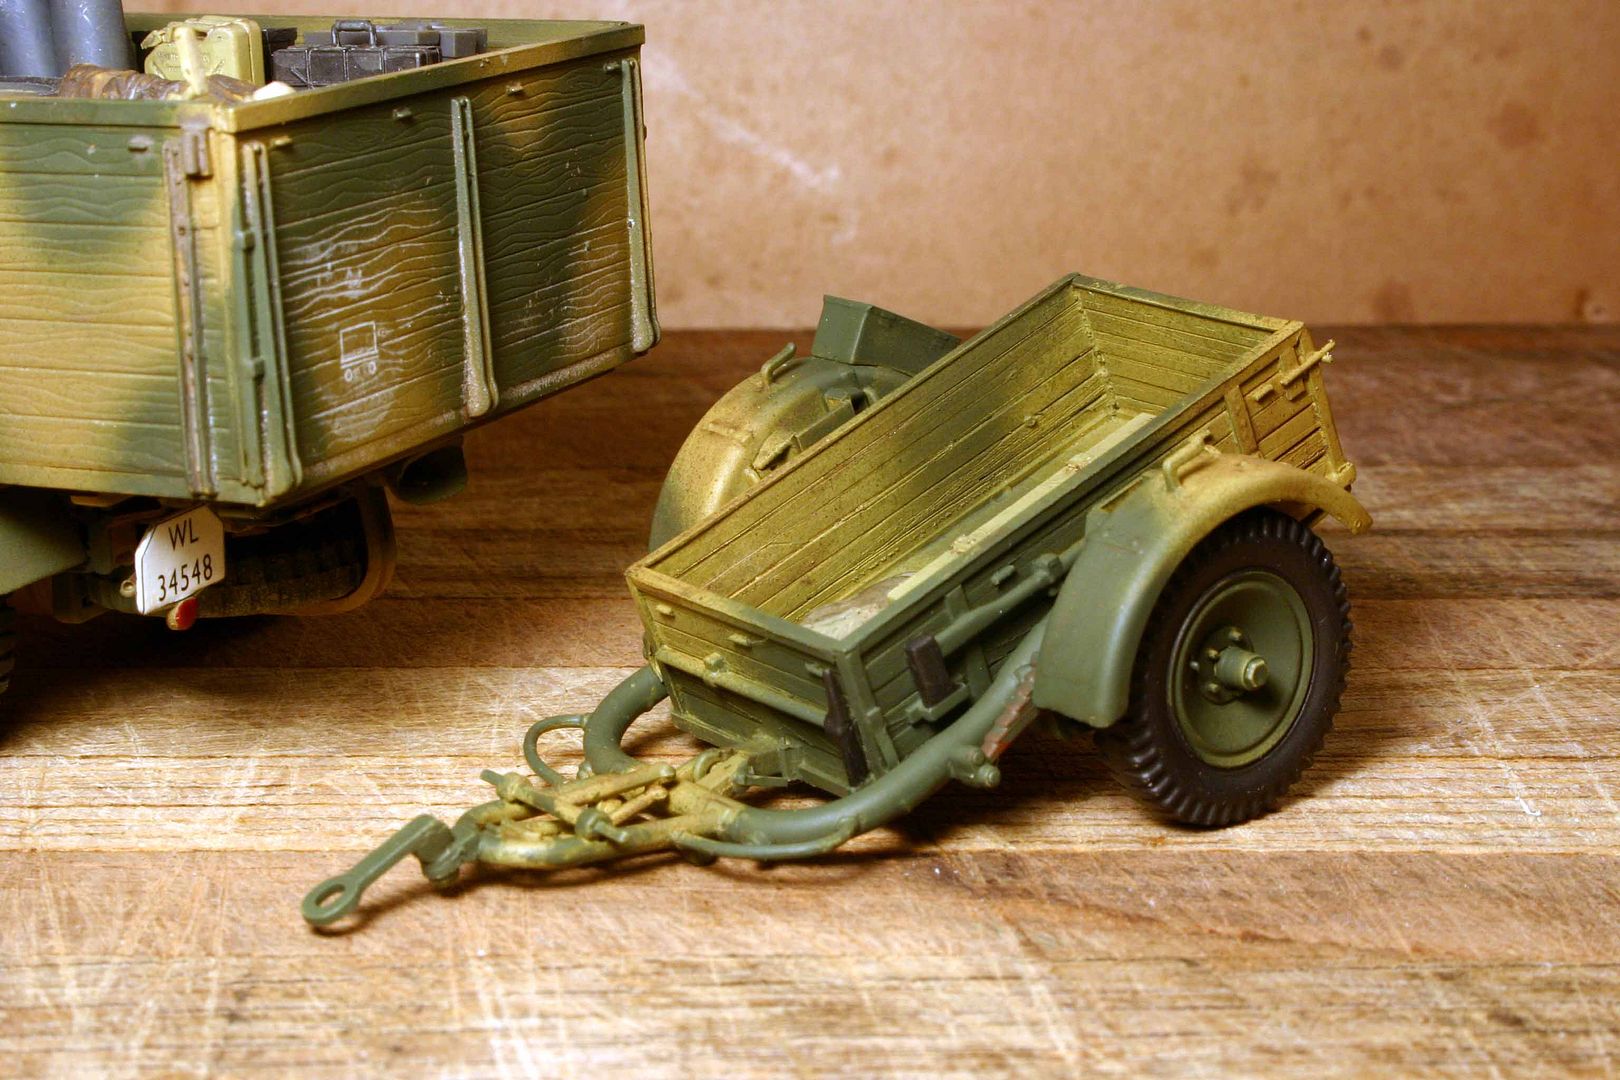
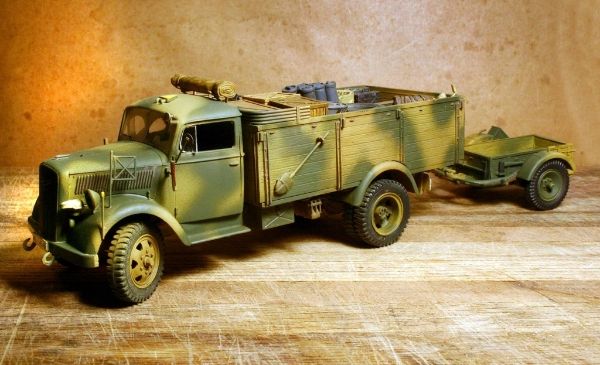
Photos of finished model:
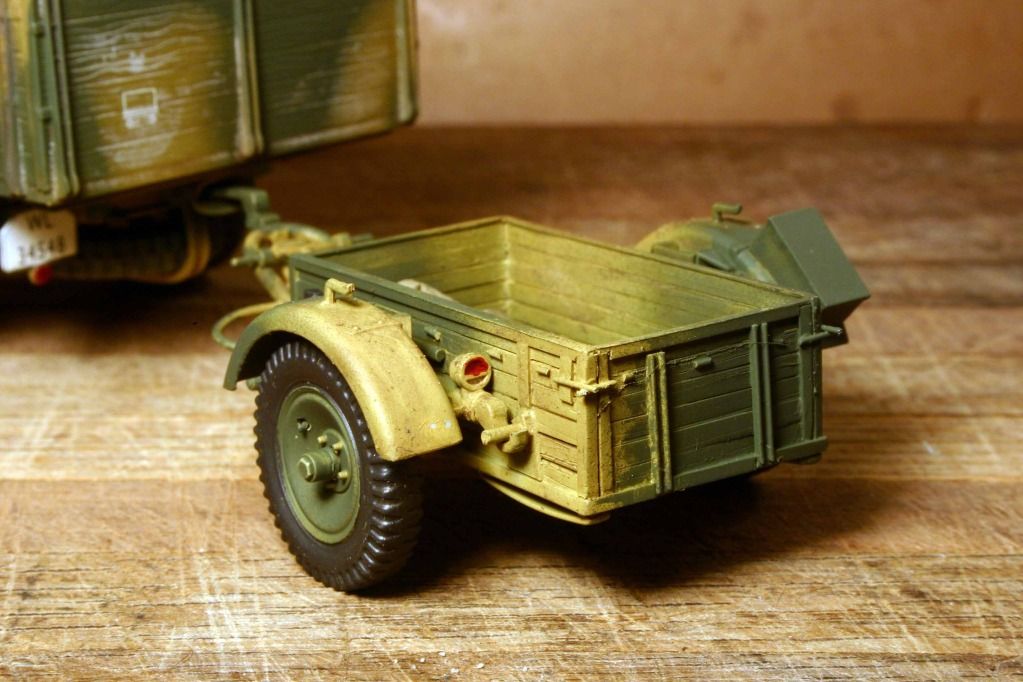
Individual board on board model construction using Evergreen strip stock distressed by dragging a hobby saw lengthwise over the plastic to create the wood grain affect. Some Evergreen angle, U channel and rod stock also used.
Open top German box "tool" trailer on a standard Sd. Ah. 51 flak carriage. Maximum load capacity rating 3/4 ton.
Reference photo from Victory Museum, Auburn, IN. ( Copyright Michael Koenig 2005 )

Photos of finished model:

Individual board on board model construction using Evergreen strip stock distressed by dragging a hobby saw lengthwise over the plastic to create the wood grain affect. Some Evergreen angle, U channel and rod stock also used.


m4sherman
Joined: January 18, 2006
KitMaker: 1,866 posts
Armorama: 1,808 posts

Posted: Wednesday, June 15, 2016 - 07:53 PM UTC
Quoted Text
Quoted TextI agree. Some fine building. Sadly none of the pictures of the master parts or prototype I made of the M15 Dragon Wagon trailer I did for Tank Workshop survived.
Randall, would really like to have seen your work there!
YES! ANYTHING! It might not stand up against some of the fine work on this thread, but it was a fun project to have finished. If only the internet was around back then.

165thspc
#521
Joined: April 13, 2011
KitMaker: 9,465 posts
Armorama: 8,695 posts
Posted: Wednesday, June 15, 2016 - 08:45 PM UTC
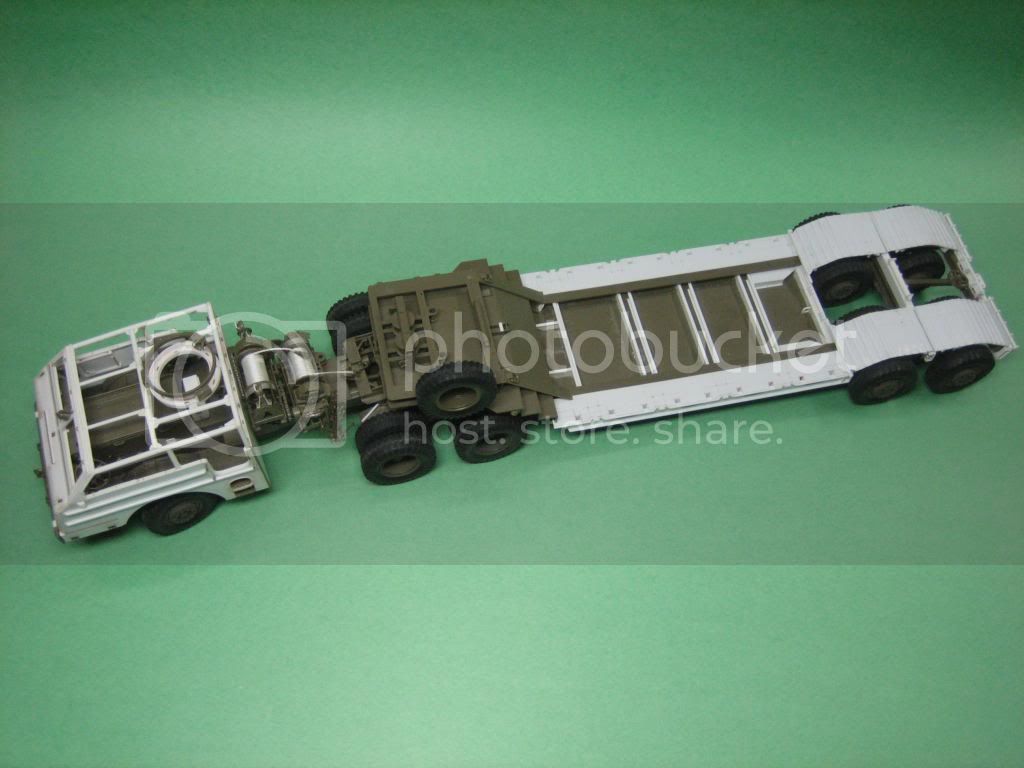
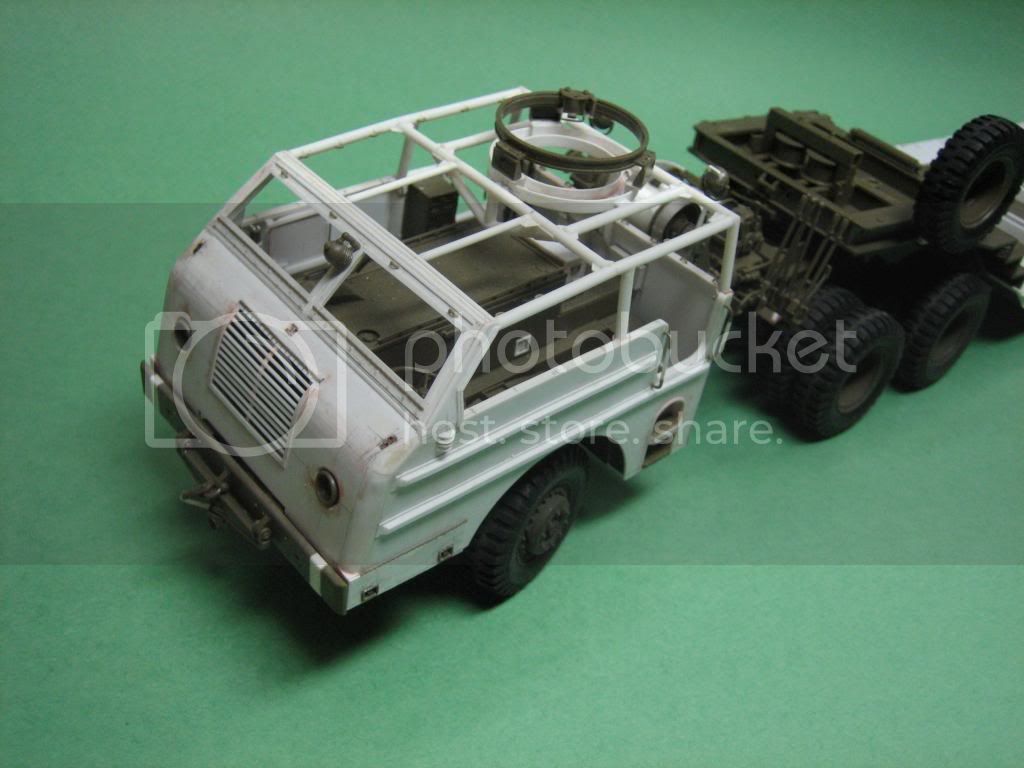
Here is a link to Ralph's (Call sign Mech) scratch builders album and also some photos of his work on the post war soft cab Dragon Wagon:
http://s1301.photobucket.com/user/scratch-builder/library/?sort=2&page=1
(Both the link and the photos below are reproduced with permission.)
http://s1301.photobucket.com/user/scratch-builder/library/?sort=2&page=1
(Both the link and the photos below are reproduced with permission.)


165thspc
#521
Joined: April 13, 2011
KitMaker: 9,465 posts
Armorama: 8,695 posts
Posted: Wednesday, June 15, 2016 - 08:50 PM UTC
Beautiful work I would certainly like to emulate.
Be sure to check out Ralph's other fine scratch work on the link!
p.s. Randall, I think I am going to have to get that Tank Workshop conversion of yours for the trailer! Question: Can I retro the conversion set onto my existing DW trailer or will I have to start with a fresh kit?
Be sure to check out Ralph's other fine scratch work on the link!
p.s. Randall, I think I am going to have to get that Tank Workshop conversion of yours for the trailer! Question: Can I retro the conversion set onto my existing DW trailer or will I have to start with a fresh kit?
m4sherman
Joined: January 18, 2006
KitMaker: 1,866 posts
Armorama: 1,808 posts
Posted: Wednesday, June 15, 2016 - 11:03 PM UTC
Quoted Text
Beautiful work I would certainly like to emulate.
Be sure to check out Ralph's other fine scratch work on the link!
p.s. Randall, I think I am going to have to get that Tank Workshop conversion of yours for the trailer! Question: Can I retro the conversion set onto my existing DW trailer or will I have to start with a fresh kit?
I wish I could help, but I left Tank Workshop in the late '90's and my old business partner Larry Provo sold the business about 9 or 10 years ago. Now I'm not sure what is left.
When they were tooling up for the M26 Tamiya bought 2 of our kits to see how Larry had done the tractor. They told Larry he is a genius, and I agree.
I checked out the link. Very nice. I'm at work, so break is over!
165thspc
#521
Joined: April 13, 2011
KitMaker: 9,465 posts
Armorama: 8,695 posts
Posted: Thursday, June 16, 2016 - 06:51 PM UTC
Fairly easy conversion of Blitz Multier (Mule) to V-2 Cable Service Vehicle. Add Radio Van house body to Mule, then some small scratch built parts. (Homemade road wheels are optional.)
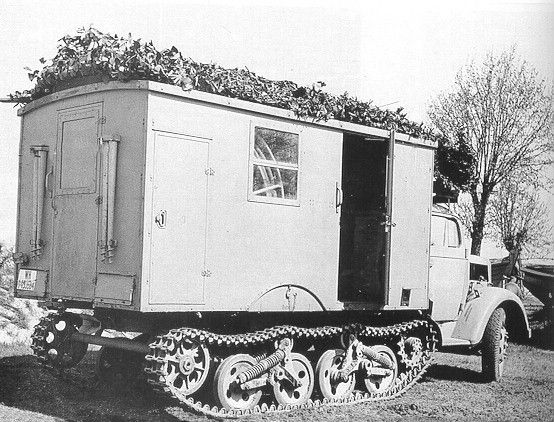
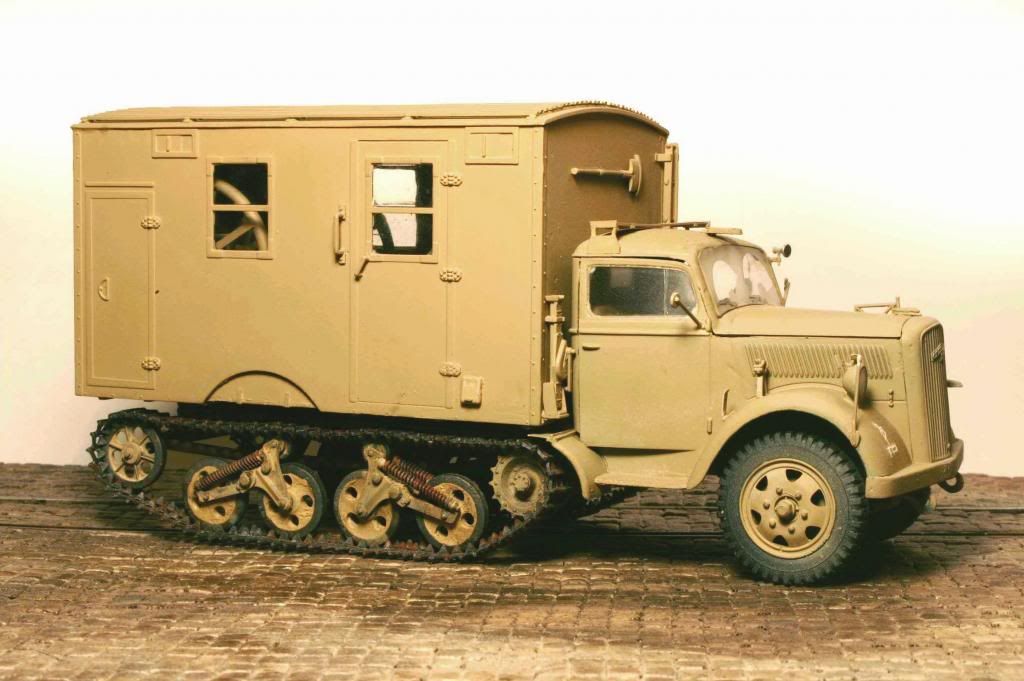
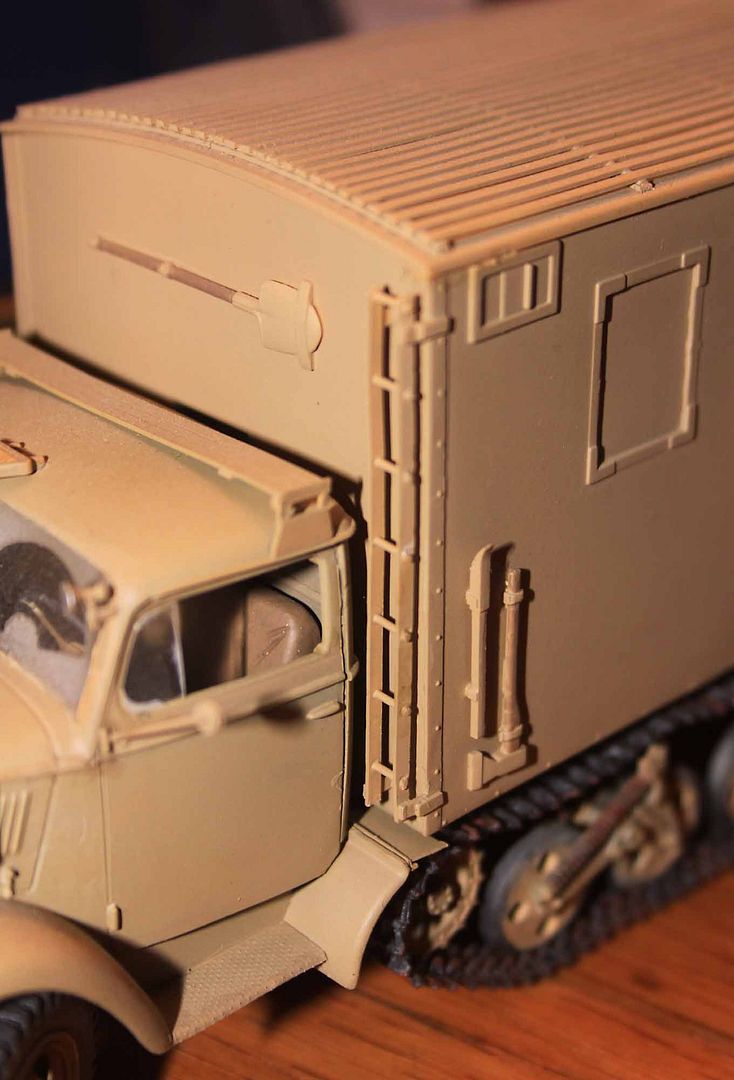
Or just start off with the relatively new Dragon Mule Ambulance kit and you are 90% of the way there! You will need to remove the raised center clerestory and re-cover the entire roof with a piece of plastic sheet stock but that is easily done. If you do not feel like scratch building the correct back wall of the shelter box them perhaps you have an old copy of the Italeri Blitz Radio Van lying around. You can get the nearly correct real wall and the correct roof from there.
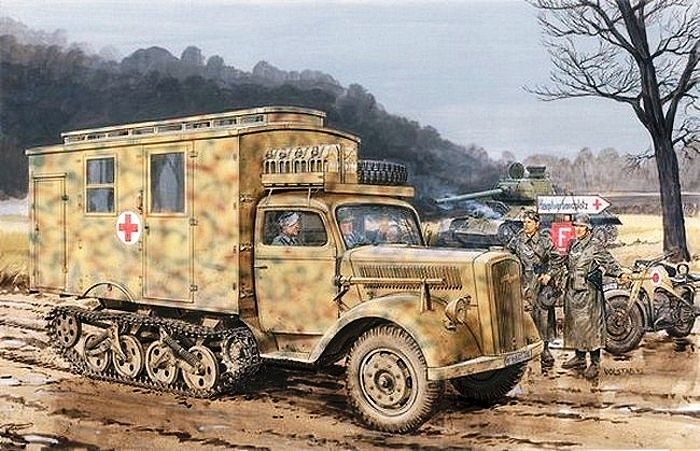


Or just start off with the relatively new Dragon Mule Ambulance kit and you are 90% of the way there! You will need to remove the raised center clerestory and re-cover the entire roof with a piece of plastic sheet stock but that is easily done. If you do not feel like scratch building the correct back wall of the shelter box them perhaps you have an old copy of the Italeri Blitz Radio Van lying around. You can get the nearly correct real wall and the correct roof from there.


Mech

Joined: July 20, 2002
KitMaker: 281 posts
Armorama: 226 posts
Posted: Friday, June 17, 2016 - 05:18 PM UTC
Hi Mike
Nice topic you started here and I'm impressed with all the scratch building every one is doing and thank you for posting my web page.
Cheers,
Ralph
Nice topic you started here and I'm impressed with all the scratch building every one is doing and thank you for posting my web page.
Cheers,
Ralph
Mech
Joined: July 20, 2002
KitMaker: 281 posts
Armorama: 226 posts
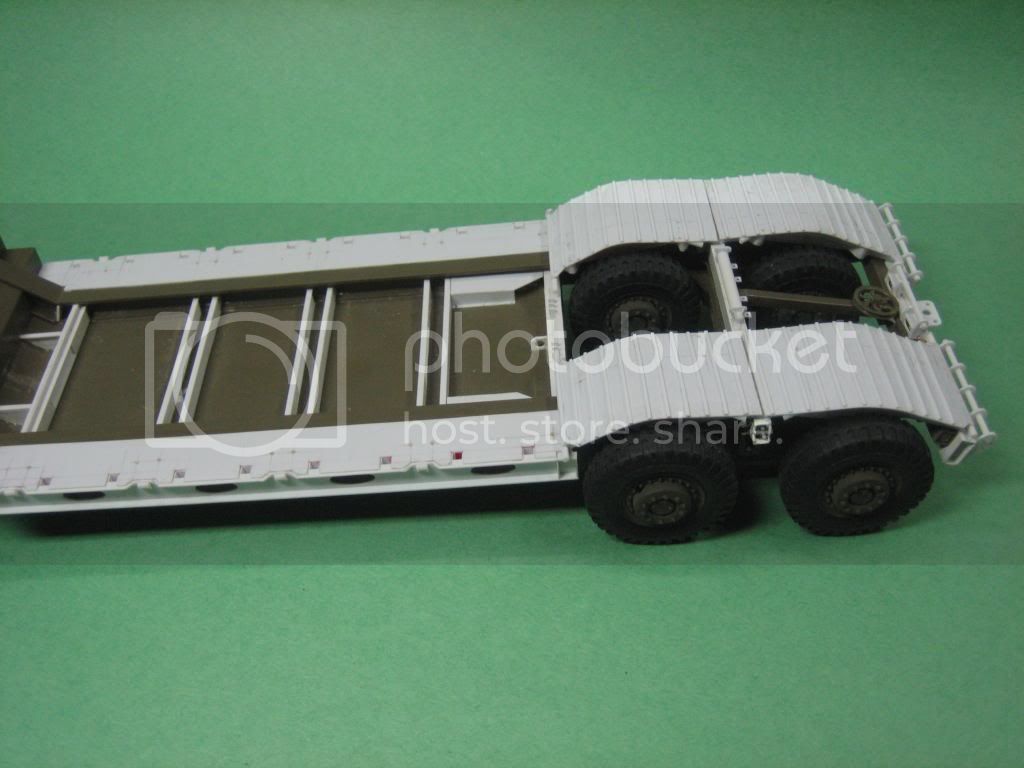
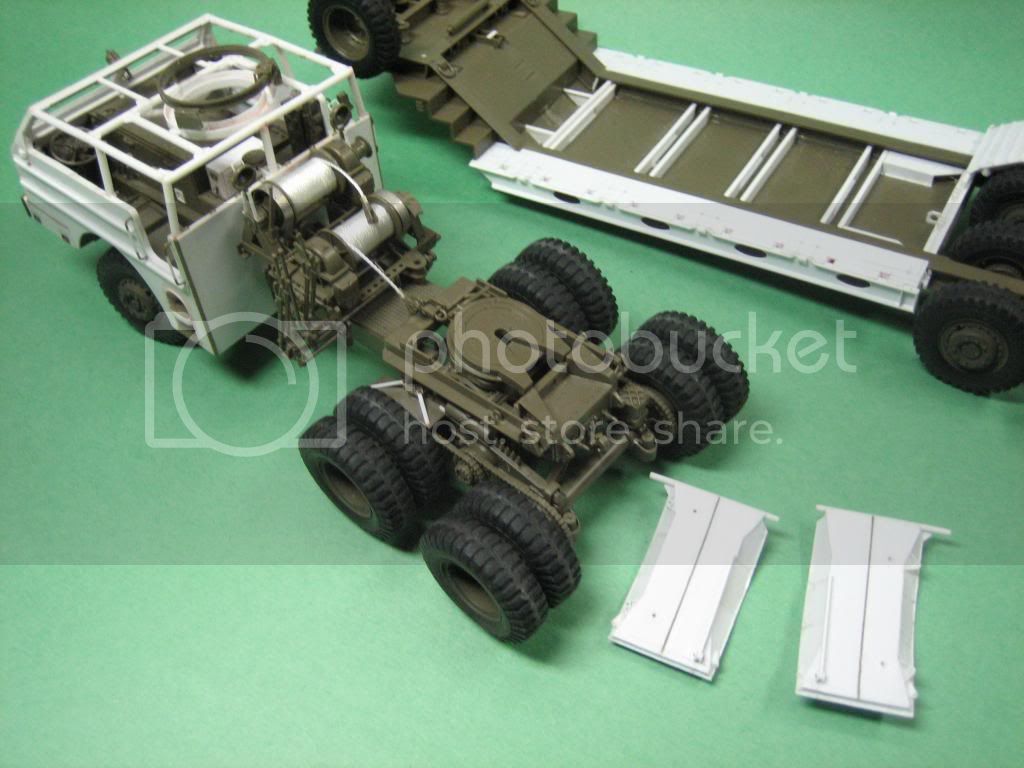
Posted: Friday, June 17, 2016 - 05:57 PM UTC
Hi everyone
I forgot to mention that the soft cab on the M26 is removable so that I can finish detailing the interior and paint it and I sill have a lot of detail on the M15a1 trailer and the cab to do especially the trailer ramps over the wheels.
Cheers,
Ralph
I forgot to mention that the soft cab on the M26 is removable so that I can finish detailing the interior and paint it and I sill have a lot of detail on the M15a1 trailer and the cab to do especially the trailer ramps over the wheels.
Cheers,
Ralph

1967er

Joined: March 12, 2012
KitMaker: 224 posts
Armorama: 201 posts
Posted: Friday, June 17, 2016 - 06:12 PM UTC
Hi,
regarding conversions and scratch build stuff I want to put in my zwo cents...
Not exactly AFC conversion, but undercarriage based on 1:24 Unimog - I hope that counts...
Build for a Mad Max Car Contest, Engine is the 12 Cylinder Allison which was used - amongst others - for the P51 Mustang.
Some steps of the building process:


There are some WIP threads with more pictures on german forums, if you want to know more I can share the Links....
Cheers
Thomas
regarding conversions and scratch build stuff I want to put in my zwo cents...
Not exactly AFC conversion, but undercarriage based on 1:24 Unimog - I hope that counts...
Build for a Mad Max Car Contest, Engine is the 12 Cylinder Allison which was used - amongst others - for the P51 Mustang.
Some steps of the building process:
There are some WIP threads with more pictures on german forums, if you want to know more I can share the Links....
Cheers
Thomas
m4sherman
Joined: January 18, 2006
KitMaker: 1,866 posts
Armorama: 1,808 posts
Posted: Friday, June 17, 2016 - 07:22 PM UTC
Ralph,
Your M26 "soft" cab is very nice. There was one out here in Arizona, not sure where it ended up. Once you stand next to one you get a feel for just how huge they are. The oil from the chains left a trail wherever it went. The chain was so covered it almost looked more like a belt.
Thomas,
Nice Madd Max. The Allison was used in the prototypes and test P-51's. Production went with the Merlin once it was discovered to be a better engine.
Some drag cars and boats ran Allisons. It would spin the tires off your truck! It will need more gas cans too!
165thspc
#521
Joined: April 13, 2011
KitMaker: 9,465 posts
Armorama: 8,695 posts
Posted: Friday, June 17, 2016 - 08:59 PM UTC
Great work on the Mad Max diorama and great photography as well. The dio is perfect and the desert background really pushes the photo work over the top!.
Re: the soft cab M 26 -
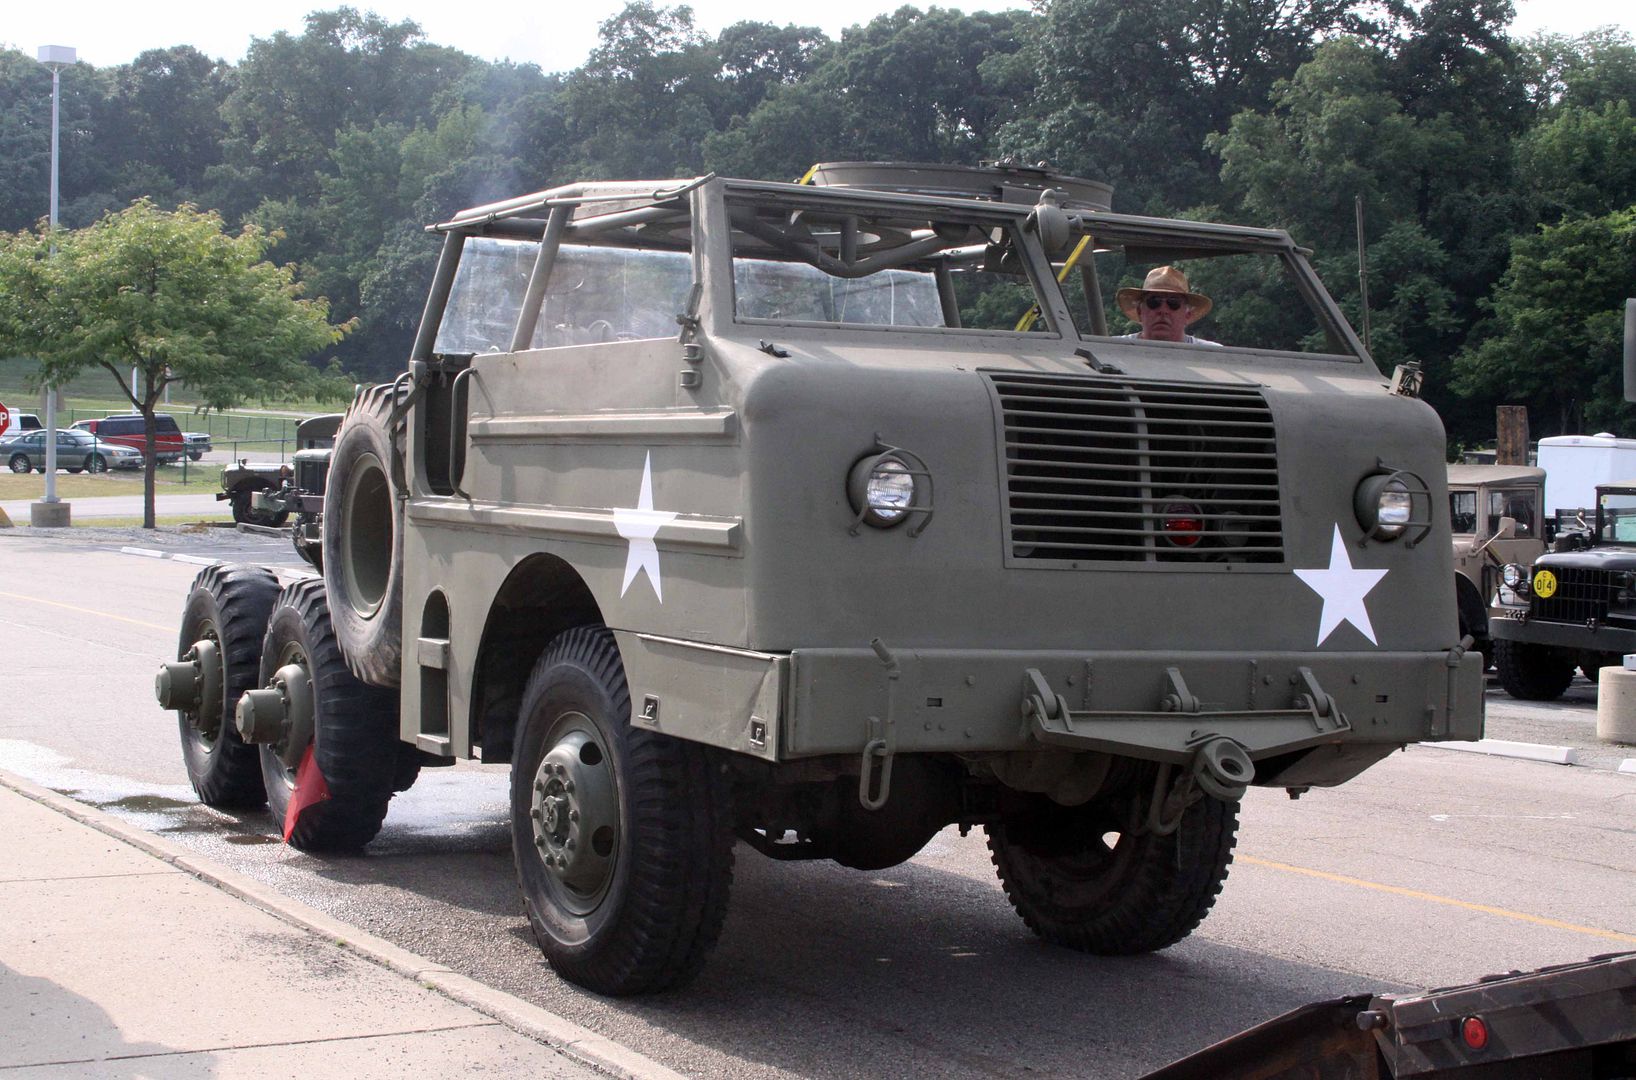
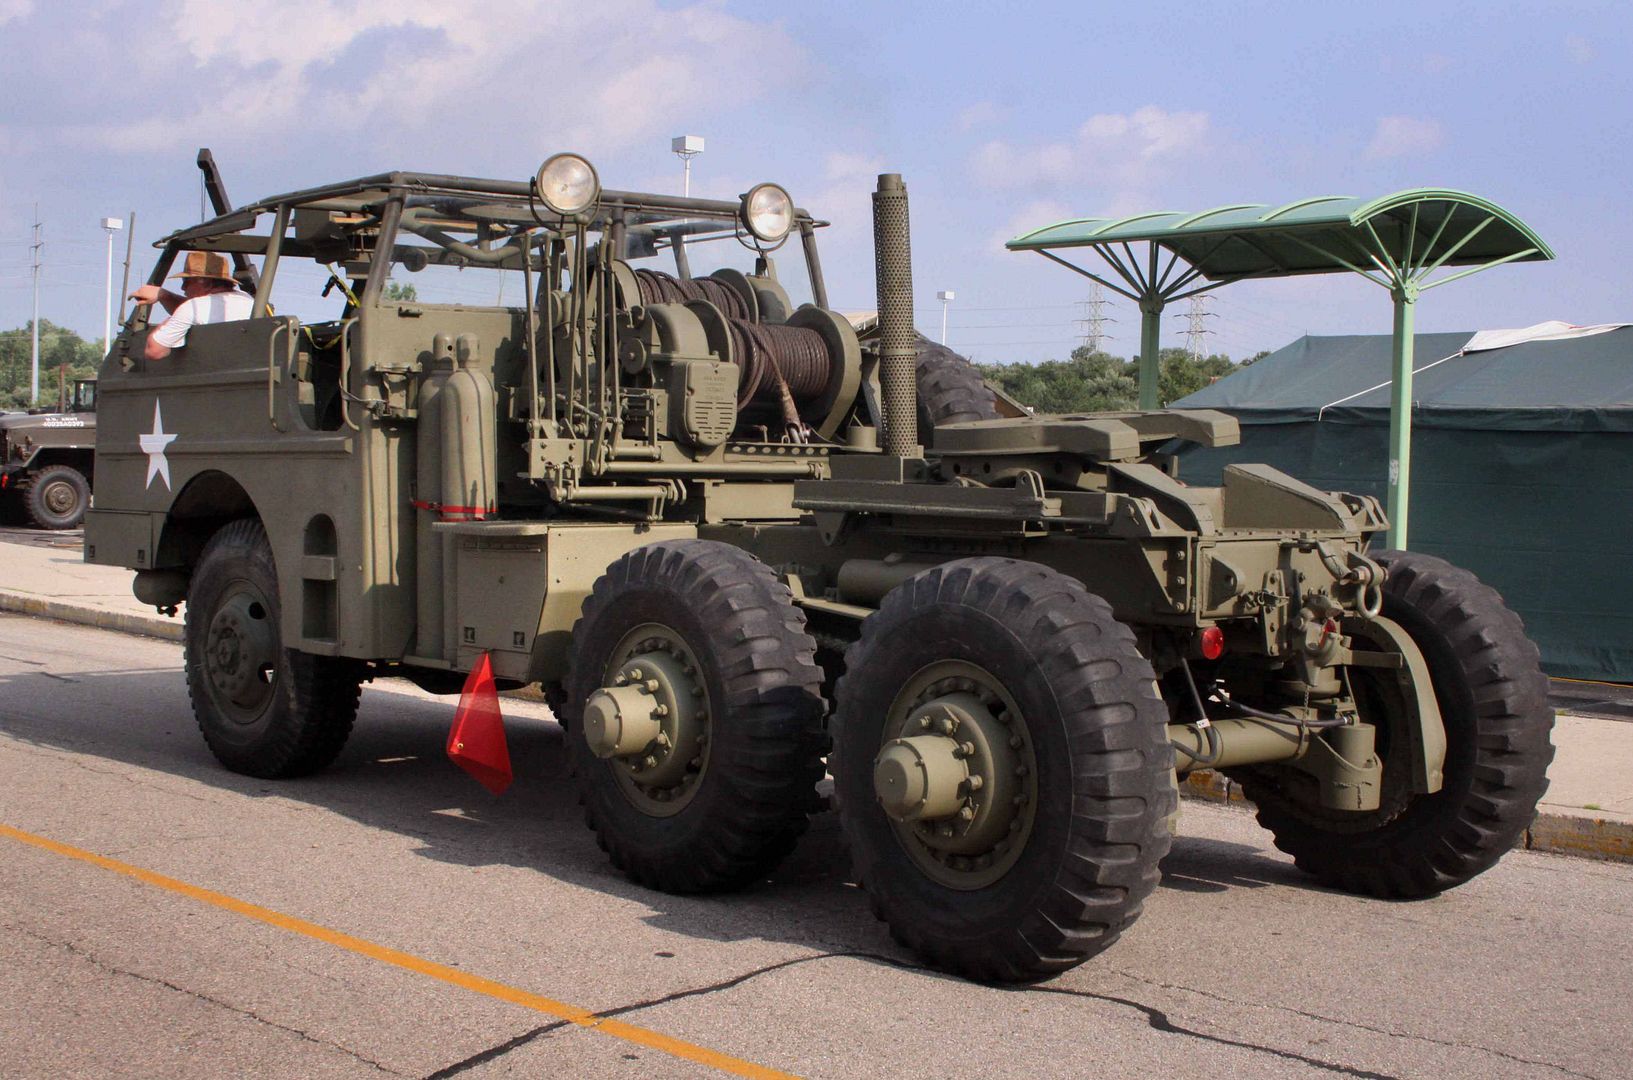
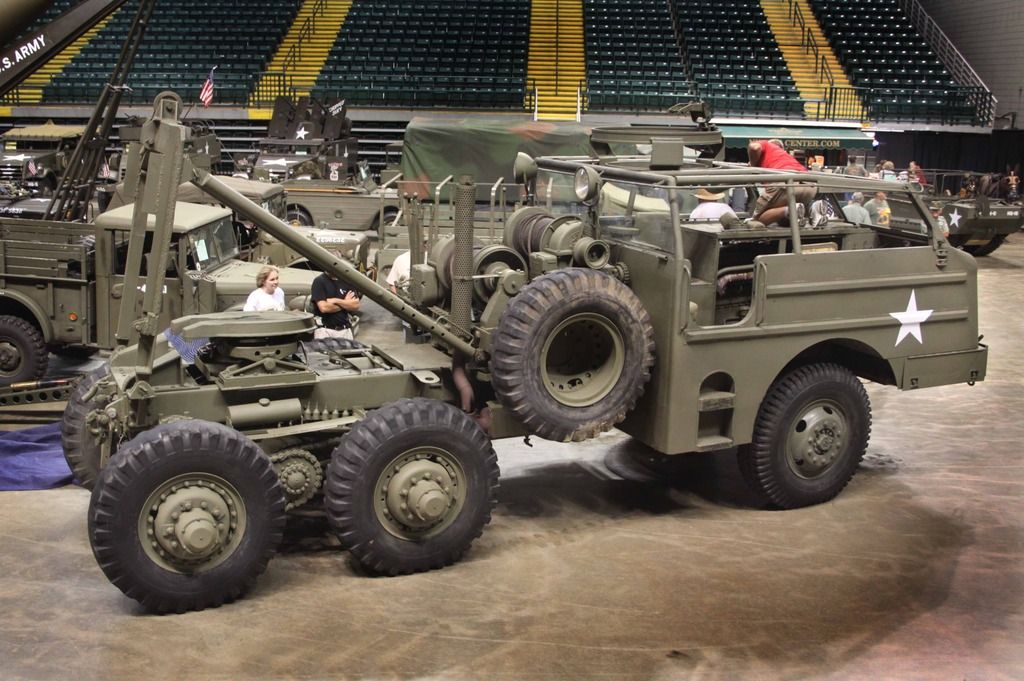
( Above photos are Copyright Michael Koenig 2011)
Re: the soft cab M 26 -


( Above photos are Copyright Michael Koenig 2011)
165thspc
#521
Joined: April 13, 2011
KitMaker: 9,465 posts
Armorama: 8,695 posts
Posted: Friday, June 17, 2016 - 09:42 PM UTC
More photos of real M 26 both hard and soft cab can be found at:
http://s1061.photobucket.com/user/165thspc/library/Dragon%20Wagon?sort=2&page=1
http://s1061.photobucket.com/user/165thspc/library/Dragon%20Wagon?sort=2&page=1
m4sherman
Joined: January 18, 2006
KitMaker: 1,866 posts
Armorama: 1,808 posts
Posted: Saturday, June 18, 2016 - 01:10 AM UTC
Wow, it looks almost too clean!
m4sherman
Joined: January 18, 2006
KitMaker: 1,866 posts
Armorama: 1,808 posts
Posted: Saturday, June 18, 2016 - 02:23 AM UTC
Quoted Text
Hi,
regarding conversions and scratch build stuff I want to put in my zwo cents...
Not exactly AFC conversion, but undercarriage based on 1:24 Unimog - I hope that counts...
Build for a Mad Max Car Contest, Engine is the 12 Cylinder Allison which was used - amongst others - for the P51 Mustang.
There are some WIP threads with more pictures on german forums, if you want to know more I can share the Links....
Cheers
Thomas
In my ealier post I was trying to say the truck would be fast. I just noticed the dog, nice touch.
1967er
Joined: March 12, 2012
KitMaker: 224 posts
Armorama: 201 posts
Posted: Saturday, June 18, 2016 - 03:37 AM UTC
Thank you for your explanation about the use of the Allison Engine.
I assumed that someone here on the forum would know much better than me about it.
I had this engine-kit laying around for years and it fits better into this purpose then the original Unimog Engine.
As it is 1:24 scale, this truck is rather big - The diorama is still missing two figures (Don Toretto and Miss Letty from Fast&Furious) and a bike.
In the end it could be named as "Fast&Furious meets Mad Max...
Cheers
Thomas
165thspc
#521
Joined: April 13, 2011
KitMaker: 9,465 posts
Armorama: 8,695 posts
Posted: Saturday, June 18, 2016 - 04:56 PM UTC
Quoted Text
Wow, it looks almost too clean!
Randall - this was for the National MVPA Convention but somebody on that M26 crew seems to have missed cleaning up that spare tire.
Thomas - thanks for contributing the great looking wild truck! I really like the rust treatment on the gas pumps. The pump station is a competition grade diorama all in itself!
165thspc
#521
Joined: April 13, 2011
KitMaker: 9,465 posts
Armorama: 8,695 posts
Posted: Saturday, June 18, 2016 - 05:21 PM UTC
I do hope in-process conversions are also acceptable:
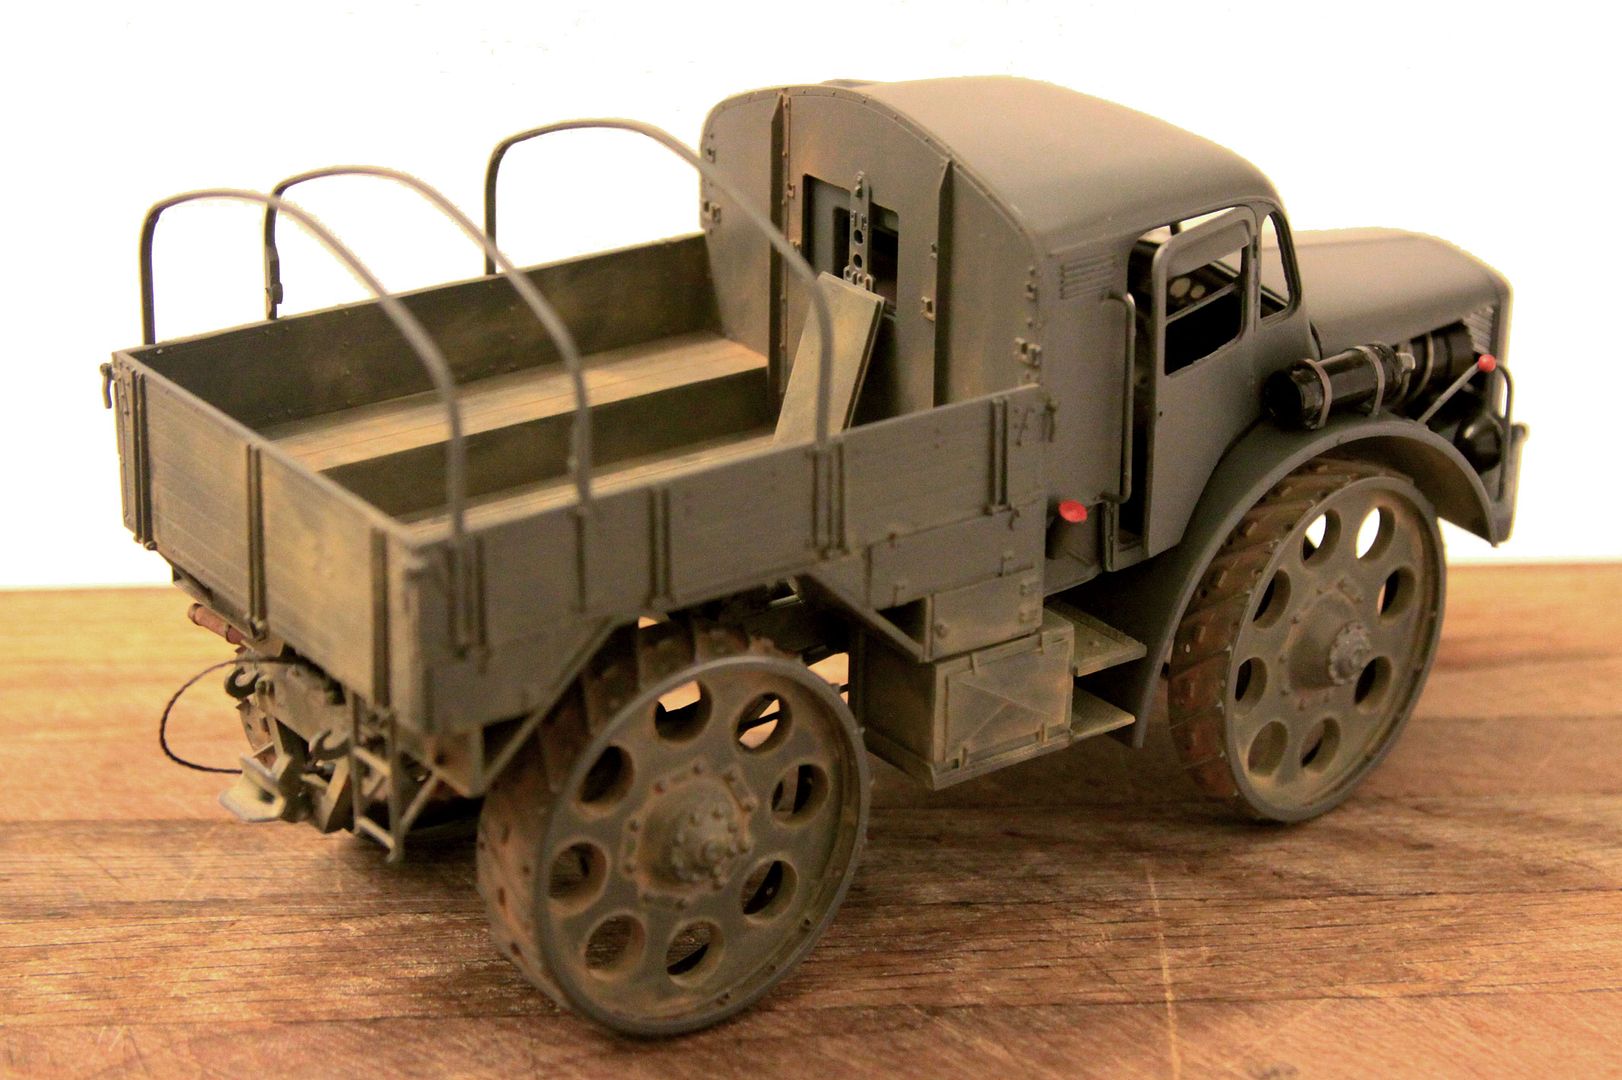
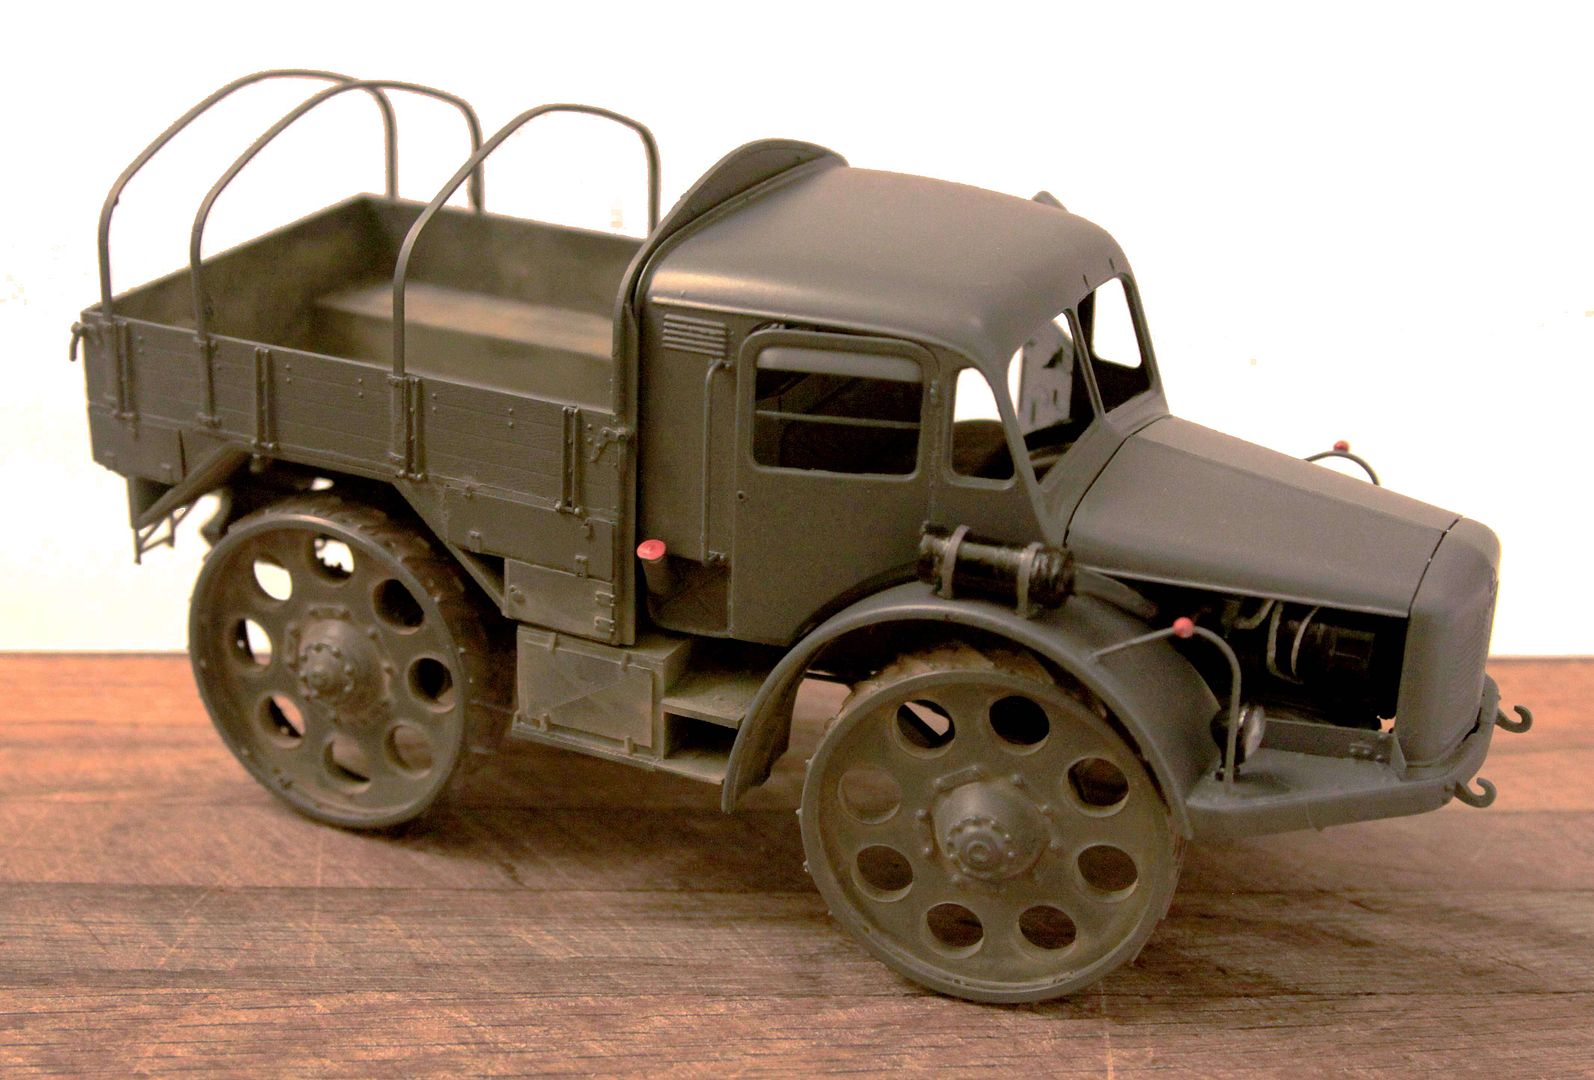
Converted Skoda RSO to back date it to look like the original prototype with perforated wheels, relocated air intake, more storage lockers and slightly changed drivers windshield treatments. Also I slightly altered canvas tilt for a bit more visual interest.
Build log on this RSO can be viewed at:
http://armorama.com/forums/205790
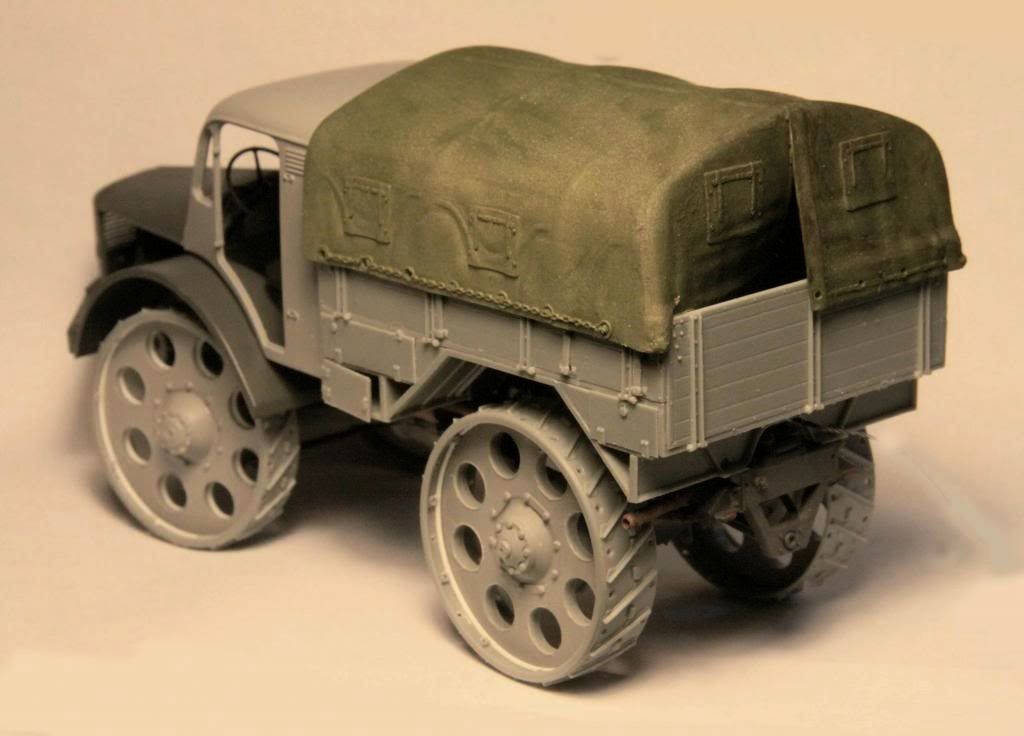

(Prototype photo Skoda Manufacturing/Capricorn Publishing - shown here for discussion purposes only.)
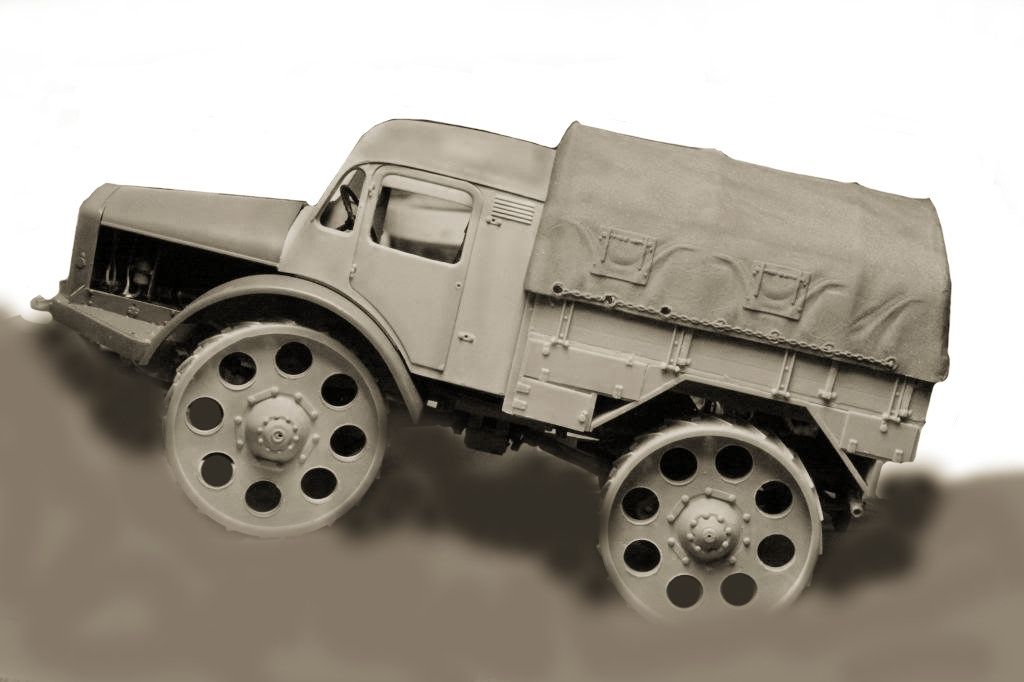
Don't think drilling out eight wheel holes times four wheels didn't make for a couple of very nervous hours!
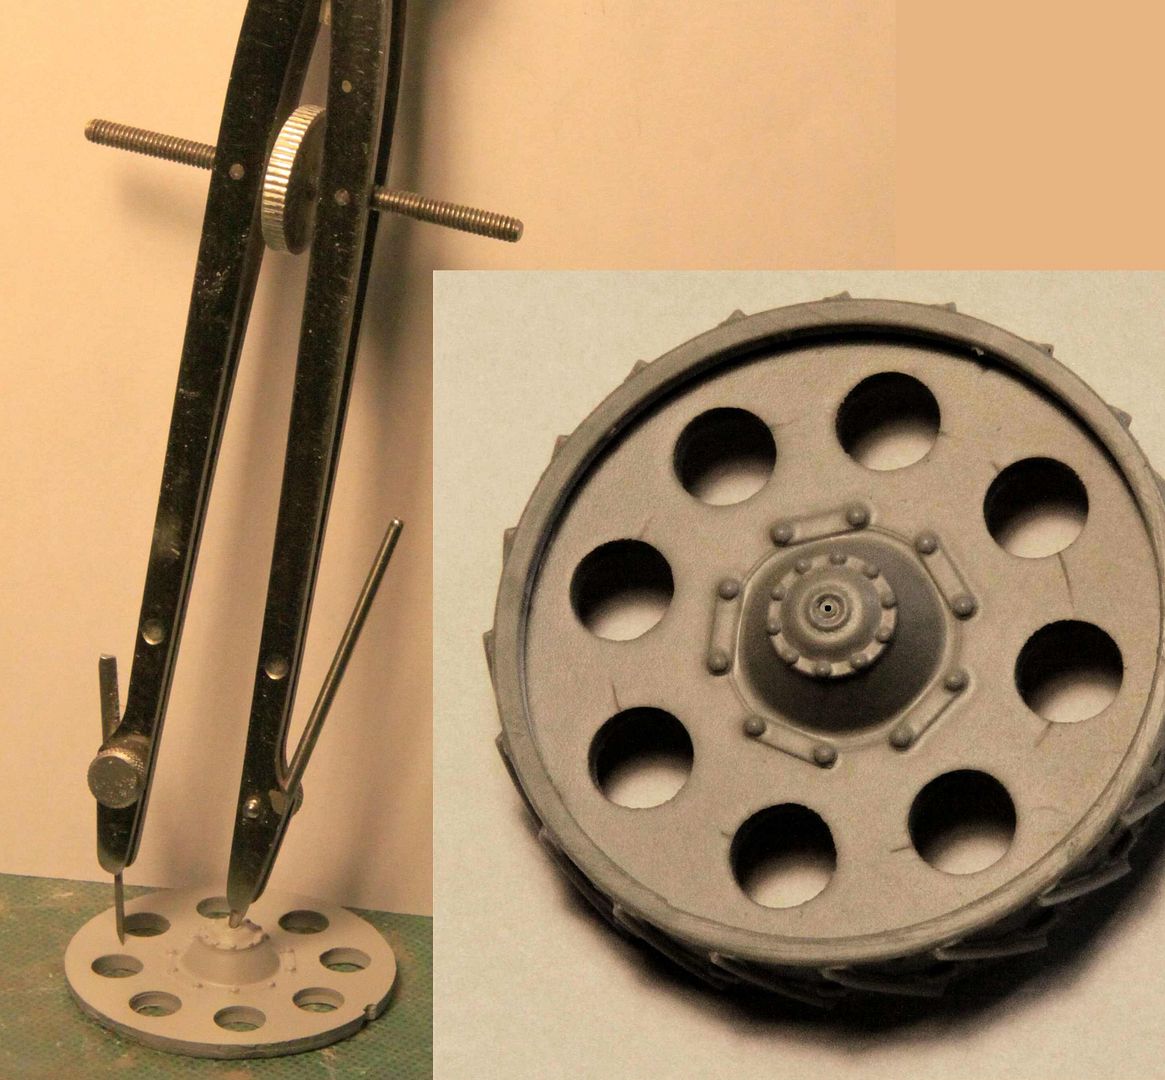
I drilled a very small hole in the center of the wheel. (to be filled in again later.) I then used a compass with a cutting blade to scribe a large circle representing the circular centerline of the eight holes. After that I used a set of dividers to find the radial center point of each of the equally spaced openings. Fun (because it WORKED!) but nerve racking!
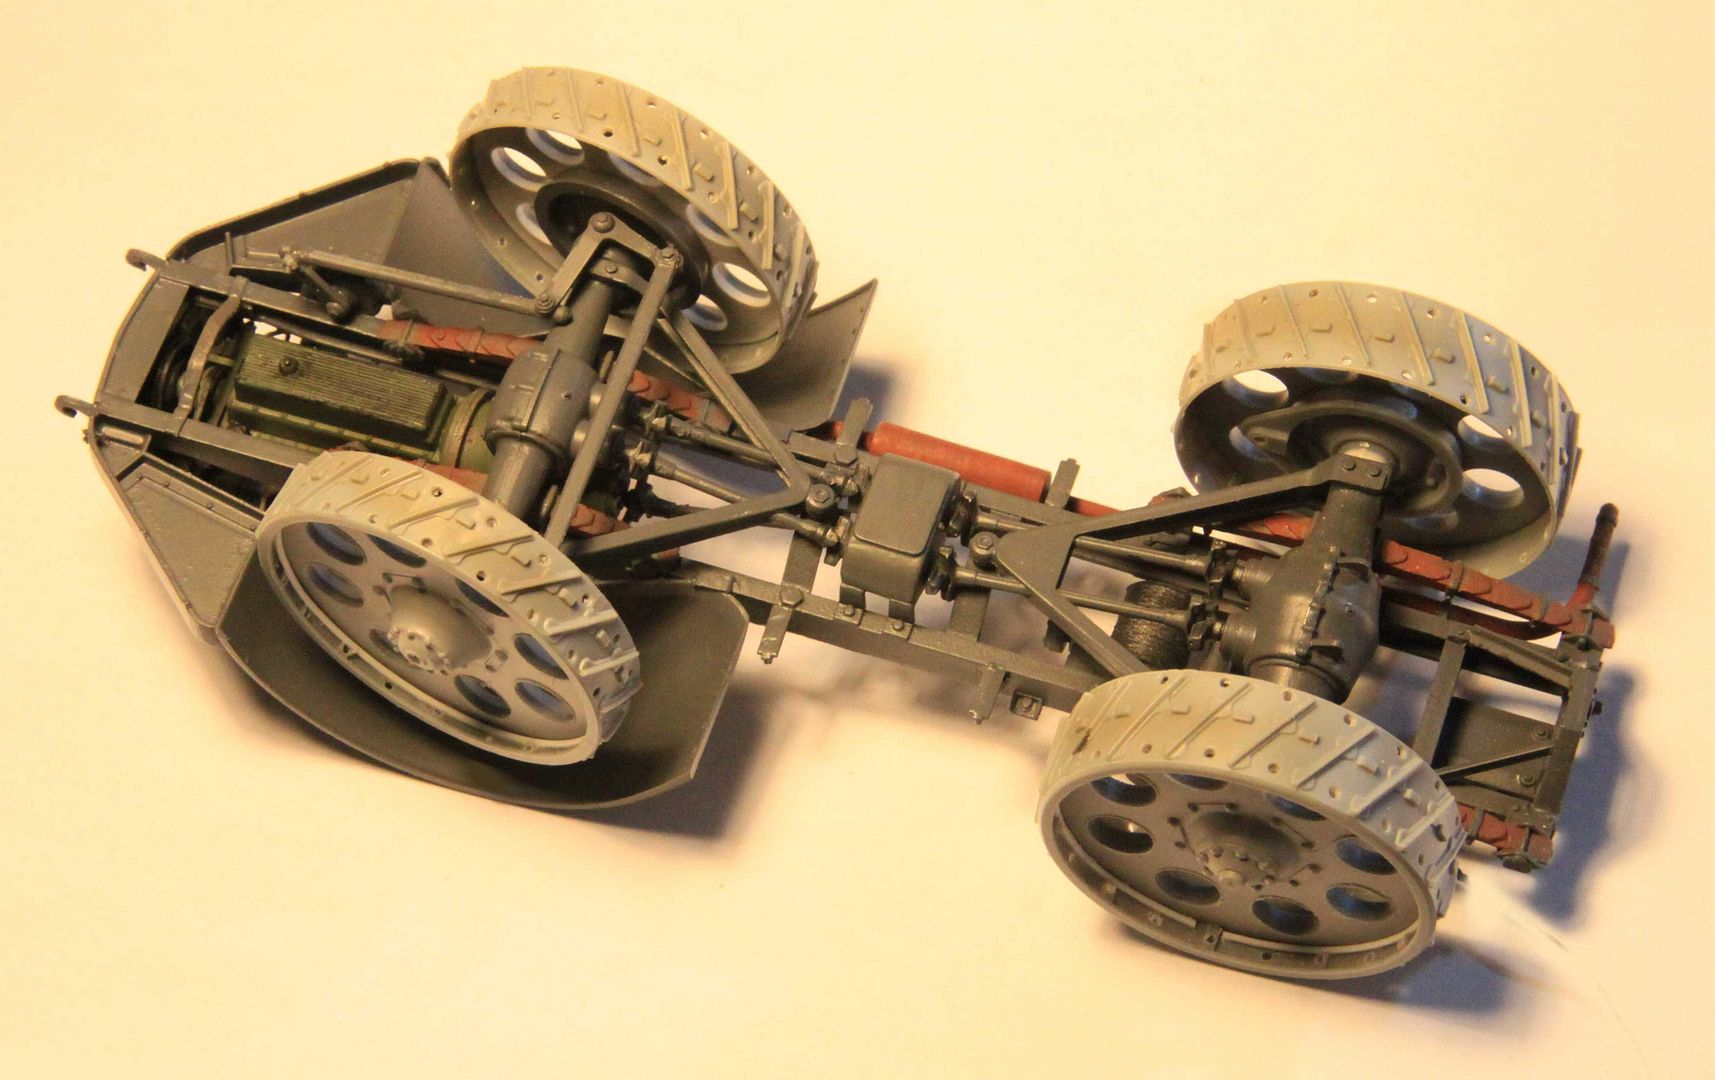
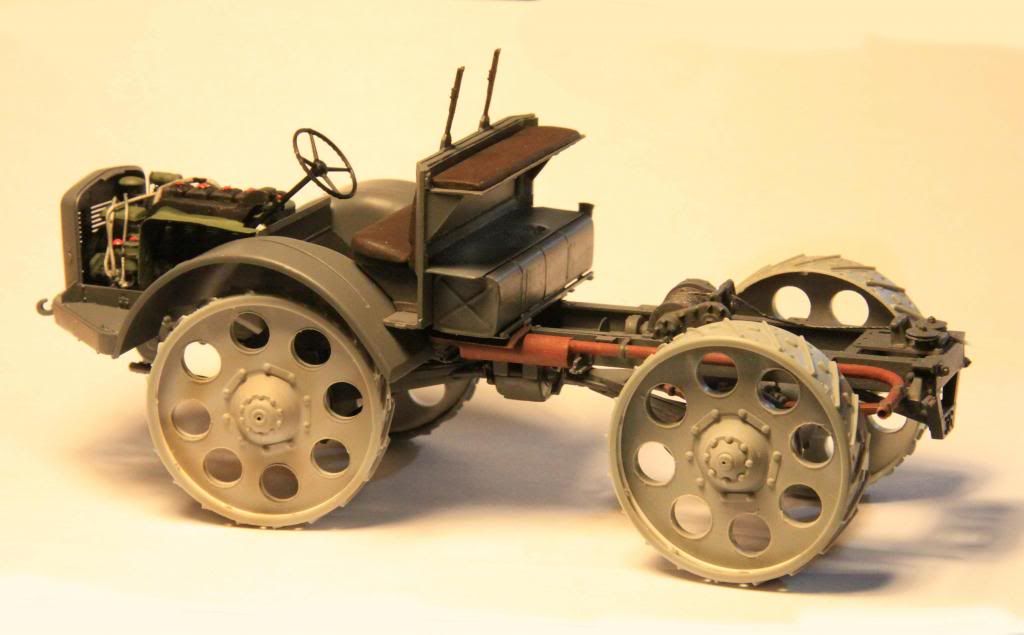
The undercarriage with some additional frame details of course. ( Added missing front engine mount cross member, missing front brake drums, brake linkage, relocated muffler and included the support frame for the gas tank. Will also be building the additional storage lockers present on each side just below the cab. )
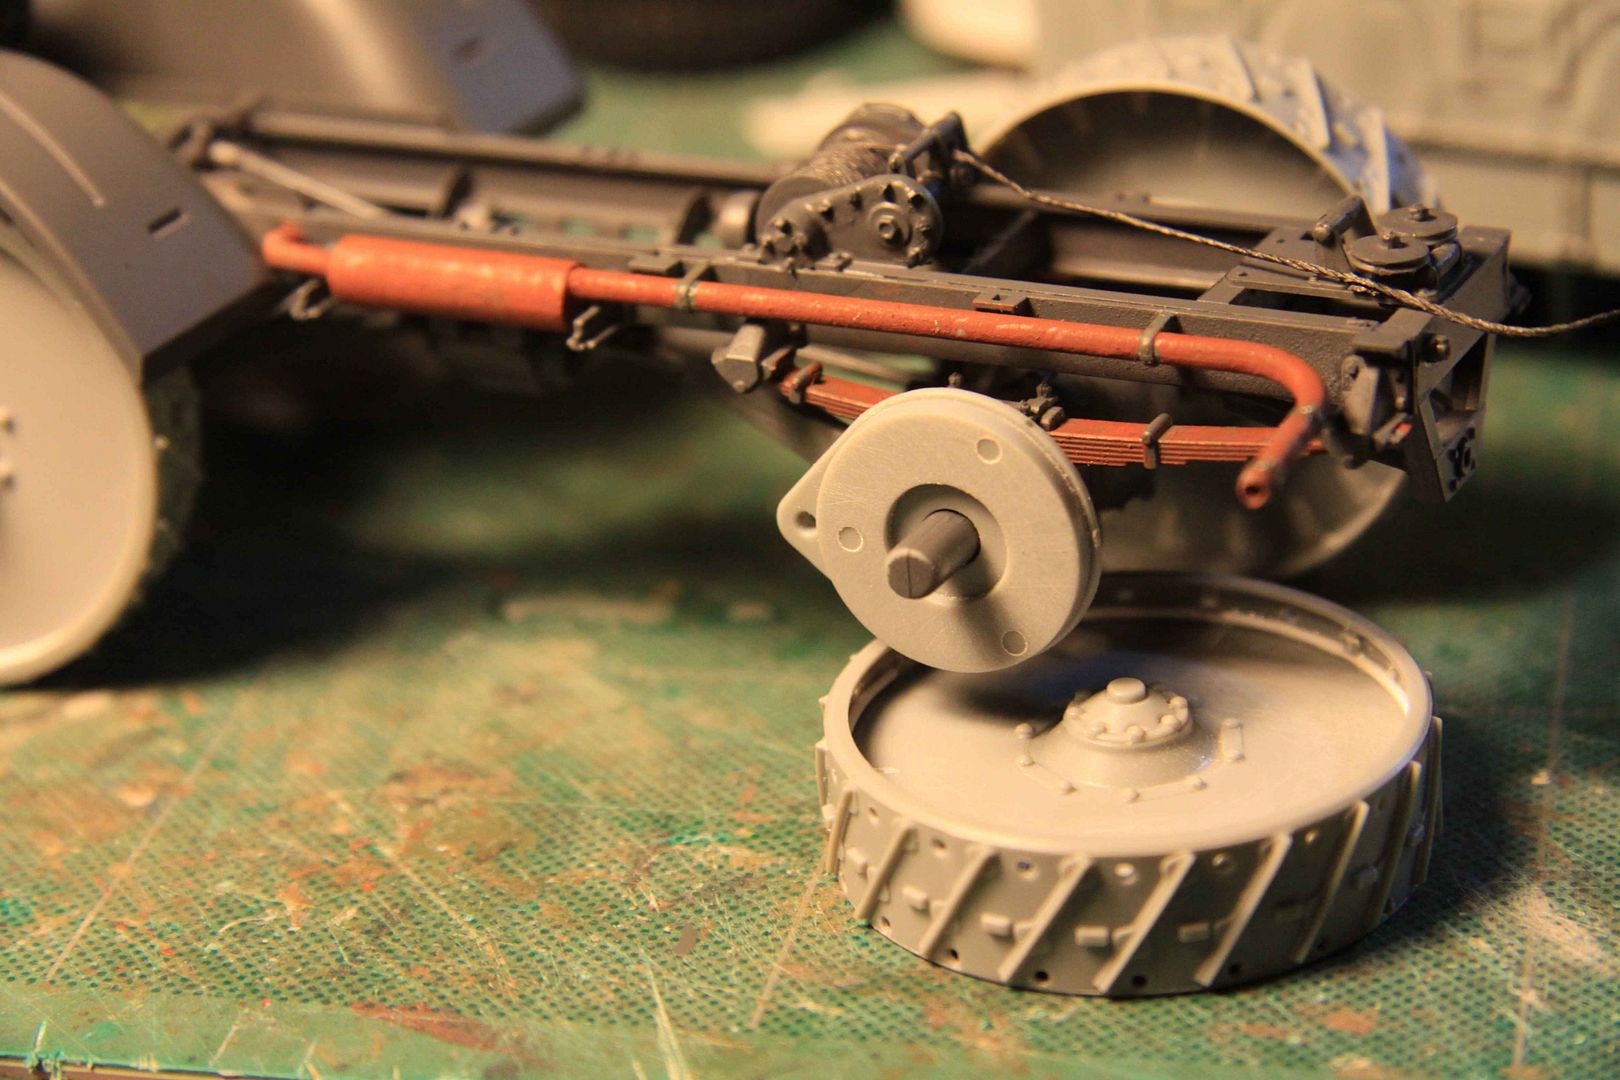
The muffler on kit is too high to clear bottom of cab and gas tank. Must be moved downward just slightly to clear. Exhaust pipe now exits out the top end of muffler whereas before it was centered.
Front engine mount frame cross member missing from Riich kit
Current construction progress.
Build log on this RSO can be viewed at:
http://armorama.com/forums/205790
Converted Skoda RSO to back date it to look like the original prototype with perforated wheels, relocated air intake, more storage lockers and slightly changed drivers windshield treatments. Also I slightly altered canvas tilt for a bit more visual interest.
Build log on this RSO can be viewed at:
http://armorama.com/forums/205790


(Prototype photo Skoda Manufacturing/Capricorn Publishing - shown here for discussion purposes only.)

Don't think drilling out eight wheel holes times four wheels didn't make for a couple of very nervous hours!

I drilled a very small hole in the center of the wheel. (to be filled in again later.) I then used a compass with a cutting blade to scribe a large circle representing the circular centerline of the eight holes. After that I used a set of dividers to find the radial center point of each of the equally spaced openings. Fun (because it WORKED!) but nerve racking!

The undercarriage with some additional frame details of course. ( Added missing front engine mount cross member, missing front brake drums, brake linkage, relocated muffler and included the support frame for the gas tank. Will also be building the additional storage lockers present on each side just below the cab. )

The muffler on kit is too high to clear bottom of cab and gas tank. Must be moved downward just slightly to clear. Exhaust pipe now exits out the top end of muffler whereas before it was centered.

Front engine mount frame cross member missing from Riich kit
Current construction progress.


Build log on this RSO can be viewed at:
http://armorama.com/forums/205790

jrutman
Joined: April 10, 2011
KitMaker: 7,941 posts
Armorama: 7,934 posts
Posted: Saturday, June 18, 2016 - 07:57 PM UTC
OK,my humble contribution to this thread would be this 251/11 telephone commo vehicle. Interior
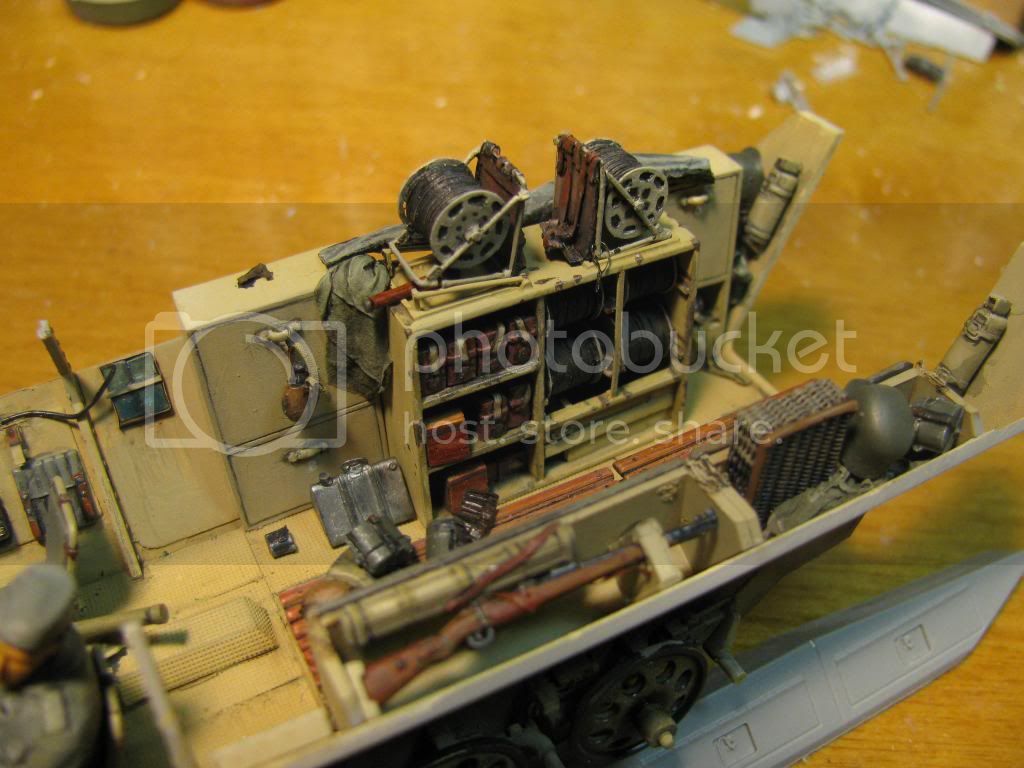
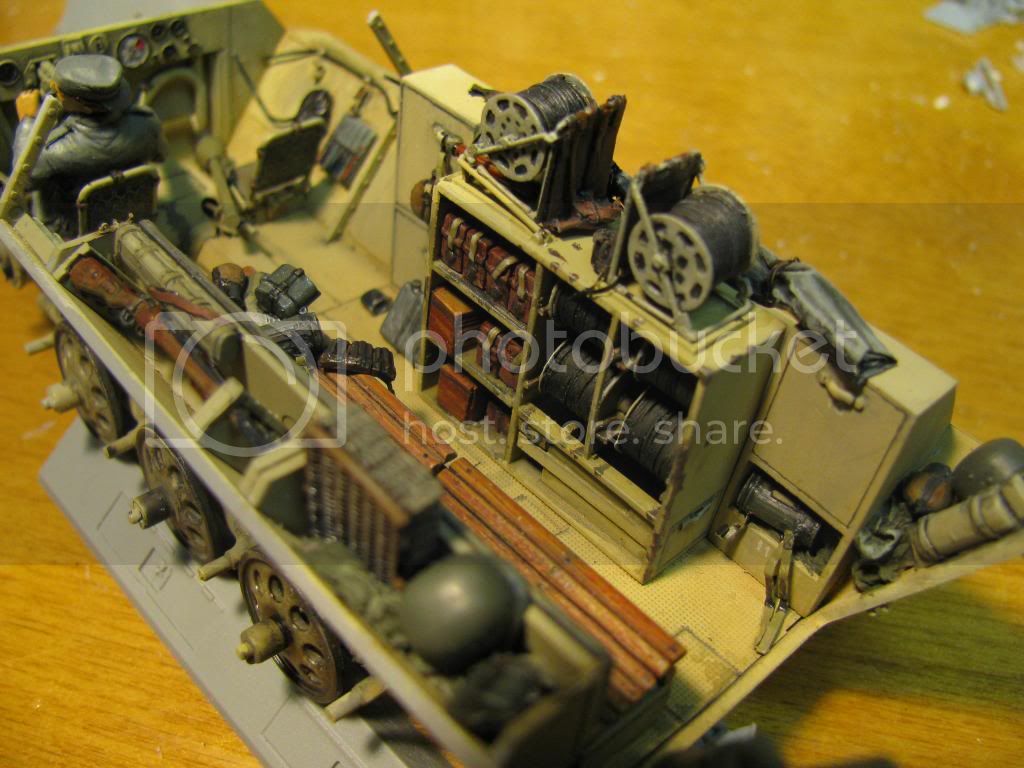
exterior
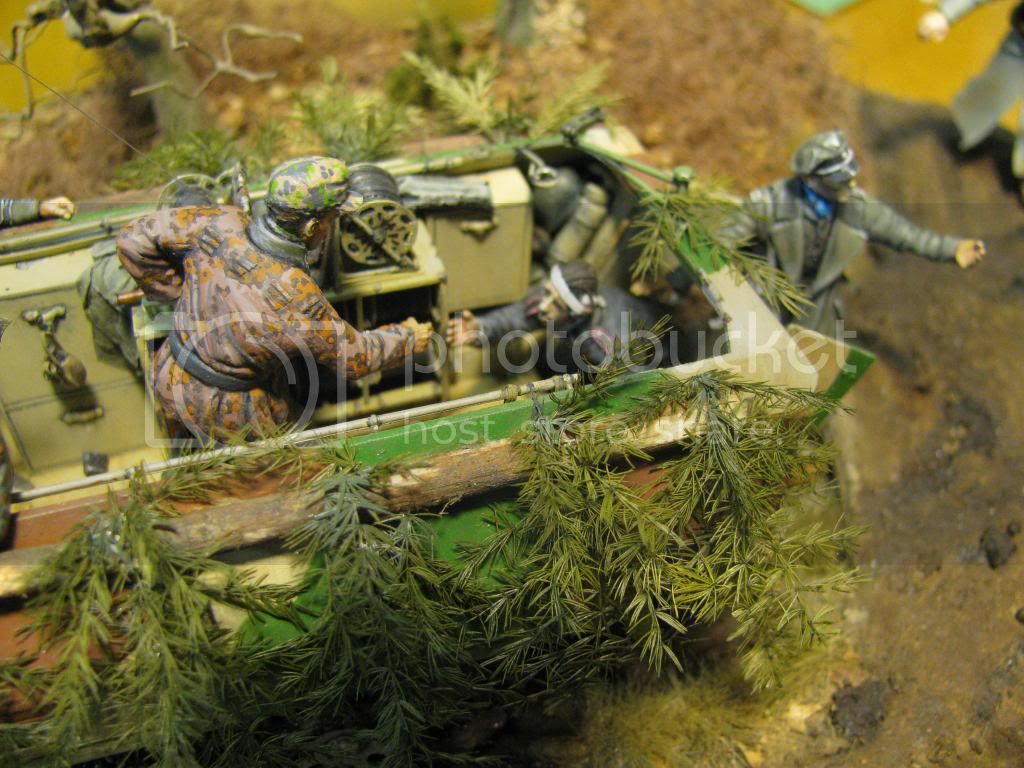

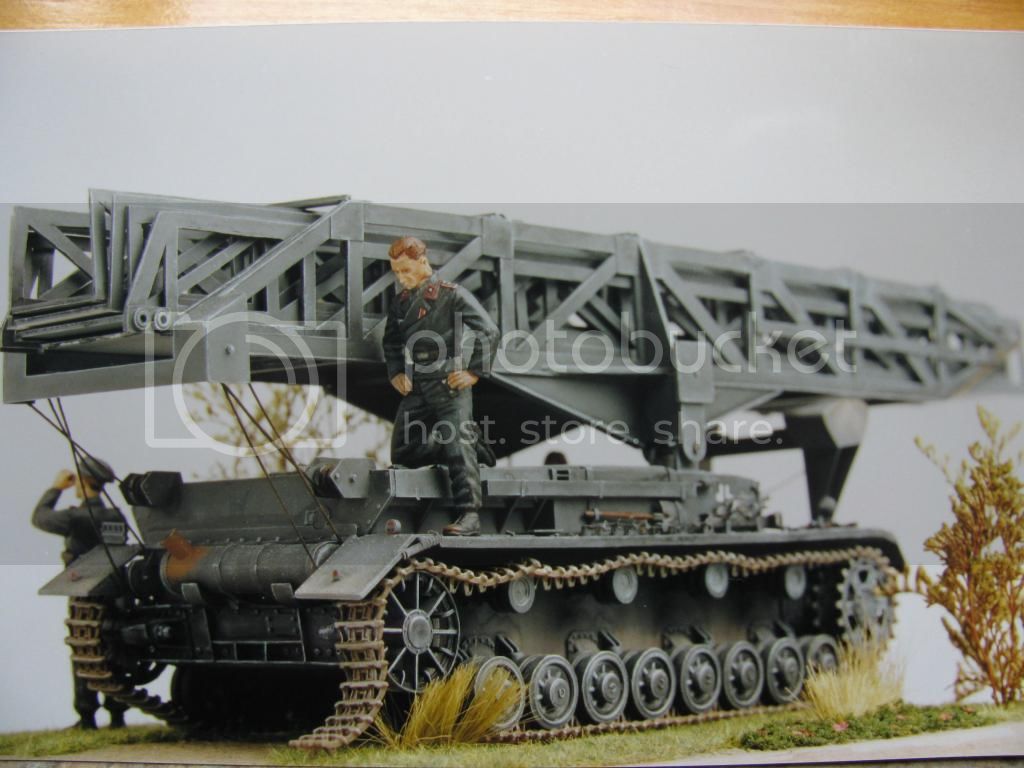
Infantry assault bridge from about 20 years ago!!!
Completely scratchbuilt artillery limber for the late style LFh 18/40

I confess,most of my scratchbuilds were airplane related and so not relevant here. Also a u-boat conning tower in 1/35.
J


exterior


Infantry assault bridge from about 20 years ago!!!

Completely scratchbuilt artillery limber for the late style LFh 18/40

I confess,most of my scratchbuilds were airplane related and so not relevant here. Also a u-boat conning tower in 1/35.
J
165thspc
#521
Joined: April 13, 2011
KitMaker: 9,465 posts
Armorama: 8,695 posts
Posted: Saturday, June 18, 2016 - 08:46 PM UTC
J, I very much like that signals interior in that 251. I myself am a Signal Corps person (photographer) but for the other side!
Thanks Jerry for your contribution!
Thanks Jerry for your contribution!
m4sherman
Joined: January 18, 2006
KitMaker: 1,866 posts
Armorama: 1,808 posts
Posted: Saturday, June 18, 2016 - 09:56 PM UTC
I thought that might be at the MVPA convention. Everything looks "new". I've been a member since around 1987. I was looking at the chain drive.
The signals 251 is nice. I had a German field phone once, it was black bakelite. A friend had one that was pysodelic yellow. German bakelite had some strange colors.
The signals 251 is nice. I had a German field phone once, it was black bakelite. A friend had one that was pysodelic yellow. German bakelite had some strange colors.
m4sherman
Joined: January 18, 2006
KitMaker: 1,866 posts
Armorama: 1,808 posts
Posted: Saturday, June 18, 2016 - 10:02 PM UTC
[quote]
Don't think drilling out eight wheel holes times four wheels didn't make for a couple of very nervous hours!
quote]
You did a good job.
Don't think drilling out eight wheel holes times four wheels didn't make for a couple of very nervous hours!
quote]
You did a good job.
165thspc
#521
Joined: April 13, 2011
KitMaker: 9,465 posts
Armorama: 8,695 posts
Posted: Saturday, June 18, 2016 - 10:24 PM UTC
Thanks - I was really amazed that I didn't mess up drilling those wheels in some way shape or form! I have a small adjustable speed drill press that made things easier but things still could have gone south in a heart beat!
One unseen benefit that came out of it all was that the drill was running at just the right speed to raise that slight little flange/shoulder around each hole. I noticed later that the real wheels had just that same small flange.
One unseen benefit that came out of it all was that the drill was running at just the right speed to raise that slight little flange/shoulder around each hole. I noticed later that the real wheels had just that same small flange.
165thspc
#521
Joined: April 13, 2011
KitMaker: 9,465 posts
Armorama: 8,695 posts
Posted: Sunday, June 19, 2016 - 04:01 PM UTC
SEAMS!
As model builders we all spend more than a little time on the work of removing seams from our models. But what about places on our models where there are SUPPOSED to be seams? Ever remove a seam you knew was supposed to be there because you thought a competition judge might mark you down for "not removing it"?
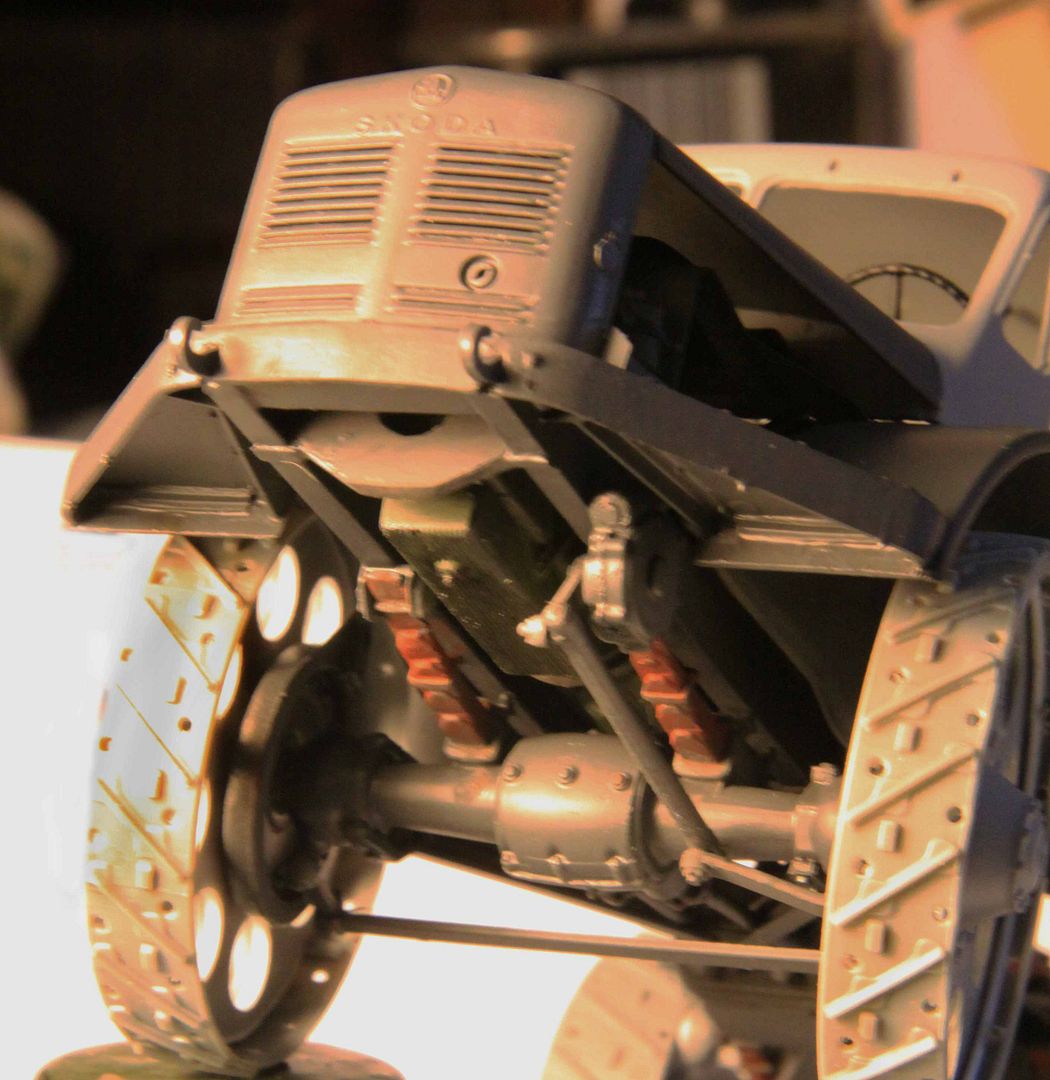
One example is on the Skoda RSO above: that shot where you can see the steering gearbox under the front axle. It clearly has a big seam down the middle but hey, in reality it was cast as two pieces and then bolted together with a seam (and a gasket) running around the centerline of the entire gearbox!
Another example is the transverse mounted leaf spring on the front of the Famo! We are in real danger there because the model piece has a center seam line running all the way around the spring. The first thing we would say is "Oh, gotta remove that" but the Famo actually had some sort of seam line running around the leaf spring like that. Perhaps the entire spring had a molded rubber boot on it to keep dirt and water from getting between the leaves????
Anyone else have a opinion on this or have had a similar occurrence?
As model builders we all spend more than a little time on the work of removing seams from our models. But what about places on our models where there are SUPPOSED to be seams? Ever remove a seam you knew was supposed to be there because you thought a competition judge might mark you down for "not removing it"?
One example is on the Skoda RSO above: that shot where you can see the steering gearbox under the front axle. It clearly has a big seam down the middle but hey, in reality it was cast as two pieces and then bolted together with a seam (and a gasket) running around the centerline of the entire gearbox!
Another example is the transverse mounted leaf spring on the front of the Famo! We are in real danger there because the model piece has a center seam line running all the way around the spring. The first thing we would say is "Oh, gotta remove that" but the Famo actually had some sort of seam line running around the leaf spring like that. Perhaps the entire spring had a molded rubber boot on it to keep dirt and water from getting between the leaves????
Anyone else have a opinion on this or have had a similar occurrence?
165thspc
#521
Joined: April 13, 2011
KitMaker: 9,465 posts
Armorama: 8,695 posts
Posted: Sunday, June 19, 2016 - 06:38 PM UTC
This rates up there with the questions about do interiors or engine and drivetrain corrections constitute a conversion?
It really bothered me that Dragon's heavy German rail flatcar was a gutless wonder, meaning that it offered no underbody detail at all! So of course I had to correct that. There is also a full air brake detailing set coming from LZ Models (Mirror) to add even more detail.
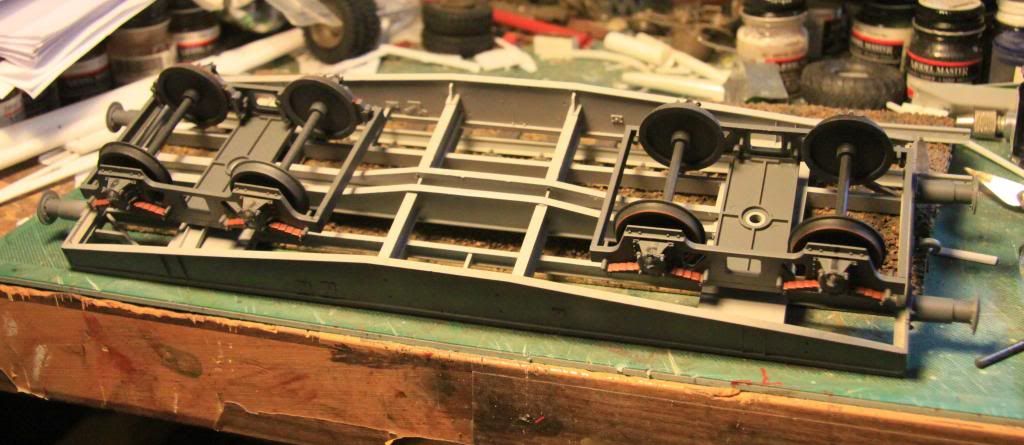
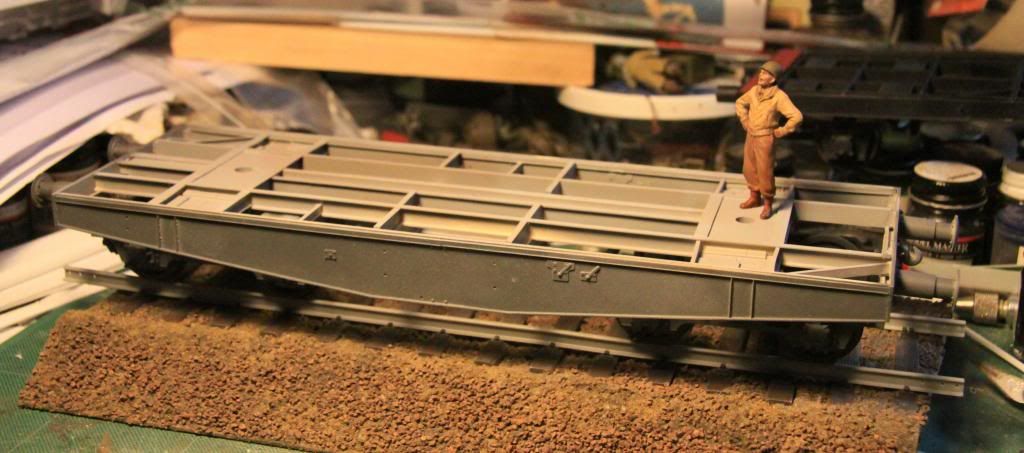
I'm afraid I could find no reference showing just how the underbody was framed up on the German flatcar so what you see here is a free-lanced "imagineered" design based on standard US railroad practice for freight car underframe design.
 |

WEB HOSTING BY


Copyright ©2021 Armorama and Kitmaker Network, a subsidiary of Silver Star Enterprises
All Rights Reserved. Please read our Conditions of Use and Privacy Policy.
All Rights Reserved. Please read our Conditions of Use and Privacy Policy.