


Armor/AFV
For discussions on tanks, artillery, jeeps, etc.
For discussions on tanks, artillery, jeeps, etc.
Hosted by Darren Baker, Mario Matijasic
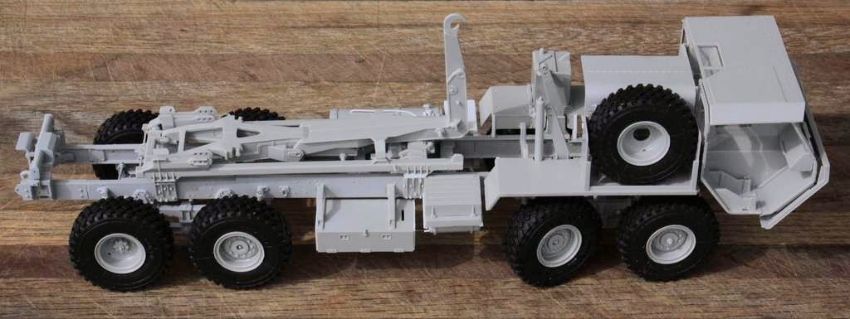
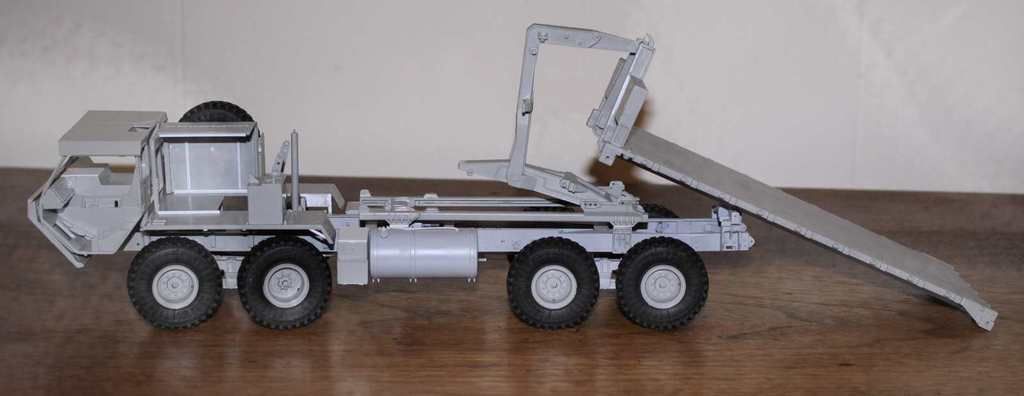
My first HEMTT - the Italeri LHS

Thirian24

Joined: September 30, 2015
KitMaker: 2,493 posts
Armorama: 2,344 posts
Posted: Saturday, August 13, 2016 - 01:19 AM UTC
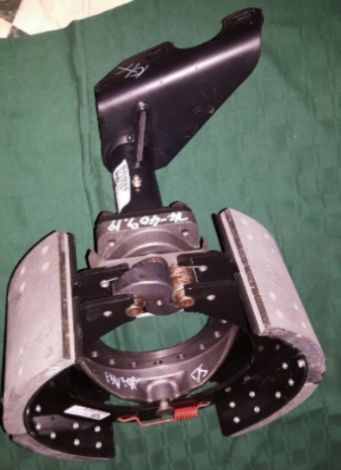
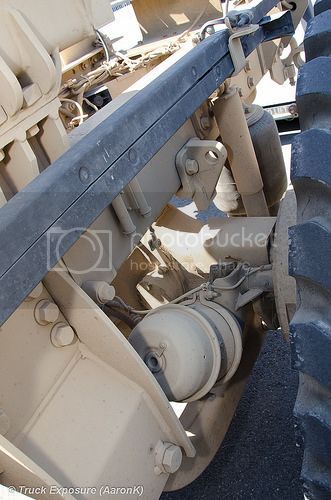
Michael - The actual "S" part of the S can is inside the brake drum, but there is a shaft/tube that comes outside of the back of the brake drum area that attaches to the slack adjuster.. That also attaches to the brake chamber.


165thspc

#521
Joined: April 13, 2011
KitMaker: 9,465 posts
Armorama: 8,695 posts
Posted: Saturday, August 13, 2016 - 03:44 AM UTC
Dustin, I almost went back and posted the remark that the slack adjuster does attach to the opposite end of the shaft the S cam is on.
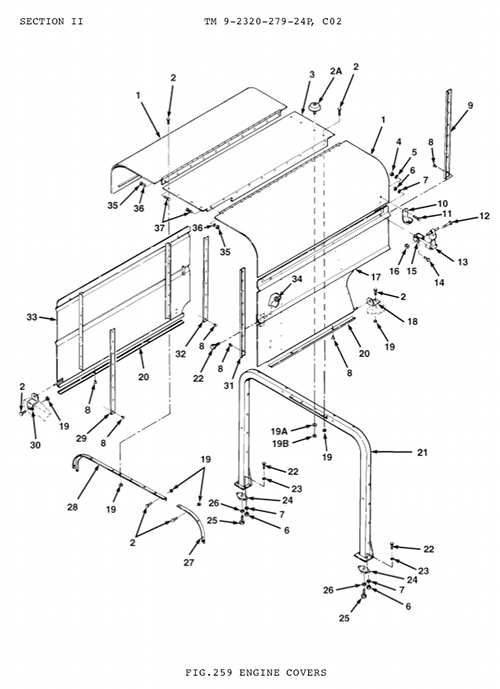
Again I won't know until the Real Model resin parts arrive. Also, so far I have not found a good photo or drawing of how the brake actuator mounting brackets are laid out on the HEMTT.
Found one!
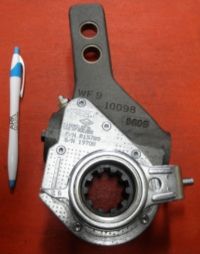
Again I won't know until the Real Model resin parts arrive. Also, so far I have not found a good photo or drawing of how the brake actuator mounting brackets are laid out on the HEMTT.
Found one!


165thspc
#521
Joined: April 13, 2011
KitMaker: 9,465 posts
Armorama: 8,695 posts
Posted: Saturday, August 13, 2016 - 03:47 AM UTC
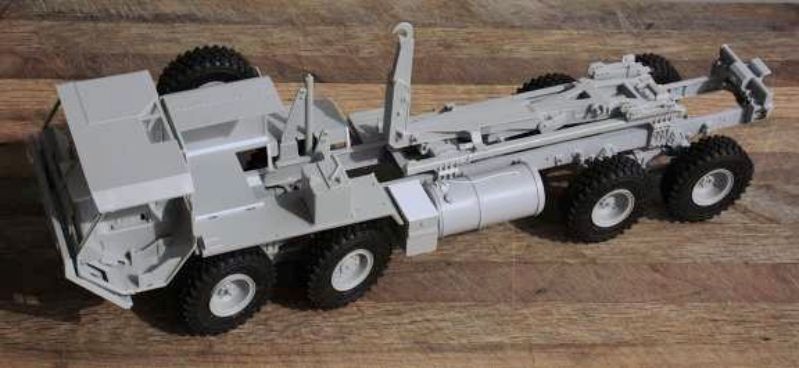
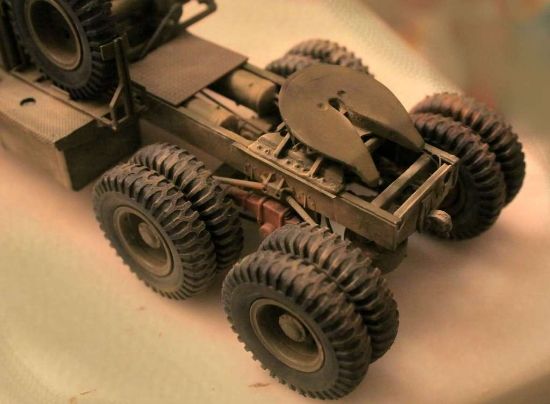
Took this vampire out into the sunlight to take some progress photos. Don't know for sure these add anything you guys and gals have not seen already.


Thirian24
Joined: September 30, 2015
KitMaker: 2,493 posts
Armorama: 2,344 posts
Posted: Saturday, August 13, 2016 - 04:08 AM UTC
The bracket that the brake chamber bolts to, and the S cam goes through is pictured here.


Bigred69
Joined: December 27, 2015
KitMaker: 290 posts
Armorama: 249 posts
Posted: Saturday, August 13, 2016 - 05:11 AM UTC
H Michael, you Vampire looks pretty good so far. I am following the build and enjoying all info you are putting out. Keep up the good work.
Ronnie
Ronnie
WXerock

#450
Joined: July 19, 2015
KitMaker: 672 posts
Armorama: 668 posts

Posted: Saturday, August 13, 2016 - 05:30 AM UTC
Michael, this build really is something to watch. Isn't it fun to look at a drawing in a TM only to find 90% of the detail was missed? You can get carried away trying to replicate it all.
Regards,
Eric
Regards,
Eric
165thspc
#521
Joined: April 13, 2011
KitMaker: 9,465 posts
Armorama: 8,695 posts
Posted: Saturday, August 13, 2016 - 07:31 AM UTC
Yes it's fun but even I know there has to be a limit! (Of course deciding where that limit is - that's another matter!)
165thspc
#521
Joined: April 13, 2011
KitMaker: 9,465 posts
Armorama: 8,695 posts
Posted: Saturday, August 13, 2016 - 08:24 AM UTC

Photographer uncredited

Anyone know of a gun ring kit available separately that I could add to my HEMTT? (Clearly the Italeri gun truck has one.) Is there any other source?
I can probably scratch the framework but the traverse ring could be the problem.

Did you know the gunner has a removable platform to stand on?

youngtiger1
Joined: May 14, 2008
KitMaker: 534 posts
Armorama: 344 posts

Posted: Saturday, August 13, 2016 - 09:20 AM UTC
Boy, this build is taking whole another meaning to modeling. All this information is priceless.
Epi
Joined: December 22, 2001
KitMaker: 3,586 posts
Armorama: 2,556 posts

Posted: Saturday, August 13, 2016 - 10:40 AM UTC
Mike,
I have 8 of those round air brake things from my Trumpeter Patriot kit and an older style gun ring kit you can have if you want.
I have 8 of those round air brake things from my Trumpeter Patriot kit and an older style gun ring kit you can have if you want.

165thspc
#521
Joined: April 13, 2011
KitMaker: 9,465 posts
Armorama: 8,695 posts
Posted: Saturday, August 13, 2016 - 11:34 AM UTC
Quoted Text
Boy, this build is taking whole another meaning to modeling. All this information is priceless.
Mike - I feel like this is the kind of research you have to do to take a model to the next level of detailing and with the internet almost anything you are looking for is probably out there.

Taylornic
Joined: January 10, 2005
KitMaker: 337 posts
Armorama: 332 posts

Posted: Saturday, August 13, 2016 - 12:09 PM UTC
I have the rings from both the m923 and the m35 if you need them.
youngtiger1
Joined: May 14, 2008
KitMaker: 534 posts
Armorama: 344 posts
Posted: Saturday, August 13, 2016 - 01:20 PM UTC
Quoted Text
Quoted TextBoy, this build is taking whole another meaning to modeling. All this information is priceless.
Mike - I feel like this is the kind of research you have to do to take a model to the next level of detailing and with the internet almost anything you are looking for is probably out there.
I hear you brother as you are absolutely correct. The evidence is already becoming clear with what you have done so far. I would strongly suggest to still replace your rubber tires for resin. I had a bad experience with rubber tires frm trumpeter kit. No matter how much paint and flat coat I sprayed on then in the end they look as if I had spray gloss.
So, in the end I gave up and took them of the kit and washed them in simple green to remove all the paint. From then on all my builds use resin replacements just so I don't have to repeat the headache.
Either way, I'm enjoying your build immensely.

Removed by original poster on 08/14/16 - 11:56:49 (GMT).
165thspc
#521
Joined: April 13, 2011
KitMaker: 9,465 posts
Armorama: 8,695 posts
Posted: Saturday, August 13, 2016 - 06:29 PM UTC
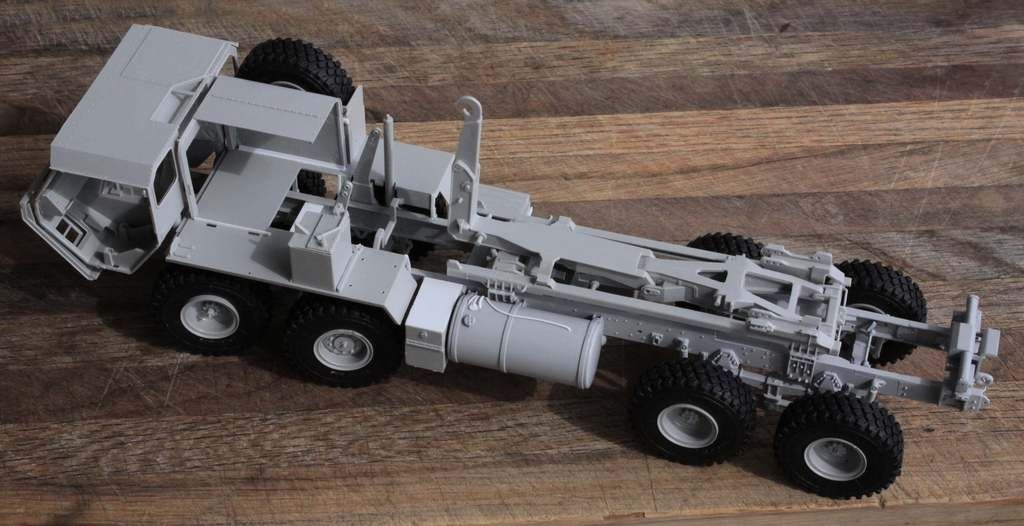
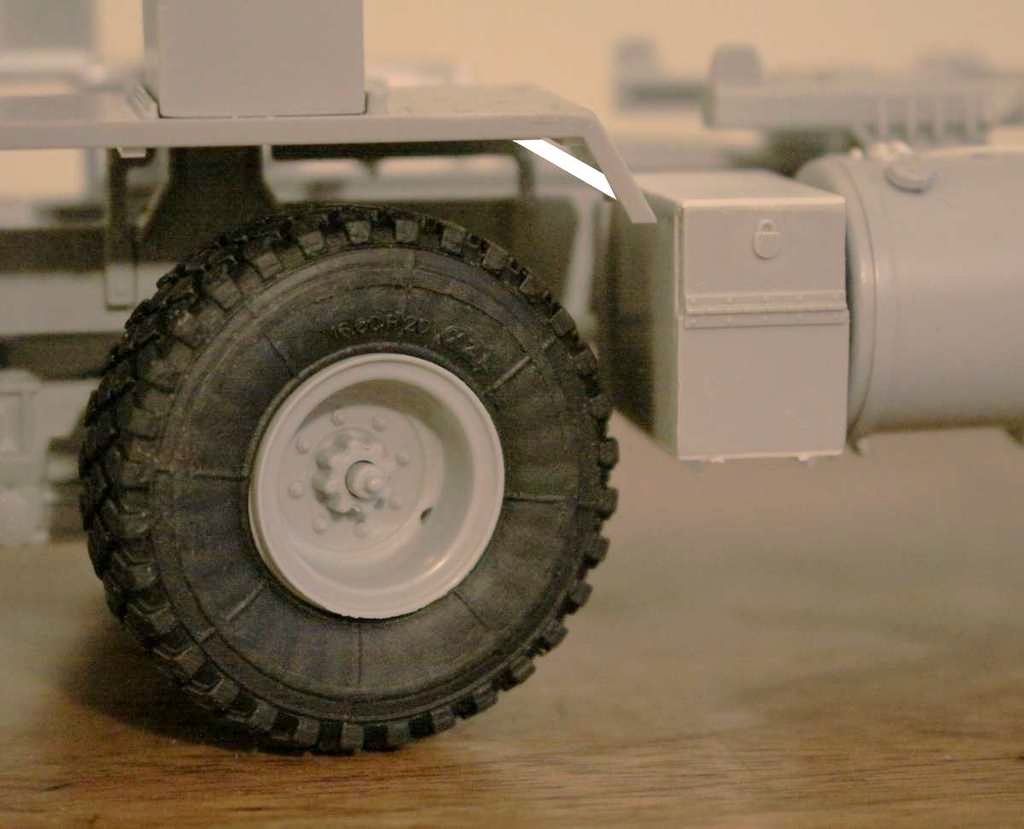
A small added detail plus finally, a good look at those new Italeri rubber tires:
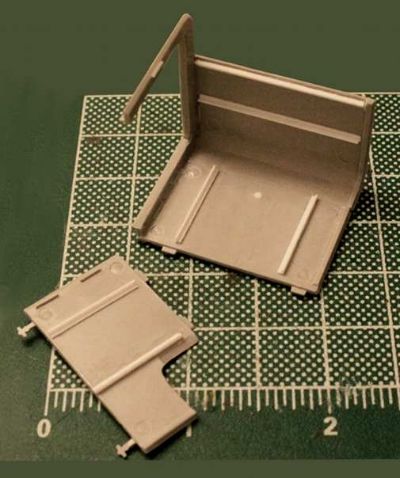
Small angle brace added to the fenders.

Small angle brace added to the fenders.
165thspc
#521
Joined: April 13, 2011
KitMaker: 9,465 posts
Armorama: 8,695 posts
Posted: Saturday, August 13, 2016 - 06:34 PM UTC
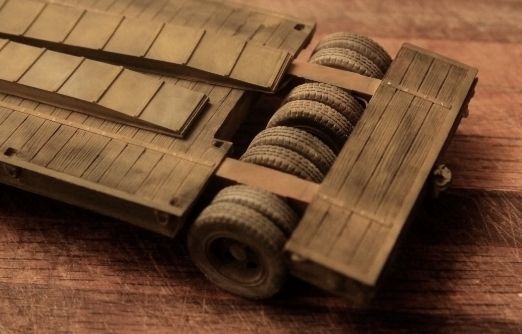
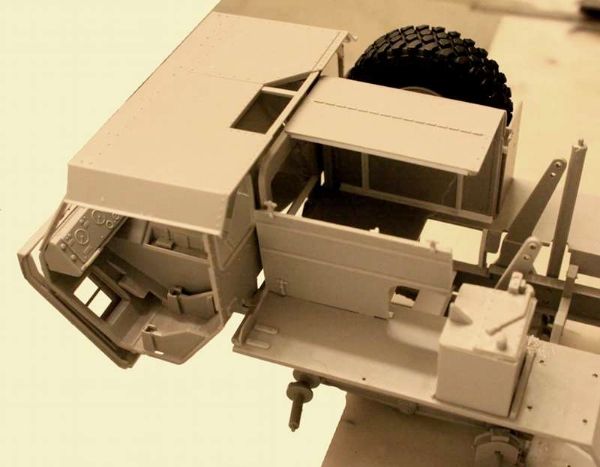
AND . . . . a shot that up till now I have not thought to take:
p.s. I started to buy the new Italeri 20' container at the same time I bought this model. Then I thought I might end up building my own load or go in a different direction entirely so I put my wallet back into my pocket.

p.s. I started to buy the new Italeri 20' container at the same time I bought this model. Then I thought I might end up building my own load or go in a different direction entirely so I put my wallet back into my pocket.
165thspc
#521
Joined: April 13, 2011
KitMaker: 9,465 posts
Armorama: 8,695 posts
Posted: Saturday, August 13, 2016 - 06:39 PM UTC
Mike - As far as painting/weathering the tires is concerned I usually weather with pastels so anything reacting chemically with the rubber is not a concern for me.
These are rubber tires on this HobbyBoss White 666 semi-tractor. (My conversion)
These are painted resin tires on this flatbed trailer.
All weathered using pastels.

These are rubber tires on this HobbyBoss White 666 semi-tractor. (My conversion)

These are painted resin tires on this flatbed trailer.
All weathered using pastels.
Thirian24
Joined: September 30, 2015
KitMaker: 2,493 posts
Armorama: 2,344 posts
Posted: Saturday, August 13, 2016 - 07:12 PM UTC
Sagged wheels would really set this off though.
That last shot is very cool.
That last shot is very cool.

ColinEdm


Joined: October 15, 2013
KitMaker: 1,355 posts
Armorama: 1,229 posts
Posted: Saturday, August 13, 2016 - 07:17 PM UTC
Impressive work Michael, you have done a great job on this so far, it is going to turn out great!
165thspc
#521
Joined: April 13, 2011
KitMaker: 9,465 posts
Armorama: 8,695 posts
Posted: Saturday, August 13, 2016 - 07:19 PM UTC
Quoted Text
Sagged wheels would really set this off though.
That last shot is very cool.
I won't promise but I do have a plan to glue the wheels on so they do not rotate and then use my Dremel to grind some flats into the bottoms of the tire.
OR . . . (a technique I saw recently) use a counter sunk wood screw through the tire and into the rim to cause the rubber tire to flatten on the bottom and bulge at the sidewalls.
165thspc
#521
Joined: April 13, 2011
KitMaker: 9,465 posts
Armorama: 8,695 posts
Posted: Saturday, August 13, 2016 - 08:47 PM UTC
More on the brakes:
Did a little photo retouching last night - starting with drawings from the TM. Here I have eliminated the internal workings of the HEMTT brake actuators so the external "look" can be seen.
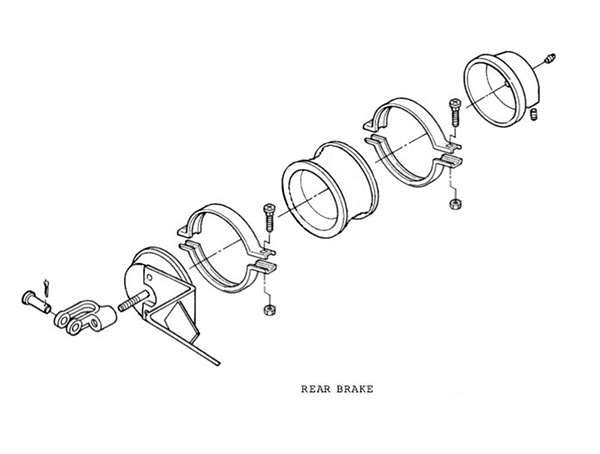
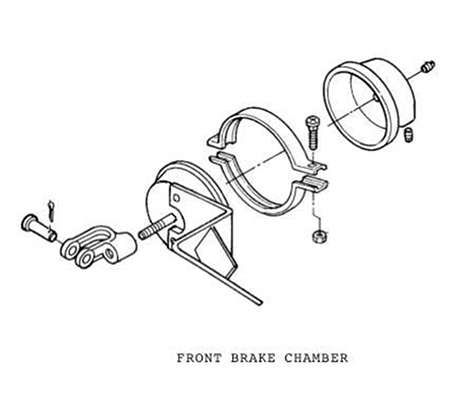
Did a little photo retouching last night - starting with drawings from the TM. Here I have eliminated the internal workings of the HEMTT brake actuators so the external "look" can be seen.


165thspc
#521
Joined: April 13, 2011
KitMaker: 9,465 posts
Armorama: 8,695 posts
Posted: Saturday, August 13, 2016 - 10:04 PM UTC
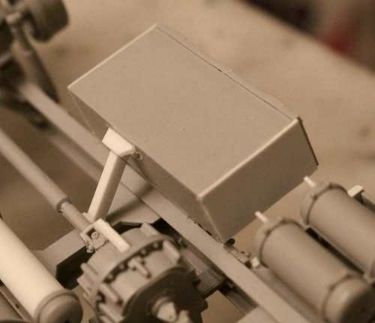
A few more minor details:


165thspc
#521
Joined: April 13, 2011
KitMaker: 9,465 posts
Armorama: 8,695 posts
Posted: Sunday, August 14, 2016 - 01:24 AM UTC
Another small:
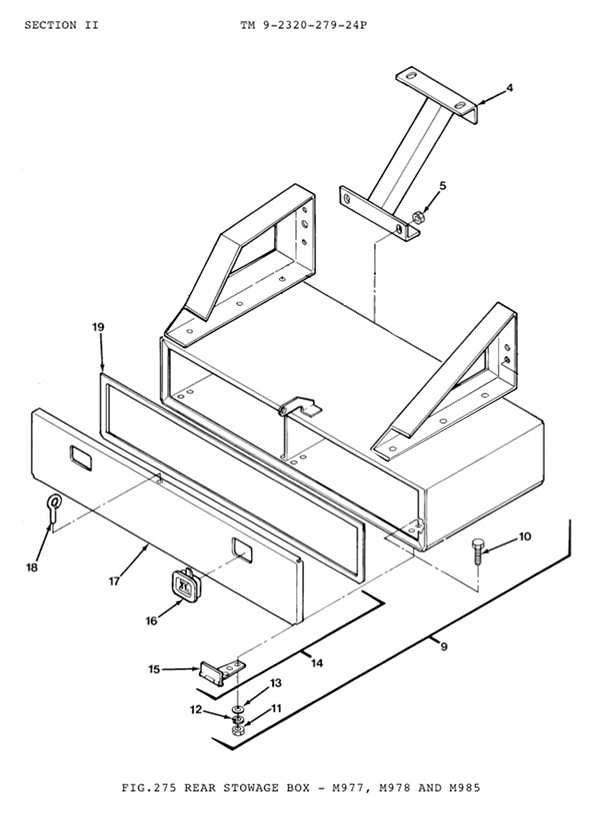
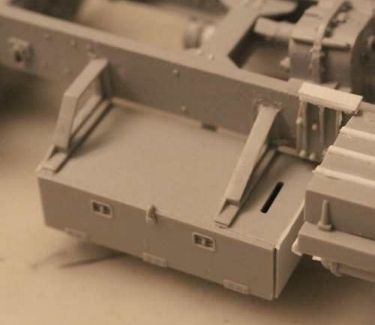
Rear angle brace for this right side rear stowage box.


Rear angle brace for this right side rear stowage box.
WXerock
#450
Joined: July 19, 2015
KitMaker: 672 posts
Armorama: 668 posts
Posted: Sunday, August 14, 2016 - 01:27 AM UTC
Michael, that is some great work on the TM images. I will have to visit this thread when I'm ready to tackle something this big.
Regards,
Eric
Regards,
Eric
165thspc
#521
Joined: April 13, 2011
KitMaker: 9,465 posts
Armorama: 8,695 posts
Posted: Sunday, August 14, 2016 - 02:50 AM UTC

 |

WEB HOSTING BY


Copyright ©2021 Armorama and Kitmaker Network, a subsidiary of Silver Star Enterprises
All Rights Reserved. Please read our Conditions of Use and Privacy Policy.
All Rights Reserved. Please read our Conditions of Use and Privacy Policy.