

Armor/AFV
For discussions on tanks, artillery, jeeps, etc.
For discussions on tanks, artillery, jeeps, etc.
Hosted by Darren Baker, Mario Matijasic
My first HEMTT - the Italeri LHS

165thspc

#521

Joined: April 13, 2011
KitMaker: 9,465 posts
Armorama: 8,695 posts
Posted: Sunday, August 14, 2016 - 02:54 AM UTC
Thanks Eric

165thspc
#521
Joined: April 13, 2011
KitMaker: 9,465 posts
Armorama: 8,695 posts
Posted: Sunday, August 14, 2016 - 05:20 AM UTC
More of my handiwork with Photoshop and the drawings from the TM:


Rear Brake


Rear Brake
Dragon164

#226

Joined: February 20, 2012
KitMaker: 1,909 posts
Armorama: 1,066 posts

Posted: Sunday, August 14, 2016 - 06:42 AM UTC
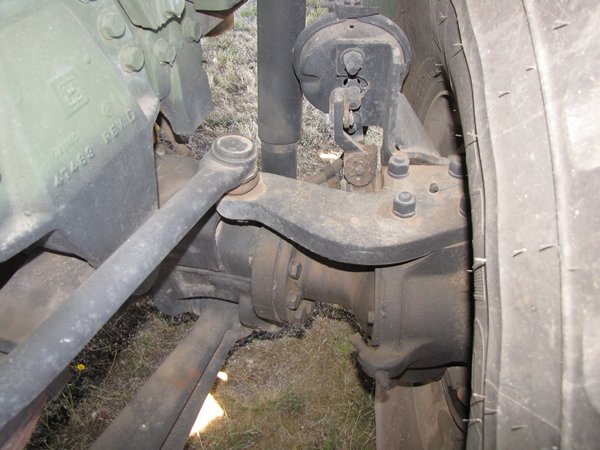
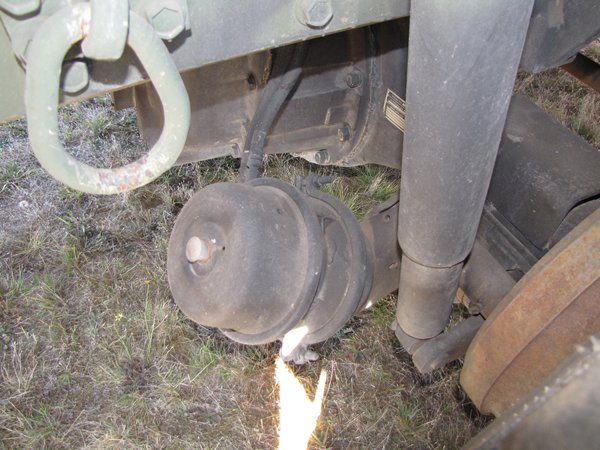
Mike,
I found one of these at the airshow I was at today got some pics of the brakes will post a little later when I have more time.
Cheers Rob.
I found one of these at the airshow I was at today got some pics of the brakes will post a little later when I have more time.
Cheers Rob.

165thspc
#521
Joined: April 13, 2011
KitMaker: 9,465 posts
Armorama: 8,695 posts
Posted: Sunday, August 14, 2016 - 07:20 AM UTC
Working now on the mounting bracket for the slave power steering gearbox:

And the steering unit itself:


And the steering unit itself:

165thspc
#521
Joined: April 13, 2011
KitMaker: 9,465 posts
Armorama: 8,695 posts
Posted: Sunday, August 14, 2016 - 09:00 AM UTC
Slave steering gear box FINISHED!


AND all six hydraulic lines that service this gearbox are represented!
Reference photo of gearbox at:
http://data4.primeportal.net/hemtt2/dieter_krause/m1120_lhs/images/m1120_lhs_64_of_92.jpg


AND all six hydraulic lines that service this gearbox are represented!
Reference photo of gearbox at:
http://data4.primeportal.net/hemtt2/dieter_krause/m1120_lhs/images/m1120_lhs_64_of_92.jpg

youngtiger1
Joined: May 14, 2008
KitMaker: 534 posts
Armorama: 344 posts

Posted: Sunday, August 14, 2016 - 09:06 AM UTC
Quoted Text
Mike - As far as painting/weathering the tires is concerned I usually weather with pastels so anything reacting chemically with the rubber is not a concern for me.
These are rubber tires on this HobbyBoss White 666 semi-tractor. (My conversion)
These are painted resin tires on this flatbed trailer.
All weathered using pastels.


Mike, I can clearly see you got that down well. Those wheels look super and I can see the trick is pastel rather then paint. So, you don't seal in your pastel?
Btw, I never heard of using a screw from tire to hub in create the sagging look. So, I'll sure to see how you do it.
Dragon164
#226
Joined: February 20, 2012
KitMaker: 1,909 posts
Armorama: 1,066 posts
Posted: Sunday, August 14, 2016 - 09:51 AM UTC
Here you go. 
Cheers Rob.


Cheers Rob.
165thspc
#521
Joined: April 13, 2011
KitMaker: 9,465 posts
Armorama: 8,695 posts
Posted: Sunday, August 14, 2016 - 06:06 PM UTC
Rob - Great photos that answer a lot of questions. Great work!
Mike - There was a famous model railroader named John Allen who used to say "there is no such thing as dust, it is just additional weathering. Now don't touch my RR cars!"
If I put a fixative on my pastel weathering it disappears so once weathered I, from then on, pick them up only by reaching under the front and rear bumpers (or their equivalent) Besides the pastels are easily repaired if they get smudged.

Taylornic
Joined: January 10, 2005
KitMaker: 337 posts
Armorama: 332 posts

Posted: Sunday, August 14, 2016 - 10:44 PM UTC
Package on the way, Mike.
165thspc
#521
Joined: April 13, 2011
KitMaker: 9,465 posts
Armorama: 8,695 posts
Posted: Monday, August 15, 2016 - 07:29 AM UTC
Thank you Sir!
165thspc
#521
Joined: April 13, 2011
KitMaker: 9,465 posts
Armorama: 8,695 posts
Posted: Monday, August 15, 2016 - 07:31 AM UTC
The Engine has ARRIVED!- almost 10 days ahead of schedule!!!!!!
(To use a NASCAR term, I guess you could say I bought a crate engine.)


An amazing and beautiful piece of casting work.
(To use a NASCAR term, I guess you could say I bought a crate engine.)


An amazing and beautiful piece of casting work.
165thspc
#521
Joined: April 13, 2011
KitMaker: 9,465 posts
Armorama: 8,695 posts
Posted: Monday, August 15, 2016 - 07:47 AM UTC
Well, I knew right away that some major engine compartment sheet metal was gonna have to go . . .


165thspc
#521
Joined: April 13, 2011
KitMaker: 9,465 posts
Armorama: 8,695 posts
Posted: Monday, August 15, 2016 - 08:19 AM UTC
Oh Yeah ! ! !

The engine is sitting a little high right now because I am still using the existing Italeri transmission mount but that will change!

The engine is sitting a little high right now because I am still using the existing Italeri transmission mount but that will change!
165thspc
#521
Joined: April 13, 2011
KitMaker: 9,465 posts
Armorama: 8,695 posts
Posted: Monday, August 15, 2016 - 08:27 AM UTC
Anybody that is into drag racing is going to recognize what this is. That's a compressor sitting on top of this engine, a "blower"!


165thspc
#521
Joined: April 13, 2011
KitMaker: 9,465 posts
Armorama: 8,695 posts
Posted: Monday, August 15, 2016 - 08:33 AM UTC
And on top of that sits an exhaust driven turbo charger with inter-cooler!
- - - A blown turbo diesel; that is one serious horse of an engine! - - -

- - - A blown turbo diesel; that is one serious horse of an engine! - - -

Taylornic
Joined: January 10, 2005
KitMaker: 337 posts
Armorama: 332 posts
Posted: Monday, August 15, 2016 - 08:38 AM UTC
Thats a sweet setup! Did it include the front brakes also? If I remember, all the missing crossmembers are included too?
165thspc
#521
Joined: April 13, 2011
KitMaker: 9,465 posts
Armorama: 8,695 posts
Posted: Monday, August 15, 2016 - 09:21 AM UTC
Yep! Front brakes and all cross members!
Taylornic
Joined: January 10, 2005
KitMaker: 337 posts
Armorama: 332 posts
Posted: Monday, August 15, 2016 - 11:02 AM UTC
Quoted Text
Yep! Front brakes and all cross members!
Good to know. I have the Trumpeter M983 on the way to combine with the M1120. I will have to order the engine kit now.
165thspc
#521
Joined: April 13, 2011
KitMaker: 9,465 posts
Armorama: 8,695 posts
Posted: Monday, August 15, 2016 - 05:51 PM UTC
Wanted to revisit the idea of just how much plastic has to be removed on the Italeri HEMTT to accept this mega engine. Good idea to make these cuts as you are building the kit rather than like I did, by taking a Dremel tool to a partially assembled model. A little more difficult to do but not impossible. At this point I have done a little bit of clean up to the cuts but still need to true up those cut lines.


F.Y.I. The Trumpeter kit is already open in these areas (no cutting required) as is the larger vehicle offered by Oshkosh.


F.Y.I. The Trumpeter kit is already open in these areas (no cutting required) as is the larger vehicle offered by Oshkosh.
165thspc
#521
Joined: April 13, 2011
KitMaker: 9,465 posts
Armorama: 8,695 posts
Posted: Monday, August 15, 2016 - 07:23 PM UTC
I made a Boo Boo!
There are two versions of the HEMTT engine kit from Real Models. WARNING, WARNING. There is one version for the Trumpeter model and another for the Italeri.
I ordered the WRONG kit. (Totally my fault.) But I am actually now glad I did!
It is now my understanding that with the kit for the Italeri HEMTT a large portion of the lower front of the engine is missing in order to fit around all that unnecessary plastic that Italeri gives us.
I like the way this turned out better. I get the FULL engine and instead have to cut away that large floorboard area in the Italeri kit that shouldn't be there anyway,
The down side: With the engine kit for the Trumpeter you do not get the rear brakes because they are already provided in the Trumpeter kit!
I am working now with the distributor and with Real Models to purchase the rear brake castings as well.
165thspc
#521
Joined: April 13, 2011
KitMaker: 9,465 posts
Armorama: 8,695 posts
Posted: Tuesday, August 16, 2016 - 03:06 AM UTC
Since I had already put in my own crossbar above the front set of wheels I figured I would just cut up the Real Models resin H-frame and add their angles to my I-beam.


165thspc
#521
Joined: April 13, 2011
KitMaker: 9,465 posts
Armorama: 8,695 posts
Posted: Tuesday, August 16, 2016 - 03:09 AM UTC
Engine wise, I got the exhaust headers installed and that allowed me to place the turbo in its' final location,


165thspc
#521
Joined: April 13, 2011
KitMaker: 9,465 posts
Armorama: 8,695 posts
Posted: Tuesday, August 16, 2016 - 10:37 AM UTC
This evening I worked on the front end of the engine: main crank pulley. fan pulley and clutch, water pump and alternator. Also worked on the rear engine mounts, the driveshaft to the T case and started scratch building the forward engine mounts.


Taylornic
Joined: January 10, 2005
KitMaker: 337 posts
Armorama: 332 posts
Posted: Tuesday, August 16, 2016 - 10:53 AM UTC
That engine looks right at home. Nice work.
165thspc
#521
Joined: April 13, 2011
KitMaker: 9,465 posts
Armorama: 8,695 posts
Posted: Tuesday, August 16, 2016 - 06:14 PM UTC
Work'n on the engine mounts now. The rear mounts that come with the engine work perfectly but I wanted a bit more realistic front mount. Try'n to work something out now.


 |

WEB HOSTING BY


Copyright ©2021 Armorama and Kitmaker Network, a subsidiary of Silver Star Enterprises
All Rights Reserved. Please read our Conditions of Use and Privacy Policy.
All Rights Reserved. Please read our Conditions of Use and Privacy Policy.