Ken and Tat,
Looking good!
Hosted by Richard S.
Half a Year for a Half Track
Posted: Monday, April 10, 2017 - 04:17 PM UTC
Posted: Monday, April 10, 2017 - 04:54 PM UTC
Thanks Mark! The kit's coming along nicely so far.
Armorsmith
Pennsylvania, United States
Joined: April 09, 2015
KitMaker: 1,063 posts
Armorama: 1,000 posts
Joined: April 09, 2015
KitMaker: 1,063 posts
Armorama: 1,000 posts
Posted: Monday, April 10, 2017 - 08:22 PM UTC
69mudbone-Half track is looking good. Anxious to see the next stage. The pictures show the preshading to good effect. Be aware that oils are usually applied over a gloss not a flat coat. That said there are those who do use oils over a flat. The advantage of gloss is that it makes it easier to remove the oils. They can still be removed from a flat but it is a bit more difficult, especially to remove them completely. Good luck!
justsendit
Colorado, United States
Joined: February 24, 2014
KitMaker: 3,033 posts
Armorama: 2,492 posts
Joined: February 24, 2014
KitMaker: 3,033 posts
Armorama: 2,492 posts
Posted: Monday, April 10, 2017 - 09:53 PM UTC
Nice variety of half-tracks in this campaign. All looking very good! Keep the pictures coming!🍺
—mike
—mike
panzerIV
England - North West, United Kingdom
Joined: January 02, 2007
KitMaker: 781 posts
Armorama: 676 posts
Joined: January 02, 2007
KitMaker: 781 posts
Armorama: 676 posts
Posted: Monday, April 10, 2017 - 10:24 PM UTC
Just seen this campaign and joined im just waiting on mr postman to deliver the revell 1/72 m16 halftrack
Posted: Monday, April 10, 2017 - 10:50 PM UTC
Quoted Text
69mudbone-Half track is looking good. Anxious to see the next stage. The pictures show the preshading to good effect. Be aware that oils are usually applied over a gloss not a flat coat. That said there are those who do use oils over a flat. The advantage of gloss is that it makes it easier to remove the oils. They can still be removed from a flat but it is a bit more difficult, especially to remove them completely. Good luck!

Flat is good if you are doing a filter, but washes do tend to work better on a gloss finish.
69mudbone
California, United States
Joined: April 26, 2016
KitMaker: 362 posts
Armorama: 285 posts
Joined: April 26, 2016
KitMaker: 362 posts
Armorama: 285 posts
Posted: Monday, April 10, 2017 - 11:28 PM UTC
Quoted Text
Quoted Text69mudbone-Half track is looking good. Anxious to see the next stage. The pictures show the preshading to good effect. Be aware that oils are usually applied over a gloss not a flat coat. That said there are those who do use oils over a flat. The advantage of gloss is that it makes it easier to remove the oils. They can still be removed from a flat but it is a bit more difficult, especially to remove them completely. Good luck!
Flat is good if you are doing a filter, but washes do tend to work better on a gloss finish.
Thanks Guys, I have read it finished in two different ways I will try this and make notes, I have a BM-13 rocket launcher built that I will try different methods I really enjoy experimenting to find what feels good
Posted: Tuesday, April 11, 2017 - 12:34 AM UTC
Welcome aboard, Anthony!
Posted: Tuesday, April 11, 2017 - 04:02 AM UTC
Quoted Text
Hi Guys, WIP update. Put the 20 year old decals on they held up fairly well , and initial weathering , waiting for flat to dry and will give oil colors a shot . Am learning a great deal during this build
image upload no compression
image hoster
Very nice Ken -- I like how the pre-shading effect went with the base coat
I worked on the suspension last night. All the wheels are dry-fitted. The kit provides some level of detail with a bit of fiddly parts. I believe the front wheels can be made to be movable, but I'd rather leave it straight.
So far the Italeri kit builds fast:
Between having something movable I'd be more concerned on having the vehicle stand even on a flat surface. Happy that it turned out ok:
More to come.
Cheers,
Tat
27-1025
North Carolina, United States
Joined: September 16, 2004
KitMaker: 1,281 posts
Armorama: 1,222 posts
Joined: September 16, 2004
KitMaker: 1,281 posts
Armorama: 1,222 posts
Posted: Wednesday, April 12, 2017 - 11:47 PM UTC
69mudbone
California, United States
Joined: April 26, 2016
KitMaker: 362 posts
Armorama: 285 posts
Joined: April 26, 2016
KitMaker: 362 posts
Armorama: 285 posts
Posted: Thursday, April 13, 2017 - 01:32 AM UTC
Hi Chris, the gun has some nice detail, looking good.
petbat
Queensland, Australia
Joined: August 06, 2005
KitMaker: 3,353 posts
Armorama: 3,121 posts
Joined: August 06, 2005
KitMaker: 3,353 posts
Armorama: 3,121 posts
Posted: Thursday, April 13, 2017 - 01:56 AM UTC
Guys some great build work going on here.
I'm amazed at how fast some of you guys can build.
Anthony you mean your ex-Matchbox come Revell kit I have the original and it will be interesting to see how the Revell kit compares with it
I'm amazed at how fast some of you guys can build.
Anthony you mean your ex-Matchbox come Revell kit I have the original and it will be interesting to see how the Revell kit compares with it
Posted: Thursday, April 13, 2017 - 02:12 AM UTC
Chris, that is looking great!
27-1025
North Carolina, United States
Joined: September 16, 2004
KitMaker: 1,281 posts
Armorama: 1,222 posts
Joined: September 16, 2004
KitMaker: 1,281 posts
Armorama: 1,222 posts
Posted: Thursday, April 13, 2017 - 02:24 AM UTC
Quoted Text
Hi Chris, the gun has some nice detail, looking good.
Thanks. They are nice kits. Hope to get around to building the rest of them in the stash.
27-1025
North Carolina, United States
Joined: September 16, 2004
KitMaker: 1,281 posts
Armorama: 1,222 posts
Joined: September 16, 2004
KitMaker: 1,281 posts
Armorama: 1,222 posts
Posted: Thursday, April 13, 2017 - 02:24 AM UTC
Quoted Text
Chris, that is looking great!
Thanks.
petbat
Queensland, Australia
Joined: August 06, 2005
KitMaker: 3,353 posts
Armorama: 3,121 posts
Joined: August 06, 2005
KitMaker: 3,353 posts
Armorama: 3,121 posts
Posted: Friday, April 14, 2017 - 03:09 AM UTC
Okay, finished the inside and added some equipment. Ready to fit the upper hull now.
The layout inside the 250/9 Neu is a mystery as there are no known pics of it, and no line diagrams either. The standard layout would not work with the turret, so this is just my take on it.
I based the layout on keeping the central area clear where the turret occupant's shoulders and arms would brush up against anything on the walls. Also, I did not add anything where it could not be seen. Then I considered what needed to be accessed regularly (meal tins), and what needed to be handy (gas Mask containers) and what would be needed less often (spare MG Barrel).
The MG Barrel container is actually clipped into the hull fitting, which is kind of U shaped with the open ends curved inward slightly to fit around the container and hold it in place. Don't know how much force was needed to pull it out but assumed enough that the rack could still be fit horizontal. Dragon has it vertical on the outside of the fuel tank.... where the seats on the turret would foul on it!!
I still don't know what went into the second rack, so left it empty as it can't actually be seen when the turret is in place.
The detail painting on the gas mask and food container equipment might appear heavy and overdone, but once the turret is in place it is dark inside and subtle dry brushing, etc is lost - These just turn into dark blobs. It looks much better with the heavier contrast when the turret is in.
Similarly, the first aid kit red cross and writing is only just visible at the steep angle, so finesse is not needed.
Posted: Friday, April 14, 2017 - 03:57 AM UTC
Nice details, Peter
ltb073
New York, United States
Joined: March 08, 2010
KitMaker: 3,662 posts
Armorama: 3,078 posts
Joined: March 08, 2010
KitMaker: 3,662 posts
Armorama: 3,078 posts
Posted: Friday, April 21, 2017 - 07:46 PM UTC
petbat
Queensland, Australia
Joined: August 06, 2005
KitMaker: 3,353 posts
Armorama: 3,121 posts
Joined: August 06, 2005
KitMaker: 3,353 posts
Armorama: 3,121 posts
Posted: Saturday, April 22, 2017 - 05:30 AM UTC
Coming along nicely Sal. Glad the idea paid off you, looks great.
Posted: Saturday, April 22, 2017 - 08:06 AM UTC
It looks cool Sal -- I might try that dark yellow over dark grey scheme in a future build.
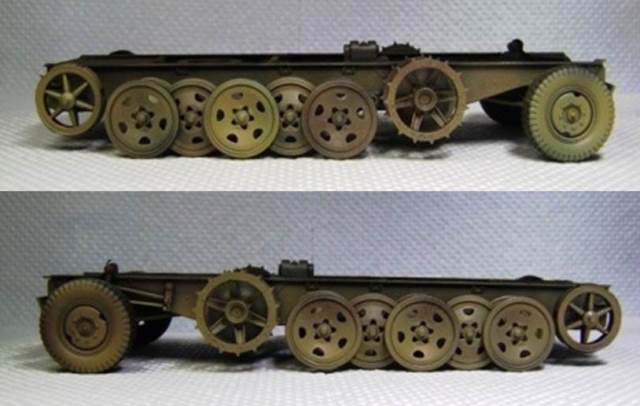
I've started to paint the road wheels and lower chassis. Will finish these first before putting on the tracks.
Test fit for the upper sub-assemblies:
Cheers,
Tat
I've started to paint the road wheels and lower chassis. Will finish these first before putting on the tracks.
Test fit for the upper sub-assemblies:
Cheers,
Tat
justsendit
Colorado, United States
Joined: February 24, 2014
KitMaker: 3,033 posts
Armorama: 2,492 posts
Joined: February 24, 2014
KitMaker: 3,033 posts
Armorama: 2,492 posts
Posted: Saturday, April 22, 2017 - 08:39 AM UTC
Looking good, guys! Really digging the builds, the details, and the paint schemes!
Very cool campaign!🍺
—mike
Very cool campaign!🍺
—mike
petbat
Queensland, Australia
Joined: August 06, 2005
KitMaker: 3,353 posts
Armorama: 3,121 posts
Joined: August 06, 2005
KitMaker: 3,353 posts
Armorama: 3,121 posts
Posted: Saturday, April 22, 2017 - 08:56 AM UTC
Looking Tat. It is a beast isn't it. You don't realise how big it was until you put it beside a tank model and compare sizes. It is bigger than a panzer IV!
I have a shelf queen awaiting paint. I built the interior and put it aside while I cast up some additional rounds for it. After seeing yours, I may go and finish mine.... after I finish the group builds I have already subscribed too!
Posted: Saturday, April 22, 2017 - 05:31 PM UTC
Big indeed Peter -- when I first inspected the sprues I was thinking that it may be off 1/35 scale. It has this beastly, brutish look to it, and at times I'd think that it wouldn't be out of place in a post-apocalyptic scenario, ala Mad Max
Hard_Target
Virginia, United States
Joined: January 30, 2017
KitMaker: 20 posts
Armorama: 17 posts
Joined: January 30, 2017
KitMaker: 20 posts
Armorama: 17 posts
Posted: Saturday, April 22, 2017 - 08:14 PM UTC
Posted: Saturday, April 22, 2017 - 08:53 PM UTC
Coming along great, guys!