Hosted by Richard S.
Half a Year for a Half Track
Posted: Wednesday, May 10, 2017 - 06:46 AM UTC
Looking great, Karl, hope you get to feeling better!
petbat

Joined: August 06, 2005
KitMaker: 3,353 posts
Armorama: 3,121 posts

Posted: Wednesday, May 10, 2017 - 02:03 PM UTC
Looking good everyone.
Time to get my sorry butt back to the 250/9.
Time to get my sorry butt back to the 250/9.
erichvon

Joined: January 17, 2006
KitMaker: 1,694 posts
Armorama: 1,584 posts

Posted: Wednesday, May 10, 2017 - 05:45 PM UTC
Thanks Clayton, going to have another bash at it today so hopefully I'll get quite a bit done fingers crossed.
erichvon

Joined: January 17, 2006
KitMaker: 1,694 posts
Armorama: 1,584 posts

Posted: Thursday, May 11, 2017 - 12:51 PM UTC
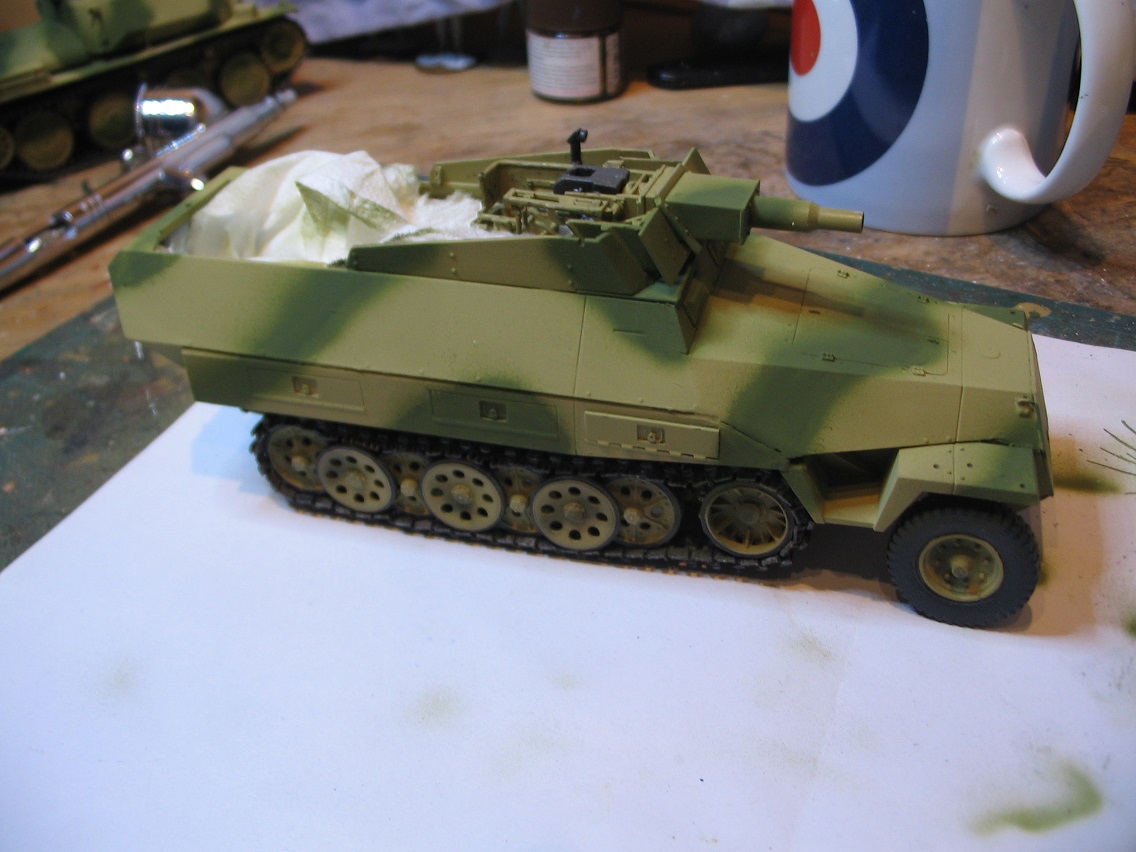
I've had a concerted effort on it as after I'd spent a couple of hours finishing off the inside I thought I'd better do some proper building.
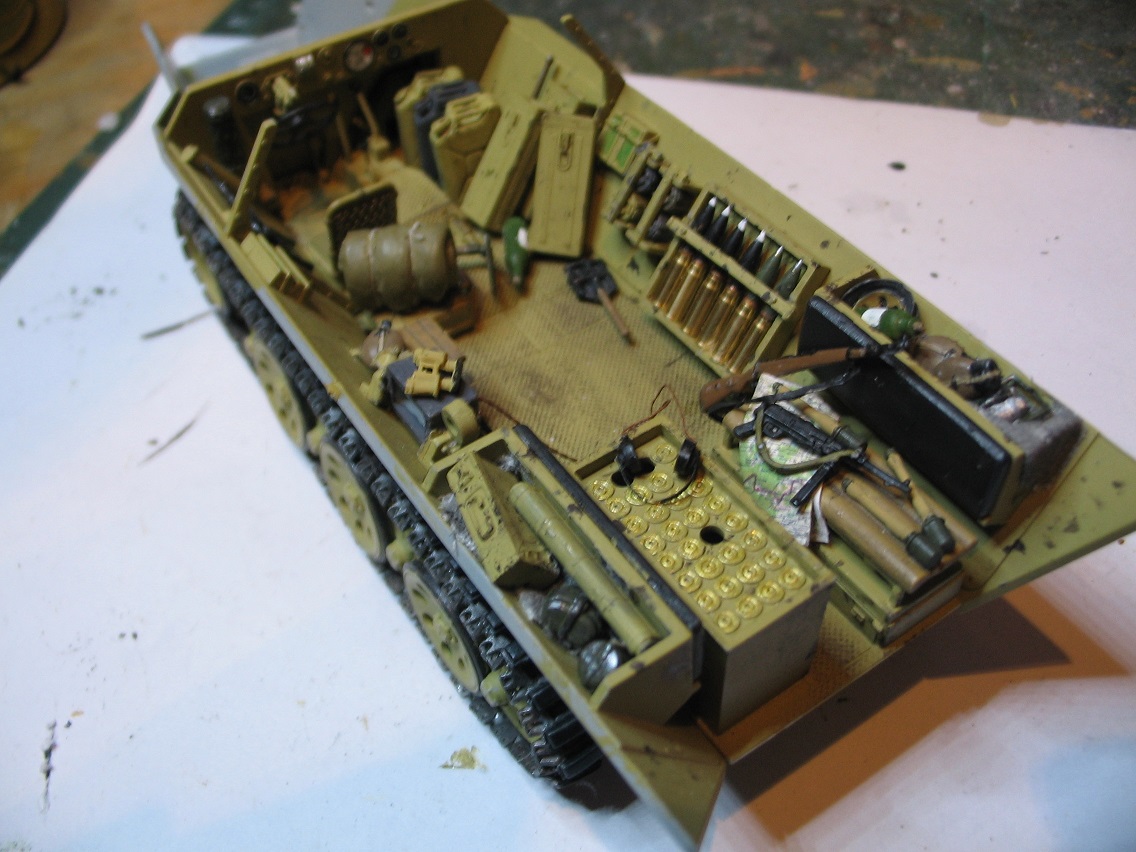
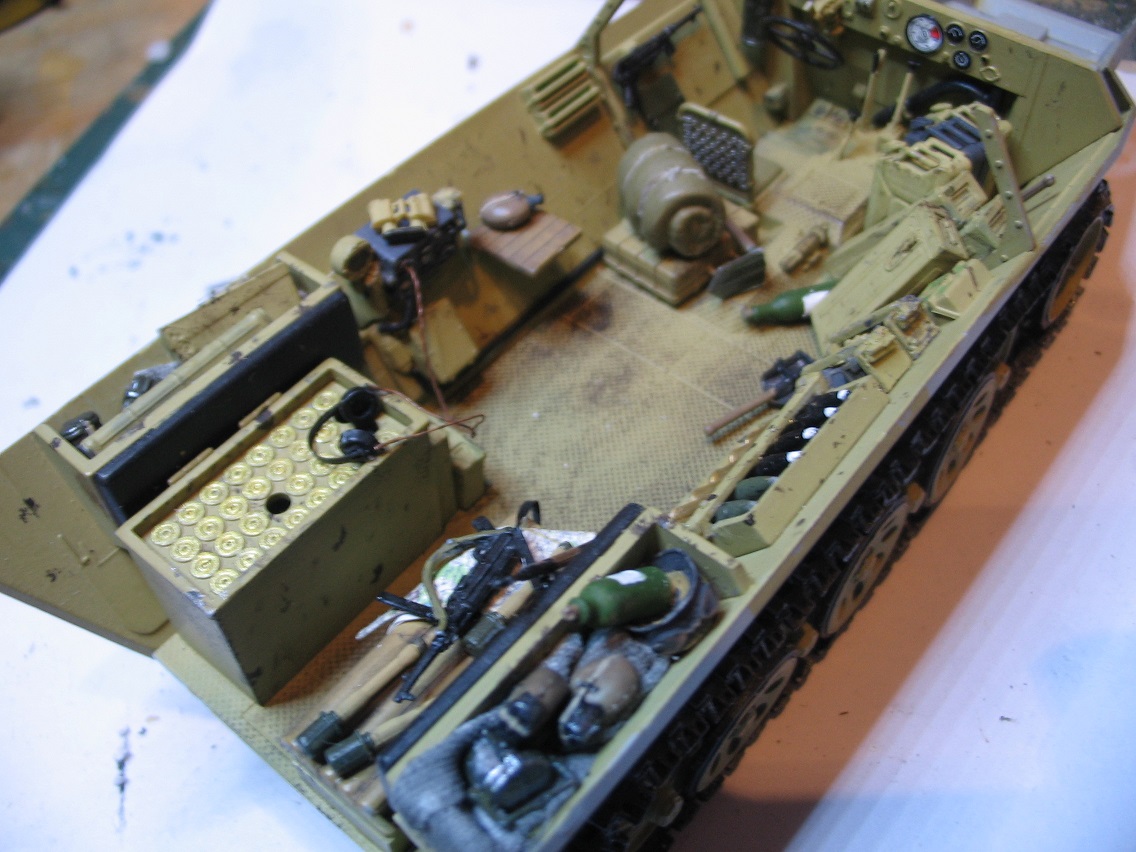
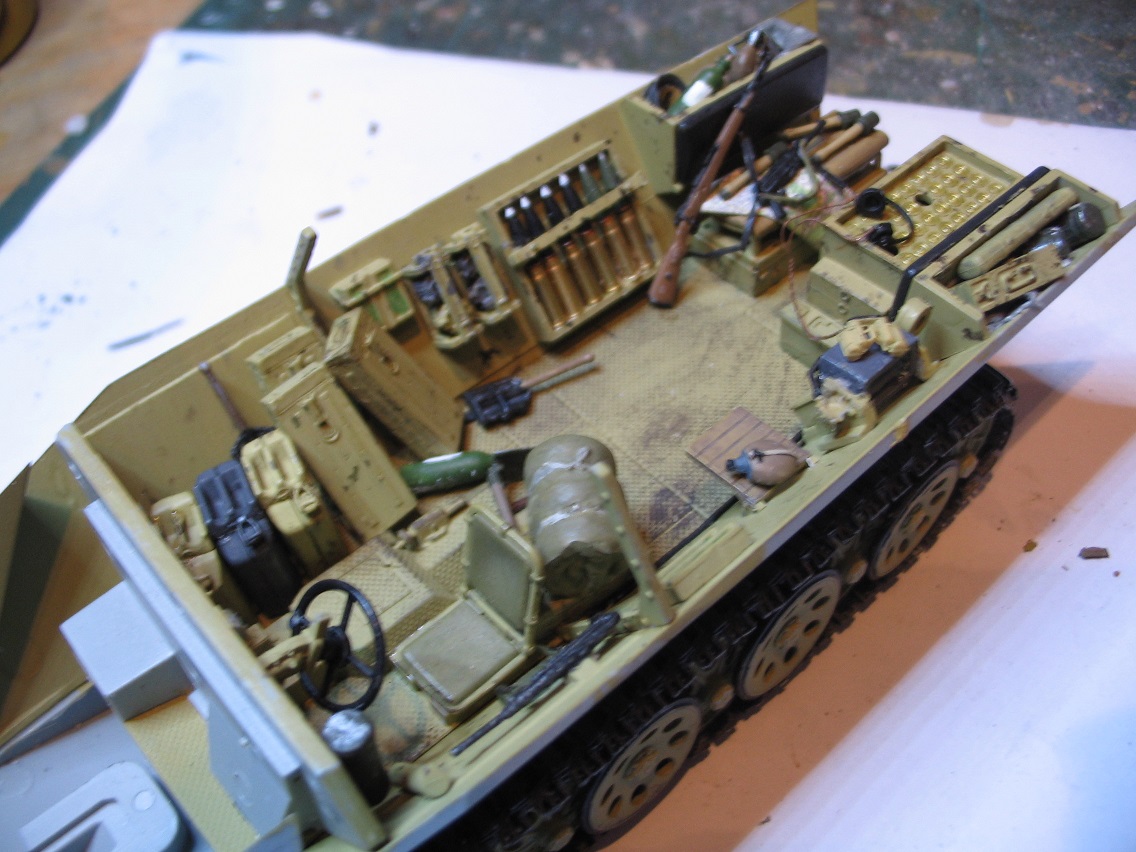
I'd forgotten just how tricky DML's half tracks are. Just for a change the instructions are vague, misleading and basically crap so it's quite hit and miss at times. I had the storage boxes off three times as they weren't sitting right but eventually got them to look okay. As it's Normandy bound hopefully I can hide the rough edges with foliage attached to it.
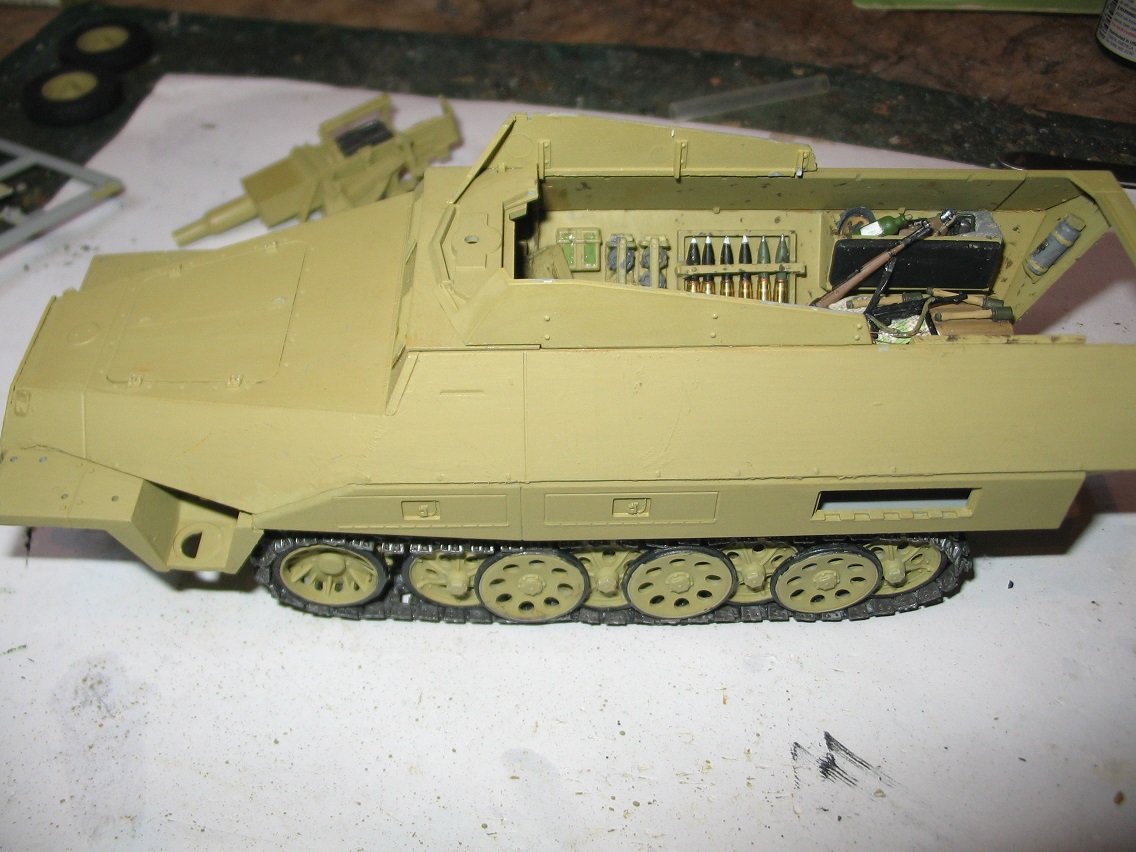
The worst part was trying to fit the armour plate to the front of the gun. After numerous attempts to fit it and failing each time drastic measures were called for. For some reason there are two raised areas on the back of the plate which prevent it touching two side plates. They don't seem to serve any purpose so I trimmed them off and sanded it flat. It then fitted. Then I had a nightmare trying to get the gun to fit in properly. Eventually I did it after a lot of swearing so all that's left now is the little bits like width indicators, MG's, number plates etc. All the bits that get knocked off easily lol. I'm leaving all those bits off until I've airbrushed it otherwise I'll end up knocking them off and losing them.
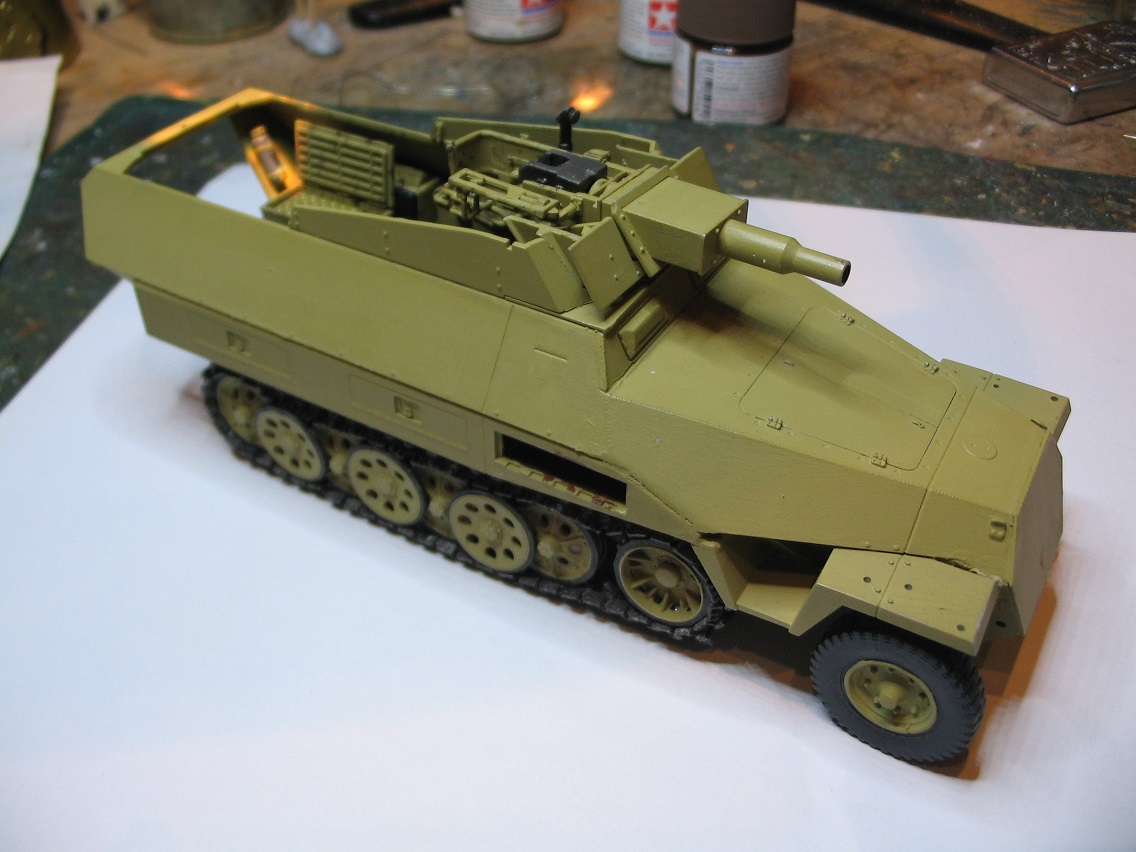
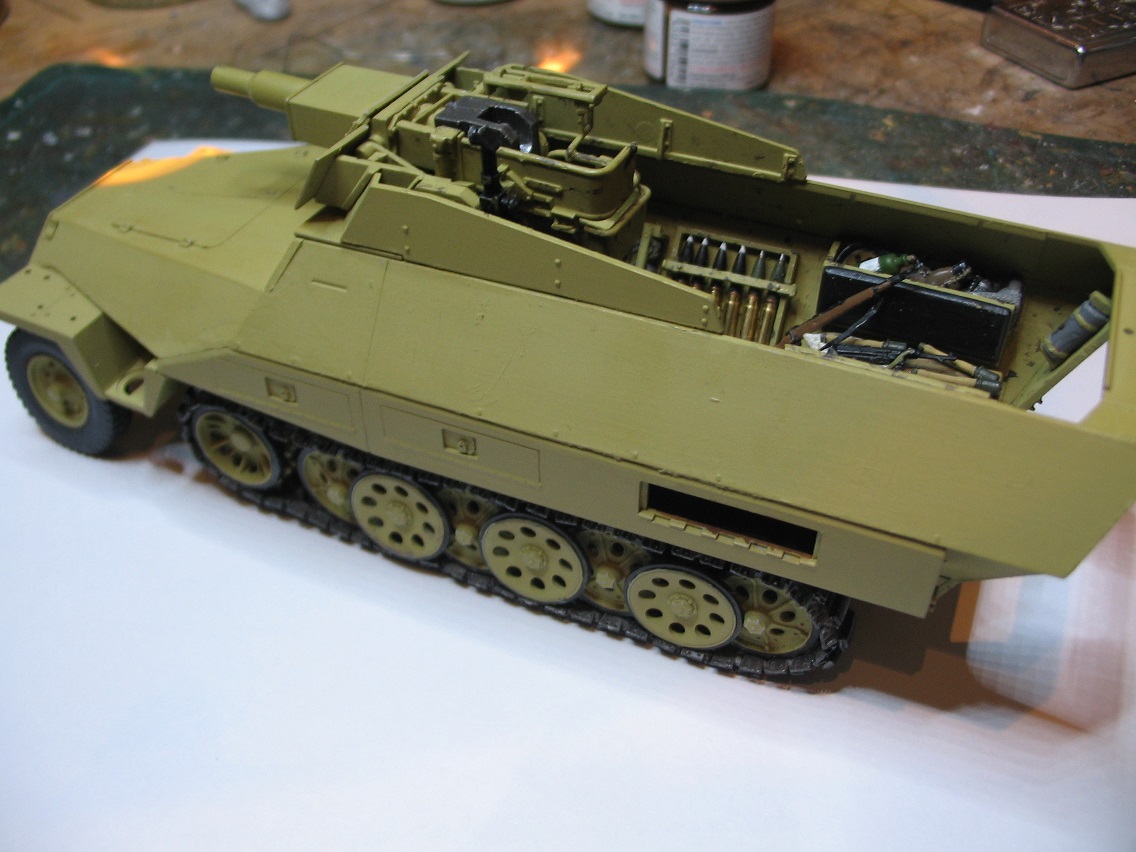
I've got one last piece of cabling to put in going to the aerial which I regret not doing before I put the top on. Doh! Hopefully I'll get some paint on it later today then I can do the crew. I've found a couple of relaxed SS figures that will fit in nicely for an admin setting. I'm leaving the doors open and the storage boxes as it seems a shame to close them after being given a choice so I'll have to find some appropriate bits to put in them. I'm going for a three colour cam seeing as it's Normandy. That's where I'm up to today gents...


I'd forgotten just how tricky DML's half tracks are. Just for a change the instructions are vague, misleading and basically crap so it's quite hit and miss at times. I had the storage boxes off three times as they weren't sitting right but eventually got them to look okay. As it's Normandy bound hopefully I can hide the rough edges with foliage attached to it.

The worst part was trying to fit the armour plate to the front of the gun. After numerous attempts to fit it and failing each time drastic measures were called for. For some reason there are two raised areas on the back of the plate which prevent it touching two side plates. They don't seem to serve any purpose so I trimmed them off and sanded it flat. It then fitted. Then I had a nightmare trying to get the gun to fit in properly. Eventually I did it after a lot of swearing so all that's left now is the little bits like width indicators, MG's, number plates etc. All the bits that get knocked off easily lol. I'm leaving all those bits off until I've airbrushed it otherwise I'll end up knocking them off and losing them.


I've got one last piece of cabling to put in going to the aerial which I regret not doing before I put the top on. Doh! Hopefully I'll get some paint on it later today then I can do the crew. I've found a couple of relaxed SS figures that will fit in nicely for an admin setting. I'm leaving the doors open and the storage boxes as it seems a shame to close them after being given a choice so I'll have to find some appropriate bits to put in them. I'm going for a three colour cam seeing as it's Normandy. That's where I'm up to today gents...
Posted: Thursday, May 11, 2017 - 06:45 PM UTC
A very clean "cluttered" look there, Karl, it's coming along great!
27-1025

Joined: September 16, 2004
KitMaker: 1,281 posts
Armorama: 1,222 posts

Posted: Thursday, May 11, 2017 - 11:58 PM UTC
Posted: Friday, May 12, 2017 - 12:03 AM UTC
It's looking great, Chris!

justsendit

Joined: February 24, 2014
KitMaker: 3,033 posts
Armorama: 2,492 posts

Posted: Friday, May 12, 2017 - 12:23 AM UTC
Wow! You guys are laying down some really nice looking Dunkelgelb and OD!🍺
—mike
—mike
erichvon

Joined: January 17, 2006
KitMaker: 1,694 posts
Armorama: 1,584 posts

Posted: Friday, May 12, 2017 - 01:36 AM UTC
Thanks Clayton, almost there now. I love 251's but wish DML would produce decent instructions and have a better parts fit. I've got another three to build. I got a couple of the Stuka das Fuss C 3 in 1 kits cheap and another with a 251/10 option to build at some point but I think once this is done I'll have a break from them for a bit. Maybe a tank next as I've got a few in the stash I've been meaning to build for a while.
petbat

Joined: August 06, 2005
KitMaker: 3,353 posts
Armorama: 3,121 posts

Posted: Saturday, May 13, 2017 - 04:36 AM UTC
Impressive work guys
27-1025

Joined: September 16, 2004
KitMaker: 1,281 posts
Armorama: 1,222 posts

Posted: Tuesday, May 16, 2017 - 08:48 AM UTC
erichvon

Joined: January 17, 2006
KitMaker: 1,694 posts
Armorama: 1,584 posts

Posted: Tuesday, May 16, 2017 - 02:34 PM UTC
Chris that's a really nice clean build. How did it go together? Any problems? I'm quite tempted by DML's US tracks (being a fan of half tracks) as a change from my stash of 251's so wondered what they're like buildwise.
Posted: Tuesday, May 16, 2017 - 06:20 PM UTC
Looks great, Chris!
69mudbone

Joined: April 26, 2016
KitMaker: 362 posts
Armorama: 285 posts

Posted: Tuesday, May 16, 2017 - 06:54 PM UTC
Sharp looking
27-1025

Joined: September 16, 2004
KitMaker: 1,281 posts
Armorama: 1,222 posts

Posted: Wednesday, May 17, 2017 - 01:56 AM UTC
Quoted Text
Chris that's a really nice clean build. How did it go together? Any problems? I'm quite tempted by DML's US tracks (being a fan of half tracks) as a change from my stash of 251's so wondered what they're like buildwise.
Thank you. This one has been almost trouble free. Typical Dragon instructions but everything fits and you can super-detail if so inclined.
panzerIV

Joined: January 02, 2007
KitMaker: 781 posts
Armorama: 676 posts

Posted: Thursday, May 18, 2017 - 05:42 AM UTC
erichvon

Joined: January 17, 2006
KitMaker: 1,694 posts
Armorama: 1,584 posts

Posted: Thursday, May 18, 2017 - 01:03 PM UTC
I'm calling mine completed now having spent the last couple of days putting the finishing touches to it. I'd decided that I wanted to finish it as a 251/9 of 12th SS Hitlerjugend but my problem was it's ID mark. As we all know it denotes company, platoon, individual vehicle in the platoon but as the make up of a German Panzer Division, especially an SS one difers so much to a British or American one I was stumped as to what number to give it as I do like to get things as close to historically right as possible. Salvation was found online when I found a partial book called "Tip Of The Spear" which is about German recconaisance battalions within a panzer division which had the breakdown of 12th SS from 07/06/1944 to November of that year. The recconaisance battalion of Hitlerjugend saw a disproportionate amount of fighting in Normandy, being cut off a couple of times and also elements of it defending villages on it's own, up to the eventual collapse of the German forces there as explained in Michael Reynolds excellent book "Steel Inferno". His book which explains in detail the activities of 1st SS Panzer Korps in Normandy (1st SS Panzer Division Liebstandarte Adolf Hitler and 12th SS Panzer Division Hitlerjugend made up 1st SS Panzer Korps) with the lions share of the fighting being borne by Hitlerjugend and the figures I got hold of yestreday illustrate that perfectly as their strength declines month by month quite drastically. As a retired Major General his knowledge of tactics serves to make the book even more interesting as not only is a he an expert on the Waffen SS, he actually understands the tactics and explains them to the reader. (Definitely worth a read if you get chance)I'd already worked out that their vehicles were marked with black numbers with a white outline so I was back in business.
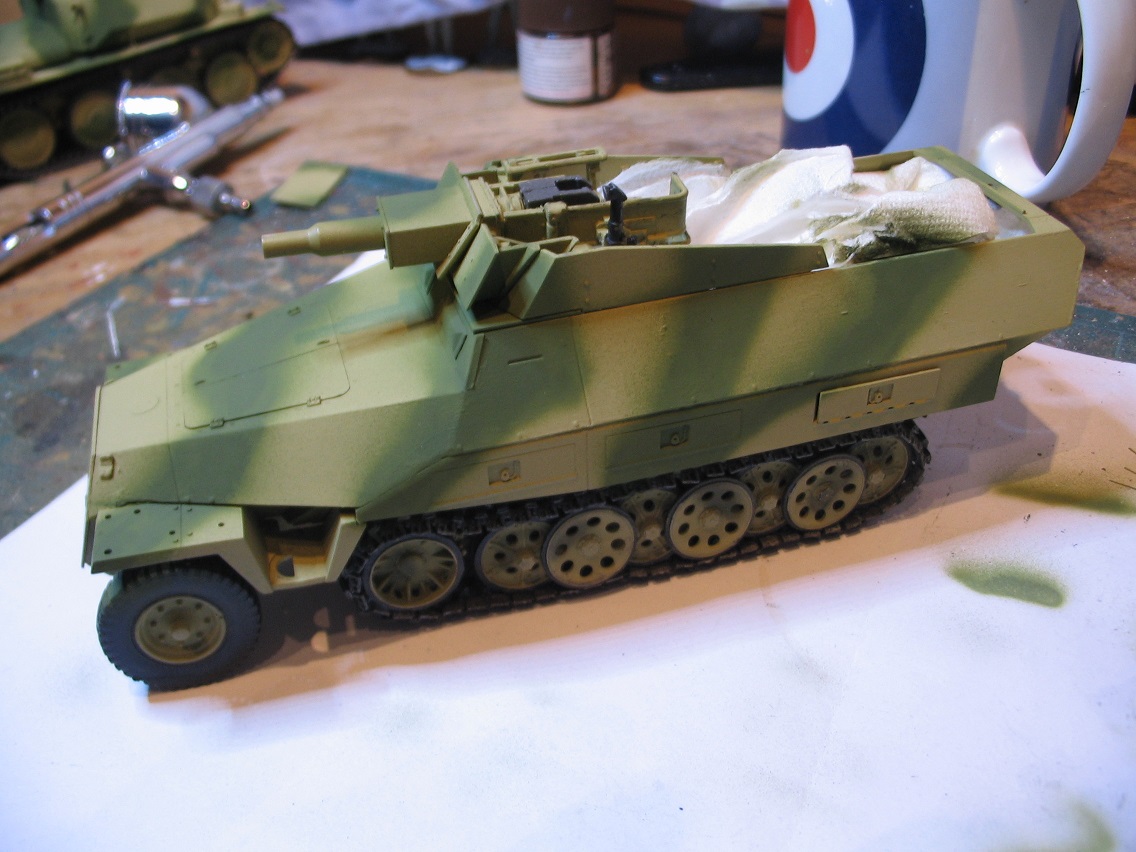
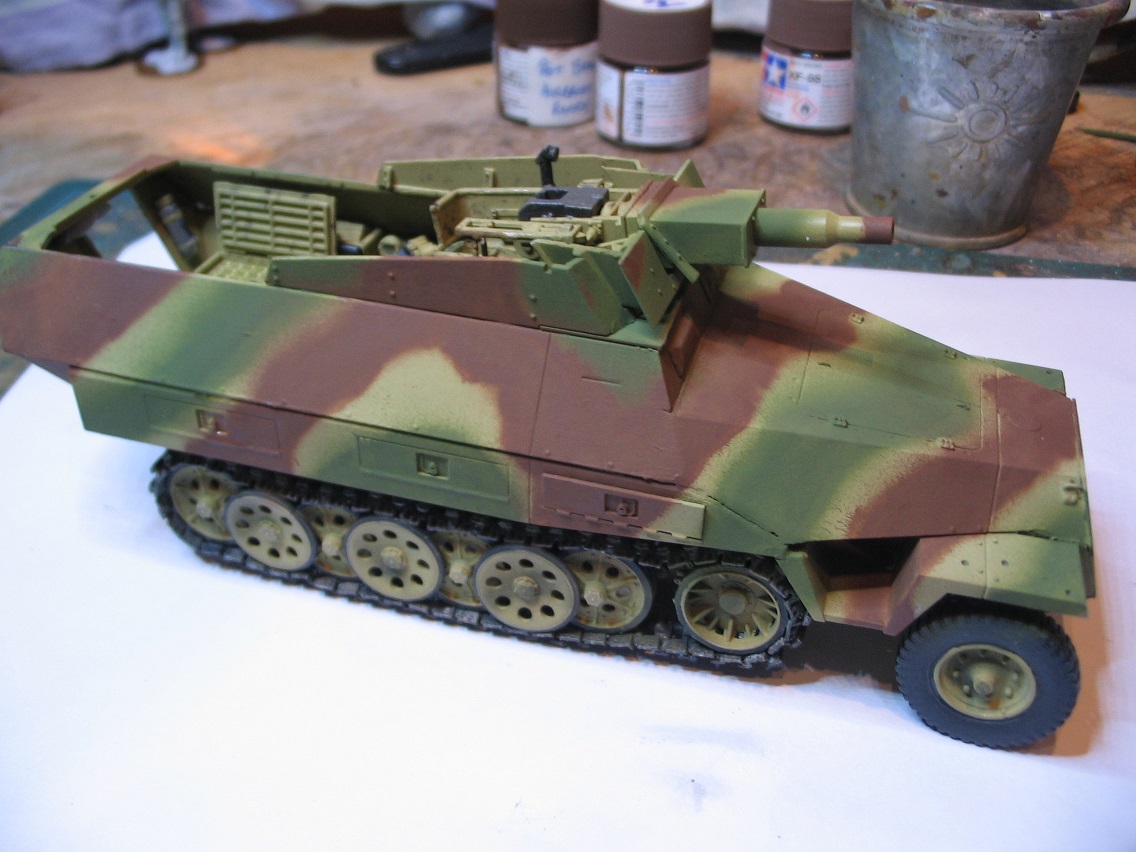
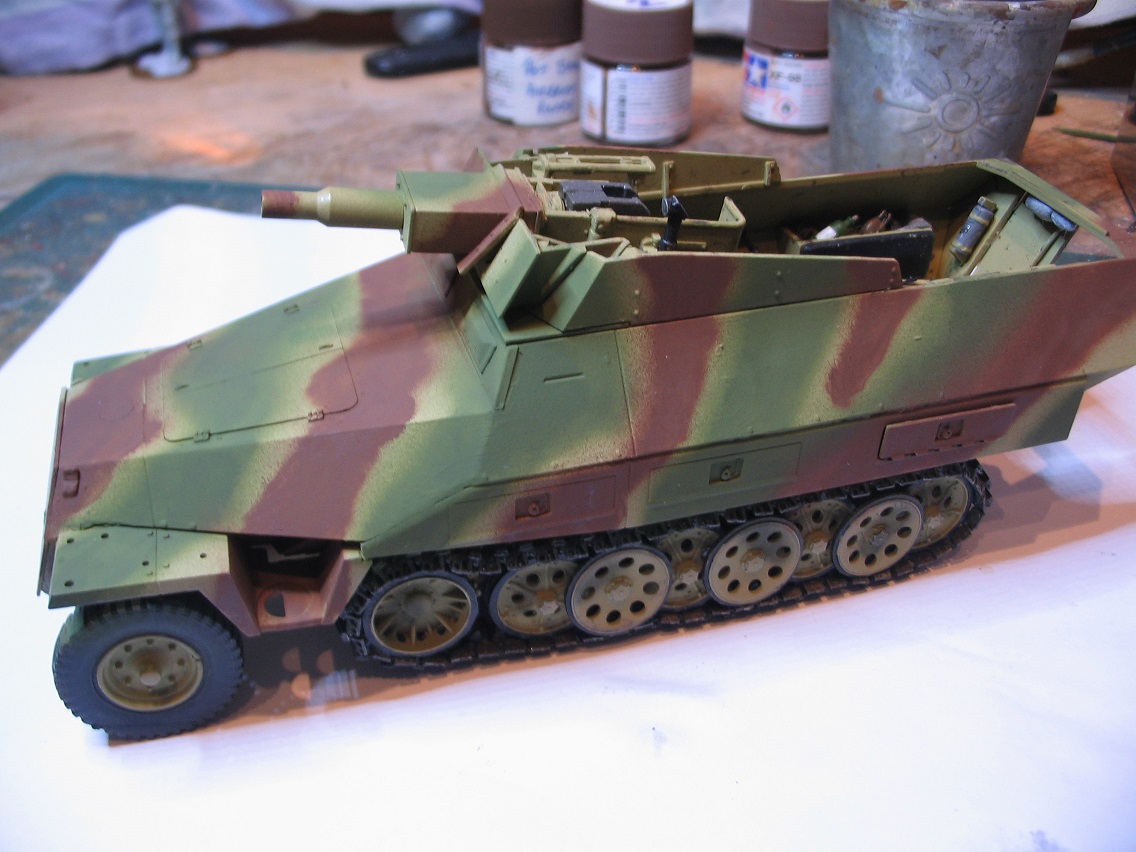
I'd originally used Tamiya XF74 OD (JGSDF) for the green but decided it was too dark so chabged it for XF67 NATO Green as it was a lot lighter and looked more in keeping with a vehicle that had been sprayed in workshop conditions with the paint thinned with the right thinners ie petrol rather than whatever is available in the field. Normandy was Hitlerjugends baptism of fire so all of their equipment was pretty much new when they entered the fray so to speak. With this in mind I've gone easy on the internal weathering as the life of this vehicle would have been a couple of months tops so I've avoided the "been in combat for 40 years" look some people go for which while showing off peoples excellent techniques doesn't look right as combat vehicles on both sides had a relatively short service life. Especially German ones in Normandy as they had to contend with overwhelming Allied firepower on the ground plus marauding Typhoons shooting up anything that they saw move on the ground.
Anyone who's seen my previous halftracks or open topped vehicles will know how much I enjoy doing the inside, adding personal kit, ammo, weapons etc to give it that lived in appearance. From my own experience I know that the inside of military vehicles is never pristine and carry anything and evrything lol. That's what I've attempted to show here.
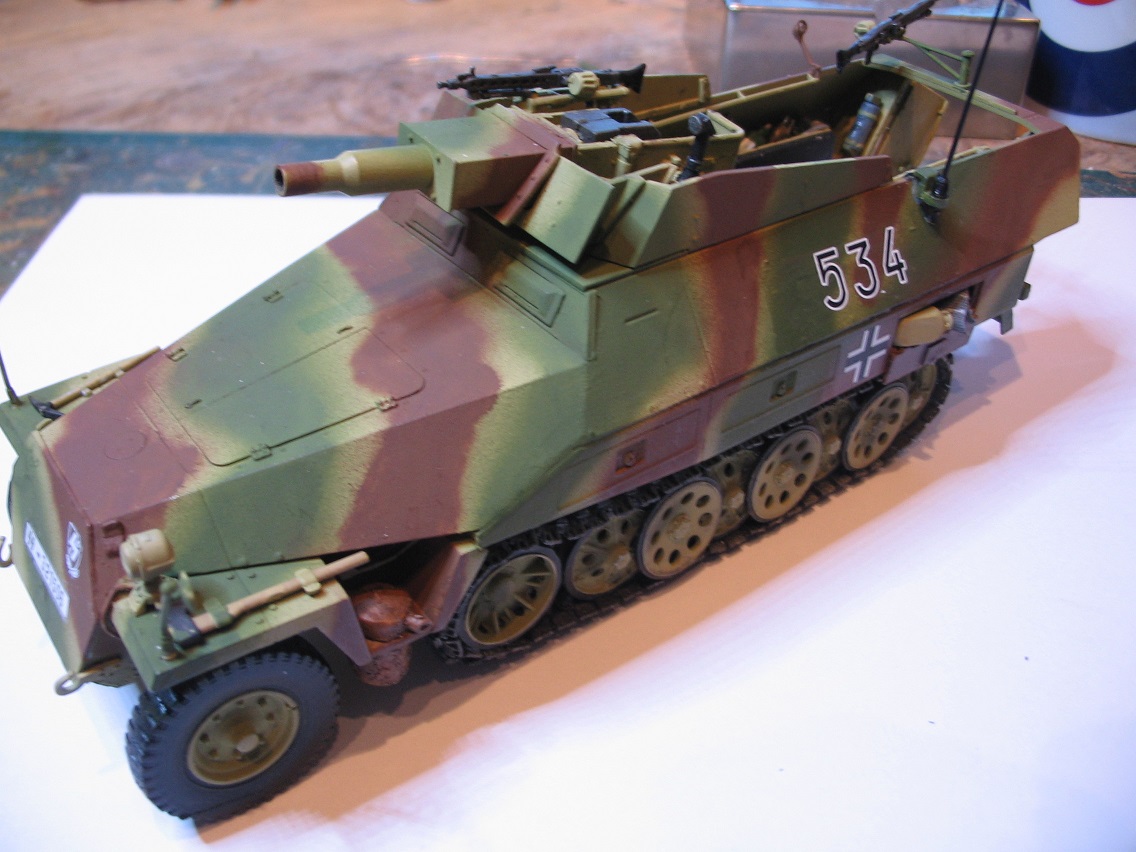
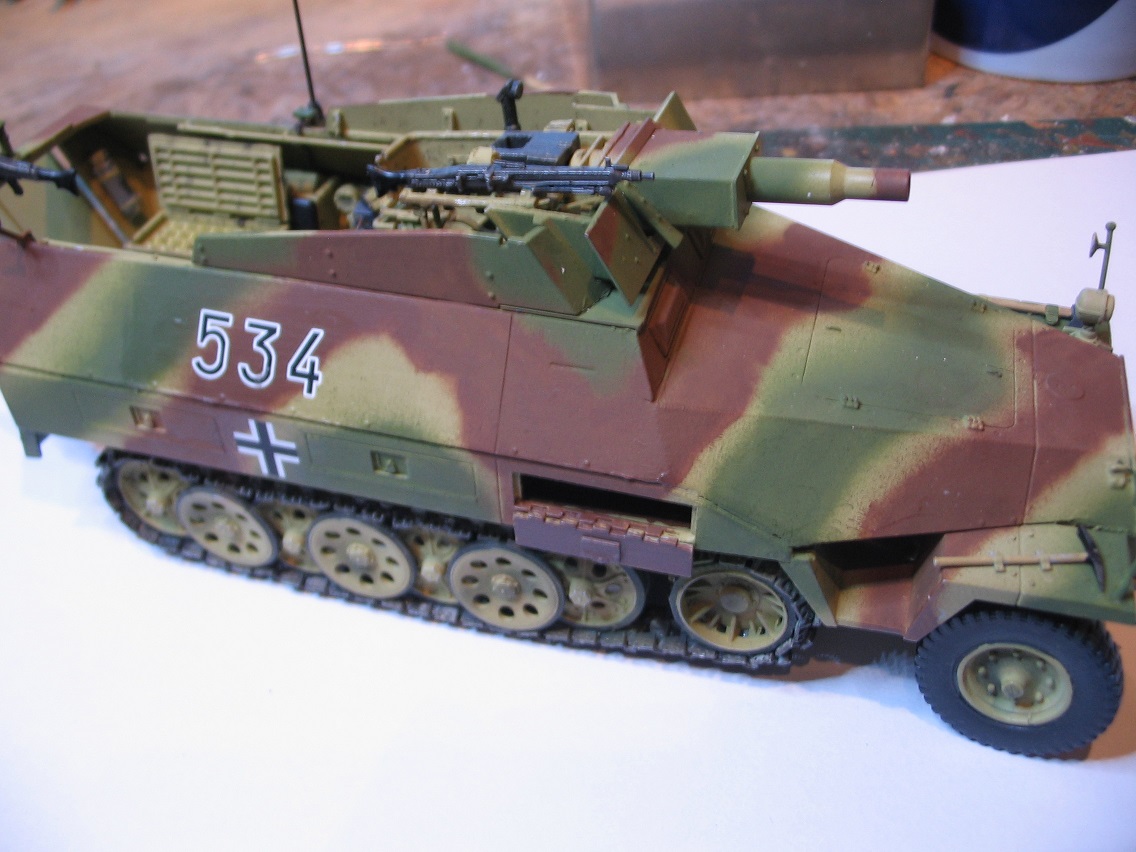
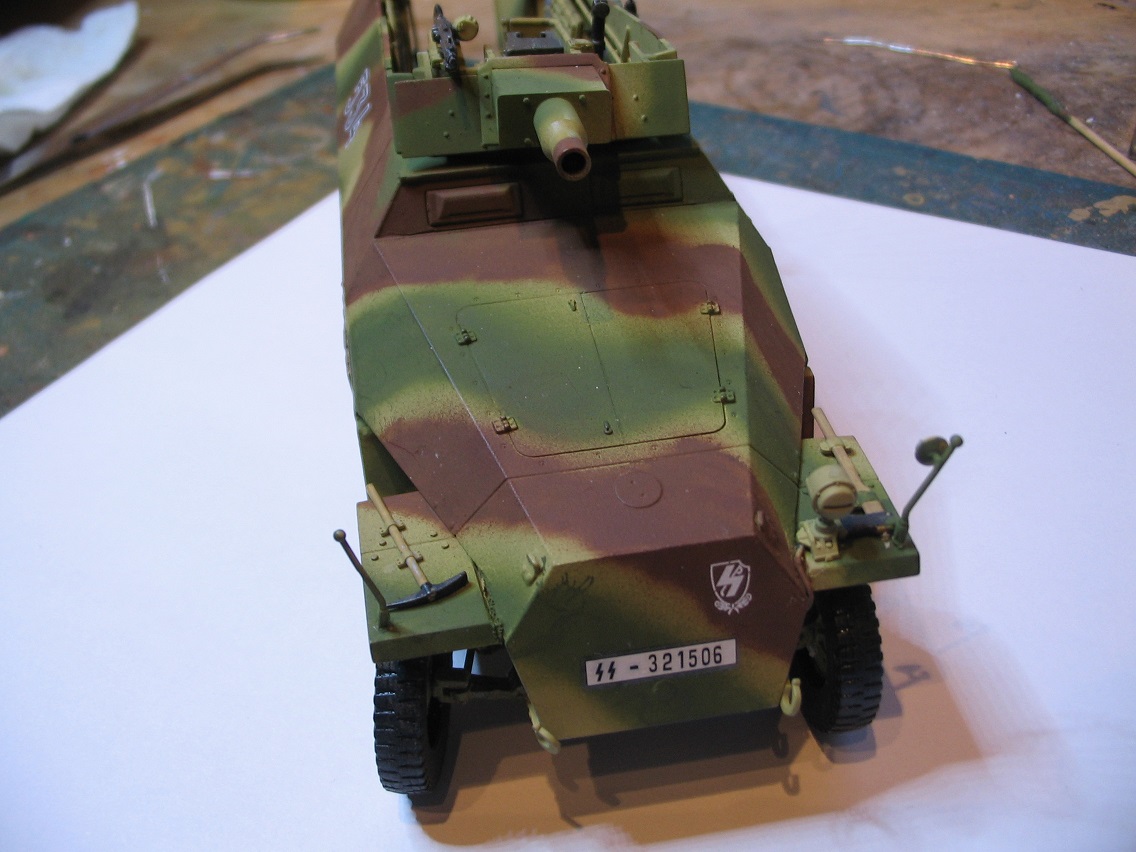
The decals I used were the excellent Cartograf ones from the kit and the divisional insignia was from an ADV dry transfer sheet courtesy of ebay. Very nice transfers as they went on smoothly with a rub from a pencil.
Just for a change, due to the location of the radio in the rear, all the wiring is visible. Usually I do the wiring, put on the weapons shelf and it vanishes out of sight. This time it can be seen. Many thanks to Peter for giving me the requisite info so I could wire it up properly. I'd done most of it before the hull top went on using fuse wire as usual but was having trouble with the last bit going to the antenna as the wire wouldn't stick in place when I tried bending it. I remembered however I'd bought some wire for Tiger towing cables in 1/72nd by mistake off ebay last year ( I really ought to read descriptions when I've got my glasses on!) so tried that. Spot on! Very flexible and stayed in place. I didn't like the kit antenna as scalewise it was about 4 inches thick so used an AM metal one I'd got plus an AM mount for it as well. Makes all the difference. Due to it's length it goes through the body's mount so I could attach the radio to the antenna bottom which I think looks quite effective. Not that noticeable but it's one of those little details that makes me happy.
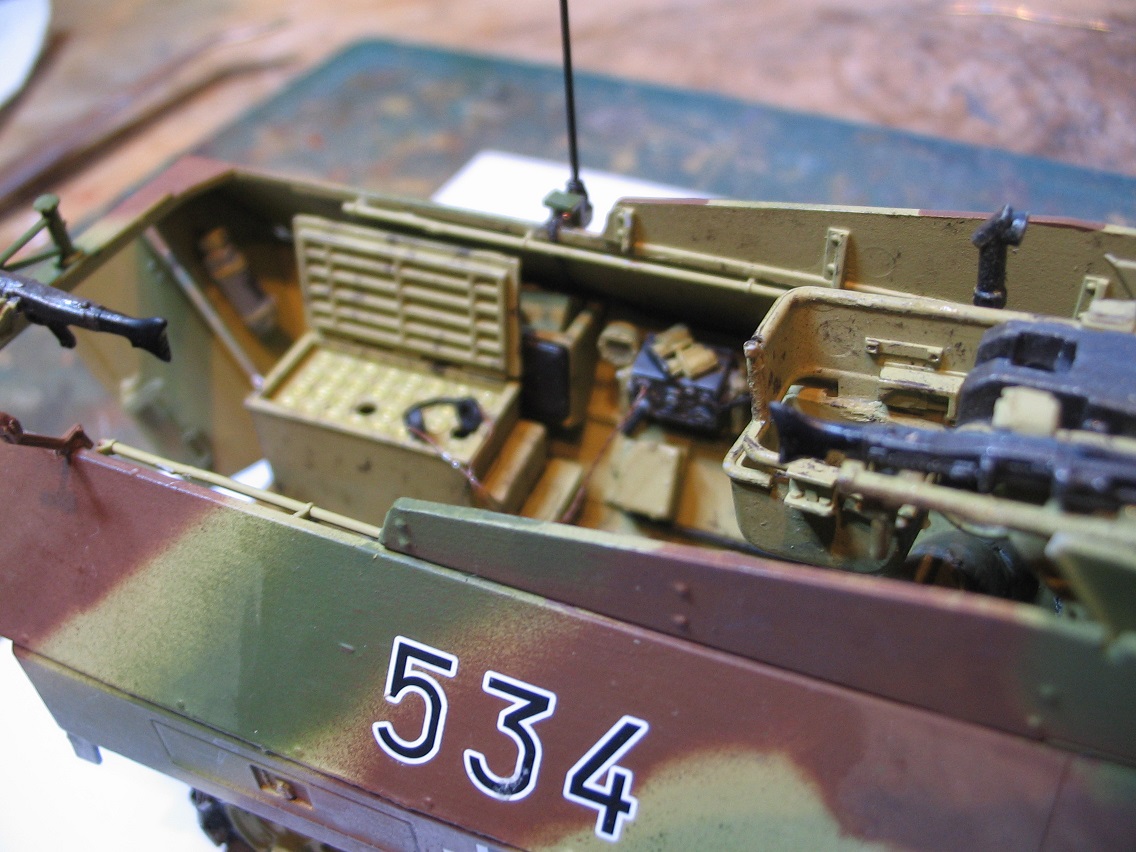
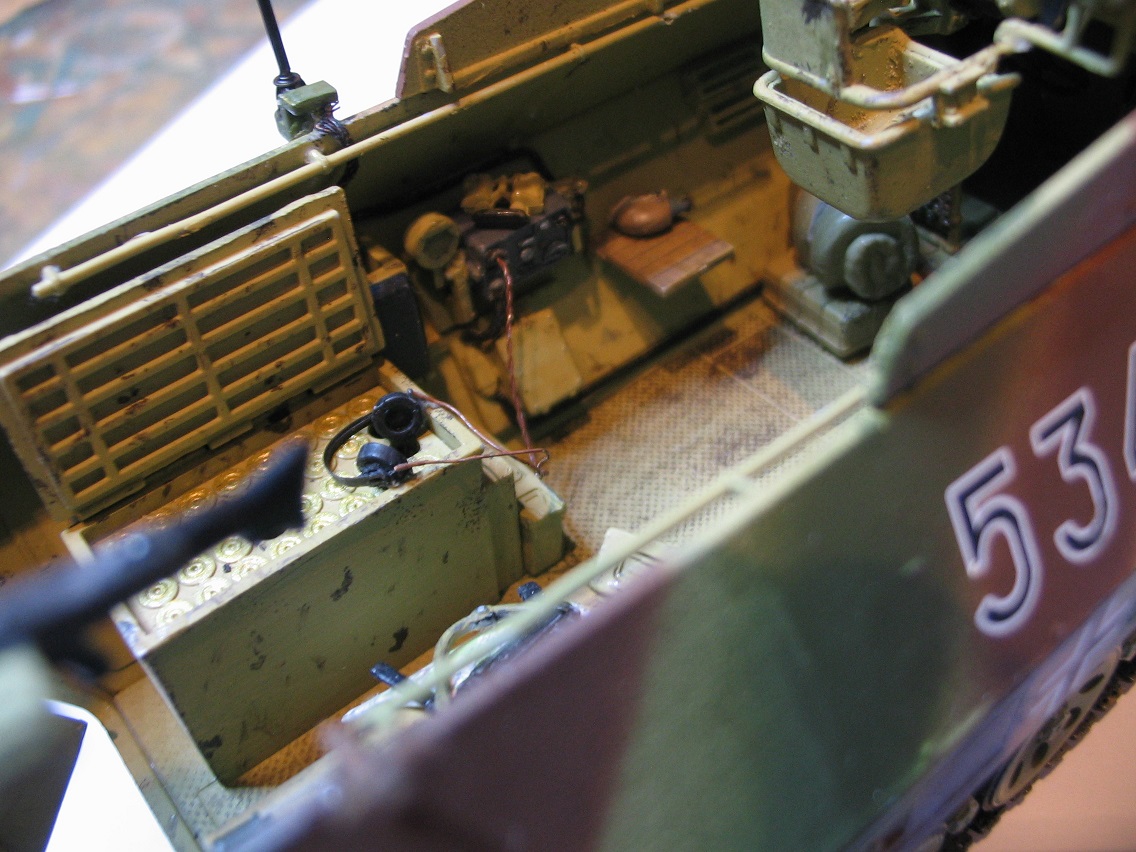
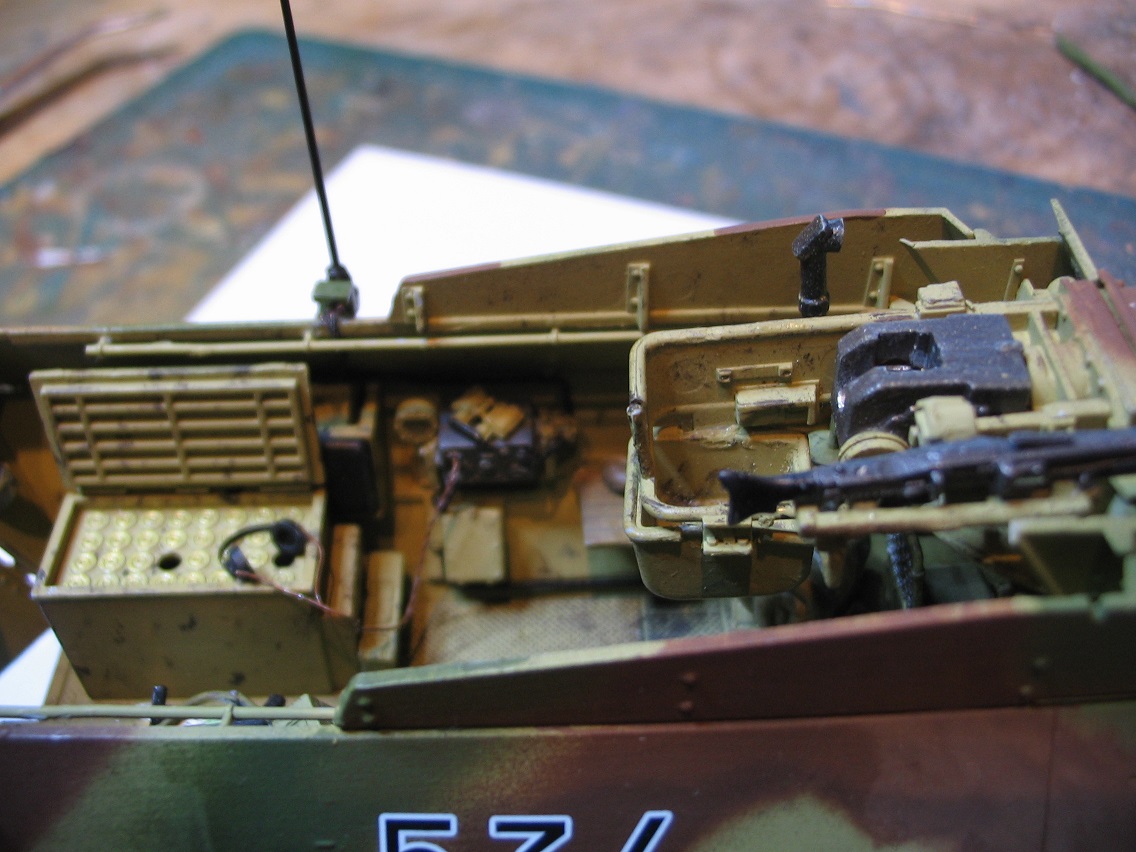
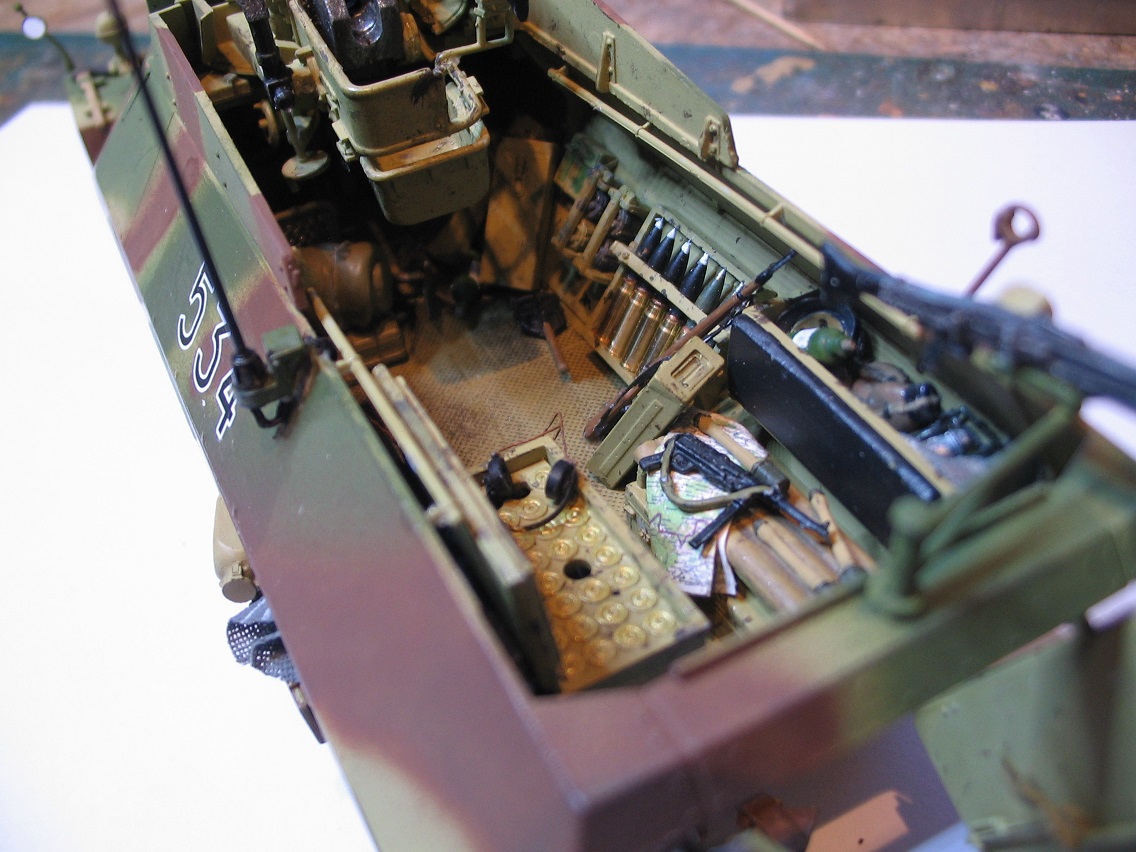
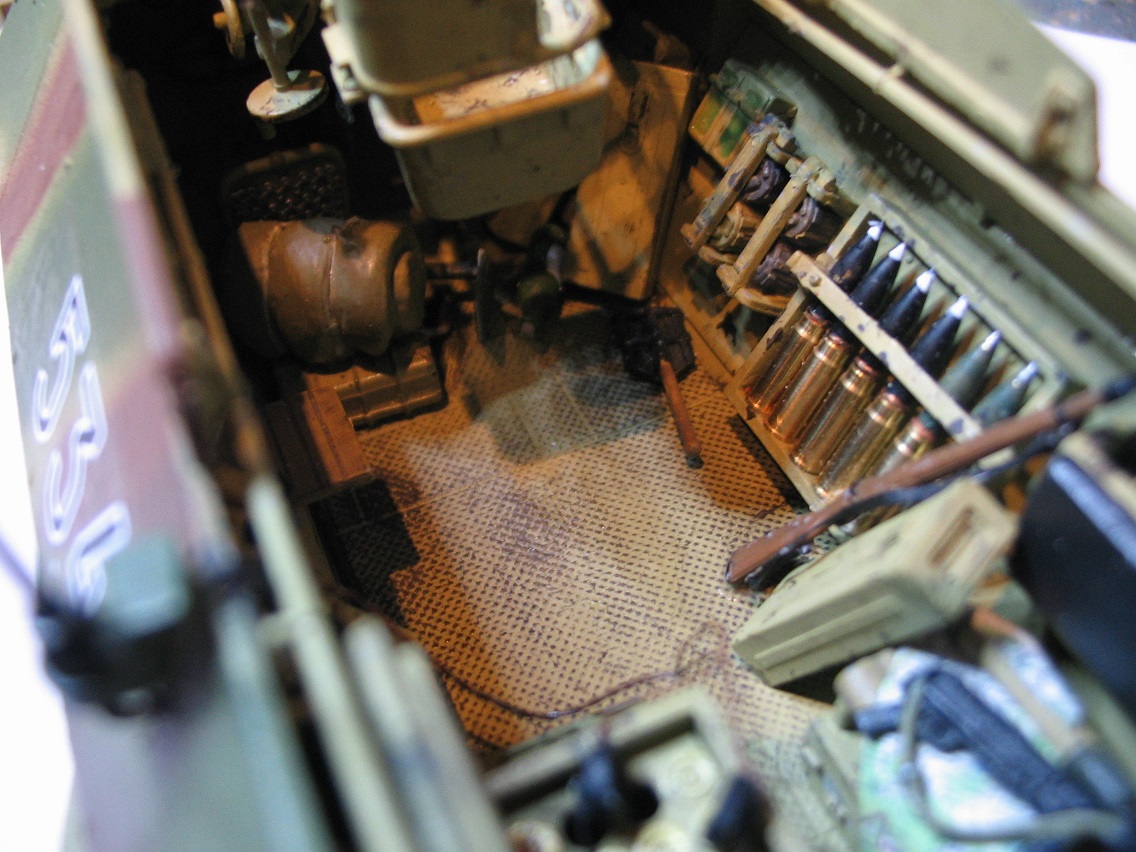
All that remains to be done now is to paint up the two crew members that I've chosen to go in the back and to weather the outside. I'm leaving that until I've got all of the vehicles together (I need to get some pigments anyway) and built the street for the dio so I can get continuity between all the different vehicles and personnel. Paints used were mainly Tamiya. XF60- Dark Yellow, XF67 NATO Green, XF68- NATO Brown. XF84- Dark Iron for weapons and the breech block of the main armament. paint chipping and areas of wear were done with vallejo 70822 German Camouflage Black Brown. I've really enjoyed this build (although it tested my patience at times with DML's notoriously crappy instructions) as half tracks are one of my favourite kit types plus there's been some lovely work shown through the campaign. Thanks to Clayton for putting on such a cracking campaign and for his words of encouragement throughout. It's a thumbs up from me. Thanks for letting me join :-)


I'd originally used Tamiya XF74 OD (JGSDF) for the green but decided it was too dark so chabged it for XF67 NATO Green as it was a lot lighter and looked more in keeping with a vehicle that had been sprayed in workshop conditions with the paint thinned with the right thinners ie petrol rather than whatever is available in the field. Normandy was Hitlerjugends baptism of fire so all of their equipment was pretty much new when they entered the fray so to speak. With this in mind I've gone easy on the internal weathering as the life of this vehicle would have been a couple of months tops so I've avoided the "been in combat for 40 years" look some people go for which while showing off peoples excellent techniques doesn't look right as combat vehicles on both sides had a relatively short service life. Especially German ones in Normandy as they had to contend with overwhelming Allied firepower on the ground plus marauding Typhoons shooting up anything that they saw move on the ground.
Anyone who's seen my previous halftracks or open topped vehicles will know how much I enjoy doing the inside, adding personal kit, ammo, weapons etc to give it that lived in appearance. From my own experience I know that the inside of military vehicles is never pristine and carry anything and evrything lol. That's what I've attempted to show here.


The decals I used were the excellent Cartograf ones from the kit and the divisional insignia was from an ADV dry transfer sheet courtesy of ebay. Very nice transfers as they went on smoothly with a rub from a pencil.
Just for a change, due to the location of the radio in the rear, all the wiring is visible. Usually I do the wiring, put on the weapons shelf and it vanishes out of sight. This time it can be seen. Many thanks to Peter for giving me the requisite info so I could wire it up properly. I'd done most of it before the hull top went on using fuse wire as usual but was having trouble with the last bit going to the antenna as the wire wouldn't stick in place when I tried bending it. I remembered however I'd bought some wire for Tiger towing cables in 1/72nd by mistake off ebay last year ( I really ought to read descriptions when I've got my glasses on!) so tried that. Spot on! Very flexible and stayed in place. I didn't like the kit antenna as scalewise it was about 4 inches thick so used an AM metal one I'd got plus an AM mount for it as well. Makes all the difference. Due to it's length it goes through the body's mount so I could attach the radio to the antenna bottom which I think looks quite effective. Not that noticeable but it's one of those little details that makes me happy.


All that remains to be done now is to paint up the two crew members that I've chosen to go in the back and to weather the outside. I'm leaving that until I've got all of the vehicles together (I need to get some pigments anyway) and built the street for the dio so I can get continuity between all the different vehicles and personnel. Paints used were mainly Tamiya. XF60- Dark Yellow, XF67 NATO Green, XF68- NATO Brown. XF84- Dark Iron for weapons and the breech block of the main armament. paint chipping and areas of wear were done with vallejo 70822 German Camouflage Black Brown. I've really enjoyed this build (although it tested my patience at times with DML's notoriously crappy instructions) as half tracks are one of my favourite kit types plus there's been some lovely work shown through the campaign. Thanks to Clayton for putting on such a cracking campaign and for his words of encouragement throughout. It's a thumbs up from me. Thanks for letting me join :-)
Posted: Thursday, May 18, 2017 - 04:12 PM UTC
Looks nice, Karl!


Posted: Thursday, May 18, 2017 - 06:15 PM UTC
Beautiful work, Karl! Your interior details are great! Thanks for your contribution!!
erichvon

Joined: January 17, 2006
KitMaker: 1,694 posts
Armorama: 1,584 posts

Posted: Thursday, May 18, 2017 - 07:07 PM UTC
Thanks guys. Much appreciated :-)

69mudbone

Joined: April 26, 2016
KitMaker: 362 posts
Armorama: 285 posts

Posted: Thursday, May 18, 2017 - 08:09 PM UTC
Karl, congrats on crossing the finish line, very well done

justsendit

Joined: February 24, 2014
KitMaker: 3,033 posts
Armorama: 2,492 posts

Posted: Thursday, May 18, 2017 - 10:30 PM UTC
Hi Karl,
Very nice finish on the 251/9! The detailing and paint look awesome! ... And thank you for including the historical notes.
Cheers!🍺
—mike
Very nice finish on the 251/9! The detailing and paint look awesome! ... And thank you for including the historical notes.

Cheers!🍺
—mike
27-1025

Joined: September 16, 2004
KitMaker: 1,281 posts
Armorama: 1,222 posts

Posted: Thursday, May 18, 2017 - 11:18 PM UTC
Very well done. Quality stuff.
27-1025

Joined: September 16, 2004
KitMaker: 1,281 posts
Armorama: 1,222 posts

Posted: Thursday, May 18, 2017 - 11:22 PM UTC
Posted: Friday, May 19, 2017 - 02:13 AM UTC
Nice clean work on the split louvered decal, Chris, those aren't easy! 

 |


