Campaigns: Completed Campaigns
Campaigns that are completed should be grouped here.
Hosted by Richard S.
Italian Campaign 1943-1945
d111298pw
#456
Visit this Community
Oklahoma, United States
Joined: September 22, 2016
KitMaker: 654 posts
Armorama: 638 posts
Posted: Friday, December 21, 2018 - 03:44 PM UTC

Quoted Text

AMark,
Congrats on completing your Elefant! It looks great! I don't mind some gentle weathering, and find that often my own methods go too far.

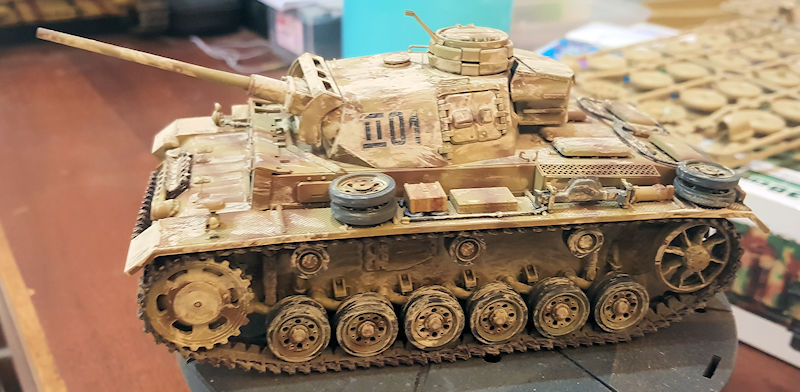
I'm also interested in that Pz III. The camo is intriguing.

Gaz


Gaz, Here is a pic of the Panzer III Ausf. L. It is the Tamiya kit with the Eduard PE set. Camo scheme is for Southern Russia in the summer of '43.

GazzaS
#424
Visit this Community
Queensland, Australia
Joined: April 23, 2015
KitMaker: 4,648 posts
Armorama: 2,248 posts
Posted: Friday, December 21, 2018 - 08:56 PM UTC
Mark,
Love the Pz III! Nice mud effects.

Gaz
d111298pw
#456
Visit this Community
Oklahoma, United States
Joined: September 22, 2016
KitMaker: 654 posts
Armorama: 638 posts
Posted: Friday, December 21, 2018 - 10:15 PM UTC

Quoted Text

Mark,
Love the Pz III! Nice mud effects.

Gaz


Thanks Gaz
GazzaS
#424
Visit this Community
Queensland, Australia
Joined: April 23, 2015
KitMaker: 4,648 posts
Armorama: 2,248 posts
Posted: Saturday, December 22, 2018 - 06:54 PM UTC
Yay!
Ready for the base paint. I will do the schürzen, Extra roadwheels, and hatches separately.


The close proximity of all of the open hatches allowed me to mask them all from the inside.

Gaz
petbat
Visit this Community
Queensland, Australia
Joined: August 06, 2005
KitMaker: 3,353 posts
Armorama: 3,121 posts
Posted: Saturday, December 22, 2018 - 09:37 PM UTC
Coming together nicely Gaz
GazzaS
#424
Visit this Community
Queensland, Australia
Joined: April 23, 2015
KitMaker: 4,648 posts
Armorama: 2,248 posts
Posted: Monday, December 24, 2018 - 09:18 AM UTC
Merry Christmas, Campaigners!

US Soldiers opening presents in Italy 1943:

GazzaS
#424
Visit this Community
Queensland, Australia
Joined: April 23, 2015
KitMaker: 4,648 posts
Armorama: 2,248 posts
Posted: Wednesday, December 26, 2018 - 05:25 PM UTC
With some time off, I was able to work on my Stürmpanzer:


I hope everyone is getting some good bench time over the holidays!

Gaz
RivetCounter
Visit this Community
Warszawa, Poland
Joined: October 26, 2012
KitMaker: 65 posts
Armorama: 62 posts
Posted: Sunday, December 30, 2018 - 11:27 AM UTC
I've started my Bronco's Staghound but there is another Staghound I would like to do for this campaign. It is an easy conversion to Close Support version based on Italeri's model.
Here is my starting photo.


I was inspired by those photographs.


It is Staghound Mk.II of the Second lieutenant Polchlopek damaged by the Germans during an ill-prepared Mussone river crossing. The vehicle's commander was killed and the others were injured.

Staghound II is a Staghound I with 3" tank howitzer in lieu of the 37mm gun. The bow machine gun was eliminated and an external 4-inch smoke discharge was mounted on the side of the turret.

I took a gun barrel from Tamiya's Matilda.


Surely the gun breech is totally wrong, but the vehicle will be closed and no one will ever see this breech.

I don't like Italeri's periscopes, therefore I will use some leftovers from AFV's Stuart.


Here are some additional sets for this sub-project.


And here is how the vehicle looks at the moment.


GazzaS
#424
Visit this Community
Queensland, Australia
Joined: April 23, 2015
KitMaker: 4,648 posts
Armorama: 2,248 posts
Posted: Sunday, December 30, 2018 - 05:03 PM UTC
Marek,
Really enjoyed the photos and modification you made! I find the tire chains very interesting.

Gaz
petbat
Visit this Community
Queensland, Australia
Joined: August 06, 2005
KitMaker: 3,353 posts
Armorama: 3,121 posts
Posted: Monday, December 31, 2018 - 10:52 AM UTC
Looking good Gaz. Well on the way.

Interesting conversion Marek. This is new to me and very interesting. I'll need to do a bit of reading now...
zontar
Visit this Community
Hawaii, United States
Joined: August 27, 2006
KitMaker: 1,646 posts
Armorama: 1,557 posts
Posted: Sunday, January 06, 2019 - 12:57 PM UTC
Aloha and Happy New Year!

Gaz: the Sturmpanzer looks great. I'm really liking the running bond camo. I think that would work well in an urban environment.

Marek: nice work on the Staghound. Are you planning to do a diorama based on the photo? Would be pretty cool.

I've made modest progress on my M-10. Pretty easy build so far, but I think I need to paint the interior before going any further. The instructions call out white for all of it, but I think I will do the raised floor under the turret in Olive Drab.


Happy Modeling,
Zon
GazzaS
#424
Visit this Community
Queensland, Australia
Joined: April 23, 2015
KitMaker: 4,648 posts
Armorama: 2,248 posts
Posted: Sunday, January 06, 2019 - 01:06 PM UTC
Hi Zon,
Thank you!

Nice start on your M-10! I can't imagine that verything on the interior was left white. Seems counter-intuitive.

Gaz
GazzaS
#424
Visit this Community
Queensland, Australia
Joined: April 23, 2015
KitMaker: 4,648 posts
Armorama: 2,248 posts
Posted: Sunday, January 06, 2019 - 04:06 PM UTC
HI Everyone,
Time to call this one done. I made several mistakes that added up and brought further plans to a halt.


Gaz
Sleepwalker71
Visit this Community
Singapore / 新加坡
Joined: August 30, 2012
KitMaker: 265 posts
Armorama: 186 posts
Posted: Sunday, January 06, 2019 - 04:25 PM UTC
Scout car is primed with black and white Surfacer 1500. This time as suggested elsewhere I didn't just follow panels but also have made a sort of light modulation applying more white on the top sections of the vertical surfaces and all horizontal surfaces. You may notice moulded-on handles of engine covers are replaced by ones made of wire. Some details are to be added like headlights and first fittings of the radio equipment. It will require some rearranging of seats in the passenger compartment.
d111298pw
#456
Visit this Community
Oklahoma, United States
Joined: September 22, 2016
KitMaker: 654 posts
Armorama: 638 posts
Posted: Sunday, January 06, 2019 - 04:33 PM UTC
Gaz,

Love your Strumpanzer IV. Makes me want to start my Hobbyboss (Tristar) version.
petbat
Visit this Community
Queensland, Australia
Joined: August 06, 2005
KitMaker: 3,353 posts
Armorama: 3,121 posts
Posted: Sunday, January 06, 2019 - 08:04 PM UTC
Still looks great to me Gaz. We live and learn by our errors, but to be honest, we all make mistakes at some time or another. You put a lot of effort in the zim and did some great work, you should be proud of it!
petbat
Visit this Community
Queensland, Australia
Joined: August 06, 2005
KitMaker: 3,353 posts
Armorama: 3,121 posts
Posted: Sunday, January 06, 2019 - 08:06 PM UTC
Be interested to see how it works out for you Damian.
GazzaS
#424
Visit this Community
Queensland, Australia
Joined: April 23, 2015
KitMaker: 4,648 posts
Armorama: 2,248 posts
Posted: Sunday, January 06, 2019 - 08:12 PM UTC
Damian, Some great progress! I'm looking forward to see how your modulation turns out.

Mark, Thank you! I really enjoyed the build. It was a really great kit.

Thank you, Peter. The Zimmerit was fun, but I'm still at a loss as the best way to highlight it.

Gaz
d111298pw
#456
Visit this Community
Oklahoma, United States
Joined: September 22, 2016
KitMaker: 654 posts
Armorama: 638 posts
Posted: Monday, January 07, 2019 - 04:41 PM UTC

Quoted Text

Damian, Some great progress! I'm looking forward to see how your modulation turns out.

Mark, Thank you! I really enjoyed the build. It was a really great kit.

Thank you, Peter. The Zimmerit was fun, but I'm still at a loss as the best way to highlight it.

Gaz


Gaz,
I had same issue with the Zim on my Elefant. Not sure of the best way to highlight to bring it out more.
GazzaS
#424
Visit this Community
Queensland, Australia
Joined: April 23, 2015
KitMaker: 4,648 posts
Armorama: 2,248 posts
Posted: Monday, January 07, 2019 - 07:47 PM UTC
Mark,
I might have tried an acrylic pin wash technique. The detail filling material would have to be soft enough to come up easily. Still... have to try it, I guess.

Gaz
petbat
Visit this Community
Queensland, Australia
Joined: August 06, 2005
KitMaker: 3,353 posts
Armorama: 3,121 posts
Posted: Monday, January 07, 2019 - 08:42 PM UTC

Quoted Text

Mark,
I might have tried an acrylic pin wash technique. The detail filling material would have to be soft enough to come up easily. Still... have to try it, I guess.

Gaz


Hi Gaz, Do up a test zim piece on some scrap styrene or old model and try using Vallejo acrylics watered down. If you moisten the kit parts first, the acrylic will run to the groove more. Keep it reasonably thin and if you add too much, a moistened brush and paper towel can be used to remove it before it dries.

I suggest German Cam. Black Brown 70822 and Burnt Umber 70941 and US Field Drab 873, That is what I have been using on the Diana and Otter you have seen.
GazzaS
#424
Visit this Community
Queensland, Australia
Joined: April 23, 2015
KitMaker: 4,648 posts
Armorama: 2,248 posts
Posted: Monday, January 07, 2019 - 08:49 PM UTC

Quoted Text


Quoted Text

Mark,
I might have tried an acrylic pin wash technique. The detail filling material would have to be soft enough to come up easily. Still... have to try it, I guess.

Gaz


Hi Gaz, Do up a test zim piece on some scrap styrene or old model and try using Vallejo acrylics watered down. If you moisten the kit parts first, the acrylic will run to the groove more. Keep it reasonably thin and if you add too much, a moistened brush and paper towel can be used to remove it before it dries.

I suggest German Cam. Black Brown 70822 and Burnt Umber 70941 and US Field Drab 873, That is what I have been using on the Diana and Otter you have seen.


Thanks Peter!
Are the three colors you mentioned mixed, or used separately?

Gaz
Lakota
#123
Visit this Community
New Mexico, United States
Joined: November 17, 2008
KitMaker: 1,202 posts
Armorama: 635 posts
Posted: Monday, January 07, 2019 - 09:43 PM UTC
Howdy Y'all
I still haven't had a chance to start my Anzio Annie.
Gaz-Great model, I hope you try the pin wash technique. If you don't, that's your choice and you still have a great model for the display shelf. Good work.
Damian-Looking forward to seeing how your modulation technique turns out. I might give it a try one of these days. The model is looking very nice.
Take care,
Con "Lakota"
johhar
Visit this Community
Alabama, United States
Joined: September 22, 2008
KitMaker: 476 posts
Armorama: 447 posts
Posted: Tuesday, January 08, 2019 - 03:46 AM UTC
Great job Gaz. Looks like it's been out in the field and dust awhile.
Really raced to get this one in before deadline, didn't you? LOL. You are aware you now have almost six months left in the campaign?
petbat
Visit this Community
Queensland, Australia
Joined: August 06, 2005
KitMaker: 3,353 posts
Armorama: 3,121 posts
Posted: Tuesday, January 08, 2019 - 07:49 AM UTC

Quoted Text


Thanks Peter!
Are the three colors you mentioned mixed, or used separately?

Gaz


I use all three and on all surfaces, but I use more of one colour depending on the surface. The darker colour is the first one I listed, I use that first. Then the middle colour selectively on areas that would get a little more light, say the sides of the superstructure, etc. Then the last on areas like the hull top, fender tops, etc.

I use the darker colour for pin washes, but mix a bit of the middle colour in to vary the shade a little instead of having one continuous colour in the pin wash.

The trick is keep it thin and the area you are painting moist to draw the paint along. That way you avoid tide marks where the acrylic pools, although a little tide mark here and there can be good where water would pool on a vehicle naturally after rain, etc.

Here are some pics of the Diana. Remember I have also done dirt and dust streaks on this, but you can still see the wash in areas and how there are slightly different colour patches, You can also see where the cab has a slightly darker finish to the fighting compartment sides to avoid mono tone.

Darker colour on the inside of the fenders facing the engine compartment, the areas closer to the cab compartment and the bottom of the engine and cab, then middle colour on the areas of the fender facing outwards, the centre area of the cab and Engine covers, with the lighter colour on top and over the tops of the fenders, etc.


The outer road wheels have the darker colour in the centre area, the medium colour to the top section and the lower colour on the bottom section - all so thin you can only just get the hint of change.