Campaigns: Completed Campaigns
Campaigns that are completed should be grouped here.
Hosted by Richard S.
Italian Campaign 1943-1945
k_mero4
Visit this Community
Sofiya, Bulgaria
Joined: November 26, 2017
KitMaker: 393 posts
Armorama: 369 posts
Posted: Monday, June 10, 2019 - 07:56 AM UTC
Peter, it is beautiful. Very good paint work and weathering is very, very fine. Congratulations.
Kalin
brekinapez
Visit this Community
Georgia, United States
Joined: July 26, 2013
KitMaker: 2,272 posts
Armorama: 1,860 posts
Posted: Tuesday, June 11, 2019 - 02:30 PM UTC
Okay. Did things a little ass-backwards in that I realized after the fact that I should have let the gray show through more on the light overcoat. I came across some clearer pics of the captured Leopold that showed the light yellow was applied more like a whitewash, in that it wasn't meant for long-term but as an immediate concern. So, I went back and applied a light haze of gray in a way to simulate it being the color peeking through; hopefully a wash and some weathering will pull it all together. Got the Peddinghaus decals so I can bring it up to Reichbahn regulations.


Oh, and funny story:

While I was checking out how the gray was coming out of the AB, the lid to the cup popped off and a splash of paint jumped out (heavily alcohol-thinned Tamiya) and hit the table right next to the main body of the gun and splattered. Amazingly, I only suffered a bunch of small spots and no flooding. I still have my old Paasche hooked up and loaded it with yellow and covered over the mess as best I could, and continued with the gray. Fortunately it was on the back side and as I am displaying the open sighting mechanism on the other side, noone can see where the spill hit once it's against the shelf.

Said mechanism which has broken off five times now. I glued it on again for the pics but we all know it's coming off when I do the decals or attempt the weathering. Hoping I don't bust off any of the little chains I made for the rails--I tried to duplicate the hooks that would be on the ends of the chains where they would hang from a fitting attached to the railing, and those made me need new glasses.
GazzaS
#424
Visit this Community
Queensland, Australia
Joined: April 23, 2015
KitMaker: 4,648 posts
Armorama: 2,248 posts
Posted: Tuesday, June 11, 2019 - 08:03 PM UTC
Looking great, Shell! Glad your paint disaster was kept to a small area!

Gaz
petbat
Visit this Community
Queensland, Australia
Joined: August 06, 2005
KitMaker: 3,353 posts
Armorama: 3,121 posts
Posted: Tuesday, June 11, 2019 - 08:16 PM UTC
Thank you Kalin.

Looking great Shell. Such a substantial chunk of plastic I am surprised you haven't knocked off more bits.

If only I had the room for one myself....
k_mero4
Visit this Community
Sofiya, Bulgaria
Joined: November 26, 2017
KitMaker: 393 posts
Armorama: 369 posts
Posted: Wednesday, June 12, 2019 - 02:41 AM UTC
This monster is ... It's impressive...and terrifying.
Congratulations on your work on the model.
Kalin
Ramanathan
#477
Visit this Community
Pest, Hungary
Joined: March 21, 2007
KitMaker: 133 posts
Armorama: 131 posts
Posted: Wednesday, June 12, 2019 - 07:53 PM UTC
Hello all,
I finally finished the Chaffee. The weathering took longer time than I expected... I wanted to depict a brand new but quite dusty tank and I applied the dust in very light layers. In the evening I'll put pictures to the campaign gallery.
Cheers,
Zsolt


d6mst0
#453
Visit this Community
Texas, United States
Joined: August 28, 2016
KitMaker: 1,925 posts
Armorama: 601 posts
Posted: Wednesday, June 12, 2019 - 11:20 PM UTC
Ramanathan,

Sweet!

Mark
McRunty
#491
Visit this Community
Missouri, United States
Joined: April 06, 2016
KitMaker: 602 posts
Armorama: 191 posts
Posted: Thursday, June 13, 2019 - 01:55 AM UTC
That Chaffee looks fantastic Ramanathan!
Ramanathan
#477
Visit this Community
Pest, Hungary
Joined: March 21, 2007
KitMaker: 133 posts
Armorama: 131 posts
Posted: Thursday, June 13, 2019 - 01:59 AM UTC
Thank you very much! It was a fun build - though a bit difficult sometimes
cheers,
Zsolt
Nate_W
Visit this Community
Missouri, United States
Joined: April 13, 2012
KitMaker: 395 posts
Armorama: 391 posts
Posted: Thursday, June 13, 2019 - 04:11 AM UTC

Quoted Text

Okay the Dragon M3 GMC is done. It was actually finished by the due date, but I took the opportunity to make a base for it. I also removed the tarp over the gun as per the earlier pic of the real vehicle, I just did not like how much it covered up. Artistic licence, I made a rolled tarp to add to the fender to replace it.


Details of the dials...


Great campaign, lots of great guys here, glad I joined in. Thanks for hosting Gaz.

Cheers all.


Whoa! Amazing job Peter! This has actually sparked a big interest in the M3 GMC 75mm. What an aesthetically pleasing vehicle to look at. Tactically it looks like it has so much potential for infantry support. Looks like I'm going to have to get Dragon's and all the awesome upgrades for it! DOwn the rabbit hole I go!
phantom_phanatic309
#372
Visit this Community
United Kingdom
Joined: March 10, 2010
KitMaker: 2,568 posts
Armorama: 423 posts
Posted: Thursday, June 13, 2019 - 06:30 AM UTC
Some amazing builds in here.
Regret not joining in now but had so much fun much going on I barely had much time to get in any modelling over the last few months.
Ironically I picked up IBG's 1/72 Otter reconnaissance car at the weekend which would have made a great little quick build here.

petbat
Visit this Community
Queensland, Australia
Joined: August 06, 2005
KitMaker: 3,353 posts
Armorama: 3,121 posts
Posted: Thursday, June 13, 2019 - 08:06 AM UTC
Zsolt, it was worth the wait. Great finish and you pulled off what you wanted to depict nicely.

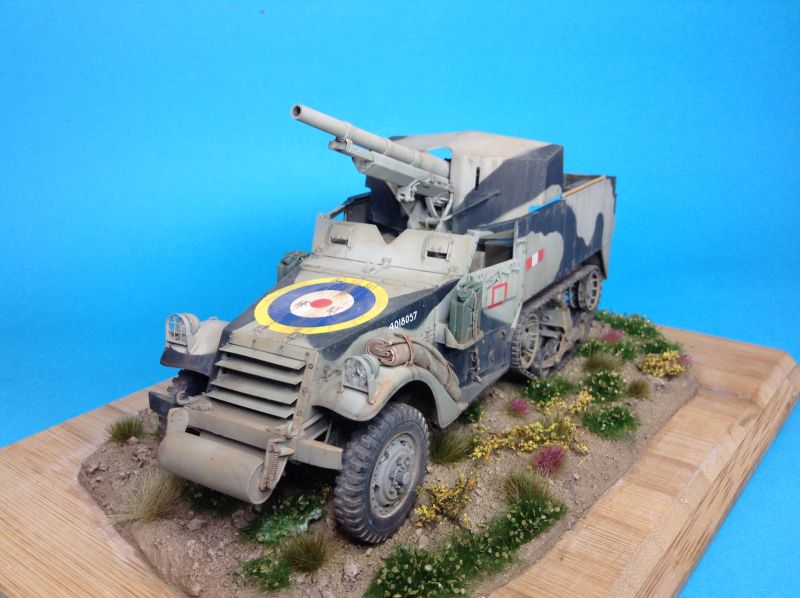
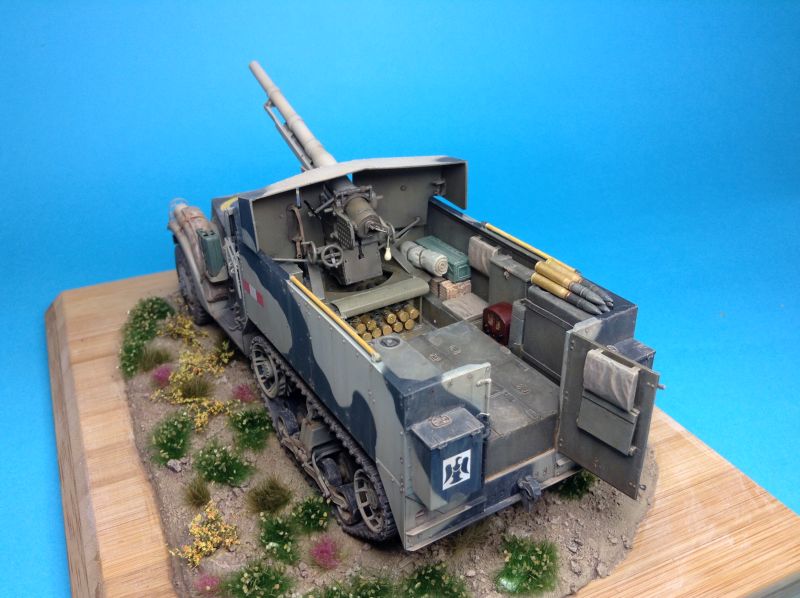
Nathan, glad you liked it. The Griffin sets do add a lot, especially the correct sized rear stowage boxes, but I will warn you the ammo compartment is very fiddly. You need to insert rounds in the tubes so you can use the point of the round to hold the rear perforated panel in the right place when fixing it to the rest of the frame. It also means you can align the tubes correctly - don't fix the tubes to the frame until you have them aligned and fix the low run, then the middle and finally the top runs. The slightest misalignment will cause you grief later. Also solder the retaining clips for the rounds to the tubes before doing anything else. Glue will not hold them and they will be easy to break off if you don't.

Do not paint the part of the round that is hidden in the tube. Any paint will make them too thick to fit. I had to scrape the paint off mine.

Good luck with your build if you go that way.

Stephen, a pity you couldn't join in. Maybe the Otter can be your entry in the APC/AFV build later this year?

I have built the IBG 1/35th scale Otter; a few accuracy issues around the doors and the driver hinged visor panel being too long and the fenders a smidgen too short in vertical height (and 1/48 scale pioneer tools!) The mortar tube is the post war truncated cone Dutch version, not a straight tube. With some TLC it comes out quite well. Not sure if the 1/72nd scale has the same issues around the doors and visor but the difference in the fender would unlikely be noticeable.

For my build I just sliced out a section of the door, repositioned the hinges and added a strip in the bottom of the door opening to raise them to the right height. Same for the visor:
GazzaS
#424
Visit this Community
Queensland, Australia
Joined: April 23, 2015
KitMaker: 4,648 posts
Armorama: 2,248 posts
Posted: Thursday, June 13, 2019 - 05:17 PM UTC
Zsolt,
Wow! What a fantastic looking Chaffee! Love the dusty weathering and all of the extras! Congratulations on completing it!

Well done!

Gaz
GazzaS
#424
Visit this Community
Queensland, Australia
Joined: April 23, 2015
KitMaker: 4,648 posts
Armorama: 2,248 posts
Posted: Friday, June 14, 2019 - 04:31 PM UTC
Alright, my friends time is winding down for the extension.

In the Baker Islands USA, the time is 4:30 PM on Friday June 14.

That leaves 31.5 hours until the entire world has entered 16 June 2019. I hope you all have a productive final day of campaigning!

Gaz
Mrclark7
Visit this Community
Texas, United States
Joined: June 04, 2017
KitMaker: 503 posts
Armorama: 477 posts
Posted: Friday, June 14, 2019 - 05:05 PM UTC
Im going to be coming in skidding. time has been very hard for me to find for this.
GazzaS
#424
Visit this Community
Queensland, Australia
Joined: April 23, 2015
KitMaker: 4,648 posts
Armorama: 2,248 posts
Posted: Friday, June 14, 2019 - 08:35 PM UTC

Quoted Text

Im going to be coming in skidding. time has been very hard for me to find for this.


I have faith in you, Kelly!
iflytb20
#501
Visit this Community
Kerala, India / भारत
Joined: August 25, 2009
KitMaker: 292 posts
Armorama: 91 posts
Posted: Saturday, June 15, 2019 - 04:55 AM UTC
And she's finished. Had to rush a bit to make the deadline. As a result I have done minimal weathering - just some dust effects to depict a tank at the end of its road march. I may revisit it one day to do some more weathering but until then she stays as it is.


Thanks a lot for the Campaign Gaz. See you in the next one

PS: I'll post pics in the gallery asap
petbat
Visit this Community
Queensland, Australia
Joined: August 06, 2005
KitMaker: 3,353 posts
Armorama: 3,121 posts
Posted: Saturday, June 15, 2019 - 09:53 AM UTC
Really nicely done Raj.
GazzaS
#424
Visit this Community
Queensland, Australia
Joined: April 23, 2015
KitMaker: 4,648 posts
Armorama: 2,248 posts
Posted: Saturday, June 15, 2019 - 10:59 AM UTC
Congratulations Raj, Stolch looks great! And I reckon subtle weathering is fine. I'm glad you were able to complete it.

Gaz
Mrclark7
Visit this Community
Texas, United States
Joined: June 04, 2017
KitMaker: 503 posts
Armorama: 477 posts
Posted: Saturday, June 15, 2019 - 12:41 PM UTC
trying to do the paint right now. Not sure if I want to stay this color. Although its not done with the coats. But I think I will go gray with it after all.

GazzaS
#424
Visit this Community
Queensland, Australia
Joined: April 23, 2015
KitMaker: 4,648 posts
Armorama: 2,248 posts
Posted: Saturday, June 15, 2019 - 12:54 PM UTC
You're not far from done, Kelly! What color did you use for the body?
Mrclark7
Visit this Community
Texas, United States
Joined: June 04, 2017
KitMaker: 503 posts
Armorama: 477 posts
Posted: Saturday, June 15, 2019 - 03:58 PM UTC
Gary- Well here it is skidding into the finish line. I went with gray. I will still try doing some weathering tomorrow. Hopefully its good enough for the end.


zontar
Visit this Community
Hawaii, United States
Joined: August 27, 2006
KitMaker: 1,646 posts
Armorama: 1,557 posts
Posted: Saturday, June 15, 2019 - 04:39 PM UTC
Aloha All,

Shell: nice work on ol' Annie. Big one that is.

Zsolt: the Chaffee looks awesome. I really like the subtlety of the weathering. Nice work.

Raj: congratulations on finishing. Looks great.

Kelly: you got this! Just bring it home.

Gaz: thank you so much for the extension and for such a great campaign.

Still needs a flat coat, but otherwise will call this one done. My first time completing figures in 1/35th scale. they are OK by me, but there is MUCH room for improvement. Really struggled to get them in position as well. I had test fit them somewhat and it seemed pretty good, but had a devil of a time getting them in there at all at the end. Oh well.


Now, I'll finish up MBT, then it's back to Stalingrad!!

Happy Modeling,
Zon
zontar
Visit this Community
Hawaii, United States
Joined: August 27, 2006
KitMaker: 1,646 posts
Armorama: 1,557 posts
Posted: Saturday, June 15, 2019 - 04:49 PM UTC
LapMan: your M10 looks the business! I like it more than I like my own. Nice work.

Lukas: fine job on the Wespe. very crisp.

Peter: I love your M3. The colors are awesome and nice job on the weathering.

Happy Modeling,
Zon
GazzaS
#424
Visit this Community
Queensland, Australia
Joined: April 23, 2015
KitMaker: 4,648 posts
Armorama: 2,248 posts
Posted: Saturday, June 15, 2019 - 05:44 PM UTC
Zon,
Great job on your M10! The crew adds a lot to the finish!

Congratulations on successfully completing the campaign... you sound busy...lol!