

Campaigns: Active Campaigns
Campaigns that are either in planning or underway should be grouped here.
Campaigns that are either in planning or underway should be grouped here.
Hosted by Richard S.
Sheperd Paine Tribute
TankManNick

Joined: February 01, 2010
KitMaker: 551 posts
Armorama: 543 posts
Posted: Thursday, March 12, 2020 - 11:21 AM UTC
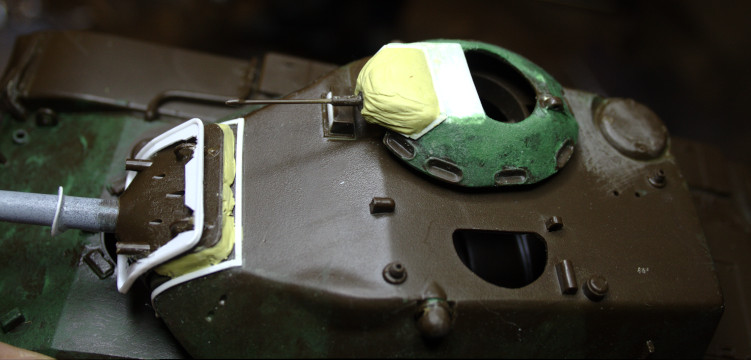
Turret work. Commanders cupola putty work is done. Prepping for the mantlet cover.
petbat

Joined: August 06, 2005
KitMaker: 3,353 posts
Armorama: 3,121 posts
Posted: Thursday, March 12, 2020 - 06:38 PM UTC
Sensational work guys.
The Chieftain really looks the part with the weathering Cam.
Ryan, the old Mr T based Jeep is very well done too.
Nice detailing Jesse. Great choice in kit for the build - was my second choice.
Jesper, she is getting close now.
Nick, that work is really paying off. You are certainly doing Shep proud on that one.


Northern_Lad

Joined: September 17, 2012
KitMaker: 462 posts
Armorama: 417 posts
Posted: Wednesday, March 18, 2020 - 09:42 AM UTC
Good evening all!
Ive made progress on the Tamiya 8rad. I want the wheels at an angle so have done some surgery to make the wheels pivot. They are now cemented at an angle.


More progress tomorrow.
Cheers
Matthew
Ive made progress on the Tamiya 8rad. I want the wheels at an angle so have done some surgery to make the wheels pivot. They are now cemented at an angle.
More progress tomorrow.
Cheers
Matthew
TankManNick
Joined: February 01, 2010
KitMaker: 551 posts
Armorama: 543 posts
Posted: Thursday, March 19, 2020 - 01:29 PM UTC
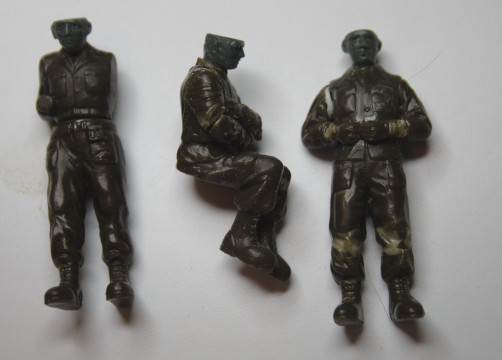
Made a start on modifying the figures. Thought I would show some in progress pictures with the figures in a very rough form. Having to do a fair bit of surgery here including grafting Tamiya German troop heads (these figures also date from 1974). Also - those boots look huge! I want to do something about them.

petbat
Joined: August 06, 2005
KitMaker: 3,353 posts
Armorama: 3,121 posts
Posted: Thursday, March 19, 2020 - 03:45 PM UTC
Nice Matthew. Hard to tell from the pic if you knew this already, but the inner road wheels do not turn out quite as much as the outer sets.
Nick that is dedication. Using 70's era figures like that.
Nick that is dedication. Using 70's era figures like that.
Northern_Lad
Joined: September 17, 2012
KitMaker: 462 posts
Armorama: 417 posts
Posted: Thursday, March 19, 2020 - 11:51 PM UTC
Quoted Text
Nice Matthew. Hard to tell from the pic if you knew this already, but the inner road wheels do not turn out quite as much as the outer sets.
Thanks for the pointer. I think the inner ones are set at the same angle as the outer ones. Hmmmm. I need to find my glue buster and adjust them.
Cheers
Matthew
barkingdigger

#013

Joined: June 20, 2008
KitMaker: 3,981 posts
Armorama: 3,403 posts
Posted: Friday, March 20, 2020 - 06:18 AM UTC
Hi Matt,
The inner wheels turn half as much as the outer ones, so the overall effect is driving around the edge of a circle. But looking good nonetheless!
The inner wheels turn half as much as the outer ones, so the overall effect is driving around the edge of a circle. But looking good nonetheless!

panzerman1
Joined: September 30, 2010
KitMaker: 430 posts
Armorama: 291 posts
Posted: Monday, March 23, 2020 - 06:33 AM UTC
Inspirational works, Gents. This campaign has nostalgia harking back to my childhood. Seeing Shep Paine'e masterful works left me gobsmacked and eager to improve my skill set. Seeing the vintage kits being worked on here has my Mojo fired up. Good luck everyone with their projects. Bill
panzerman1
Joined: September 30, 2010
KitMaker: 430 posts
Armorama: 291 posts
Posted: Monday, March 23, 2020 - 06:43 AM UTC
Hello Fellow Modelers,
I've been duly inspired and spurred on to join this fantastic campaign. My plan is to recreate the British paratroopers vs German Flakpanzer Ostwind diorama in 1/72 scale. Good luck everyone with their projects. Thanks for viewing. Bill
Kits in diorama:
ESCI German Flakpanzer IV Wirbelwind......1980.
ESCI Red Devils British Paratroopers.....1976.
ESCI/ERTL British Paratroopers.....1983.
I'm planning on scratchbuilding the Ostwind turret, and kit sourcing a time frame suitable 37mm AA gun. I also need to find a jeep to convert into the communications vehicle seen in the diorama.

hetzer44
Joined: December 21, 2005
KitMaker: 241 posts
Armorama: 124 posts
Posted: Wednesday, March 25, 2020 - 07:31 AM UTC
Here's a little progress on the 1/32 Monogram Sherman Hedgehog. While the Monogram kits don't stack up to the newer offerings, I still like the older kits as I work on my meager scratch building skills. I guess it's nostalgia that endears me to those older kits.
In this case, I started with the turret shell and the barrel. I didn't think I would need the putty so soon, but at least I had it in the man cave to get this great campaign started. The liftng eyes on the rear turret edge both needed putty as there were major gaps in the fit. The barrel was two piece, but actually went together rather well though a bit of putty was needed for some very small gaps after most sanding and priming was done.


Love all the entries. Looking forward to seeing progress on these builds.
Stay safe and Cheers to all modelers everywhere!
chuck
In this case, I started with the turret shell and the barrel. I didn't think I would need the putty so soon, but at least I had it in the man cave to get this great campaign started. The liftng eyes on the rear turret edge both needed putty as there were major gaps in the fit. The barrel was two piece, but actually went together rather well though a bit of putty was needed for some very small gaps after most sanding and priming was done.
Love all the entries. Looking forward to seeing progress on these builds.
Stay safe and Cheers to all modelers everywhere!
chuck
Raulito

Joined: January 24, 2013
KitMaker: 112 posts
Armorama: 105 posts
Posted: Wednesday, March 25, 2020 - 01:34 PM UTC
Hi, everybody
I finally managed to put mi hands on the Tamiyas Sd. Kfz. 222. The work on the interior just began.
I´m not trying to reproduce every bit exactly, but to give a general idea, little will be see with the body close.
Cheers!


I finally managed to put mi hands on the Tamiyas Sd. Kfz. 222. The work on the interior just began.
I´m not trying to reproduce every bit exactly, but to give a general idea, little will be see with the body close.
Cheers!
panzerman1
Joined: September 30, 2010
KitMaker: 430 posts
Armorama: 291 posts
Posted: Thursday, March 26, 2020 - 02:25 AM UTC
Chuck, good start on that venerable, old kit.
Raul, nice job scrstchbuilding an interior on the 222.
Raul, nice job scrstchbuilding an interior on the 222.
SGTJKJ
#041

Joined: July 20, 2006
KitMaker: 10,069 posts
Armorama: 4,677 posts

Posted: Thursday, March 26, 2020 - 05:38 AM UTC
Some really great work going on here!
Raul, Love the old school scratch building - looks great!
I have started weathering on my Sherman Calliope. I cannot get the wiring on the missiles right and difficult to weather for all the wiring.
I am going for a very muddy European 1944/45 winter look. Still quite some work to do before I can finish it, but getting there.

tangodown

#494

Joined: August 08, 2018
KitMaker: 213 posts
Armorama: 198 posts

Posted: Thursday, March 26, 2020 - 07:54 AM UTC
Looking great Jesper! Man, that's a lot of wires.

petbat
Joined: August 06, 2005
KitMaker: 3,353 posts
Armorama: 3,121 posts
Posted: Thursday, March 26, 2020 - 08:07 AM UTC
Chuck and Raul. Good starts guys. Nice extras raul.
Jesper that is a lot of spaghetti you have cooked there... how are the eyes??
Jesper that is a lot of spaghetti you have cooked there... how are the eyes??

yeahwiggie

Joined: March 24, 2006
KitMaker: 2,093 posts
Armorama: 1,359 posts

Posted: Thursday, March 26, 2020 - 08:27 AM UTC
A lot of inspirational work, people!
Awesome!!
@ William; I used to have literally 1000's of those little soldiers as a kid! We used to conduct some sort of wargame with other kids from the block... Deploying our troops, thinking tactical and strategical.. Single shot weapons were 1 kill, automatics 2. A grenade 3, same as a heavy MG. Mortars and flamers were 5... Ohh the memories!
@ Raul; You really are showing the spirit of the campaign!!
@ Jesper; you really are living up to the level I am used of you. Great!!
hetzer44
Joined: December 21, 2005
KitMaker: 241 posts
Armorama: 124 posts
Posted: Thursday, March 26, 2020 - 08:32 AM UTC
Another update on the Monogram Sherman Hedge Hog build. I'm trying to do as much of this out of the box as possible and limit scratch building to parts that are just wrong, missing or needs a bit of enhancement.
Bogie units are now complete and they look pretty good for being made in the 1970s.

More work on the turret..okay well putty work.

Upper and lower hull went together relatively well, though filling with putt was needed on the nose.

Thanks for viewing and the encouraging words along the way.
Cheers everyone!
chuck
Bogie units are now complete and they look pretty good for being made in the 1970s.
More work on the turret..okay well putty work.
Upper and lower hull went together relatively well, though filling with putt was needed on the nose.
Thanks for viewing and the encouraging words along the way.
Cheers everyone!
chuck

oldbean
Joined: July 05, 2004
KitMaker: 769 posts
Armorama: 461 posts
Posted: Friday, March 27, 2020 - 06:19 AM UTC
Well, this all this staying home stuff, I was able to get a lot done on my Panzerwerfer 42. On the drivers side, I added gas, clutch and brake pedals, and small box on the commanders side.

I also opened up one of the storage panels on the side, added the rest of the steering column and started the rocket pod tie downs.

I opened up the visors and added details for Tamiya's Grief kit (1974 era)

On the rocket launcher, I removed the molded on wires and replaced them with thin brass wire and bulked up the wiring box.

I added new locking mechanisms to all the hatches.

The kit comes with only 4 rocket pods, so I made 6 more from plastic tube and sheet stock.

Nos to start gluing it all together and painting it.
Jesse
I also opened up one of the storage panels on the side, added the rest of the steering column and started the rocket pod tie downs.
I opened up the visors and added details for Tamiya's Grief kit (1974 era)
On the rocket launcher, I removed the molded on wires and replaced them with thin brass wire and bulked up the wiring box.
I added new locking mechanisms to all the hatches.
The kit comes with only 4 rocket pods, so I made 6 more from plastic tube and sheet stock.
Nos to start gluing it all together and painting it.
Jesse
petbat
Joined: August 06, 2005
KitMaker: 3,353 posts
Armorama: 3,121 posts
Posted: Friday, March 27, 2020 - 08:34 AM UTC
Looking god Chuck. Putty was the tool of the day back then hey...
Nice little extras Jesse. One thing, if I recall right, Italeri says to fit the ammo tubes on the inside ready racks. This is not correct. There was insufficient room to be able to remove the rounds from the tubes without a lot of difficulty. The rockets were removed from the transport tubes and then fitted to the ready racks. This was the same for the SWS version of the Panzerwerfer, although they were fitted nose up in that.
Nice little extras Jesse. One thing, if I recall right, Italeri says to fit the ammo tubes on the inside ready racks. This is not correct. There was insufficient room to be able to remove the rounds from the tubes without a lot of difficulty. The rockets were removed from the transport tubes and then fitted to the ready racks. This was the same for the SWS version of the Panzerwerfer, although they were fitted nose up in that.
TankManNick
Joined: February 01, 2010
KitMaker: 551 posts
Armorama: 543 posts
Posted: Friday, March 27, 2020 - 02:53 PM UTC
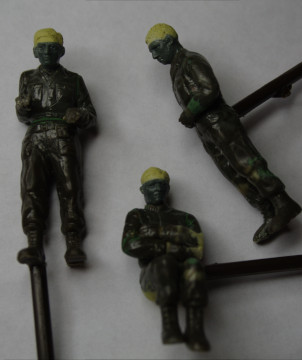
Well here are the figures. Want to see how they look with a coat of primer, but they were worked over so well I thought I'd better wash them first. I took a pic before then to prove I sculpted the hair. You know, in case they are so good you can't tell after a shot of primer! Haha.
The searchlight is very basic so I'm trying to dress it up a bit. Adding detail front and back. Clear sheet will added at front. Boy this would have been so much easier if the thing had it's cover on! But alas, the vehicle I chose has it 'on display'!

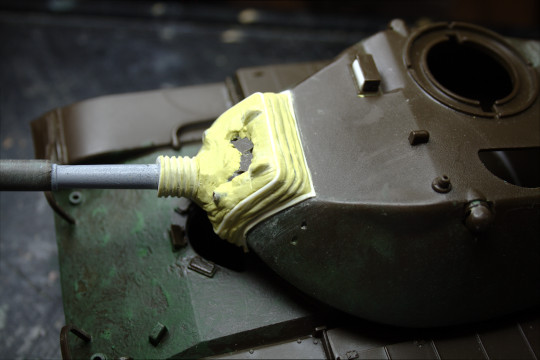
Sculpted the mantlet cover. I realized I had to leave a gap to attach the searchlight. Anyone know of any good pictures showing the attachment of these early model searchlights to the mantlet through the cover? I found good references for the searchlight itself. Come to that where does the cable go on the turret? I see a possible place but a picture would sure be nice!
The searchlight is very basic so I'm trying to dress it up a bit. Adding detail front and back. Clear sheet will added at front. Boy this would have been so much easier if the thing had it's cover on! But alas, the vehicle I chose has it 'on display'!
Sculpted the mantlet cover. I realized I had to leave a gap to attach the searchlight. Anyone know of any good pictures showing the attachment of these early model searchlights to the mantlet through the cover? I found good references for the searchlight itself. Come to that where does the cable go on the turret? I see a possible place but a picture would sure be nice!
oldbean
Joined: July 05, 2004
KitMaker: 769 posts
Armorama: 461 posts
Posted: Friday, March 27, 2020 - 11:50 PM UTC
Quoted Text
Looking god Chuck. Putty was the tool of the day back then hey...
Nice little extras Jesse. One thing, if I recall right, Italeri says to fit the ammo tubes on the inside ready racks. This is not correct. There was insufficient room to be able to remove the rounds from the tubes without a lot of difficulty. The rockets were removed from the transport tubes and then fitted to the ready racks. This was the same for the SWS version of the Panzerwerfer, although they were fitted nose up in that.
Dang it!! No worries though, I just won't put them in. Now I can show off the work I did on the ready racks.
Jesse
McRunty
#491
Joined: April 06, 2016
KitMaker: 602 posts
Armorama: 191 posts

Posted: Saturday, March 28, 2020 - 04:59 AM UTC
First update on the Universal Carrier. Has gone together well and is almost built. Having to build and paint in sub-assemblies. Not too much putty needed to be added. Injector pin marks tend to be in hidden areas so that's nice. Typical Tamiya 
Right now just the drivers compartment is painted and ready for washes etc. Had to paint this first as there was no way to get the driver in and the compartment painted if you fully built the bit first.

Right now just the drivers compartment is painted and ready for washes etc. Had to paint this first as there was no way to get the driver in and the compartment painted if you fully built the bit first.
panzerman1
Joined: September 30, 2010
KitMaker: 430 posts
Armorama: 291 posts
Posted: Saturday, March 28, 2020 - 07:39 AM UTC
Jesper, awesome job painting and weathering your Calliope tank.
Ron, thanks for the comment. I played a similar game with my Brother.
Chuck, more good work on your Monogram kit. Those vintage kits can be putty pigs.
Jesse, little improvements here and there rally add to the realism of the kit. Good job.
Nick, great job sculpting the hair on the figures. Added details on the searchlight and mantle cover look terrific.
Rory, great start on your universal carrier. Nice paintwork.
Good luck all on your projects. Bill
panzerman1
Joined: September 30, 2010
KitMaker: 430 posts
Armorama: 291 posts
Posted: Saturday, March 28, 2020 - 07:46 AM UTC
Update time on my British Paras vs Ostwind diorama.

Started doing the layout for the scratchbuilt Ostwind turret. Luckily, I had the Hasegawa kit to use as a template.

Here's the completed Ostwing turret. It was a bugger to get right. All those panels were fiddly to align right.
Thanks for viewing. Good luck all on your projects. Bill
Started doing the layout for the scratchbuilt Ostwind turret. Luckily, I had the Hasegawa kit to use as a template.
Here's the completed Ostwing turret. It was a bugger to get right. All those panels were fiddly to align right.
Thanks for viewing. Good luck all on your projects. Bill
petbat
Joined: August 06, 2005
KitMaker: 3,353 posts
Armorama: 3,121 posts
Posted: Saturday, March 28, 2020 - 08:03 AM UTC
Looking good Rory. I have fond memories of that kit. I did the first release as an Eighth Army Western Desert vehicle in the early 80's....
Bill, my hats off to you on that turret. 1/72nd scale, would have been sooo fiddly.
Bill, my hats off to you on that turret. 1/72nd scale, would have been sooo fiddly.
 |

WEB HOSTING BY


Copyright ©2021 Armorama and Kitmaker Network, a subsidiary of Silver Star Enterprises
All Rights Reserved. Please read our Conditions of Use and Privacy Policy.
All Rights Reserved. Please read our Conditions of Use and Privacy Policy.