

Campaigns: Active Campaigns
Campaigns that are either in planning or underway should be grouped here.
Campaigns that are either in planning or underway should be grouped here.
Hosted by Richard S.
Sheperd Paine Tribute
barkingdigger

#013

Joined: June 20, 2008
KitMaker: 3,981 posts
Armorama: 3,403 posts
Posted: Saturday, April 18, 2020 - 11:22 PM UTC
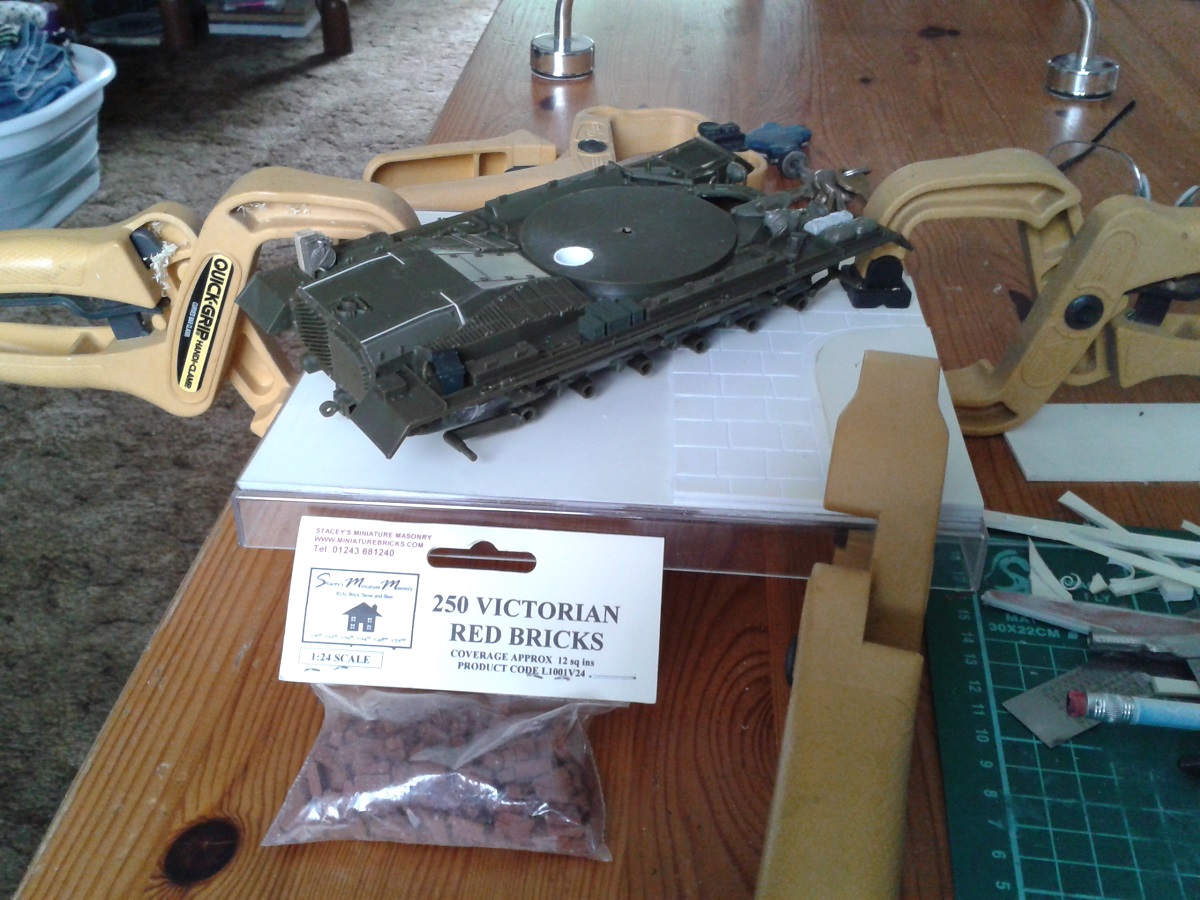
The base for my build started taking shape yesterday. (Those Fererro Rocher boxes do come in handy even after they are empty!) THe basic idea is a street corner "somewhere in Europe", with the tank mounting the pavement and demolishing a brick garden wall. I need to add some Polyfilla to make raised ground in the street, and some drainage details.

hetzer44

Joined: December 21, 2005
KitMaker: 241 posts
Armorama: 124 posts
Posted: Sunday, April 19, 2020 - 06:03 AM UTC
Everyone has shown a lot of real good progress. It will help inspire the next generation of scratchbuilders.
Cheers!
chuck
Cheers!
chuck

Lakota

#123
Joined: November 17, 2008
KitMaker: 1,202 posts
Armorama: 635 posts
Posted: Sunday, April 19, 2020 - 12:45 PM UTC
Howdy Y'all 
A little progress on my Sherman. I'm working on the base coat: Tamiya Olive Drab airbrushed. I still have a few more spots to hit for full coverage. I don't plan on any additions or scratch building, just an out-of-the-box build like I'd do when I was a kid.

Take care,
Don "Lakota"
A little progress on my Sherman. I'm working on the base coat: Tamiya Olive Drab airbrushed. I still have a few more spots to hit for full coverage. I don't plan on any additions or scratch building, just an out-of-the-box build like I'd do when I was a kid.
Take care,
Don "Lakota"
Raulito

Joined: January 24, 2013
KitMaker: 112 posts
Armorama: 105 posts
Posted: Sunday, April 19, 2020 - 09:45 PM UTC
Hi, everyone
First I want to thank William, Jesper , Peter and Ron for their kind words. Thank you guys!
I finished the Sd.Kfz. 222 interior a week ago, but my 20 years old air compressor decided to retire and as we cannot go out and the vast majority of services are unavailable due to the virus restrictions I was not able to send it to service.
Imagine the situation, for the first time in my life I cannot go out, I have to stay at home with nothing better to do than watch TV (no sports) and talk to the wife
To make a long story short, I bought a new one on line. What else could I do? It´s my mental health after all.
So when my new baby arrives (this week I hope) I´ll prime this interior and began the paint work so I can move to the rest of the model.
Keep the good work and above all stay safe.
Cheers.

Northern_Lad

Joined: September 17, 2012
KitMaker: 462 posts
Armorama: 417 posts
Posted: Tuesday, April 28, 2020 - 07:28 AM UTC
Good evening!
An update on the 8rad
Ive tried to preshade and prehighlight.

After that I applied Vallejo dunkel panzer grau through my airbrush.

The effect isnt as dramatic as Id hoped. Still, I have solid base now to apply washes, pin wash, subtle chipping, etc.
Best
Matthew
An update on the 8rad
Ive tried to preshade and prehighlight.
After that I applied Vallejo dunkel panzer grau through my airbrush.
The effect isnt as dramatic as Id hoped. Still, I have solid base now to apply washes, pin wash, subtle chipping, etc.
Best
Matthew
petbat

Joined: August 06, 2005
KitMaker: 3,353 posts
Armorama: 3,121 posts
Posted: Tuesday, April 28, 2020 - 01:42 PM UTC
Wow. Managed to miss the thread over the past few days and so much has been posted! All looking fantastic. Nice scratch building and dio work being done too!
Keep it up guys
Keep it up guys


panzerman1
Joined: September 30, 2010
KitMaker: 430 posts
Armorama: 291 posts
Posted: Thursday, April 30, 2020 - 12:23 AM UTC
Tom, nice detailing on your kit. I like the mantle covering.
Tom, cool idea for the base.Wrecking a local's brick wall will cause a commotion. Ha!
Don, your Sherman looks good. An Out Of Box build can be very relaxing.
Raul, you are welcomed. Terrific work detailing the interior of the 222.
Matthew, the paintwork on your 8 rad looks good to me. Cool vehicle.
Awesome works everyone. Good luck on the rest of your projects. Bill
panzerman1
Joined: September 30, 2010
KitMaker: 430 posts
Armorama: 291 posts
Posted: Thursday, April 30, 2020 - 12:44 AM UTC
Update on my British Paras vs German Flakpanzer Ostwind diorama.

Kit decal problem. First Balkan cross shattered while applying it. I sealed the other decals with Testors Dull coat as a remedy.

Preparing the tank tools for application. Some missing tools I had to make. Not visible are a tow clevis and barrel cleaning rods.

Completed Ostwind hull. I added the spare tracks, tow cable, and tank tools. I even painted the wounded tank crewman.

This view shows the horrible kit provided tracks. A replacement would have been necessary, but this build is Old School. The scratchbuilt tow clevis and cleaning rods are visible.

I picked up a time frame suitable Wileys jeep(1st issued 1973). This I will be converting into the communications jeep seen in the diorama.
Thanks for viewing. Good luck to all on your projects. Bill
Kit decal problem. First Balkan cross shattered while applying it. I sealed the other decals with Testors Dull coat as a remedy.
Preparing the tank tools for application. Some missing tools I had to make. Not visible are a tow clevis and barrel cleaning rods.
Completed Ostwind hull. I added the spare tracks, tow cable, and tank tools. I even painted the wounded tank crewman.
This view shows the horrible kit provided tracks. A replacement would have been necessary, but this build is Old School. The scratchbuilt tow clevis and cleaning rods are visible.
I picked up a time frame suitable Wileys jeep(1st issued 1973). This I will be converting into the communications jeep seen in the diorama.
Thanks for viewing. Good luck to all on your projects. Bill
Raulito
Joined: January 24, 2013
KitMaker: 112 posts
Armorama: 105 posts
Posted: Thursday, April 30, 2020 - 08:11 AM UTC
Hi, everyone.
Very nice 8 rad Matthew, looks great.
Thank you, Bill. Good work on the tiny Pz. IV. Waiting to see the Willis.
On my side I have received this new baby and I´m in peace with the world now.

On the other hand I began to base paint the interior. As I said before, little will be seen so no mayor effort here. It will get a clear coat for the washes and then a matt one for sand, dust, etc. the usual stuff.


One point thou. I build the gun and it´s pedestal and when I dry fit it...it will not turn!
The crew seats are a little over scale and the left one is of the wrong shape. I don´t know, may be I will scratch new ones or live with it. We´ll see.

That´s all for now. Keep the good work and be safe.
Cheers.
Raul
Very nice 8 rad Matthew, looks great.
Thank you, Bill. Good work on the tiny Pz. IV. Waiting to see the Willis.
On my side I have received this new baby and I´m in peace with the world now.
On the other hand I began to base paint the interior. As I said before, little will be seen so no mayor effort here. It will get a clear coat for the washes and then a matt one for sand, dust, etc. the usual stuff.
One point thou. I build the gun and it´s pedestal and when I dry fit it...it will not turn!
The crew seats are a little over scale and the left one is of the wrong shape. I don´t know, may be I will scratch new ones or live with it. We´ll see.
That´s all for now. Keep the good work and be safe.
Cheers.
Raul
petbat
Joined: August 06, 2005
KitMaker: 3,353 posts
Armorama: 3,121 posts
Posted: Thursday, April 30, 2020 - 08:49 AM UTC
Nice work William. Good to see some scratch built work at this scale.
Okay started the Tamiya Horch 1a last weekend. Start pic:

I am going to be correcting and detailing what will be visible, but anything you can't see will be left alone....
First up was fixing the ride height appearance. The old Tamiya kit has the wheel hubs too high in the arches - a very heavily laden vehicle, so some surgery required. The wishbones had to be removed from the moulded all in one piece so the angle could be set correctly. I drilled out the parts and fitted a styrene rod pin. The upper wishbones needed to have the location 'bar' trimmed too, so it would sit at the correct angle.
Then the springs needed to be replaced too - 1) to allow for the corrected ride height, 2) to save trying to clean up the Tamiya parts. I cut off the Tamiya springs, drilled out the mount and put in the bolt shaft to secure the lower spring section and made springs by twisting two lengths of wire around a drill bit. Doing two pieces of wire gives you an even spacing and two springs the same - just 'unscrew' one from the other.
Front assembly mostly done, just dampers and shock arms to build and bolt heads, etc to go. This pic shows the work, with rear wishbone modifications showing the articulation of the wishbones. Note also the 'box' securing the front wishbones has been cut away to form the 'horn' shape of the real 1a suspension. I also removed the section of the chassis where there should be a space for the engine.

Note the difference in size of the springs!
I also sanded down the inside of the doors and started on the sides as well. Kit parts are way too thick, have no detail and the inside door latch is nothing like the real thing. All will be repaired eventually.

Okay started the Tamiya Horch 1a last weekend. Start pic:
I am going to be correcting and detailing what will be visible, but anything you can't see will be left alone....
First up was fixing the ride height appearance. The old Tamiya kit has the wheel hubs too high in the arches - a very heavily laden vehicle, so some surgery required. The wishbones had to be removed from the moulded all in one piece so the angle could be set correctly. I drilled out the parts and fitted a styrene rod pin. The upper wishbones needed to have the location 'bar' trimmed too, so it would sit at the correct angle.
Then the springs needed to be replaced too - 1) to allow for the corrected ride height, 2) to save trying to clean up the Tamiya parts. I cut off the Tamiya springs, drilled out the mount and put in the bolt shaft to secure the lower spring section and made springs by twisting two lengths of wire around a drill bit. Doing two pieces of wire gives you an even spacing and two springs the same - just 'unscrew' one from the other.
Front assembly mostly done, just dampers and shock arms to build and bolt heads, etc to go. This pic shows the work, with rear wishbone modifications showing the articulation of the wishbones. Note also the 'box' securing the front wishbones has been cut away to form the 'horn' shape of the real 1a suspension. I also removed the section of the chassis where there should be a space for the engine.
Note the difference in size of the springs!
I also sanded down the inside of the doors and started on the sides as well. Kit parts are way too thick, have no detail and the inside door latch is nothing like the real thing. All will be repaired eventually.

oldbean
Joined: July 05, 2004
KitMaker: 769 posts
Armorama: 461 posts
Posted: Monday, May 04, 2020 - 03:22 AM UTC
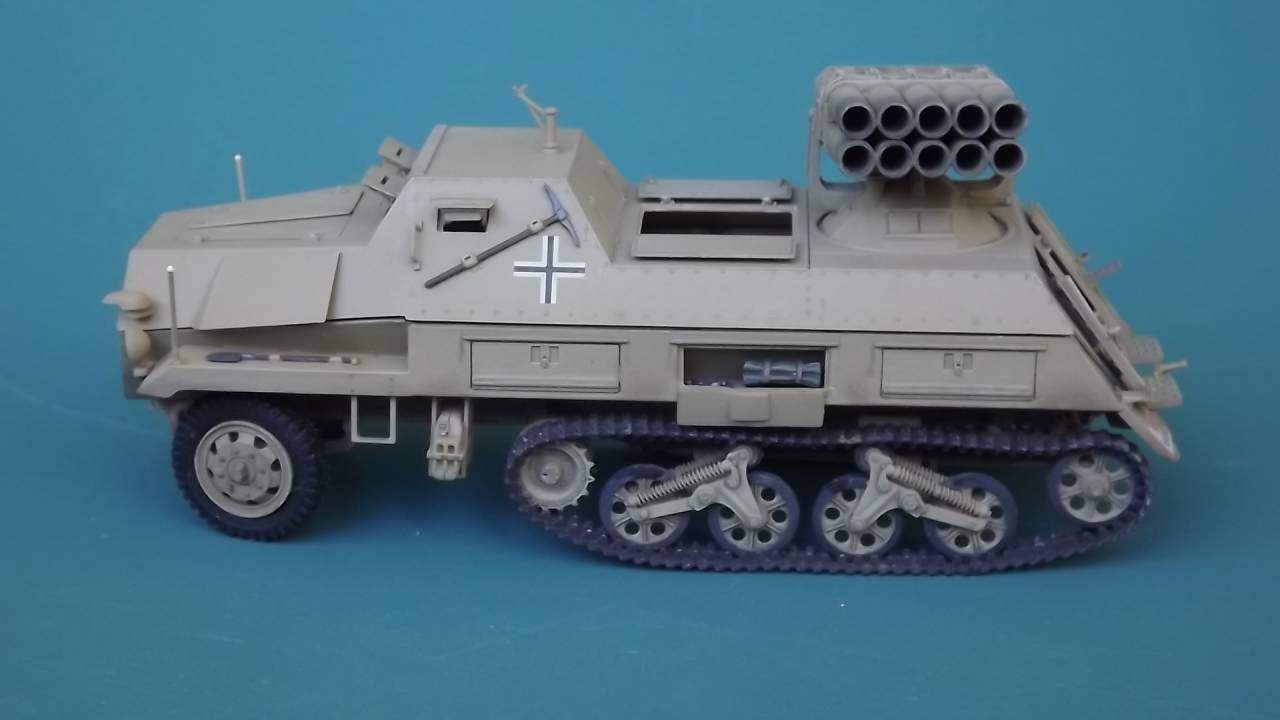
Finished my Panzerwerfer last weekend.
Inside:

exterior:


Jesse
Inside:
exterior:
Jesse
petbat
Joined: August 06, 2005
KitMaker: 3,353 posts
Armorama: 3,121 posts
Posted: Monday, May 04, 2020 - 08:15 AM UTC
Very nicely done Jesse.
hetzer44
Joined: December 21, 2005
KitMaker: 241 posts
Armorama: 124 posts
Posted: Monday, May 04, 2020 - 09:07 AM UTC
Well done, Jesse. Love that kit.
c
c

GulfWarrior
Joined: January 05, 2010
KitMaker: 1,051 posts
Armorama: 1,029 posts

Posted: Monday, May 04, 2020 - 09:28 AM UTC
Yes, as everyone else has said...very nice work!


oldbean
Joined: July 05, 2004
KitMaker: 769 posts
Armorama: 461 posts
Posted: Monday, May 04, 2020 - 11:55 PM UTC
Thanks everyone. Now to get busy on the anti tank campaign!!
HARV
#012

Joined: November 07, 2003
KitMaker: 3,098 posts
Armorama: 1,236 posts
Posted: Sunday, May 10, 2020 - 09:09 AM UTC
Well its been almost three months since I have done anything with my entry but this weekend I was able to get some work done on it finally. I got the roadwheels, tracks, weapons, tools, pioneer tools, headlights, taillights, etc. painted.

Decals and weathering everything is next on the list of things to do as well as running all of the wiring to the rocket launcher tubes. Hopefully I can keep going on it now that I have finally started working on it again.
Thanks,
Randy
Decals and weathering everything is next on the list of things to do as well as running all of the wiring to the rocket launcher tubes. Hopefully I can keep going on it now that I have finally started working on it again.
Thanks,
Randy

panzerman1
Joined: September 30, 2010
KitMaker: 430 posts
Armorama: 291 posts
Posted: Thursday, May 14, 2020 - 12:08 PM UTC
COMMENT CAFE:
Raul, thanks. Nice compressor. Awesome paintwork inside your 222.
Peter, thank you. Love the Horch...rugged looking. Nice spring details.
Jesse, Marvelous finish to your Panzerwerfer. Inside and out...top notch.
Randy, great thing about a long term campaign is you can get back at it anytime. Nice job on your Calliope Sherman.
Good luck everyone on your projects. Bill
panzerman1
Joined: September 30, 2010
KitMaker: 430 posts
Armorama: 291 posts
Posted: Thursday, May 14, 2020 - 12:23 PM UTC
British Paras vs German Flakpanzer Ostwind diorama update:
In order to cut down on a photo heavy update this will be......
Part 1

Turret, gun, and cradle are ready for paint. I added an ammo locker, seating, and wall stowage to the turret interior.

The turret and gun are painted and weathered. I also made some 37mm shells for the turret interior.

Started work on the British communications jeep. Adding a wire spool and mounting bracket to the rear. More mods to come.
That's it for now. Part 2 will be posted tomorrow. Thanks for viewing. Bill
In order to cut down on a photo heavy update this will be......
Part 1
Turret, gun, and cradle are ready for paint. I added an ammo locker, seating, and wall stowage to the turret interior.
The turret and gun are painted and weathered. I also made some 37mm shells for the turret interior.
Started work on the British communications jeep. Adding a wire spool and mounting bracket to the rear. More mods to come.
That's it for now. Part 2 will be posted tomorrow. Thanks for viewing. Bill

yeahwiggie

Joined: March 24, 2006
KitMaker: 2,093 posts
Armorama: 1,359 posts

Posted: Friday, May 15, 2020 - 02:33 AM UTC
Real nice work, everyone!!
I just love the scratchbuilding shown.
My project has stalled for the moment as I am slugging away through the last weeks of the schoolyear. Damn, I'm tired.
I just love the scratchbuilding shown.
My project has stalled for the moment as I am slugging away through the last weeks of the schoolyear. Damn, I'm tired.
barkingdigger
#013
Joined: June 20, 2008
KitMaker: 3,981 posts
Armorama: 3,403 posts
Posted: Saturday, May 16, 2020 - 07:47 AM UTC
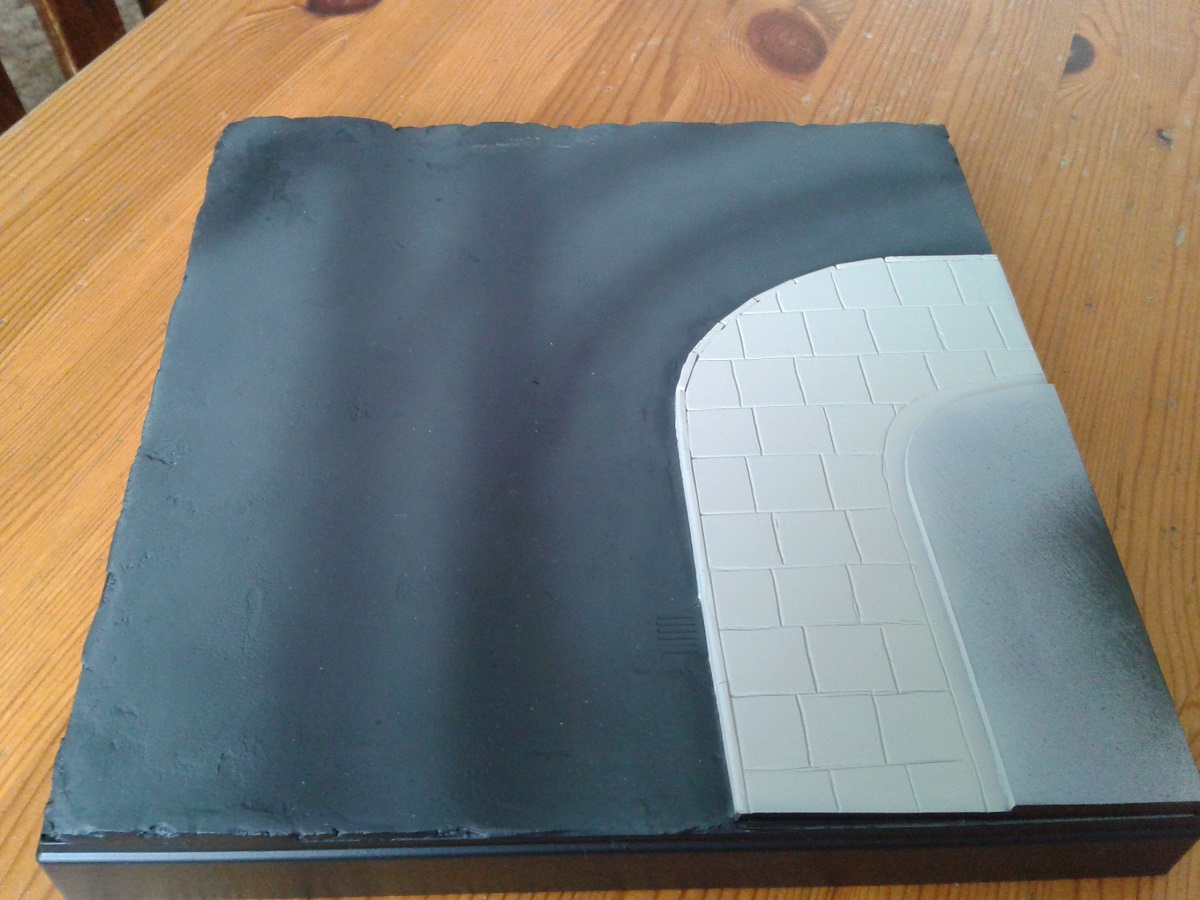
Great stuff guys! (Sorry you're so wiped out Ron! My sister's a teacher with similar complaints...) My own build was stalled by the base, since I need it done to fit the suspension arms. It's got a lick of paint now, but still needs lots of detail paint and weathering, a brick wall built, and some grass before I can fit the tank to it.
If I get the time, or more importantly find decent old figs, I'd like an old woman or an MP ticking off the tank crew for causing trouble on exercise - any good suggestions?
If I get the time, or more importantly find decent old figs, I'd like an old woman or an MP ticking off the tank crew for causing trouble on exercise - any good suggestions?
petbat
Joined: August 06, 2005
KitMaker: 3,353 posts
Armorama: 3,121 posts
Posted: Saturday, May 16, 2020 - 08:46 AM UTC
Staligrad does a particularly good, severe looking old woman that would fit in any place and era #S-3143

Not exactly berating the tankers... but...
Miniart also does a German Civilian set with an old woman, but the figure is not that good in my opinion.
Not exactly berating the tankers... but...
Miniart also does a German Civilian set with an old woman, but the figure is not that good in my opinion.
barkingdigger
#013
Joined: June 20, 2008
KitMaker: 3,981 posts
Armorama: 3,403 posts
Posted: Saturday, May 16, 2020 - 09:46 AM UTC
She certainly looks grumpy! But to keep within the rules the fig needs to have been released before the 1995 cut-off.
panzerman1
Joined: September 30, 2010
KitMaker: 430 posts
Armorama: 291 posts
Posted: Saturday, May 16, 2020 - 04:11 PM UTC
COMMENT CAFE:
Ron, thanks. I'm glad you like my efforts. I hope you get some rest.
Tom, nice start to the base. Models always look better in their environment.
Peter, that's one AUSTERE looking Babyshka!!!
Good luck everyone on your projects.
Bill
Ron, thanks. I'm glad you like my efforts. I hope you get some rest.
Tom, nice start to the base. Models always look better in their environment.
Peter, that's one AUSTERE looking Babyshka!!!
Good luck everyone on your projects.
Bill
panzerman1
Joined: September 30, 2010
KitMaker: 430 posts
Armorama: 291 posts
Posted: Saturday, May 16, 2020 - 04:21 PM UTC
Part 2, British Paras vs German Flakpanzer Ostwind.

Completed Ostwind. The turret doesn't look too bad attached to the hull.

With only 3 decals on the original Ostwind, I tried to recreate them as accurately as possible. Even the cursive "F" (divisional symbol) on the rear was a patch job.

Yikes! I still have to add 2 spare road wheels to this side. Ha!
That's all for now, fellow modelers. Thanks for viewing. Keep having fun.
Bill
Completed Ostwind. The turret doesn't look too bad attached to the hull.
With only 3 decals on the original Ostwind, I tried to recreate them as accurately as possible. Even the cursive "F" (divisional symbol) on the rear was a patch job.
Yikes! I still have to add 2 spare road wheels to this side. Ha!
That's all for now, fellow modelers. Thanks for viewing. Keep having fun.
Bill
HARV
#012
Joined: November 07, 2003
KitMaker: 3,098 posts
Armorama: 1,236 posts
Posted: Sunday, May 17, 2020 - 02:27 PM UTC
A couple of in-progress photos of my project so far. Everything is assembled, decals added, a new antenna was added, wiring ran to the rocket launcher tubes, the jettison cables are in place, the cable is run to the antenna and Dull-Cote has been applied. Next up will be the placing of the logs on it for added protection. I'll figure out what I want to do for extra gear storage, and then it will be time to weather it all up.


Sorry for the dark photos. Took them in my man cave this evening and it is late so no natural light is coming in.
Thank you Bill, I appreciate the kind comment. And I am glad we still have time to get our projects finished up. It feels good to be taking part in a campaign again.
Thanks,
Randy
Sorry for the dark photos. Took them in my man cave this evening and it is late so no natural light is coming in.
Quoted Text
Randy, great thing about a long term campaign is you can get back at it anytime. Nice job on your Calliope Sherman.
Thank you Bill, I appreciate the kind comment. And I am glad we still have time to get our projects finished up. It feels good to be taking part in a campaign again.
Thanks,
Randy
 |

WEB HOSTING BY


Copyright ©2021 Armorama and Kitmaker Network, a subsidiary of Silver Star Enterprises
All Rights Reserved. Please read our Conditions of Use and Privacy Policy.
All Rights Reserved. Please read our Conditions of Use and Privacy Policy.