

VEry nice, Olivier! That muzzle cover really looks real.
Campaigns: Active Campaigns
Campaigns that are either in planning or underway should be grouped here.
Campaigns that are either in planning or underway should be grouped here.
Hosted by Richard S.
Bundeswehr 2020 Group Build

GazzaS

#424

Joined: April 23, 2015
KitMaker: 4,648 posts
Armorama: 2,248 posts

Posted: Saturday, June 13, 2020 - 11:25 AM UTC

zorrolobo

Joined: May 31, 2013
KitMaker: 1,457 posts
Armorama: 1,440 posts
Posted: Saturday, June 13, 2020 - 04:56 PM UTC
Quoted Text
Great looking 2A7 Marcos. One small question - wouldn't it be easier to temporarily place the armour pieces around the driver's hatch while painting, rather than try to match it up later?
I would have to mask the lenses so I prefer to match it up later.
zorrolobo
Joined: May 31, 2013
KitMaker: 1,457 posts
Armorama: 1,440 posts
Posted: Saturday, June 13, 2020 - 05:15 PM UTC
Now some streaking and rain marks:


Then some chipping and some pigments:


Chipping was very light because this model tank is a demo tank.
Then some chipping and some pigments:
Chipping was very light because this model tank is a demo tank.

bison126

Joined: June 10, 2004
KitMaker: 5,329 posts
Armorama: 5,204 posts
Posted: Saturday, June 13, 2020 - 09:17 PM UTC
Quoted Text
VEry nice, Olivier! That muzzle cover really looks real.
Thanks for the comment. I must say that I am happy with the result and it was easier to get than I expected.
Olivier

bison126
Joined: June 10, 2004
KitMaker: 5,329 posts
Armorama: 5,204 posts
Posted: Saturday, June 13, 2020 - 09:20 PM UTC
Good start Marcos. Keep the chipping light for the reason you mentioned but you can go the heavy way for mud and dust as this tank is supposed to show its capacities on difficult ground during exhibitions.
Olivier
Olivier
bison126
Joined: June 10, 2004
KitMaker: 5,329 posts
Armorama: 5,204 posts
Posted: Sunday, June 14, 2020 - 02:06 AM UTC
Here is the PzH 2000 covered with dust coming back from a training session with the muzzle covered and the gun secured on the travel lock. The flashing light is one the rear of the turret.


I consider this one complete if you have no further remarks.
Olivier
I consider this one complete if you have no further remarks.
Olivier

GulfWarrior

Joined: January 05, 2010
KitMaker: 1,051 posts
Armorama: 1,029 posts

Posted: Sunday, June 14, 2020 - 02:55 AM UTC
Looks awesome Olivier! 


terminators
Joined: February 20, 2012
KitMaker: 1,932 posts
Armorama: 1,907 posts
Posted: Sunday, June 14, 2020 - 03:07 AM UTC
Great PZH 2000, congrats.
zorrolobo
Joined: May 31, 2013
KitMaker: 1,457 posts
Armorama: 1,440 posts
Posted: Sunday, June 14, 2020 - 04:22 AM UTC
For some reason I can´t see Olivier´s postings. Anybody know how to fix that. Is there like a blocking system on Armorama?
zorrolobo
Joined: May 31, 2013
KitMaker: 1,457 posts
Armorama: 1,440 posts
Posted: Sunday, June 14, 2020 - 04:29 AM UTC
Pretty much finished with the hull.


zorrolobo
Joined: May 31, 2013
KitMaker: 1,457 posts
Armorama: 1,440 posts
Posted: Sunday, June 14, 2020 - 04:31 AM UTC
It needs a little more pigments on the wheels and tracks.

BlackWidow

Joined: August 09, 2009
KitMaker: 1,732 posts
Armorama: 326 posts
Posted: Sunday, June 14, 2020 - 06:37 AM UTC
Olivier, your PzH 2000 looks great. Well done on this beast!
Don't know, if you have already seen this Youtube video, where PzH 2000 were shooting like a MBT on a distance of only 800 meters!
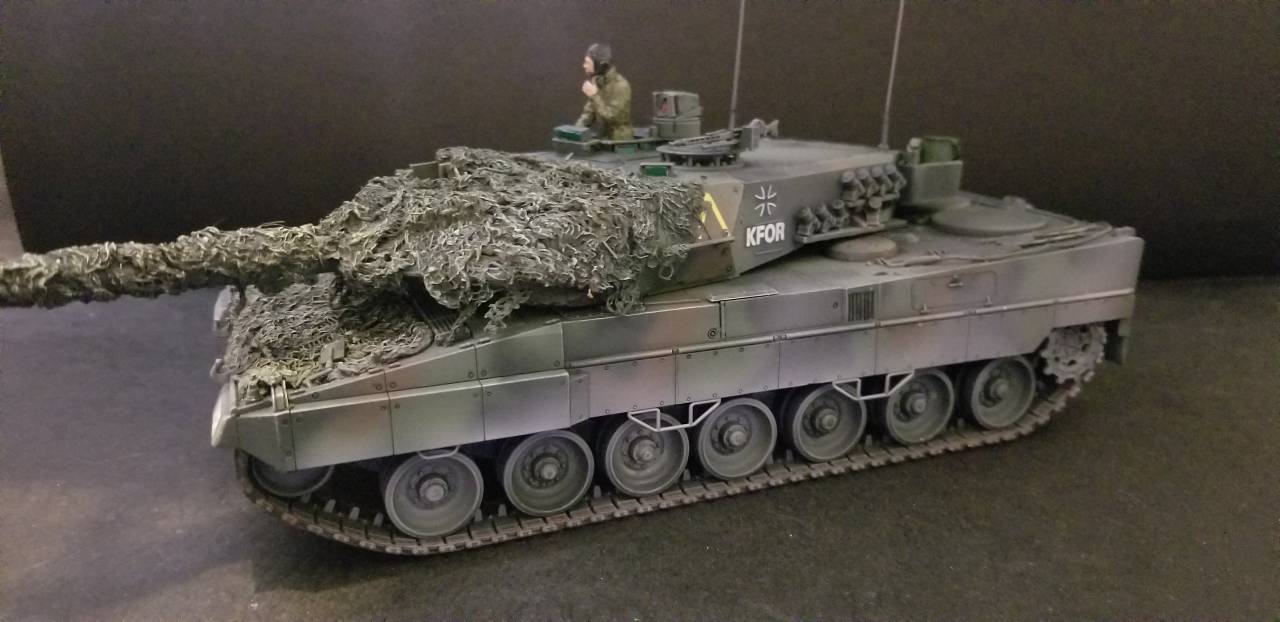
Marcos, also well done on your Leo so far. I wouldn't do much or any chipping on this as it is a new vehicle. But muddy - yes!
Anyway, after a few hours on a rainy afternoon this is my first progress photo of the M 110. Fitting so far is good, though many parts have what we call here "Fischhaut". I don't know the english word for it but a direct translation would be fish skin ....

Don't know, if you have already seen this Youtube video, where PzH 2000 were shooting like a MBT on a distance of only 800 meters!
Marcos, also well done on your Leo so far. I wouldn't do much or any chipping on this as it is a new vehicle. But muddy - yes!
Anyway, after a few hours on a rainy afternoon this is my first progress photo of the M 110. Fitting so far is good, though many parts have what we call here "Fischhaut". I don't know the english word for it but a direct translation would be fish skin ....

petbat
Joined: August 06, 2005
KitMaker: 3,353 posts
Armorama: 3,121 posts
Posted: Sunday, June 14, 2020 - 02:52 PM UTC
Magnificent Olivier. Loved watching this one come together. Thanks for joining in. Hopefully mine will come up to scratch.
Love the subtle detailing Marcos. Looks fantastic.
Ah, the M110 with Rubber bands accessories... I remember it well Torsten

Love the subtle detailing Marcos. Looks fantastic.
Ah, the M110 with Rubber bands accessories... I remember it well Torsten


Antilles

Joined: March 22, 2015
KitMaker: 671 posts
Armorama: 45 posts
Posted: Monday, June 15, 2020 - 02:22 AM UTC
Hello fellow modeler´s. Some outstanding work is going on here!
Olivier:
This is a wonderful modeled Panzerhaubitze. It is really an eye-catcher. Congratulation!
Here is my entry for this campaign. The Revell Spähpanzer 2 Luchs A2 in 1/72 scale.

First, I wanted to show the 8 wheeled Luchs with steered wheels. But, than I saw how complex the modeled supsension of the Revell kit is and quit my plan. As the suspension of the Luchs has 22 modeling steps, I guess the decision was good.

Oliver
Olivier:
This is a wonderful modeled Panzerhaubitze. It is really an eye-catcher. Congratulation!
Here is my entry for this campaign. The Revell Spähpanzer 2 Luchs A2 in 1/72 scale.
First, I wanted to show the 8 wheeled Luchs with steered wheels. But, than I saw how complex the modeled supsension of the Revell kit is and quit my plan. As the suspension of the Luchs has 22 modeling steps, I guess the decision was good.
Oliver
bison126
Joined: June 10, 2004
KitMaker: 5,329 posts
Armorama: 5,204 posts
Posted: Monday, June 15, 2020 - 04:52 AM UTC
Thanks for the comments guys.
Enjoy your Luchs Oliver.
Olivier
Enjoy your Luchs Oliver.
Olivier
petbat
Joined: August 06, 2005
KitMaker: 3,353 posts
Armorama: 3,121 posts
Posted: Monday, June 15, 2020 - 09:28 AM UTC
22 steps just for the suspension for a 1/72nd scale kit! I hope you enjoy all that work Oliver.. Nice to see a Braille companion to Gaz's 1/35th scale build.
zorrolobo
Joined: May 31, 2013
KitMaker: 1,457 posts
Armorama: 1,440 posts
Posted: Tuesday, June 16, 2020 - 03:14 AM UTC
Back in the day I used to love 1/72 models, but you only had to put together 5 or 6 parts and you were done. I used to love the Rocco miniatures, although I think they were 1/76th scale.

jon_a_its

Joined: April 29, 2004
KitMaker: 1,336 posts
Armorama: 1,137 posts

Posted: Tuesday, June 16, 2020 - 05:05 AM UTC
Quoted Text
Back in the day I used to love 1/72 models, but you only had to put together 5 or 6 parts and you were done. I used to love the Rocco miniatures, although I think they were 1/76th scale.
ROCO were Continental HO scale 1/87th
zorrolobo
Joined: May 31, 2013
KitMaker: 1,457 posts
Armorama: 1,440 posts
Posted: Tuesday, June 16, 2020 - 06:27 AM UTC
Quoted Text
ROCO were Continental HO scale 1/87th
Sorry, that is correct. 1/87th.
zorrolobo
Joined: May 31, 2013
KitMaker: 1,457 posts
Armorama: 1,440 posts
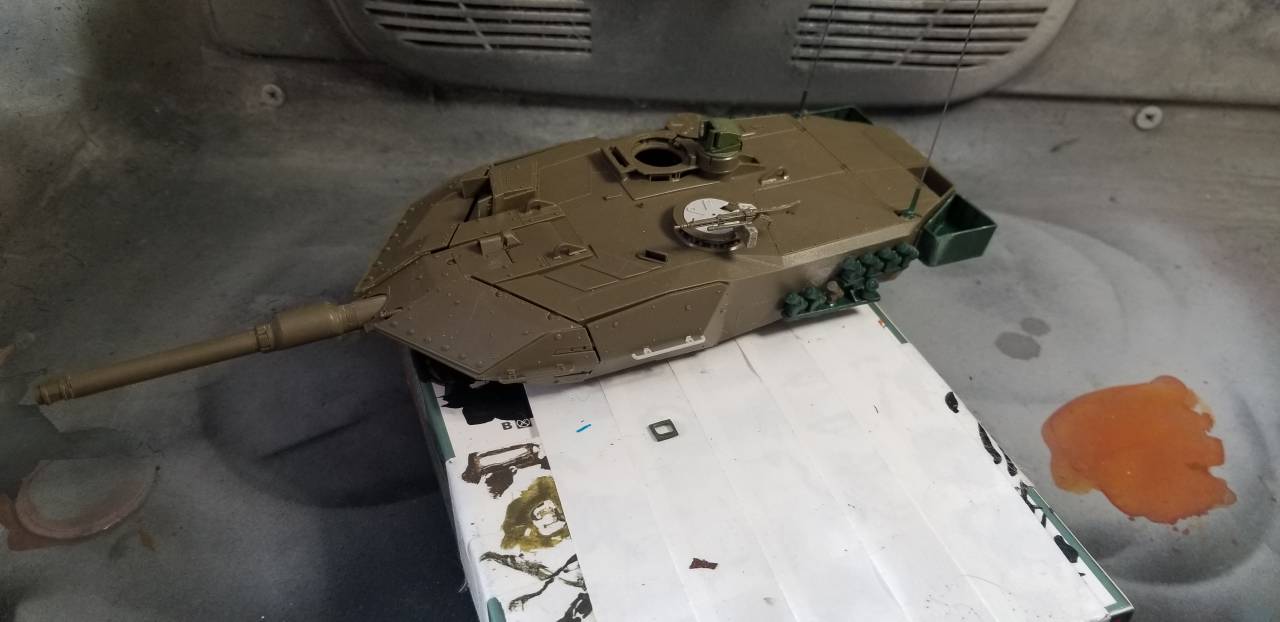
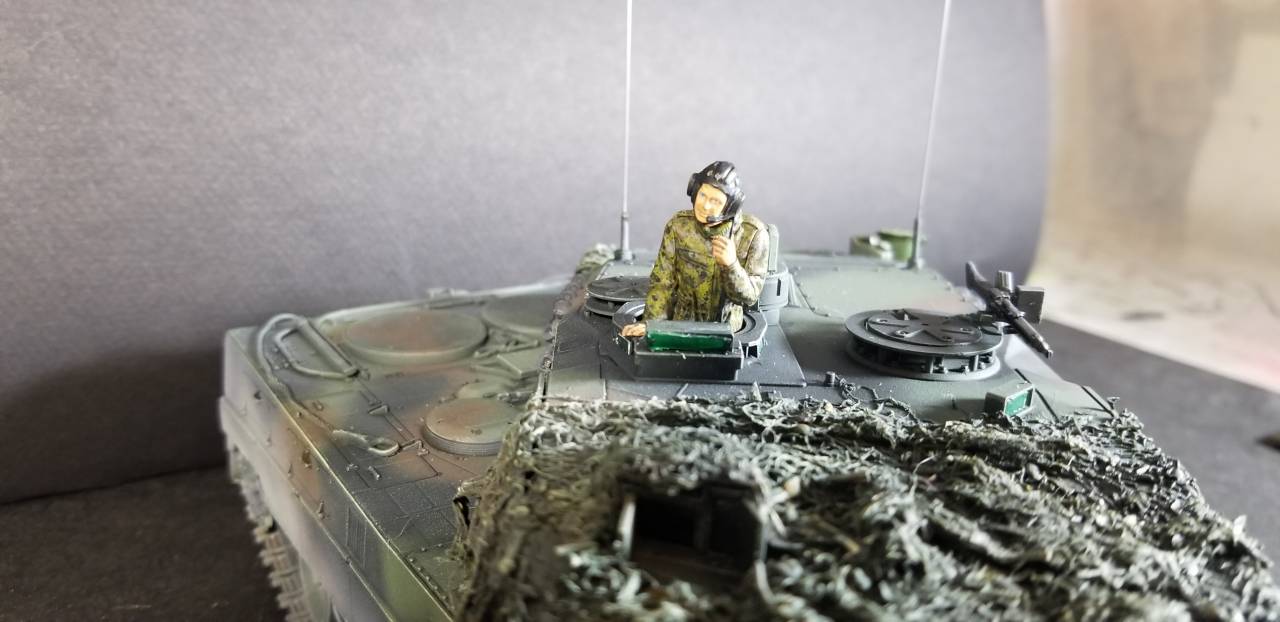
Posted: Tuesday, June 16, 2020 - 01:29 PM UTC
Working on the turret:


terminators
Joined: February 20, 2012
KitMaker: 1,932 posts
Armorama: 1,907 posts
Posted: Tuesday, June 16, 2020 - 11:00 PM UTC
Great painting work on the upper hull.
petbat
Joined: August 06, 2005
KitMaker: 3,353 posts
Armorama: 3,121 posts
Posted: Tuesday, June 16, 2020 - 11:44 PM UTC
I am still amazed at just how big that turret is Marcos. A lot of territory to paint, but it is coming along very nicely indeed.
Removed by original poster on 06/17/20 - 15:47:50 (GMT).
zorrolobo
Joined: May 31, 2013
KitMaker: 1,457 posts
Armorama: 1,440 posts
Posted: Wednesday, June 17, 2020 - 03:55 AM UTC
All done with the three colors. It will need touch ups on borders.

In this picture you can clearly see the difference in tonalities between the basic colors and the colors after the application of filters, washes and pigments.
You can see the figures on the background. Starting to work on them as well.
In this picture you can clearly see the difference in tonalities between the basic colors and the colors after the application of filters, washes and pigments.
You can see the figures on the background. Starting to work on them as well.

mechaman

Joined: November 18, 2003
KitMaker: 61 posts
Armorama: 57 posts

Posted: Wednesday, June 17, 2020 - 06:36 AM UTC
well let me tell you my story of this cursed Tamiya 2a5 frank'n kit. For this build I pulled out a kit that had been sitting in the stash for awhile. The initial build started off really good however, it then took several turns for the worse. First problem - over the year I guess I salvaged parts from this box for other various kits so I needed to find replacements. Luckily I had a Revell 2a6 and a Italeri 2a5/6 in my stash which I could steal parts. Second problem - While at the grocery store my Cat and Dog decided my workspace was a great spot for a grudge match which sent parts flying everywhere destroying the turret baskets with photoetch, some turret hatches, smoke grenade launchers, etc...  With post taking forever these days I proceed to again salvage more parts from the other kits.
Unfortunately the only turret baskets I had where the solid ones from Revell, but what the hell lets go for it.
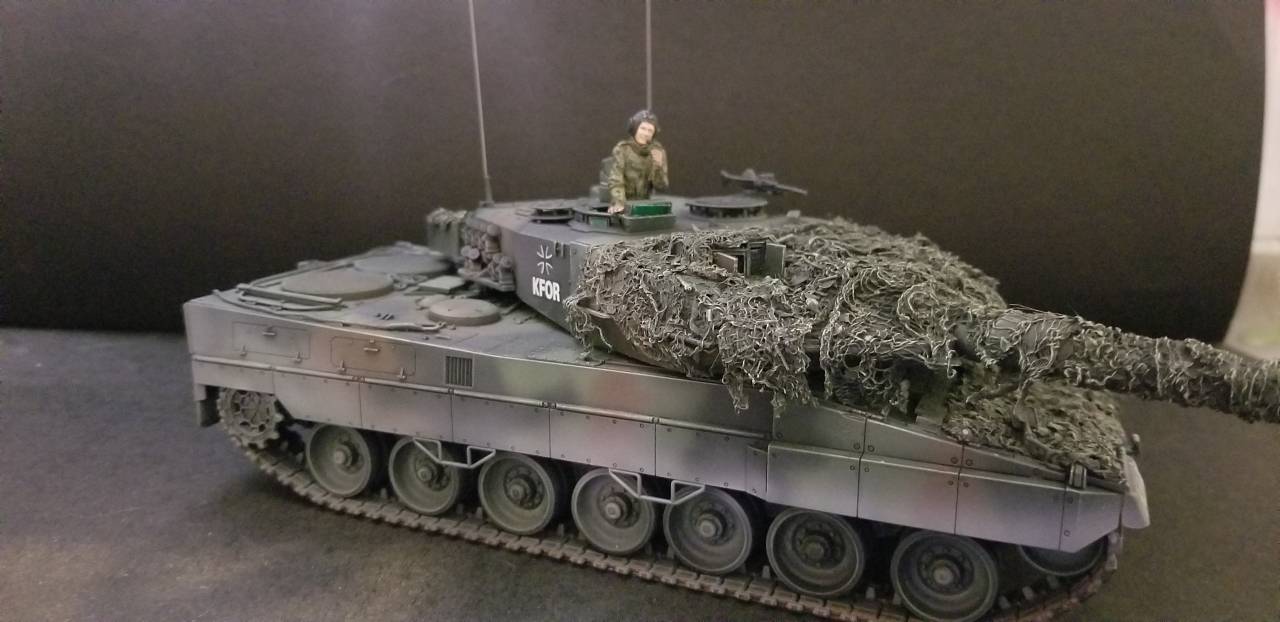
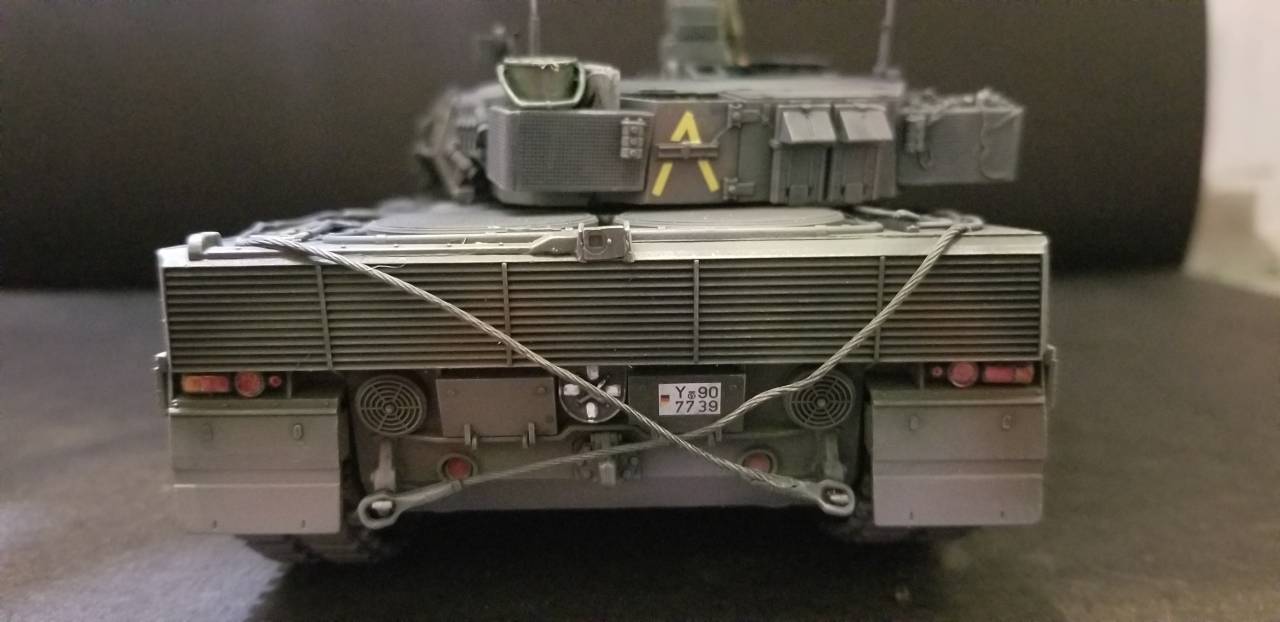
The hull went together without incident thank goodness and I then took the opportunity to add some camo net to the turret and hull. I went a little overboard with the netting on the turret but I am good with it. I painting the kit using all Mission Models paints. Black primer, white primer (for Pre shading), Nato Green, Nato Brown, and Nato Black as well as Transparent dust. Problem 3 - The Decals! They had been in the box for so long that they needed a lot of attention for them to even release from the backing. because of this they had a difficult time sticking so bathing them in Tamiya Mark fit Strong helped them to become decals once again.
Here is my completed kit which I am completly happy with!

Thank you
With post taking forever these days I proceed to again salvage more parts from the other kits. Unfortunately the only turret baskets I had where the solid ones from Revell, but what the hell lets go for it.
The hull went together without incident thank goodness and I then took the opportunity to add some camo net to the turret and hull. I went a little overboard with the netting on the turret but I am good with it. I painting the kit using all Mission Models paints. Black primer, white primer (for Pre shading), Nato Green, Nato Brown, and Nato Black as well as Transparent dust. Problem 3 - The Decals! They had been in the box for so long that they needed a lot of attention for them to even release from the backing. because of this they had a difficult time sticking so bathing them in Tamiya Mark fit Strong helped them to become decals once again.
Here is my completed kit which I am completly happy with!
Thank you
 |

WEB HOSTING BY


Copyright ©2021 Armorama and Kitmaker Network, a subsidiary of Silver Star Enterprises
All Rights Reserved. Please read our Conditions of Use and Privacy Policy.
All Rights Reserved. Please read our Conditions of Use and Privacy Policy.