Noord-Holland, Netherlands
Joined: October 25, 2002
KitMaker: 1,757 posts
Armorama: 914 posts
Posted: Monday, June 08, 2020 - 12:14 AM UTC
Ex- PFC Erwin Leetink, RNLA
Napoleon Bonaparte:
"A soldier will fight long and hard for a bit of colored ribbon."
England - South West, United Kingdom
Joined: October 17, 2017
KitMaker: 944 posts
Armorama: 928 posts
Posted: Wednesday, June 10, 2020 - 02:55 AM UTC
Hi Erwin,
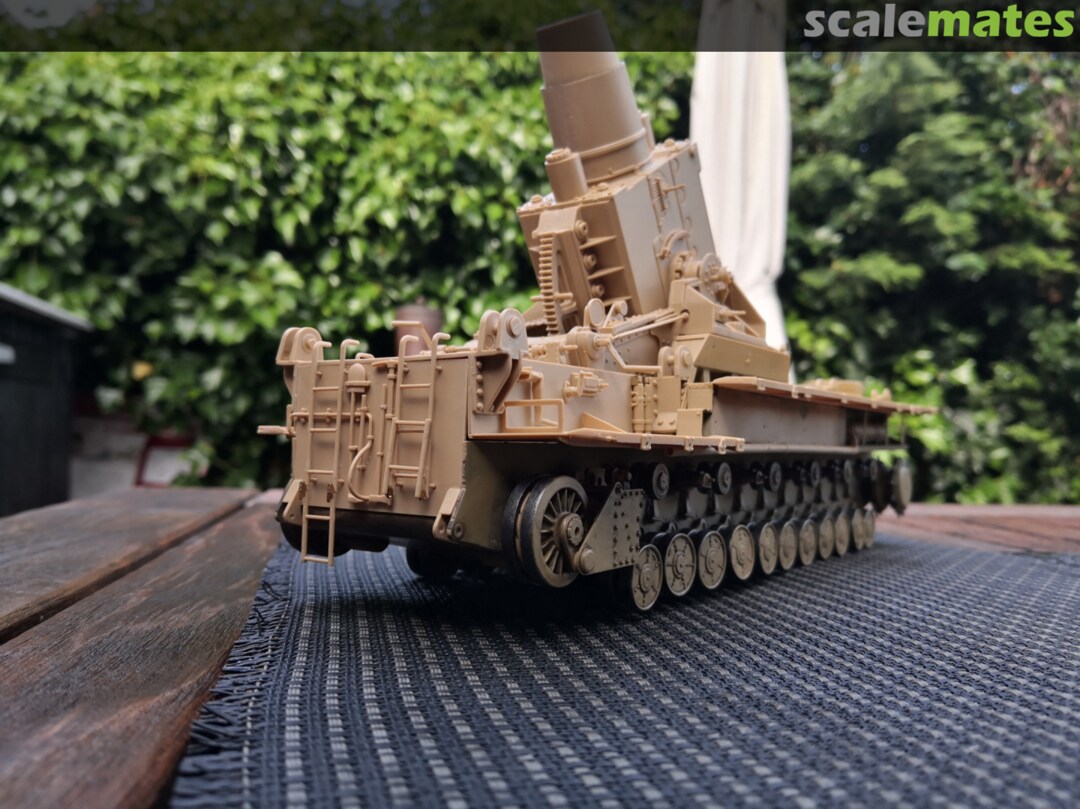
That's one big, impressive beastie you've built there, the partial figure is dwarfed,

.
Is it a complex build?
Cheers,

,
G
An optimist is a pessimist without all the facts.
Noord-Holland, Netherlands
Joined: October 25, 2002
KitMaker: 1,757 posts
Armorama: 914 posts
Posted: Wednesday, June 10, 2020 - 05:03 AM UTC
You can say that again! The original vehicle is 11 metres long!!!
Actually, so far it is not too difficult... There are 2 parts mixed up (left and right steps of the walkway) and 2 holes indicated to be drilled out, but not used anywhere (not seen on the photo's of the original gun either). Also some parts are included, but not on the instruction (rear and convoy lights), but their location can be found on original photo's...
The most difficult parts have yet to come: the platforms with all their PE parts...
Ex- PFC Erwin Leetink, RNLA
Napoleon Bonaparte:
"A soldier will fight long and hard for a bit of colored ribbon."
Vilnius, Lithuania
Joined: November 09, 2009
KitMaker: 132 posts
Armorama: 109 posts
Posted: Wednesday, June 10, 2020 - 06:29 AM UTC
Quoted Text
Speaking of which: I opted to have 2 of the ladders folded, yet wonder how the folded part was fastened to keep it upright, although the pictures I see seem to have no brackets whatsoever? A holding pin???
Seems like there was some buckle and a pin on the hinge.
They are present on Ziu in Kubinka:
https://upload.wikimedia.org/wikipedia/commons/f/fe/M%C3%B6rser_Karl_in_Kubinka.jpgNoord-Holland, Netherlands
Joined: October 25, 2002
KitMaker: 1,757 posts
Armorama: 914 posts
Posted: Wednesday, June 10, 2020 - 07:06 PM UTC
I indeed see a pin and hole on the hinge... This is so small, that it will not be visible on the model... Thanks for your help!
Ex- PFC Erwin Leetink, RNLA
Napoleon Bonaparte:
"A soldier will fight long and hard for a bit of colored ribbon."
New South Wales, Australia
Joined: May 04, 2016
KitMaker: 1,476 posts
Armorama: 1,463 posts
Posted: Thursday, June 11, 2020 - 05:56 PM UTC
Looks great Erwin - I was going to say I wasn’t sure about the folded ladder bracket but guessed some kind of simple spring-clip would have done the job & barely visible for your purposes - looks like I was half right. So according to my abacus this monster’s approx. 30 cms long? I’m glad you’re painting it, I’d end up with more spray on my face than the kit


Noord-Holland, Netherlands
Joined: October 25, 2002
KitMaker: 1,757 posts
Armorama: 914 posts
Posted: Thursday, June 11, 2020 - 06:54 PM UTC
Hi Martin,
I'not unhappy that the ladder is only held by an barely visible pin, since it saves me the hassle of trying to reproduce it..

You still use an abacus????

Yes, it is pretty hefty... By the way, I only fo the primer with the hairy stick. The basecoat and camo (dark yellow, green and brown) will be done with the AB (the running gear is already airbrushed...)
Ex- PFC Erwin Leetink, RNLA
Napoleon Bonaparte:
"A soldier will fight long and hard for a bit of colored ribbon."
Noord-Holland, Netherlands
Joined: October 25, 2002
KitMaker: 1,757 posts
Armorama: 914 posts
Posted: Tuesday, June 23, 2020 - 11:30 PM UTC
Ex- PFC Erwin Leetink, RNLA
Napoleon Bonaparte:
"A soldier will fight long and hard for a bit of colored ribbon."
England - South West, United Kingdom
Joined: October 17, 2017
KitMaker: 944 posts
Armorama: 928 posts
Posted: Wednesday, June 24, 2020 - 03:42 AM UTC
Hi Erwin,
Nice looking beast...nooo, not you, I meant the Karl,

.
the flatbed looks a nicely detailed bit of kit, how will it be used alongside the Karl?
Cheers,

,
G
An optimist is a pessimist without all the facts.
Noord-Holland, Netherlands
Joined: October 25, 2002
KitMaker: 1,757 posts
Armorama: 914 posts
Posted: Wednesday, June 24, 2020 - 04:23 AM UTC
That would be something, if could see that from my profile pic

The flatbed will be on a second track (carriers+shunter on track 1) together with some other rail wagons and a steam engine, with the ammo panzer just about to drive off. ...
Ex- PFC Erwin Leetink, RNLA
Napoleon Bonaparte:
"A soldier will fight long and hard for a bit of colored ribbon."
Noord-Holland, Netherlands
Joined: October 25, 2002
KitMaker: 1,757 posts
Armorama: 914 posts
Posted: Saturday, June 27, 2020 - 05:03 AM UTC
Ex- PFC Erwin Leetink, RNLA
Napoleon Bonaparte:
"A soldier will fight long and hard for a bit of colored ribbon."
England - South West, United Kingdom
Joined: October 17, 2017
KitMaker: 944 posts
Armorama: 928 posts
Posted: Saturday, June 27, 2020 - 05:09 AM UTC
Hi Erwin,
Excellent camouflage,

. Was so good it took me a few minutes to spot the beast,

.
Thoroughly enjoying this build, looking forward to seeing it weathered-down...do you use proprietary weathering products, or do you make them up your weathering colours from standard colours?
Cheers,

,
G
An optimist is a pessimist without all the facts.
Noord-Holland, Netherlands
Joined: October 25, 2002
KitMaker: 1,757 posts
Armorama: 914 posts
Posted: Saturday, June 27, 2020 - 08:51 PM UTC
Thanks, my friend! 😁 Though I made some corrections after seeing my own pictures. (no bigger critic than yourself). I saw that the ladders had their outline visible in yellow. That looked rather strange... Gone, they are, yes!
I am actually a bit puzzled now: usually I spray a mist of a lighter colour af the base coat as a forced highlight on the upper surfaces. But with a 3 colour camouflage, how to handle this? I will go easy on the weathering with this one, as, after every action, it went to the depot for an overhaul. Some of dot filters to get rid of the uniformity, pin wash for the creation of depth and dusting from the rail travel...
Ex- PFC Erwin Leetink, RNLA
Napoleon Bonaparte:
"A soldier will fight long and hard for a bit of colored ribbon."
New Jersey, United States
Joined: January 05, 2005
KitMaker: 2,185 posts
Armorama: 1,813 posts
Posted: Saturday, June 27, 2020 - 09:20 PM UTC
Nice camo Erin , lookin good !!
Noord-Holland, Netherlands
Joined: October 25, 2002
KitMaker: 1,757 posts
Armorama: 914 posts
Posted: Sunday, June 28, 2020 - 01:39 AM UTC
Quoted Text
Nice camo Erin , lookin good !!
Thanks buddy. Really appreciate it...
Ex- PFC Erwin Leetink, RNLA
Napoleon Bonaparte:
"A soldier will fight long and hard for a bit of colored ribbon."
New Jersey, United States
Joined: January 05, 2005
KitMaker: 2,185 posts
Armorama: 1,813 posts
Posted: Sunday, June 28, 2020 - 02:24 AM UTC
Sorry man , forgot the " w " on Erwin !!
Noord-Holland, Netherlands
Joined: October 25, 2002
KitMaker: 1,757 posts
Armorama: 914 posts
Posted: Sunday, June 28, 2020 - 07:59 AM UTC
I noticed, but that is no problem... 😊
Ex- PFC Erwin Leetink, RNLA
Napoleon Bonaparte:
"A soldier will fight long and hard for a bit of colored ribbon."
Budapest, Hungary
Joined: March 09, 2018
KitMaker: 206 posts
Armorama: 205 posts
Posted: Sunday, June 28, 2020 - 08:12 AM UTC
Quoted Text
The camouflage is on. Rather satisfied, considering the fact that I wasn't really looking forward to it. This was my first time ever in tackling camouflage...
Now for the details and weathering.
Comments welcome!
Hi Erwin,
When you have mentioned the 3-color camo I expected a mostly yellow monster with some narrow green and brown stripes. Classic Reich-type camo.
But the pics show me something much closer to the contemporary NATO version.
I am not critisizing just wondering why this was chosen in the WWII period (and not used on more tanks, vehicles etc...).
The build and your painting is lovely, the result has a very good beasty impress, though. Congrats!
Tamás

Noord-Holland, Netherlands
Joined: October 25, 2002
KitMaker: 1,757 posts
Armorama: 914 posts
Posted: Sunday, June 28, 2020 - 06:57 PM UTC
I know what you mean: actually Trumpeter suggests just that...
But indeed the original photo's show quite a thorrough covering of the base dark yellow layer by the camouflage colours... Why this pattern? I dunno...

Thank you very much for the compliments... They are very much appreciated...
Ex- PFC Erwin Leetink, RNLA
Napoleon Bonaparte:
"A soldier will fight long and hard for a bit of colored ribbon."
Pennsylvania, United States
Joined: April 10, 2011
KitMaker: 7,941 posts
Armorama: 7,934 posts
Posted: Monday, June 29, 2020 - 03:10 AM UTC
It is really proceeding nicely for sure. Huge thing!
J
Noord-Holland, Netherlands
Joined: October 25, 2002
KitMaker: 1,757 posts
Armorama: 914 posts
Posted: Monday, June 29, 2020 - 10:20 PM UTC
Quoted Text
It is really proceeding nicely for sure. Huge thing!
J
Thanks Jerry

Ex- PFC Erwin Leetink, RNLA
Napoleon Bonaparte:
"A soldier will fight long and hard for a bit of colored ribbon."
New South Wales, Australia
Joined: May 04, 2016
KitMaker: 1,476 posts
Armorama: 1,463 posts
Posted: Monday, June 29, 2020 - 10:57 PM UTC
Yep excellent work Erwin, waiting for a figure to show its true scale. Regarding your earlier musing about weathering you might want to try dry-brushing (yeah so I’m a dinosaur) the different camo shades i.e. lighter versions of each. Intricate & tricky for sure but can’t think of a better idea

Noord-Holland, Netherlands
Joined: October 25, 2002
KitMaker: 1,757 posts
Armorama: 914 posts
Posted: Tuesday, June 30, 2020 - 12:22 AM UTC
Dry brushing... I am ofcourse familliar with the technique (I am no dinosaur, but not that young either

), but to my knowledge one generally uses it to bring out highlights of say hatches or handles or to represent worn areas...
No worries. I will put in the driver when all is done...
Ex- PFC Erwin Leetink, RNLA
Napoleon Bonaparte:
"A soldier will fight long and hard for a bit of colored ribbon."
England - South West, United Kingdom
Joined: October 17, 2017
KitMaker: 944 posts
Armorama: 928 posts
Posted: Tuesday, June 30, 2020 - 05:26 AM UTC
Hi Erwin,
I agree with the old dinos...ooops, I mean Tim, I swear by dry-brushing for adjusting colours...must make me a dinosaur too,

.
Though I have been known to swear at dry-brushing when I've got it wrong,

.
Cheers,

,
G
An optimist is a pessimist without all the facts.
Noord-Holland, Netherlands
Joined: October 25, 2002
KitMaker: 1,757 posts
Armorama: 914 posts
Posted: Tuesday, June 30, 2020 - 07:02 AM UTC
With hard edge camouflage, that might be feasible, but this is soft edge camo. How do you envision that? No critics here, just looking for guidance...
Ex- PFC Erwin Leetink, RNLA
Napoleon Bonaparte:
"A soldier will fight long and hard for a bit of colored ribbon."


 .
. ,
,


 .
. ,
,


 . Was so good it took me a few minutes to spot the beast,
  .
. ,
,


 ), but to my knowledge one generally uses it to bring out highlights of say hatches or handles or to represent worn areas...


 .
. .
. ,
,


