Dioramas
Do you love dioramas & vignettes? We sure do.
Barkin' Karl
G-man69
Visit this Community
England - South West, United Kingdom
Joined: October 17, 2017
KitMaker: 944 posts
Armorama: 928 posts
Posted: Wednesday, July 01, 2020 - 04:07 AM UTC

Quoted Text

With hard edge camouflage, that might be feasible, but this is soft edge camo. How do you envision that? No critics here, just looking for guidance...


Hi Erwin,

In truth I'm not sure, I've only managed to paint two kits so far and I'm rubbish with an airbrush so when I want to create tonal variation within panels I tend to use a variation on dry-brushing.

Not sure if the process has a name? But for want of anything better let's call it dry-blending, ...

...I start by creating a slightly lighter colour of the base and using an old brush with most of the paint removed...as in standard dry-brushing...I start to stipple the colour in random circular motions, starting in the centre and moving outwards.

I then repeat the process a number of times until I'm happy with the results...each repeat is with a slightly lighter colour and each time the area covered gets smaller. I do this with oils, but enamels would work as it's best if the previous layers are still wet so that they blend together...don't know about acrylics, ?

I've never tried it on hard edged, multi-camouflaged kits, but I think it would work?

Cheers, ,

G
Dioramartin
Visit this Community
New South Wales, Australia
Joined: May 04, 2016
KitMaker: 1,476 posts
Armorama: 1,463 posts
Posted: Wednesday, July 01, 2020 - 04:27 PM UTC
Hi Erwin, you originally mentioned you usually “sprayed a mist of lighter colour at the base coat as a forced highlight on the upper surfaces”, which of course is different to “weathering” which to me anyway means scrapes, fades, scuffs & dirt. I understood your hesitation was about the former, and that the highlights need to be applied to soft-edge camo.

I can’t recall which vehicle (it’s not in my display cases anymore!) but I do recall doing something similar years ago with German brown & green sprayed over yellow. On a palette or similar make a triangle with puddles of the three colours at the three points (at least 5 cms apart), and a small puddle of white in the middle. It’s then just a matter of (dry-)brushing each colour in towards the white and then choosing the appropriate lightened colour-blend for the area you want to dry-brush.

As you’re from the land of some of the greatest painters who ever lived…Rembrandt, Vermeer et al, it should be in your genes!
Golikell
Visit this Community
Noord-Holland, Netherlands
Joined: October 25, 2002
KitMaker: 1,757 posts
Armorama: 914 posts
Posted: Wednesday, July 01, 2020 - 06:50 PM UTC
Thanks guys... I got many advices, some similar, some different... I have to sit and contemplate what is (for me) the best technique. The first thing to do, however, is to lay down some gloss varnish and apply decals, then seal them with matte varnish...

btw: sorry for creating confusion... To me, weathering is everything besides the base coat, including the lowlights and highlights...
Golikell
Visit this Community
Noord-Holland, Netherlands
Joined: October 25, 2002
KitMaker: 1,757 posts
Armorama: 914 posts
Posted: Sunday, July 05, 2020 - 07:35 PM UTC
I've been busy with the painting of Karl... Making progress, but not worth posting (I think)...

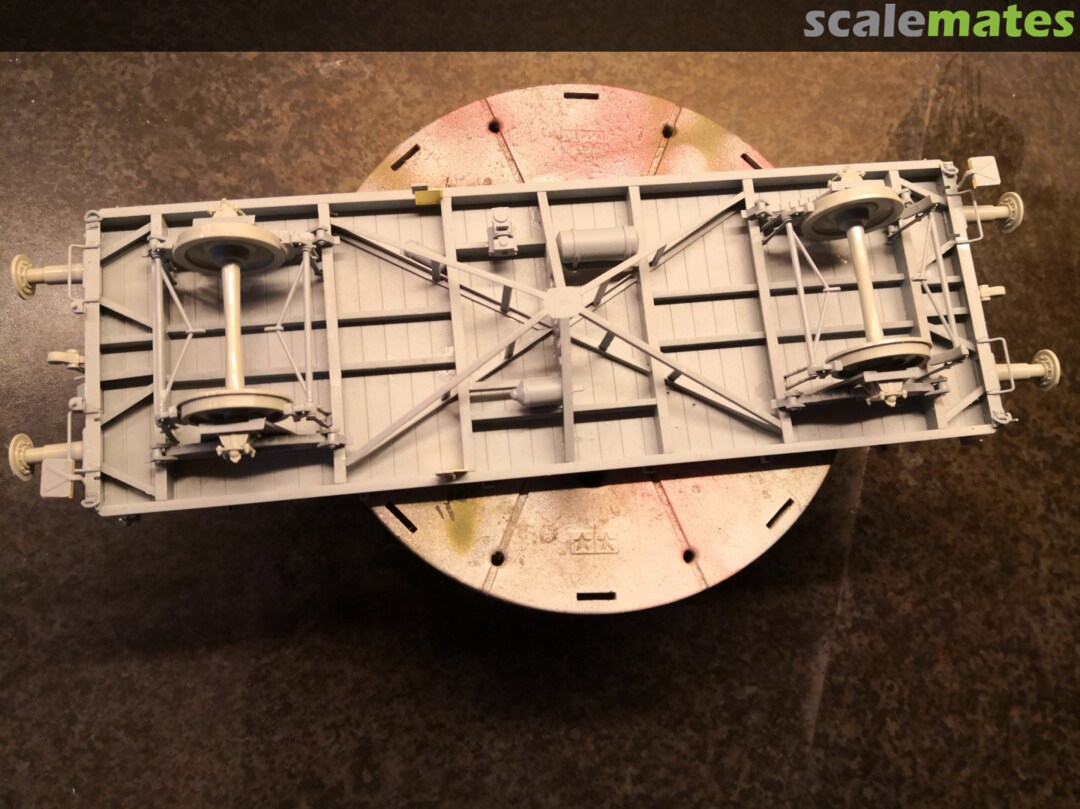
In the mean time, the construction of Sabre Models 0mmr flatcar wagon has reached new hights and can be considdered finished.
Except for the air hoses,used for the braking system, of course. I will add these once the cars will be connected, probably from lead wire. The ones included are designed to hang limp, in which state they ar not really usefull.
But so far, it is ready to receive paint.


cheyenne
Visit this Community
New Jersey, United States
Joined: January 05, 2005
KitMaker: 2,185 posts
Armorama: 1,813 posts
Posted: Monday, July 06, 2020 - 01:50 PM UTC
Nice work Erwin , looks like a fun build and nice detail plastic wise .
Dioramartin
Visit this Community
New South Wales, Australia
Joined: May 04, 2016
KitMaker: 1,476 posts
Armorama: 1,463 posts
Posted: Monday, July 06, 2020 - 05:23 PM UTC
Good looking flatcar Erwin, I’m sure you’ll enjoy painting/weathering that more than the Karl, no pesky camo to deal with
Golikell
Visit this Community
Noord-Holland, Netherlands
Joined: October 25, 2002
KitMaker: 1,757 posts
Armorama: 914 posts
Posted: Monday, July 06, 2020 - 07:43 PM UTC
Cheers guys. The greatest challenge, besides some teeny weeny PE rivets (of which I managed to lose only 2!) was decyphering the instructions... Further it was a rather quick, clean build. Painting won't be a problem. The question is, how much weathering will I apply... I already started it's cargo (ammo carrier for Karl), which has it's own challenges...
G-man69
Visit this Community
England - South West, United Kingdom
Joined: October 17, 2017
KitMaker: 944 posts
Armorama: 928 posts
Posted: Wednesday, July 08, 2020 - 04:39 AM UTC
Hi Erwin,

Looking good my friend, .

Cheers, ,

G
Golikell
Visit this Community
Noord-Holland, Netherlands
Joined: October 25, 2002
KitMaker: 1,757 posts
Armorama: 914 posts
Posted: Wednesday, July 08, 2020 - 06:47 PM UTC
Cheers mate!
G-man69
Visit this Community
England - South West, United Kingdom
Joined: October 17, 2017
KitMaker: 944 posts
Armorama: 928 posts
Posted: Friday, July 10, 2020 - 04:07 AM UTC

Quoted Text

Cheers mate!


You're welcome Erwin, really looking forward to seeing this build pan out, methinks it is going to be one impressive diorama, .

Cheers, ,

G
Golikell
Visit this Community
Noord-Holland, Netherlands
Joined: October 25, 2002
KitMaker: 1,757 posts
Armorama: 914 posts
Posted: Friday, July 10, 2020 - 07:47 AM UTC
I am also curious about how this will turn out. I know what vehicles vehicles I want to include (though I am in doubt whether to include a Famo, as this was used to transport the crew), details are far from decided. Specifically for the figures. I am afraid that I will have to create or modify some myself as I don't know any stock figures that will fit into the scene I have in mind...
Golikell
Visit this Community
Noord-Holland, Netherlands
Joined: October 25, 2002
KitMaker: 1,757 posts
Armorama: 914 posts
Posted: Thursday, August 13, 2020 - 06:28 AM UTC
After some silence on this side of the office on my progress, here is a sign of life. Due to circumstances (weather, work, studies, holidays, family, et such), not much work has been done. Yet work was not fully abandoned. The flatbed wagon is nearing competion: only some metal pigments, flat varnish and dusting of the underside need to be added.

G-man69
Visit this Community
England - South West, United Kingdom
Joined: October 17, 2017
KitMaker: 944 posts
Armorama: 928 posts
Posted: Friday, August 14, 2020 - 05:26 AM UTC
Hi Erwin,

Blimey, you've been so quiet you made me jump with your sudden appearance, . Joking aside, welcome back my friend, looking forward to seeing this build advance.

Liking the weathering of the rolling stock, nicely done, .

Will it be loaded down with anything?

Cheers, .

G
jrutman
Visit this Community
Pennsylvania, United States
Joined: April 10, 2011
KitMaker: 7,941 posts
Armorama: 7,934 posts
Posted: Friday, August 14, 2020 - 07:18 AM UTC
The wagon looks great. I have always been fascinated by trains and am happy to see so much now available in 1/35 covering them. It tempts me but I have enough on my plate as it is!
J
Dioramartin
Visit this Community
New South Wales, Australia
Joined: May 04, 2016
KitMaker: 1,476 posts
Armorama: 1,463 posts
Posted: Friday, August 14, 2020 - 11:39 PM UTC
Great wagon Erwin & I far prefer your planking to the seemingly garish decals DW provide
Golikell
Visit this Community
Noord-Holland, Netherlands
Joined: October 25, 2002
KitMaker: 1,757 posts
Armorama: 914 posts
Posted: Sunday, August 16, 2020 - 12:18 AM UTC
Cheer fellas! Surely the flat wagon will be loaded. It will be occupied by the munitions panzer (based on the Panzer 4), which will be at the brink of driving off the wagon. Need a decent tank driver for that (his head will be above armour) an a tanker that is suitable for converting to the commander, busy guiding the driver.
Golikell
Visit this Community
Noord-Holland, Netherlands
Joined: October 25, 2002
KitMaker: 1,757 posts
Armorama: 914 posts
Posted: Sunday, August 16, 2020 - 07:48 PM UTC
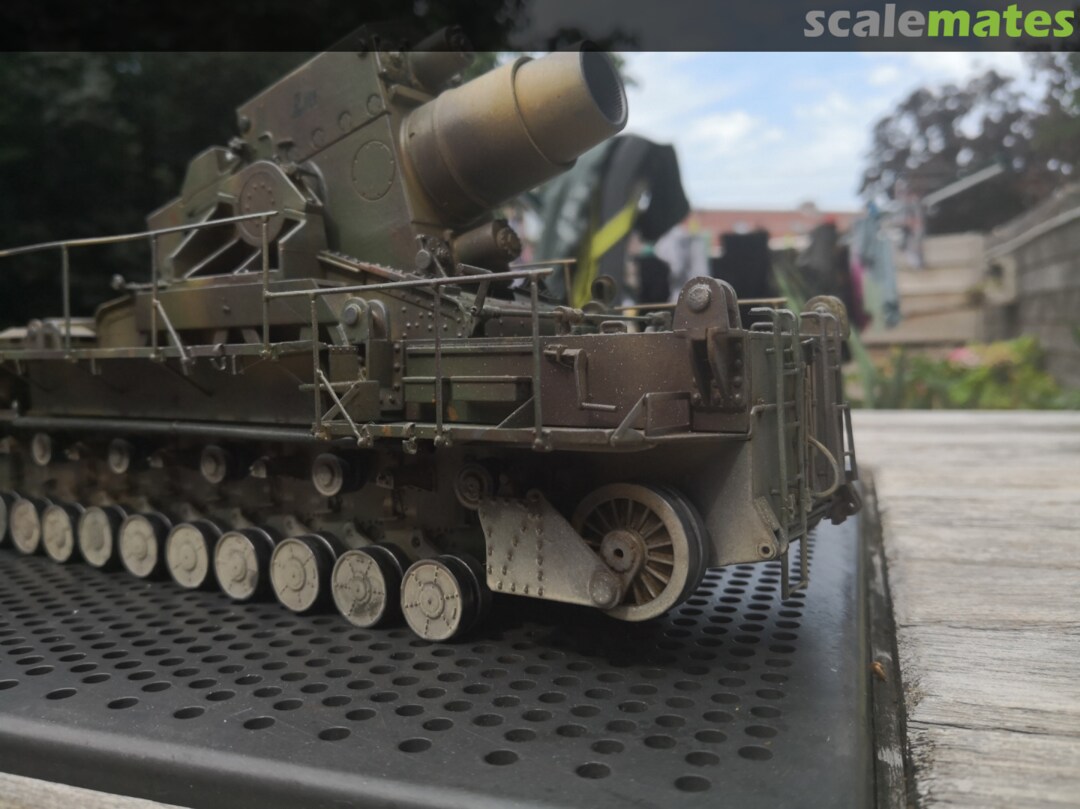
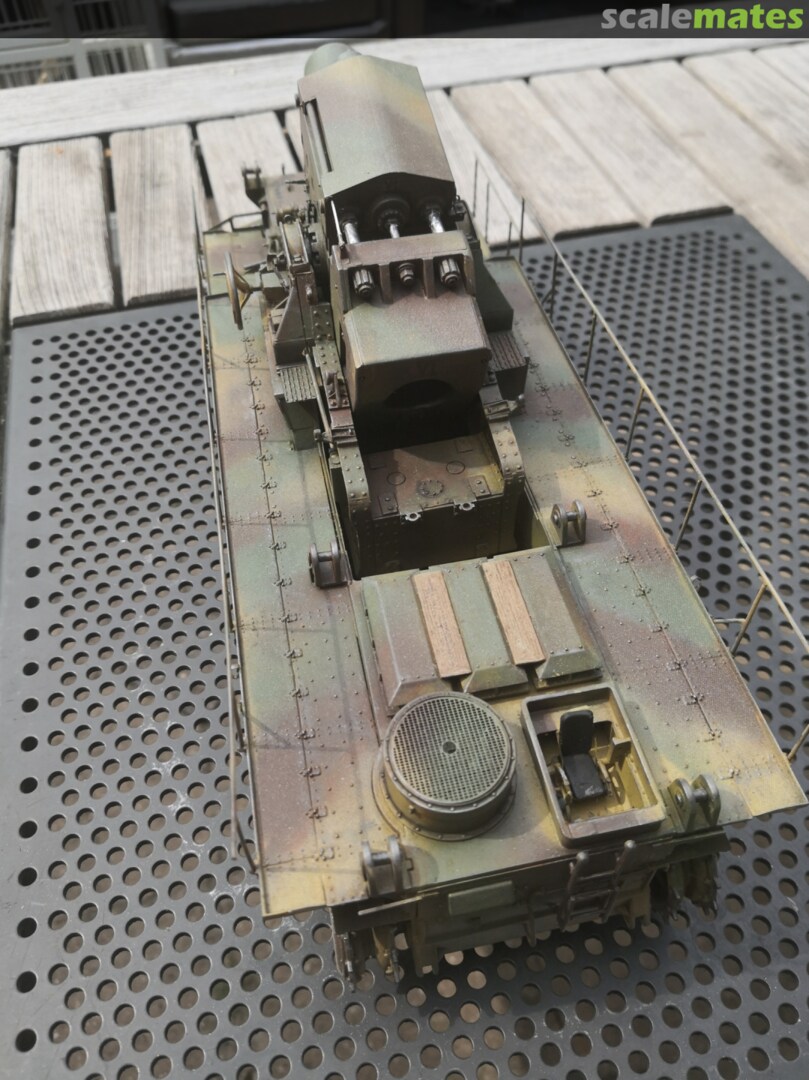
*Alert* For those who thought I was completly dormant the last weeks, here come a lot of pics!

The flatcar is finished (left the air hoses off on purpose). Awaiting it's load. Building was rather well, except for the wheels and bumpers, whis are made of another type of plastic, and responded not so good to glue. And the instructions are a bit cryptic in some places. The biggest challenge however was the painting of the planking. I think the result is rather ok.


Not only that, but Karl itself is also ready. This piece de resistance only misses its tracks.
These have been in back order for quite a few months now. According to my LHS, Friul is not really
trustworthy these days. Does not respond to inqueries by both retailers, or importers alike...


Further more I started the ammo panzer, yet came accross a inexplicable goof from Trumpy:
if you want to use all the supplied PE, you need 109 PE boltheads. (2x 6 for the towing brackets, 6x 18 for the ammo box mounts), yet a fret of 100 is included (no, I did not count wrong: for each bolthead, an indentation is included).


BUT, things get even stranger: the plastic parts show only 14 boltheads???
So which one is correct???
G-man69
Visit this Community
England - South West, United Kingdom
Joined: October 17, 2017
KitMaker: 944 posts
Armorama: 928 posts
Posted: Monday, August 17, 2020 - 05:09 AM UTC
Hi Erwin,

'Dormant', makes you sound like a dormouse, .

Excellent work on both the flatbed and the Karl, they both have that dusty look that might come about during a prolonged dry summer spell, really enjoyed the images, .

Cheers, ,

G
Golikell
Visit this Community
Noord-Holland, Netherlands
Joined: October 25, 2002
KitMaker: 1,757 posts
Armorama: 914 posts
Posted: Monday, August 17, 2020 - 06:47 PM UTC
Trust me, I regularly feel that way!

Since the vehicle I want to depict, just traveled more than 600 km by rail, in august, I figured that some dusting would not go amiss

Oh, I just saw I missed a picture of aforementioned mounting:
cheyenne
Visit this Community
New Jersey, United States
Joined: January 05, 2005
KitMaker: 2,185 posts
Armorama: 1,813 posts
Posted: Monday, August 17, 2020 - 09:06 PM UTC
Nice work Erwin , I like the weathering a lot !!
Golikell
Visit this Community
Noord-Holland, Netherlands
Joined: October 25, 2002
KitMaker: 1,757 posts
Armorama: 914 posts
Posted: Monday, August 17, 2020 - 10:06 PM UTC

Quoted Text

Nice work Erwin , I like the weathering a lot !!


Thank you. I am happy my handywork is being appreciated
G-man69
Visit this Community
England - South West, United Kingdom
Joined: October 17, 2017
KitMaker: 944 posts
Armorama: 928 posts
Posted: Tuesday, August 18, 2020 - 04:01 AM UTC
Hi Dormouse, ,

Nice job on the photoetched bracket, it definitely looks better than the plastic part, but it's something I try to steer clear of...a bit like figure painting, .

Cheers, ,

G
Dioramartin
Visit this Community
New South Wales, Australia
Joined: May 04, 2016
KitMaker: 1,476 posts
Armorama: 1,463 posts
Posted: Wednesday, August 19, 2020 - 12:43 AM UTC
What they’ve said, that Karl paint job’s as perfect as I’ve ever seen, 11/10 superb
Golikell
Visit this Community
Noord-Holland, Netherlands
Joined: October 25, 2002
KitMaker: 1,757 posts
Armorama: 914 posts
Posted: Wednesday, August 19, 2020 - 02:41 AM UTC

Quoted Text

Hi Dormouse, ,

Nice job on the photoetched bracket, it definitely looks better than the plastic part, but it's something I try to steer clear of...a bit like figure painting, .

Cheers, ,

G


Cheers... It is actually a miracle that I did not lose a single bolthead due to *pling*!!!
I am putting continuation with this kit ahead of me, because of these bolt heads. The only solution I can imagine (Trumpeter does not respond to my e-mail) is making them myself. I must have a hex punch and die set lying around somewhere. I have to dig it up and see if the correct size is there...
Golikell
Visit this Community
Noord-Holland, Netherlands
Joined: October 25, 2002
KitMaker: 1,757 posts
Armorama: 914 posts
Posted: Wednesday, August 19, 2020 - 02:43 AM UTC
Thank you very much for the kind words. They are more than welcome, specially from an accomplished modeller as you...