

I can't speak to the accuracy of the new look because it is new to me,the cobbled ford. I will say the new look seems better.
J
Dioramas
Do you love dioramas & vignettes? We sure do.
Do you love dioramas & vignettes? We sure do.
Hosted by Darren Baker, Mario Matijasic
Carrier Crossing

jrutman

Joined: April 10, 2011
KitMaker: 7,941 posts
Armorama: 7,934 posts
Posted: Tuesday, August 18, 2020 - 05:03 AM UTC
Golikell

Joined: October 25, 2002
KitMaker: 1,757 posts
Armorama: 914 posts

Posted: Tuesday, August 18, 2020 - 06:46 PM UTC
Sneezing would be an interesting/funny/both sight 
Must have been a bad memory then... This is what I did with the popcicle sticks on the floor of my railway station:
Wow! That tedious work realy paid of... Those stones really look the part now!!!
Must have been a bad memory then... This is what I did with the popcicle sticks on the floor of my railway station:
Wow! That tedious work realy paid of... Those stones really look the part now!!!


Dioramartin

Joined: May 04, 2016
KitMaker: 1,476 posts
Armorama: 1,463 posts
Posted: Wednesday, August 19, 2020 - 12:34 AM UTC
The perils of Lockdown, I was considering smoking my trees & now youre snorting DAS
maybe theres more to Glenns masonry blocks than meets the eye? Anyhow you seem to have made a perfect conversion of styrene into aged timber G, if you hadnt already er nailed it with plastic Id have been extolling the Joy of Balsa too. And those cobbles look great too, looking properly worn-in now so the dry-brushing should make'em sing 

G-man69

Joined: October 17, 2017
KitMaker: 944 posts
Armorama: 928 posts
Posted: Monday, August 24, 2020 - 04:16 AM UTC
Quoted Text
I can't speak to the accuracy of the new look because it is new to me,the cobbled ford. I will say the new look seems better.
J
Hi Jerry,
As for 'accuracy', methinks being able to speak for it in the case of my builds is always going to be questionable,
.But thank you for saying that the new look seems better, much appreciated,
 .
.Cheers,
,G
G-man69
Joined: October 17, 2017
KitMaker: 944 posts
Armorama: 928 posts
Posted: Monday, August 24, 2020 - 04:19 AM UTC
Quoted Text
Sneezing would be an interesting/funny/both sight
Must have been a bad memory then... This is what I did with the popcicle sticks on the floor of my railway station:
Wow! That tedious work realy paid of... Those stones really look the part now!!!
Hi Erwin,
Thanks for the kind feedback,
.Your use of wooden sticks for your station flooring looks great, maybe my experience was down to a bad hair day...what's left of it,
.Cheers,
,G
G-man69
Joined: October 17, 2017
KitMaker: 944 posts
Armorama: 928 posts
Posted: Monday, August 24, 2020 - 04:23 AM UTC
Quoted Text
The perils of Lockdown, I was considering smoking my trees & now youre snorting DAS maybe theres more to Glenns masonry blocks than meets the eye? Anyhow you seem to have made a perfect conversion of styrene into aged timber G, if you hadnt already er nailed it with plastic Id have been extolling the Joy of Balsa too. And those cobbles look great too, looking properly worn-in now so the dry-brushing should make'em sing
Hi Tim,
Thanks for the kind feedback, and for making me smile regarding our modelling substance abuse,
. Joking aside, I dropped my glue bottle this last weekend and spilt half the contents...boy was I bouncing off of the ceiling for the next couple of hours until the fumes had dispersed, 
 .
.Cheers,
,G
G-man69
Joined: October 17, 2017
KitMaker: 944 posts
Armorama: 928 posts
Posted: Monday, August 24, 2020 - 04:50 AM UTC
Hi all,
Been a tad lax these last few days, slow going and little progress, .
.
Started to build the first of the carriers and have always struggled painting canvas stowage in a realistic fashion, so decided to clad the kit camouflage net with tissue and real netting (see images below). A bit messy at the moment, but hopefully it'll look okay once painted, .
.


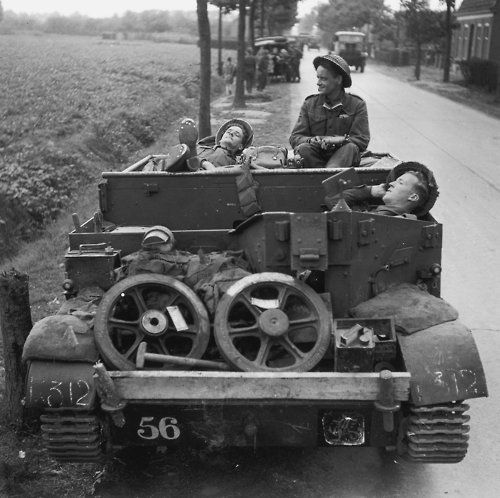
Saw an interesting image in a book showing an unusual stowage method for the glacis, a plank of wood held in place by two wooden pegs, so decided to do something similar (see images below). There was all sorts of different paraphernalia stowed behind it...was even thinking of placing a liberated bicycle there if I can find a cheap one,.


The glacis plate isn't glued down yet.
The images below are me simply playing around with location(s) and trying to determine whether or not two carriers might be a tad cramped. The cobbles have had a rough dry-brush to see how they might look once finished.


Cheers,,
G
Been a tad lax these last few days, slow going and little progress,
.Started to build the first of the carriers and have always struggled painting canvas stowage in a realistic fashion, so decided to clad the kit camouflage net with tissue and real netting (see images below). A bit messy at the moment, but hopefully it'll look okay once painted,
. Saw an interesting image in a book showing an unusual stowage method for the glacis, a plank of wood held in place by two wooden pegs, so decided to do something similar (see images below). There was all sorts of different paraphernalia stowed behind it...was even thinking of placing a liberated bicycle there if I can find a cheap one,
. The glacis plate isn't glued down yet.
The images below are me simply playing around with location(s) and trying to determine whether or not two carriers might be a tad cramped. The cobbles have had a rough dry-brush to see how they might look once finished.
Cheers,
,G
jrutman
Joined: April 10, 2011
KitMaker: 7,941 posts
Armorama: 7,934 posts
Posted: Monday, August 24, 2020 - 09:30 AM UTC
Nice solution for the net! I ended up using the kit part,gluing a piece of wedding tulle fabric on the top and adding scrim made from painted tissue paper.
J
J
Golikell
Joined: October 25, 2002
KitMaker: 1,757 posts
Armorama: 914 posts
Posted: Monday, August 24, 2020 - 09:33 PM UTC
Talking about abuse of modelling means!!!! : D
Must have been this pic:
I love the way you will display your camo netting!!! I think 2 will fit nicely on the base...
: DMust have been this pic:
I love the way you will display your camo netting!!! I think 2 will fit nicely on the base...
PolishBrigade12
Joined: January 31, 2009
KitMaker: 380 posts
Armorama: 366 posts

Posted: Tuesday, August 25, 2020 - 04:55 AM UTC
I like the layout on this dio, great work!
Cheers, Ski.
Cheers, Ski.
G-man69
Joined: October 17, 2017
KitMaker: 944 posts
Armorama: 928 posts
Posted: Thursday, August 27, 2020 - 03:52 AM UTC
Quoted Text
Nice solution for the net! I ended up using the kit part,gluing a piece of wedding tulle fabric on the top and adding scrim made from painted tissue paper.
J
Hi Jerry,
I'll have to give the wedding tulle fabric a go, thanks for the idea.
I'm contemplating adding some scrim, I always think it can look more effective than plain netting...I make mine from thin paper soaked in diluted white glue.
Cheers,
,G
G-man69
Joined: October 17, 2017
KitMaker: 944 posts
Armorama: 928 posts
Posted: Thursday, August 27, 2020 - 03:55 AM UTC
Quoted Text
Talking about abuse of modelling means!!!!
Must have been this pic:
I love the way you will display your camo netting!!! I think 2 will fit nicely on the base...
Hi Erwin,
Thanks for the kind feedback, and well done on finding the image, you're bang on with your guess,
.Cheers,
,G
G-man69
Joined: October 17, 2017
KitMaker: 944 posts
Armorama: 928 posts
Posted: Thursday, August 27, 2020 - 03:57 AM UTC
Quoted Text
I like the layout on this dio, great work!
Cheers, Ski.
Hi Ski,
Thank you for the supportive feedback, it's much appreciated, and hopefully you'll continue to like it as it progresses,
.Cheers,
,G
G-man69
Joined: October 17, 2017
KitMaker: 944 posts
Armorama: 928 posts
Posted: Thursday, August 27, 2020 - 04:11 AM UTC
Hi all,
A tad more progress today,.
The first Carrier undercoated (see images below), the glacis and embrasure plate are just dry fitted for now to allow ease of painting and adding the driver.


Also done a bit of work to the bridge and the groundwork (see images below).


Cheers,,
G
A tad more progress today,
.The first Carrier undercoated (see images below), the glacis and embrasure plate are just dry fitted for now to allow ease of painting and adding the driver.
Also done a bit of work to the bridge and the groundwork (see images below).
Cheers,
,G
G-man69
Joined: October 17, 2017
KitMaker: 944 posts
Armorama: 928 posts
Posted: Wednesday, September 02, 2020 - 02:49 AM UTC
Hi all,
Having spent time on, the dreaded figure painting, trying to finish off my other current project I've let this one slip a bit, especially as I was waiting for some plastic strip to enable me to finish off the bridge construction.
Having achieved the bridge build I decided to start block painting the 'wood' and some of the surrounding groundwork (see images below).


The colours all look a tad rough, especially as the oils are still wet, but they are just a base coat, much of the groundwork and retaining wall will be covered in grass and general foliage.
Cheers,,
G
Having spent time on, the dreaded figure painting, trying to finish off my other current project I've let this one slip a bit, especially as I was waiting for some plastic strip to enable me to finish off the bridge construction.
Having achieved the bridge build I decided to start block painting the 'wood' and some of the surrounding groundwork (see images below).
The colours all look a tad rough, especially as the oils are still wet, but they are just a base coat, much of the groundwork and retaining wall will be covered in grass and general foliage.
Cheers,
,G
jrutman
Joined: April 10, 2011
KitMaker: 7,941 posts
Armorama: 7,934 posts
Posted: Wednesday, September 02, 2020 - 04:25 AM UTC
Nice update. Very believable colors.
J
J
BootsDMS
Joined: February 08, 2012
KitMaker: 978 posts
Armorama: 965 posts
Posted: Wednesday, September 02, 2020 - 10:45 PM UTC
Just a tweak to the model - not the scenery Gareth: your rifles will require some slings. Thin card or etch offcuts should do the job, or even a specific accessory set should you wish to pursue that particular line.
Brian
Brian
G-man69
Joined: October 17, 2017
KitMaker: 944 posts
Armorama: 928 posts
Posted: Thursday, September 03, 2020 - 01:18 AM UTC
Quoted Text
Nice update. Very believable colors.
J
Hi Jerry,
Thank you, though it does need a dry brush before I start to grass it over.
Cheers,
,G
jrutman
Joined: April 10, 2011
KitMaker: 7,941 posts
Armorama: 7,934 posts
Posted: Thursday, September 03, 2020 - 01:23 AM UTC
Quoted Text
Quoted TextNice update. Very believable colors.
J
Hi Jerry,
Thank you, though it does need a dry brush before I start to grass it over.
Cheers,
G
If you say so! Let it be so!
J
G-man69
Joined: October 17, 2017
KitMaker: 944 posts
Armorama: 928 posts
Posted: Thursday, September 03, 2020 - 01:28 AM UTC
Quoted Text
Just a tweak to the model - not the scenery Gareth: your rifles will require some slings. Thin card or etch offcuts should do the job, or even a specific accessory set should you wish to pursue that particular line.
Brian
Hi Brian,
Thank you for the feedback, much appreciated,
.As well as the slings I've noted that in many images there is a small canvas cover (not sure if it has a proper name?) over just the firing mechanism and magazine of the SMLE.
Also, a number show a cover over the butt, firing mechanism and magazine of the the stowed bren, but not sure if this was an ad hoc or purpose made cover as it appears to only go as far as the carrying handle...do you know the answer?
Cheers,
,G
G-man69
Joined: October 17, 2017
KitMaker: 944 posts
Armorama: 928 posts
Posted: Thursday, September 03, 2020 - 01:31 AM UTC
Hi all,
Is it possible to dry brush with acrylics and, if so, is it practical due to the speed they dry at? Or is it best to do dry brushing with enamels and oils only?
Any advice would be greatly appreciated,.
Cheers,,
G
Is it possible to dry brush with acrylics and, if so, is it practical due to the speed they dry at? Or is it best to do dry brushing with enamels and oils only?
Any advice would be greatly appreciated,
.Cheers,
,G

steel_tiger1
Joined: May 14, 2008
KitMaker: 35 posts
Armorama: 34 posts
Posted: Thursday, September 03, 2020 - 01:36 AM UTC
Watching this for sure. Planning a river crossing Diorama of my own. Amazing work so far. The second attempt on the road stones is spot on. 
BootsDMS
Joined: February 08, 2012
KitMaker: 978 posts
Armorama: 965 posts
Posted: Thursday, September 03, 2020 - 03:01 AM UTC
Quoted Text
Quoted TextJust a tweak to the model - not the scenery Gareth: your rifles will require some slings. Thin card or etch offcuts should do the job, or even a specific accessory set should you wish to pursue that particular line.
Brian
Hi Brian,
Thank you for the feedback, much appreciated,
As well as the slings I've noted that in many images there is a small canvas cover (not sure if it has a proper name?) over just the firing mechanism and magazine of the SMLE.
Also, a number show a cover over the butt, firing mechanism and magazine of the the stowed bren, but not sure if this was an ad hoc or purpose made cover as it appears to only go as far as the carrying handle...do you know the answer?
Cheers,
G
#
There was a specific cover for the Lee Enfield - just Google "Breech cover Lee Enfield Rifle" and you'll find loads of pictures (and colour variations) so just take your pick - easy enough to replicate with say, a dab of Milliput or tissue paper perhaps; tiny discs would replicate the press studs although to be honest in 1:35 they'd be pretty much unidentifiable I should think. Of course, it depends what the scenario is: remember the "Ws"? Is it say, a sunny Normandy? In which case loads of dust and possible use of the covers. Is it say, a wet Normandy, then rain means rust so covers again. Is it an advance to contact? In other words, are the enemy likely to be encountered in which case the weapons will be needed quite quickly. Having said that of course, if the enemy are indeed around the vehicle crew would have them made ready and not stowed.
I'm not too sure about the Bren; "Breech cover Bren" reveals a complete cover ie for the whole weapon (courtesy of Google); however, the same criteria applies as described above and the Bren is an important provider of firepower.
Of course, in addition, soldiers will devise what necessity dictates if there's no issue kit to do the job - as you identify.
Keep it up - all looking good!
Brian
G-man69
Joined: October 17, 2017
KitMaker: 944 posts
Armorama: 928 posts
Posted: Thursday, September 03, 2020 - 03:59 AM UTC
Quoted Text
Watching this for sure. Planning a river crossing Diorama of my own. Amazing work so far. The second attempt on the road stones is spot on.
Hi Tom,
Thanks for the feedback on the stones, always nice to get positive comments and, hopefully, you'll enjoy following this build,
.have you any specific thoughts as to what you intend to create on your diorama?
Thanks again, and cheers,
,G
G-man69
Joined: October 17, 2017
KitMaker: 944 posts
Armorama: 928 posts
Posted: Thursday, September 03, 2020 - 04:09 AM UTC
Quoted Text
There was a specific cover for the Lee Enfield - just Google "Breech cover Lee Enfield Rifle" and you'll find loads of pictures (and colour variations) so just take your pick - easy enough to replicate with say, a dab of Milliput or tissue paper perhaps; tiny discs would replicate the press studs although to be honest in 1:35 they'd be pretty much unidentifiable I should think. Of course, it depends what the scenario is: remember the "Ws"? Is it say, a sunny Normandy? In which case loads of dust and possible use of the covers. Is it say, a wet Normandy, then rain means rust so covers again. Is it an advance to contact? In other words, are the enemy likely to be encountered in which case the weapons will be needed quite quickly. Having said that of course, if the enemy are indeed around the vehicle crew would have them made ready and not stowed.
I'm not too sure about the Bren; "Breech cover Bren" reveals a complete cover ie for the whole weapon (courtesy of Google); however, the same criteria applies as described above and the Bren is an important provider of firepower.
Of course, in addition, soldiers will devise what necessity dictates if there's no issue kit to do the job - as you identify.
Keep it up - all looking good!
Brian
Hi Brian,
Thanks for the information SMLE, I had planned to replicate it...least try to...using tissue and lashings of white glue...well not that much as they're so small,
.As for the Bren, it might be that the image I saw showed an ill fitted purpose made cover, possibly down to sloppiness or perhaps as partial protection to critical areas whilst allowing easier removal if the gun was needed urgently,
? Or it might have been an ad hoc temporary cover protecting the mechanism, either way, I quite liked the look of it as something to try and replicate.Thanks again for your knowledgeable input, and cheers,
,G
 |

WEB HOSTING BY


Copyright ©2021 Armorama and Kitmaker Network, a subsidiary of Silver Star Enterprises
All Rights Reserved. Please read our Conditions of Use and Privacy Policy.
All Rights Reserved. Please read our Conditions of Use and Privacy Policy.