Campaigns
Where Armorama group builds can be discussed, organized, and updates posted.
Get the Job Done Again
Mecenas
Joined: December 23, 2007
KitMaker: 1,596 posts
Armorama: 165 posts
Posted: Saturday, October 10, 2009 - 09:17 PM UTC
It's high time to show some progress. I had to change my project a bit due to the lack of references. I intended to buiild an ausf N based on the ausf M chassis but I decided to finish the model in the original ausf M version with a 50mm gun.

Sorry for the poor pics, I had only my "idioten camera" and generaly no good light. When I get a professional camera I'll do some macro pics showing the details.


Red4
Visit this Community
California, United States
Joined: April 01, 2002
KitMaker: 4,287 posts
Armorama: 1,867 posts
Posted: Wednesday, October 14, 2009 - 12:59 AM UTC
The "Leo" is looking great Paul. Keep at it. Same with the PzIII Michal. Thanks for keeping the thread going guys. I'm up to my eyeballs in schoolwork
Thanks, "Q"
Damraska
Visit this Community
California, United States
Joined: October 06, 2006
KitMaker: 580 posts
Armorama: 499 posts
Posted: Saturday, October 17, 2009 - 09:38 PM UTC
A new job and numerous concurrent projects equals slow progress.


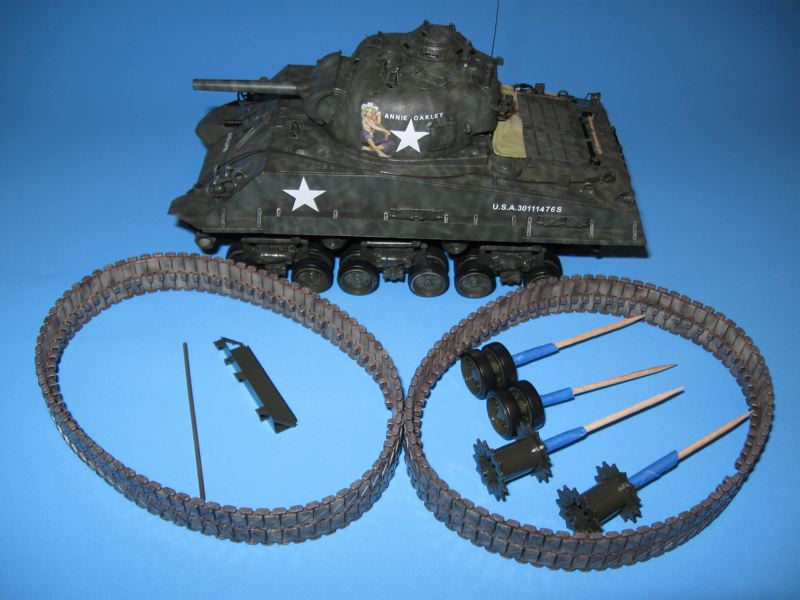
The kit comes with one relatively accurate decal scheme, "Andy", but the bumper codes are wrong. I corrected the bumper codes, switched the tank number, and changed the serial number slightly, thus resulting in another M4A3(105) from the same unit. I seriously doubt any of these tanks wore pinup art but it's my model and if I want a pretty girl on the side, I am putting a pretty girl on the side. So there.

Now, on to the oil paints.

-Doug
Red4
Visit this Community
California, United States
Joined: April 01, 2002
KitMaker: 4,287 posts
Armorama: 1,867 posts
Posted: Sunday, October 18, 2009 - 10:23 AM UTC
Very nice Doug. I like the pin up as well.
"Q"
Bigrip74
Visit this Community
Texas, United States
Joined: February 22, 2008
KitMaker: 5,026 posts
Armorama: 1,604 posts
Posted: Sunday, October 25, 2009 - 10:22 AM UTC
@ Doug: Nice M4, great camo. How did you accomplish it?
@ MIke: A lot of work going on with that Stug, more photos please.
@ David: Is that the Maquette Valentine, looks good. I will have to rebuild the turret ring area on the hull on mine, the mold process left more of a jigsaw puzzle than a hole.
@ Paul: Your Leopard turned out really nice.
@ Tony: Nice Bradley, is it 1/35 or 1/72?
@ Michal: A lot of work happening on your Pz.kpfw. III ausf.M. Waiting for the finished photo.

Here is my Vickers E Mk. A that was started for "On the Eastern Front" last year. I took it off the shelf and washed about 1" of dust off. Now to put the decals on and a little more wearthering then flat coat.
Photobucket

Robert

Bigrip74
Visit this Community
Texas, United States
Joined: February 22, 2008
KitMaker: 5,026 posts
Armorama: 1,604 posts
Posted: Monday, October 26, 2009 - 10:05 AM UTC
Hi Matthew:
Here is my ( Lekki czolg Vickers E Mk. A ) that was started for the On The Eastern Front Campaign last year.
Photobucket
Photobucket
Photobucket
Photobucket
Photobucket
Photobucket
Photobucket
Photobucket
Photobucket

Finished after a long time stitting on the shelf with other derilicts. I put chipped paint, decals, and clear flat overcoat.

Robert
Red4
Visit this Community
California, United States
Joined: April 01, 2002
KitMaker: 4,287 posts
Armorama: 1,867 posts
Posted: Monday, October 26, 2009 - 10:44 AM UTC
Nice job Robert. Thanks for the update. Much appreciated. "Q"
bilko
Visit this Community
Queensland, Australia
Joined: April 22, 2003
KitMaker: 584 posts
Armorama: 241 posts
Posted: Thursday, November 05, 2009 - 11:02 PM UTC

Another one finished. This was started just over 3 years ago before I was transferred and has been sitting in a box since then. It is the Trumpeter 1/32 Tomahawk IIA which has been converted to a Tomahawk IIB flown by Flying Officer Andrew (Nicky) Barr in 3 Sq RAAF in North Africa. T his is the aircraft he shot down his first 3 aircraft in - a Bf 110 (12/12/41), a Bf109F and a Ju88 the following day. He quickly rose to Sqd Leader and OC of 3 Squadron before being shot down on 26/8/42 and becoming a POW. He made numerous escape attempts and eventually joined up with commandos and partisans behind the lines in Italy where he assisted other crashed aircrew to escape.

The "conversion" consisted of scratching a reflector gunsight - done by casting a 1/32 Spitfire sight, adding the radio mast - again cast from the Spit kit, and making the pitot tube using brass rod.


I have added other pics to a post on Aeroscale as I might try to get this into the MoM.

Brian
yeahwiggie
Visit this Community
Dalarnas, Sweden
Joined: March 24, 2006
KitMaker: 2,093 posts
Armorama: 1,359 posts
Posted: Wednesday, November 11, 2009 - 09:55 PM UTC
I got my "get the job done" really done, now!
I have given it the title "Falsche tarnung, Herr Leutnant!" (wrong camouflage, Lt!)

Being my first multi-vehicle dio, it was kind of hard to keep focussed and I did loose interest in it in the end. I guess I'm more of a small dio/vignette kind of builder.
I added the last figures, bits and pieces, so it looks like this now;
The front;


the back;


from the top;


The focal point;


And some of the accessoires in the front;


The paintcans are complete made up...
Mecenas
Joined: December 23, 2007
KitMaker: 1,596 posts
Armorama: 165 posts
Posted: Wednesday, November 11, 2009 - 10:18 PM UTC
Here's a progress of my job to be done


I cutting the tracks off the sprue (I use the Dragon made separate tracks). Only 240 to be cut off and re worked...
Red4
Visit this Community
California, United States
Joined: April 01, 2002
KitMaker: 4,287 posts
Armorama: 1,867 posts
Posted: Thursday, November 12, 2009 - 11:09 AM UTC
Nice work guys. December 31st is fast approaching. Keep at it. Thanks for posting. "Q"
ppawlak1
Visit this Community
Victoria, Australia
Joined: March 14, 2006
KitMaker: 1,973 posts
Armorama: 1,843 posts
Posted: Thursday, November 12, 2009 - 06:30 PM UTC
Another pic.

More work on the weathering to be done......

I originally was going to make this beast quite clean, but after seeing the dust on the Aussie AS1's in Northern Australia in Michael Cecil's "Battlefield Leopard", I though I'd give it a "real dusting".


Now to add stowage, the dozer blade, and the turret details that are still missing

Cheers

Paul
Bigrip74
Visit this Community
Texas, United States
Joined: February 22, 2008
KitMaker: 5,026 posts
Armorama: 1,604 posts
Posted: Friday, November 13, 2009 - 08:39 AM UTC
Ron nice dio, the afvs & figures look really good and the dio is funny. It reminds me of Murphy's law ( if any thing is going to go wrong it will! )


Robert
SGTJKJ
#041
Visit this Community
Kobenhavn, Denmark
Joined: July 20, 2006
KitMaker: 10,069 posts
Armorama: 4,677 posts
Posted: Friday, November 20, 2009 - 03:22 AM UTC
Nice looking Leopard II, Paul. Looks better now with the colours toned down a bit.

Thanks for sharing
ant88
Visit this Community
Rhode Island, United States
Joined: January 27, 2005
KitMaker: 225 posts
Armorama: 176 posts
Posted: Sunday, November 22, 2009 - 01:32 AM UTC
This Campaign was MADE for me. Back from another season of fishing. I have about 7 to contribute! Im in!
Korpse
Visit this Community
Queensland, Australia
Joined: October 06, 2009
KitMaker: 382 posts
Armorama: 378 posts
Posted: Tuesday, November 24, 2009 - 12:54 AM UTC
Hello

I got one modelling project finished today.

It maybe just needs a little pastel chalk dust, or perhaps a light drybush in a couple of spots. Its the UM 1/72nd BA-3ZD Armoured Car (Kit 364) with the railway wheels. Its not a newly built kit, its been sitting on a shelf, and I have never been happy with how it turned out, so set it aside. I made this one a couple of years ago, and sprayed it with very diluted dark yellow enamel. The intention was for the green plastic to show through in areas to simulate a worn repaint of a captured vehicle, pressed into german service. I tried this type of paint scheme once before with some success, but this one turned out badly, the paint was too thin, and the end colour looked more like pale brown, and totally unconvincing, it didn't look like anything except a badly painted model. Also I had trimmed the headlight holders and placed them in an incorrect position and angle of the front, and they were not symmetrical either. I dont know how I made such a dogs breakfast of this neat little kit.

From the start had I wanted this vehicle to be a "beute" in axis service, and this aim haadn't changed. Lots of pictures exist of BA armoured cars in axis use. Not sure I've seen the rail version in use by the axis, but there are pictures of other soviet armoured cars with rail wheels in use by the axis.

The light assemblies and bumper were a little tricky to remove, trim to correct size and refit, as they are quite fragile. I noticed in the macro pictures the bumper still needs a small repair.

I recently bought the "Lifecolor German WWII Tanks Set 1" which has 6 acrylic colours in it. I painted the model overall RAL 7028 Dark Yellow, with light irregular patched of RAL 6003 Olive Green and RAL 8017 Red Brown. I thinned the paint a bit with water, and was pretty happy with the end result. I wasn't trying anything intricate with the green and brown, just wanted a little irregular colour over the yellow.

When throughly dry I mixed a little Burnt Umber with turpentine to highlight the recessed lines and hatches. I used a sharpened HB pencil to put a dark shine on the face of the rail wheels, and also used the pencil to put a few marks and lines to replicate slightly worn edges and marks on surfaces. I sprayed the whole model with thinned Aqueous Hobby Color Flat Clear to finish.

I'm heaps happier with the end result. I couldn't find a 'before' photo, except a blurred one, which wasn't any good for comparison purposes. I should have taken a better one before I started just to show the difference.


The vehicle could maybe be a little dustier, and the road tyres are perhaps a bit too clean and black looking also. Anyway its looking much better, just as it is.

When first built I converted this one to HO scale so that it would be easy to place on readily available track. The kit does come with a short piece of track, but I wanted to be able to place the model on a longer stretch. In retrospect I wish I had just left it as the manufacturer intended, but too much modification has been done now to change it back. The axle length now equates to very close to 'narrow gauge'

Next post will either be about the Mac Opel Blitz Holzengas, which is near complete, or perhaps an Academy Opel Blitz, which like this BA armoured car is undergoing refurbishment. I also am rebuilding the front of an Ace Kfz 17 Radio Car , and have a Phanomen Granit Kubel near to completion, with some luck I'll have all these tidied up and posted here before 31 December....


cheers
Neil

dutchboyinohio
Visit this Community
Ohio, United States
Joined: August 05, 2007
KitMaker: 258 posts
Armorama: 116 posts
Posted: Saturday, November 28, 2009 - 07:12 PM UTC
Finally got more work done on my Cromwell. I finished the HobbyBoss tracks; that alone took me almost four evenings but was well worth the effort. I ended up having to scratchbuild a couple of the brackets on the turret storage bin as they were very poorly cast.

So here is the dryfit, still have some of the smaller details to add and one more crew figure (driver). Up next is the painting of this beast, not my favorite part of the build, as I haven't done any vehicle painting and weathering in a long, long time.....


Mecenas
Joined: December 23, 2007
KitMaker: 1,596 posts
Armorama: 165 posts
Posted: Saturday, November 28, 2009 - 08:50 PM UTC
Just one month left, but I'm doing my best to finish the build. I hope I'll be able to show the finished model on Christmass.

The model will be primed in a couple of hours, so we'll see how much is to jazz up.


A bit more pics you can find following this LINK to my build blog
Red4
Visit this Community
California, United States
Joined: April 01, 2002
KitMaker: 4,287 posts
Armorama: 1,867 posts
Posted: Sunday, November 29, 2009 - 03:55 AM UTC
Hello all. I have been lurking here and there checking out the progress on the thread/campaign. Very impressive with the amount of builds that are being comepleted. My classes are officially over come 7 December so I am looking forward to this time to do some more cramming as it were, at my work bench. I still have a few I think I can squeeze in under the wire. I need to focus on school at the moment, but that is just a few more days worth. Thanks for continuing to post your updates, and progress pics. Looking forward to awarding a bunch of ribbons at the end of the campaign. Don't forget to upload your completed pics to the gallery. Thanks again for keeping the thread alive in my absence. "Q"
Damraska
Visit this Community
California, United States
Joined: October 06, 2006
KitMaker: 580 posts
Armorama: 499 posts
Posted: Sunday, November 29, 2009 - 06:08 PM UTC

Quoted Text

Doug: Nice M4, great camo. How did you accomplish it?


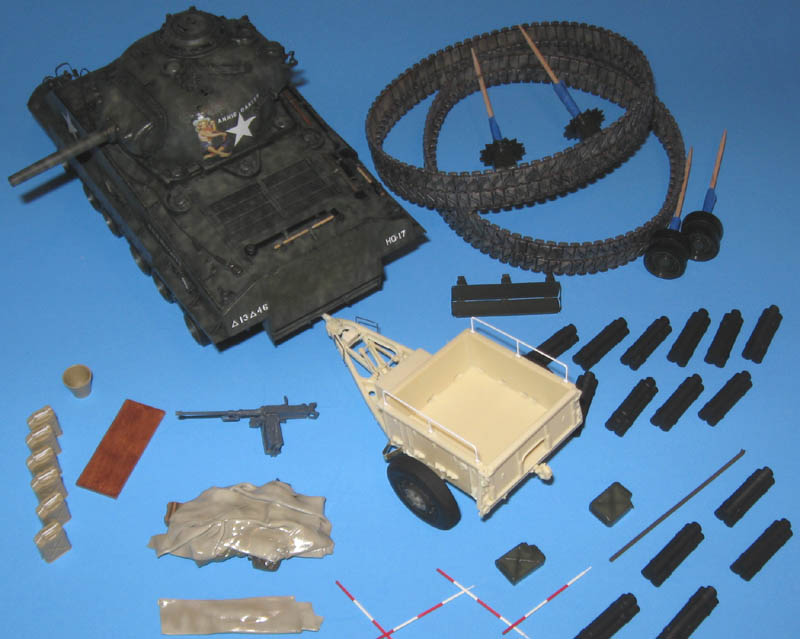
Rob, I apologize for not responding to your question earlier. All painting so far was accomplished with an airbrush. I spray the whole model with a custom mix of Olive Drab based on MAFVA specs, then mottle on other shades lightened with Earth Yellow, Armor Sand, and Sand. The next step--weathering with oil paints--will tone down the blotchiness but still leave interesting color variations.

Some progress...


The ammunition trailer is a new addition to the project. It will carry a partial ammunition load and assorted junk. Did I say junk? I meant critical war materials.

-Doug
Mecenas
Joined: December 23, 2007
KitMaker: 1,596 posts
Armorama: 165 posts
Posted: Sunday, November 29, 2009 - 08:24 PM UTC
No time to waste, so I'm working hard with shooting pics and paint

Before:


After:
Torchy
#047
Visit this Community
England - East Anglia, United Kingdom
Joined: September 13, 2005
KitMaker: 2,016 posts
Armorama: 1,187 posts
Posted: Tuesday, December 01, 2009 - 08:39 PM UTC
Hi all
I found this lurking in the loft,will make a change from tanks and aircraft!


An old Aifix beam engine,I was going to finish my Tasca Firefly,but I've lost some parts
Should get it finished in time
Andy
Neo
Visit this Community
North Carolina, United States
Joined: January 20, 2005
KitMaker: 916 posts
Armorama: 758 posts
Posted: Saturday, December 05, 2009 - 05:34 AM UTC
Done w/ this one - 1/72 Italeri Kubelwagen - originally for the Eastern Front Campaign but I did not get it finished.


More pic's in the Campaign Gallery.
Red4
Visit this Community
California, United States
Joined: April 01, 2002
KitMaker: 4,287 posts
Armorama: 1,867 posts
Posted: Monday, December 07, 2009 - 01:25 AM UTC
Nicely done Neo. Thanks for posting. "Q"
gbkirsch
Visit this Community
Ohio, United States
Joined: June 04, 2005
KitMaker: 627 posts
Armorama: 455 posts
Posted: Wednesday, December 09, 2009 - 06:26 PM UTC
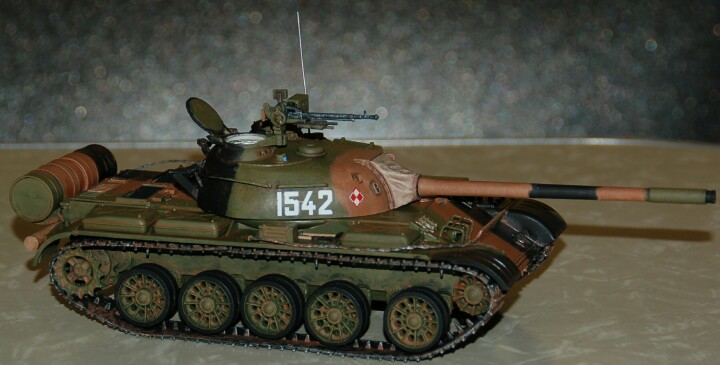
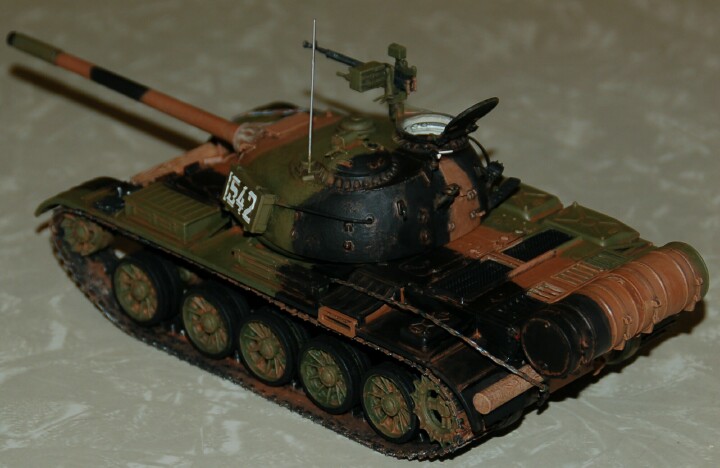
Polish T-55. Trumpeter kit, Built OOB and hand painted and weathered.