Guatemala
Joined: April 12, 2005
KitMaker: 343 posts
Armorama: 223 posts
Posted: Monday, November 08, 2010 - 12:39 PM UTC
Quoted Text
Please take Terry's reviews as they are meant to be, in box reviews for the most part.
Ok!, will do. sometimes we get carried away and forgot that this is a distraction, at least for me it is. maybe we are getting quite serious here. So, take it easy everyone, but a Tiger I is not a Pz.Kpfw.IV

Regards
Byron
If you are not part of the solution, Don't be a part of the problem.
Ontario, Canada
Joined: May 18, 2010
KitMaker: 219 posts
Armorama: 213 posts
Posted: Monday, November 08, 2010 - 12:59 PM UTC
Just jumped in to the action. Wow! The quality of builds is impressive. I did an old Tamiya kit awhile back and got near the end finish, but stopped because the eyes were giving me trouble. So if no one minds, I'll continue finishing the kit as part of this campaign. So Onward and upward... now I have to finish that little beastie!

Dying is easy... comedy is hard! Scale modeling? Well that's another story altogether.
"War is a series of catastrophes that results in a victory." ~ Georges Clemenceau

#136
Distrito Federal, Mexico
Joined: April 06, 2002
KitMaker: 437 posts
Armorama: 391 posts
Posted: Monday, November 08, 2010 - 06:47 PM UTC

Friends Byron and Jesper, thanks for your kind comments!
Here more pics!
Working the parts of gun, interiors and exteriors of turret.


Regards,
Rodolfo
Current Project:
I am building a Kingtiger Ausf. B, Version: March 1945 - AMMO/MIG, 1/35

#136
Distrito Federal, Mexico
Joined: April 06, 2002
KitMaker: 437 posts
Armorama: 391 posts
Posted: Monday, November 08, 2010 - 06:51 PM UTC

Hello friends:
More pics!
I drilled the superior plate of the turret for adding screws and rivets.

I drilled the hinges and now the door can be open and closed.


Regards,
Rodolfo
Current Project:
I am building a Kingtiger Ausf. B, Version: March 1945 - AMMO/MIG, 1/35
Texas, United States
Joined: February 22, 2008
KitMaker: 5,026 posts
Armorama: 1,604 posts
Posted: Monday, November 08, 2010 - 07:08 PM UTC
Rodolfo, nice construciton you have there. Cant wait to see the finished build.
Bob
If it aint broke dont fix it.
South Australia, Australia
Joined: August 14, 2007
KitMaker: 5,926 posts
Armorama: 712 posts
Posted: Monday, November 08, 2010 - 08:10 PM UTC
I got to thinking today that I could enter my Bergepanzer IV in this build rather than the troublesome Tristar Ausf.B if this Campaign finished before the Military Engineering Campaign.. But, you guessed it, they both finish on the same day!!

Here are some shots of the finished Bergepanzer and I will make a decision before Dec 31..

You may be right, I may be crazy.
Uusimaa, Finland
Joined: March 30, 2004
KitMaker: 2,845 posts
Armorama: 808 posts
Posted: Thursday, November 11, 2010 - 09:46 AM UTC
I had been lazing around with my entry for a while but figured out that I have to pick up the pace if I'm to get it done before the deadline.
While the RB Model gun barrel did come with a small PE fret, I couldn't figure out the purpose of the two tiny rectangular shaped parts. Muzzle brake attachments perhaps? They didn't look quite like the real thing so I replaced them with thin styrene sheet and a squash-moulded bolt.

The exhaust assembly done, sans the dents and mr. surfacer treatment that will go on before painting. I replaced the actual exhaust pipe with a piece of tubing from a ferrule component.

I also got started with the zimmerit coating, my first ever. Regular grade milliput, pattern done with a screwdriver. What do you think?


#136
Distrito Federal, Mexico
Joined: April 06, 2002
KitMaker: 437 posts
Armorama: 391 posts
Posted: Thursday, November 11, 2010 - 02:35 PM UTC
Quoted Text
Rodolfo, nice construciton you have there. Cant wait to see the finished build.
Bob

Thanks for your kind comments friend!
Here are more pics
I removed the "L's" of the hoop because they are in position wrong (out) the position correct is (within ). I added PE with screws within the hoop.

I changed the handles of control of the box of the electrycally-powered ventilation in the turret roof, now they are more thin

Regards,
Rodolfo
Current Project:
I am building a Kingtiger Ausf. B, Version: March 1945 - AMMO/MIG, 1/35
Texas, United States
Joined: February 22, 2008
KitMaker: 5,026 posts
Armorama: 1,604 posts
Posted: Thursday, November 11, 2010 - 03:05 PM UTC
Rodolfo, very nice work there but how do you facilitate such a small assembly. My hands are too big for such small work.
Bob
If it aint broke dont fix it.
South Australia, Australia
Joined: August 14, 2007
KitMaker: 5,926 posts
Armorama: 712 posts
Posted: Thursday, November 11, 2010 - 09:59 PM UTC
My Ausf.B learned to fly today! Yes, it is not only the Russians that had a flying tank. It soared beautifully until it hit the wall on the other side of the room.. It is very much unlike me to do something like that but I had reached my breaking point with the impossible tracks.. They hang together just long enough until you are about to put them in place then they fall into 96 pieces... This happened four times no matter how careful I was.. Then I snapped and the tank flew.
Not much damage to the tank amazingly, but I have misplaced one of the road wheels... And I finally got the tracks on.. and they will never be mentioned again...
You may be right, I may be crazy.
New York, United States
Joined: March 08, 2010
KitMaker: 3,662 posts
Armorama: 3,078 posts
Posted: Friday, November 12, 2010 - 01:39 AM UTC
Warreni,
Please remind us what type of kit that was so I don't buy 1

Active Campaigns on the bench:
Operation Fall Gelb - Pz.Kpfw. IV Ausf. C
Engineering the Future - M-26 Recovery Vehicle
115 Campaigns completed
Texas, United States
Joined: February 22, 2008
KitMaker: 5,026 posts
Armorama: 1,604 posts
Posted: Friday, November 12, 2010 - 05:23 AM UTC
My personal opinion ( for what it is worth ) a little challange is nice every once and a while, dont shoot me now. Sal I think Warren stated that the kit was a Tristar.
Bob
If it aint broke dont fix it.
South Australia, Australia
Joined: August 14, 2007
KitMaker: 5,926 posts
Armorama: 712 posts
Posted: Friday, November 12, 2010 - 05:31 AM UTC
Hi Sal.
It is the Tristar 1/35 Panzer IV Ausf.B. I have a feeling that Tristar may have dropped the ball with this one. If you treat the tracks like Magic Tracks or individual links, rather than fully moveable as Tristar state, then I suppose they would be OK. This in no Tamigawa shake n bake kit, and I think it is the only game in town if you want an Ausf.B. The other problem with the tracks is that each and every link has flash so needs clean up.. With at least 86 links per side that becomes very tired very fast.
I like challenges as well Bob, but this is not the sort of challenge I like. You pay extra for Tristar stuff yet the quality just isn't up there compared to a Dragon kit, which you pay less for.
I have three more Tristar Pz IVs in the stash and I will look a them today to see if they have the same problems with flash etc.
You may be right, I may be crazy.
Removed by original poster on 11/12/10 - 22:38:06 (GMT).
Removed by original poster on 11/12/10 - 22:39:01 (GMT).
Removed by original poster on 11/12/10 - 22:41:24 (GMT).

#136
Distrito Federal, Mexico
Joined: April 06, 2002
KitMaker: 437 posts
Armorama: 391 posts
Posted: Friday, November 12, 2010 - 12:42 PM UTC
Quoted Text
Rodolfo, very nice work there but how do you facilitate such a small assembly. My hands are too big for such small work.
Bob

Thanks friend!. I am using 4 Magnifier, 4 types of tweezers and some times "Micro Stix" for hold and place small parts and many patience.
More pics!.
More drilling in order to open and close the hatches. Handles of PE has been added into the hatches (one was removed and added again).


Regards,
Rodolfo
Current Project:
I am building a Kingtiger Ausf. B, Version: March 1945 - AMMO/MIG, 1/35
Guatemala
Joined: April 12, 2005
KitMaker: 343 posts
Armorama: 223 posts
Posted: Saturday, November 13, 2010 - 11:22 AM UTC
Quoted Text
 Thanks friend!. I am using 4 Magnifier, 4 types of tweezers and some times "Micro Stix" for hold and place small parts and many patience.
Rodolfo
I think we would have to change your name to Rodolfo "Scissors hands"

Happy Modeling
Byron

If you are not part of the solution, Don't be a part of the problem.
Removed by original poster on 11/13/10 - 23:39:46 (GMT).
Texas, United States
Joined: February 22, 2008
KitMaker: 5,026 posts
Armorama: 1,604 posts
Posted: Saturday, November 13, 2010 - 11:41 AM UTC
@ Byron: or least spiderman with the multiple tools Rodolfo uses at one time

my main problems with minute parts is 1. the application of glue, 2. holding it in place, and then letting go.
@ Rodolfo, I applaud your talents.
Bob
If it aint broke dont fix it.
Ontario, Canada
Joined: May 18, 2010
KitMaker: 219 posts
Armorama: 213 posts
Posted: Saturday, November 13, 2010 - 11:52 AM UTC
Dying is easy... comedy is hard! Scale modeling? Well that's another story altogether.
"War is a series of catastrophes that results in a victory." ~ Georges Clemenceau
Removed by original poster on 11/14/10 - 00:01:13 (GMT).
Ontario, Canada
Joined: May 18, 2010
KitMaker: 219 posts
Armorama: 213 posts
Posted: Saturday, November 13, 2010 - 11:56 AM UTC
I use a toothpick with bluetack on the end. It's not perfect but I am able to get PE and small parts to stay put... most of the time.

Quoted Text
@ Byron: or least spiderman with the multiple tools Rodolfo uses at one time  my main problems with minute parts is 1. the application of glue, 2. holding it in place, and then letting go.
@ Rodolfo, I applaud your talents.
Bob
Dying is easy... comedy is hard! Scale modeling? Well that's another story altogether.
"War is a series of catastrophes that results in a victory." ~ Georges Clemenceau
Texas, United States
Joined: February 22, 2008
KitMaker: 5,026 posts
Armorama: 1,604 posts
Posted: Saturday, November 13, 2010 - 12:05 PM UTC
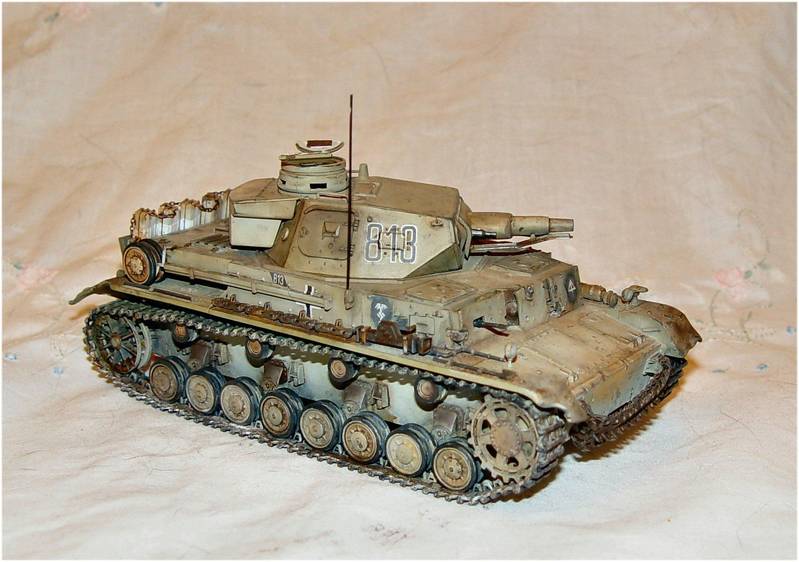
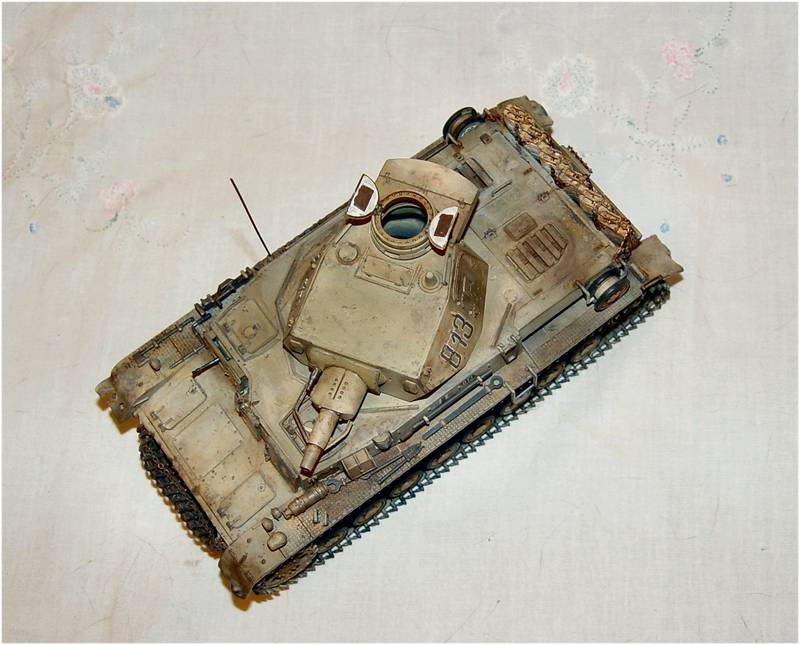
I have put my base coat on this Ausf.D to see what it looks like, next.
1. touch up.
2. wash.
3. mud.
4. filter.
5. pin wash.
6. and maybe it will look like a tank.
7. how do you spray future on, I have tried in the past and I alwasys get an orange peel effect.


Bob
If it aint broke dont fix it.
Ontario, Canada
Joined: May 18, 2010
KitMaker: 219 posts
Armorama: 213 posts
Posted: Saturday, November 13, 2010 - 12:14 PM UTC
Bob,
Are your smoke canisters on the back reversed, or is it my stupid vision?
Peter
Quoted Text
I have put my base coat on this Ausf.D to see what it looks like, next.
1. touch up.
2. wash.
3. mud.
4. filter.
5. pin wash.
6. and maybe it will look like a tank.
7. how do you spray future on, I have tried in the past and I alwasys get an orange peel effect.
Bob
Dying is easy... comedy is hard! Scale modeling? Well that's another story altogether.
"War is a series of catastrophes that results in a victory." ~ Georges Clemenceau


