Looking good!! Bob, keep it up.
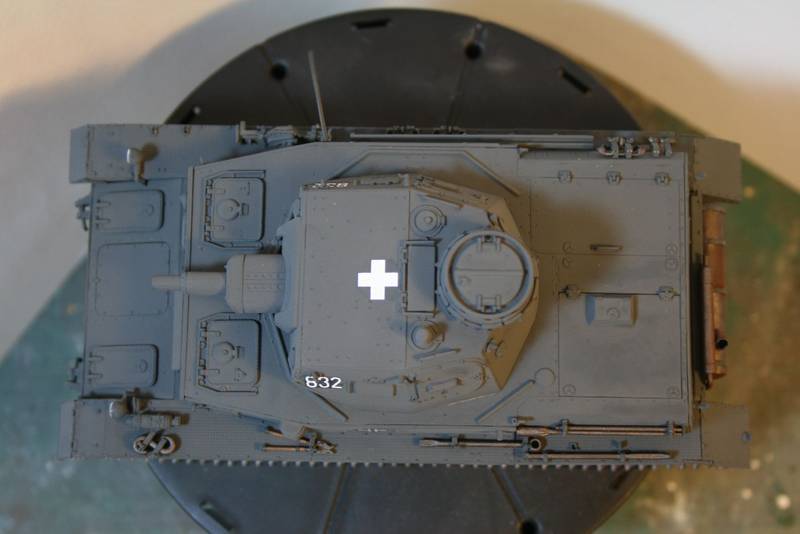
regarding the Future, apply in ligth coats. put just enough in the airbrush for one aplication, let dry on the model, clean the airbrush; and them apply another one, this avoids the orange peel efect and the drop run also.
Happy modeling
Byron
Campaigns
Where Armorama group builds can be discussed, organized, and updates posted.
Where Armorama group builds can be discussed, organized, and updates posted.
Hosted by Darren Baker, Richard S.
The Workhorse: Panzer IV
Ruffus

Joined: April 12, 2005
KitMaker: 343 posts
Armorama: 223 posts

Posted: Saturday, November 13, 2010 - 12:15 PM UTC

Bigrip74

Joined: February 22, 2008
KitMaker: 5,026 posts
Armorama: 1,604 posts

Posted: Saturday, November 13, 2010 - 12:17 PM UTC
[quote] I use a toothpick with bluetack on the end. It's not perfect but I am able to get PE and small parts to stay put... most of the time. [quote]
Pete, that is what I am shooting for (most ot the time) at the moment it is 1/2 of the time, with either ruining the peice or the carpet monster eating that small piece.
Bob
Pete, that is what I am shooting for (most ot the time) at the moment it is 1/2 of the time, with either ruining the peice or the carpet monster eating that small piece.
Bob

Bigrip74

Joined: February 22, 2008
KitMaker: 5,026 posts
Armorama: 1,604 posts

Posted: Saturday, November 13, 2010 - 12:21 PM UTC
[quote] Are your smoke canisters on the back reversed, or is it my stupid vision? [quote]
Thats what I get for following the insructions without my glasses8) Ok Pete when are you coming over to correct this for me, at the moment I have gray paint all over my hands I will try to pull it off a reset.
Bob
Thats what I get for following the insructions without my glasses8) Ok Pete when are you coming over to correct this for me, at the moment I have gray paint all over my hands
 I will try to pull it off a reset.
Bob

PadrePete

Joined: May 18, 2010
KitMaker: 219 posts
Armorama: 213 posts

Posted: Saturday, November 13, 2010 - 12:26 PM UTC
[quote][quote] I use a toothpick with bluetack on the end. It's not perfect but I am able to get PE and small parts to stay put... most of the time.
I find that the greater magnification (what ever your eyes can tolerate) made my movements very delicate. Also secure the model; don't hold the model AND apply something the rug might nibble on. I also use Chinese toothpicks, they're bamboo and have a sharp end and a flat end.
I find now with all the kits getting into finer and finer detail that whoever builds their photo examples must either have nerves of steal or be tentacle-endowed.
Quoted Text
Pete, that is what I am shooting for (most ot the time) at the moment it is 1/2 of the time, with either ruining the peice or the carpet monster eating that small piece.
Bob
I find that the greater magnification (what ever your eyes can tolerate) made my movements very delicate. Also secure the model; don't hold the model AND apply something the rug might nibble on. I also use Chinese toothpicks, they're bamboo and have a sharp end and a flat end.
I find now with all the kits getting into finer and finer detail that whoever builds their photo examples must either have nerves of steal or be tentacle-endowed.


PadrePete

Joined: May 18, 2010
KitMaker: 219 posts
Armorama: 213 posts

Posted: Saturday, November 13, 2010 - 12:29 PM UTC
[quote][quote] Are your smoke canisters on the back reversed, or is it my stupid vision?
I warn you Bob, I have a two drink minimum before tackling a part removal. Sometimes it's easier to doctor a picture and claim it was a field mod!
Pete


Quoted Text
Thats what I get for following the insructions without my glasses8) Ok Pete when are you coming over to correct this for me, at the moment I have gray paint all over my handsI will try to pull it off a reset.
Bob
I warn you Bob, I have a two drink minimum before tackling a part removal. Sometimes it's easier to doctor a picture and claim it was a field mod!
Pete


Bigrip74

Joined: February 22, 2008
KitMaker: 5,026 posts
Armorama: 1,604 posts

Posted: Saturday, November 13, 2010 - 01:01 PM UTC
Ok! Pete, I repositioned the smoke cannisters on correctly with no problems (that was a first) now I can hide the minor seam with some paint.
Bob
Bob

warreni

Joined: August 14, 2007
KitMaker: 5,926 posts
Armorama: 712 posts

Posted: Saturday, November 13, 2010 - 02:30 PM UTC
From the tank that tried to fly to the finished tank. Just finished the decals and they are taking ages to dry due to the high humidity at the moment so please excuse the wet looking paint around the decals. Speaking of which they were easily the highlight of the kit. Cartograf always seem to do good decals.
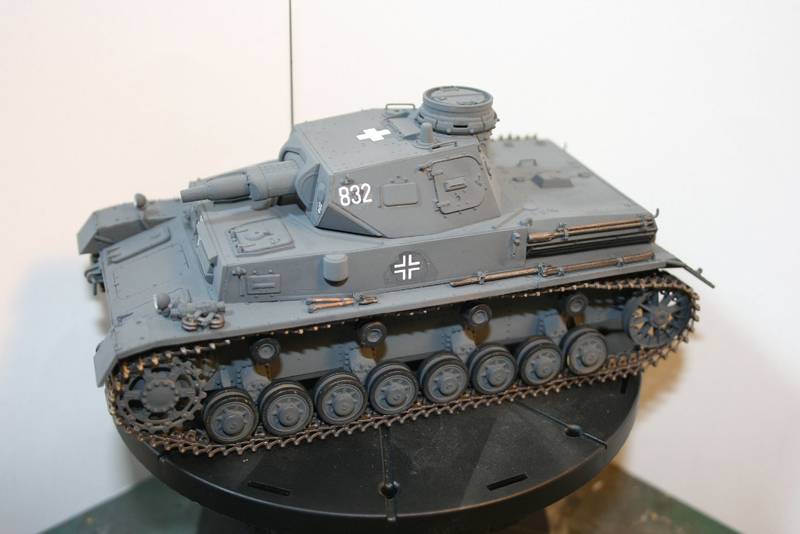
The model was lucky I didn't just put it in the box and leave it for another decade or so to finish it.. I have only put very light weathering on the track area as I figure at the start of the French campaign these tanks would have been mainly on paved roads anyway Please don't ask me to substantiate that, it is just the premise I worked on.
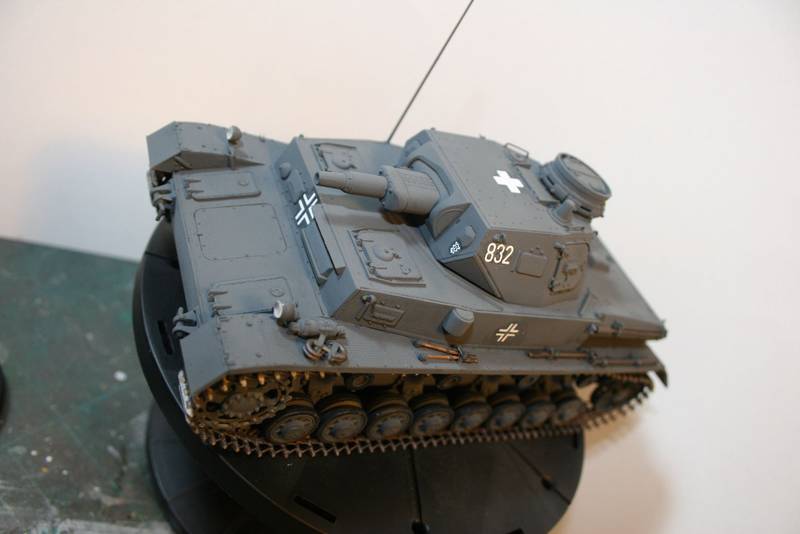
The other premise is that I have never seen any photos of tanks with a full set of tools, unless they are straight out of the factory. I figure that people would steal the most useful tools on the tank, so I left off the shovel and a crowbar. .
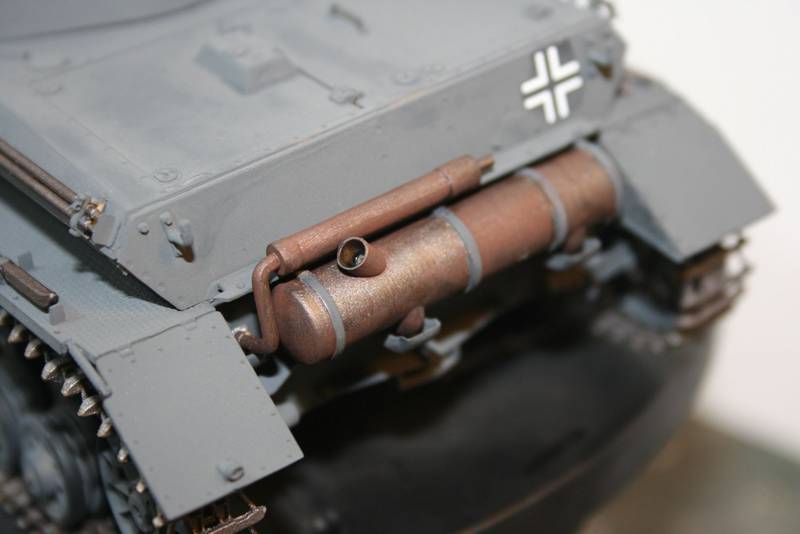
I used MIG Pigments for the two exhausts. I love these pigments and they work great on flat paint with no liquid needed.
I could not recommend this model to anyone who did not like a huge challenge. Fit is not good for most parts and there is more flash than Mr Gordon ever had, especially with the individual links of the tracks, each of which needed a good clean up.. and there are 196 of them...
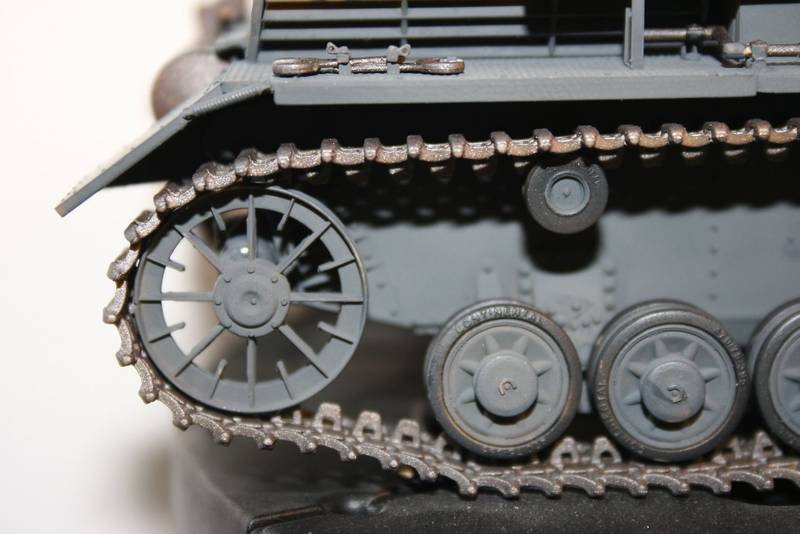
Tracks in relatively good condition for the early part of the French Campaign.
Still, this is the only way to get an Ausf.B Panzer IV, that I can recall..
I will inspect the other Tristar kits of the PzKfz IV I have and see if they suffer from the same problems.
Paint has the flat, chalky look I was after. Has had a wash since arriving from Poland but has not had the time to get filthy yet.

The model was lucky I didn't just put it in the box and leave it for another decade or so to finish it.. I have only put very light weathering on the track area as I figure at the start of the French campaign these tanks would have been mainly on paved roads anyway Please don't ask me to substantiate that, it is just the premise I worked on.

The other premise is that I have never seen any photos of tanks with a full set of tools, unless they are straight out of the factory. I figure that people would steal the most useful tools on the tank, so I left off the shovel and a crowbar. .


I used MIG Pigments for the two exhausts. I love these pigments and they work great on flat paint with no liquid needed.
I could not recommend this model to anyone who did not like a huge challenge. Fit is not good for most parts and there is more flash than Mr Gordon ever had, especially with the individual links of the tracks, each of which needed a good clean up.. and there are 196 of them...

Tracks in relatively good condition for the early part of the French Campaign.
Still, this is the only way to get an Ausf.B Panzer IV, that I can recall..
I will inspect the other Tristar kits of the PzKfz IV I have and see if they suffer from the same problems.

Paint has the flat, chalky look I was after. Has had a wash since arriving from Poland but has not had the time to get filthy yet.

Bigrip74

Joined: February 22, 2008
KitMaker: 5,026 posts
Armorama: 1,604 posts

Posted: Sunday, November 14, 2010 - 05:42 AM UTC
Warren, I will use the photo of that amazing looking muffler to help me with mine. Looking good can not wait to see the finish/weathered job.
Bob
Bob

warreni

Joined: August 14, 2007
KitMaker: 5,926 posts
Armorama: 712 posts

Posted: Sunday, November 14, 2010 - 07:09 AM UTC
Thanks heaps Bob. All I did was paint it with Gunze Sangyo Acrylic #76 first, then rubbed it with the Mig Pigment Track Red with a relatively stiff brush. Just be careful when using dry pigments that they don't go all over the place as they stain whatever they touch..  I usually do mine over a piece of plastic used to hold a sprue then chuck it out straight away.
 I usually do mine over a piece of plastic used to hold a sprue then chuck it out straight away.
ltb073

Joined: March 08, 2010
KitMaker: 3,662 posts
Armorama: 3,078 posts

Posted: Sunday, November 14, 2010 - 02:30 PM UTC
Warren,
For a flying tank it turned out pretty good and the tracks look great. I'm glad you stuck it out and didn't let it beat you. Looking forward to seeing the finished product but i will stay away from Tri Star kits

For a flying tank it turned out pretty good and the tracks look great. I'm glad you stuck it out and didn't let it beat you. Looking forward to seeing the finished product but i will stay away from Tri Star kits


Bigrip74

Joined: February 22, 2008
KitMaker: 5,026 posts
Armorama: 1,604 posts

Posted: Sunday, November 14, 2010 - 02:50 PM UTC
At the moment I am brushing on the future since I still do not do a good with applying it using the airbrush. FUN!
Bob
Bob

Bigrip74

Joined: February 22, 2008
KitMaker: 5,026 posts
Armorama: 1,604 posts

Posted: Sunday, November 14, 2010 - 04:49 PM UTC

PadrePete

Joined: May 18, 2010
KitMaker: 219 posts
Armorama: 213 posts

Posted: Sunday, November 14, 2010 - 05:21 PM UTC
Okay. Here is my finished product. I use AIM powders exclusively to get this effect. I am able to manipulate the pigments easily, and I wanted that 'almost run out' look on my Panzer. I took it from a book on Rommel. Hope you like it.


Hope you like it.
Hope you like it.
ltb073

Joined: March 08, 2010
KitMaker: 3,662 posts
Armorama: 3,078 posts

Posted: Sunday, November 14, 2010 - 11:07 PM UTC
Nice Job Pete, It looks great, I like it a lot 
@ Bob Nice progress there.
@ Rodolfo, Your builds are amazing looking forward to see this 1 finished


@ Bob Nice progress there.
@ Rodolfo, Your builds are amazing looking forward to see this 1 finished


Posted: Monday, November 15, 2010 - 11:19 AM UTC
You bunch of modeling monsters! There are way to many outstanding builds going on here. With all of the comical comments going back and forth in the postings you guys are killing me! 
The deadline date to complete your builds is coming around real soon and I don't believe that I will be done with my project, nor do I want to rush it. After seeing quite a few outstanding builds here with the old Tamiya Panzer IV Ausf. D, and having this kit in the pile, I am going to go ahead and put it together. I should be able to have it completed before the deadline date. What really did it for me was Peter Wood's rendition - very impressive! I know I'll be rushing it but I hope that it will turn out at least as close to nice as some of the other Tamiya D's here?
I will still go ahead and complete my original build but it may be way after the deadline date.
Ok, it off to the modeling bench.
-Eddy

The deadline date to complete your builds is coming around real soon and I don't believe that I will be done with my project, nor do I want to rush it.
 After seeing quite a few outstanding builds here with the old Tamiya Panzer IV Ausf. D, and having this kit in the pile, I am going to go ahead and put it together. I should be able to have it completed before the deadline date. What really did it for me was Peter Wood's rendition - very impressive! I know I'll be rushing it but I hope that it will turn out at least as close to nice as some of the other Tamiya D's here?
 I will still go ahead and complete my original build but it may be way after the deadline date.
Ok, it off to the modeling bench.
-Eddy


Bigrip74

Joined: February 22, 2008
KitMaker: 5,026 posts
Armorama: 1,604 posts

Posted: Monday, November 15, 2010 - 02:08 PM UTC
@ Eddy: just looked at your build log. You are building a real tank correct?  it looks fantastic. (BTW) the Tamiya Mk IV was so easy and fast to build it was over in one afternoon, the painting is taking me the longest.
Bob
 it looks fantastic. (BTW) the Tamiya Mk IV was so easy and fast to build it was over in one afternoon, the painting is taking me the longest.
Bob
Ruffus

Joined: April 12, 2005
KitMaker: 343 posts
Armorama: 223 posts

Posted: Monday, November 15, 2010 - 02:20 PM UTC
Peter, You really did a good job there!! I specially like the last photo. Congratulations!! and don't forget to post in the gallery.
Happy Modeling
Byron
Happy Modeling
Byron
Posted: Monday, November 15, 2010 - 08:11 PM UTC
Looks great, Peter. The finish is very nice.
Thanks for participating.
Thanks for participating.


Bigrip74

Joined: February 22, 2008
KitMaker: 5,026 posts
Armorama: 1,604 posts

Posted: Tuesday, November 16, 2010 - 07:22 AM UTC

Bigrip74

Joined: February 22, 2008
KitMaker: 5,026 posts
Armorama: 1,604 posts

Posted: Tuesday, November 16, 2010 - 06:19 PM UTC

Tojo72

Joined: June 06, 2006
KitMaker: 4,691 posts
Armorama: 3,509 posts

Posted: Wednesday, November 17, 2010 - 12:58 AM UTC
Hi Robert your mud looks good,I hope you weren't worried about the color of the rubber on those bogies  I kinda think your mud is going to cover them up.
 I kinda think your mud is going to cover them up.
Bigrip74

Joined: February 22, 2008
KitMaker: 5,026 posts
Armorama: 1,604 posts

Posted: Wednesday, November 17, 2010 - 06:15 AM UTC
Anthony, it would still be nice to know the correct color for those bogies even after I plaster them with MUD 
Bob

Bob

PadrePete

Joined: May 18, 2010
KitMaker: 219 posts
Armorama: 213 posts

Posted: Wednesday, November 17, 2010 - 09:43 AM UTC
Thanks for the kind words. What gallery do I load them into? 

Ruffus

Joined: April 12, 2005
KitMaker: 343 posts
Armorama: 223 posts

Posted: Wednesday, November 17, 2010 - 10:15 AM UTC
Quoted Text
Thanks for the kind words. What gallery do I load them into?
You can load them here http://gallery.kitmaker.net/showgallery.php/cat/25743/page/1
Regards
Byron

PadrePete

Joined: May 18, 2010
KitMaker: 219 posts
Armorama: 213 posts

Posted: Wednesday, November 17, 2010 - 10:48 AM UTC
Quoted Text
Quoted TextThanks for the kind words. What gallery do I load them into?
You can load them here http://gallery.kitmaker.net/showgallery.php/cat/25743/page/1
Regards
Byron
Thanks Byron!
 |


