Question... I'd like to enlist in the campaign, but I just want to make sure I qualify.
I'm building Tamiya's Panzer II Polish Campaign. However, rather than the 1/3rd dark brown, 2/3rd panzer grey scheme, since I don't have an airbrush yet, I'm doing a straight panzer grey scheme.
Is that "historically accurate enough"?
Campaigns
Where Armorama group builds can be discussed, organized, and updates posted.
Where Armorama group builds can be discussed, organized, and updates posted.
Hosted by Darren Baker, Richard S.
Axis of Armor
pseudorealityx

Joined: January 31, 2010
KitMaker: 2,191 posts
Armorama: 1,814 posts

Posted: Tuesday, February 23, 2010 - 09:55 AM UTC
casualmodeler

Joined: February 04, 2009
KitMaker: 702 posts
Armorama: 665 posts

Posted: Wednesday, February 24, 2010 - 01:25 AM UTC
Quoted Text
Question... I'd like to enlist in the campaign, but I just want to make sure I qualify.
I'm building Tamiya's Panzer II Polish Campaign. However, rather than the 1/3rd dark brown, 2/3rd panzer grey scheme, since I don't have an airbrush yet, I'm doing a straight panzer grey scheme.
Is that "historically accurate enough"?
IMO it should but it´s Matt who makes final decision...
Posted: Wednesday, February 24, 2010 - 02:56 AM UTC
Hey, Matt,
Just saw this Campaign and had to enlist! I'm building Italeri's old Puma and the 234/1 for my club's annual display theme (armoured cars this year) and figured they'd fit right in. As I've only just cracked open the Puma I'll post some progress shots soon.
Tom
Just saw this Campaign and had to enlist! I'm building Italeri's old Puma and the 234/1 for my club's annual display theme (armoured cars this year) and figured they'd fit right in. As I've only just cracked open the Puma I'll post some progress shots soon.
Tom

retiredyank

Joined: June 29, 2009
KitMaker: 11,610 posts
Armorama: 7,843 posts

Posted: Wednesday, February 24, 2010 - 11:26 PM UTC
That should be accurate enough. I believe that the vehicles in that theater were grey. Camoflage was not prevelant till later in the war. Looking forward to your build.
Matt N.
Matt N.
Quoted Text
Question... I'd like to enlist in the campaign, but I just want to make sure I qualify.
I'm building Tamiya's Panzer II Polish Campaign. However, rather than the 1/3rd dark brown, 2/3rd panzer grey scheme, since I don't have an airbrush yet, I'm doing a straight panzer grey scheme.
Is that "historically accurate enough"?
Posted: Friday, February 26, 2010 - 02:10 AM UTC
A little more progress on the Pz. IV for this campaign. A lot of nice details in the Dragon kit and enough parts to make both the ausf. F2, G, and H from this kit.
More to follow....

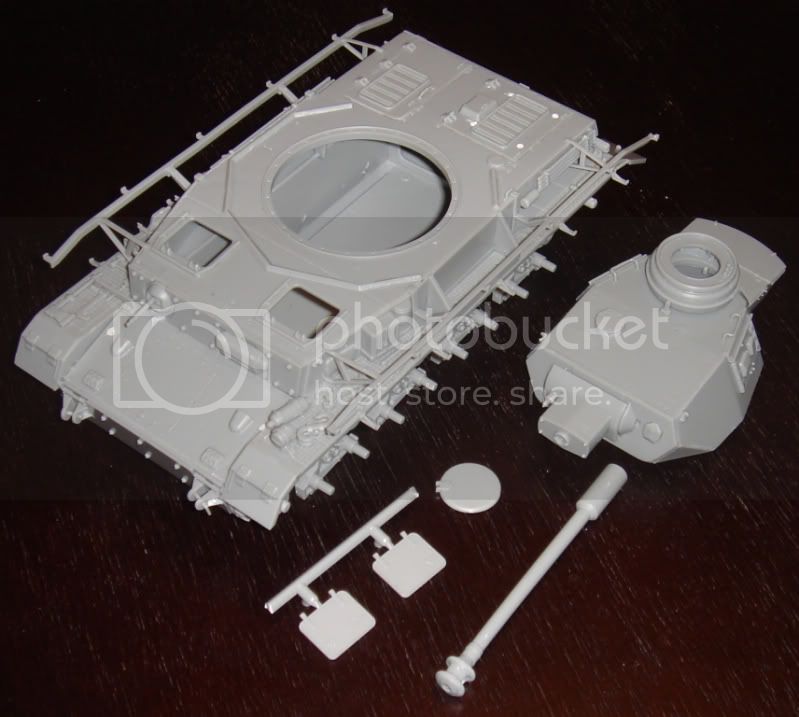
More to follow....


Posted: Friday, February 26, 2010 - 05:39 AM UTC
Already some nice builds are popping up! My enforced rest (leg in a cast) has given me time to knock together the Italeri Puma in a few days. It will be weeks before I can get to the airbrush, but the basic build is done!


It may not be as well-detailed as the newer Dragon kit (especially the suspension arms, and the interior) but with a little effort it turns out pretty well. I've got another one to build (the 234/1) but painting them will wait til April, when I hope to lose the cast.
Tom


It may not be as well-detailed as the newer Dragon kit (especially the suspension arms, and the interior) but with a little effort it turns out pretty well. I've got another one to build (the 234/1) but painting them will wait til April, when I hope to lose the cast.
Tom
Posted: Sunday, February 28, 2010 - 08:39 PM UTC
Hmmm seems the campaign's off to a busy start. I'll be putting up the Tamiya Jagdpanzer 38T. Seems to be a very straightforward build. If I can muster enough confidence, I will give the disc camo scheme a try.
Tom, nice to see you in the campaign as well. All the best to your build.
Cheers,
Tat
Tom, nice to see you in the campaign as well. All the best to your build.
Cheers,
Tat
shadowx

Joined: June 13, 2009
KitMaker: 8 posts
Armorama: 5 posts

Posted: Wednesday, March 03, 2010 - 03:54 PM UTC
I will join right now im working on a academy exterior tiger 1,i might get some things off of ebay to perfect it. 

JMartine

Joined: October 18, 2007
KitMaker: 1,698 posts
Armorama: 45 posts

Posted: Sunday, March 07, 2010 - 09:00 AM UTC
Roman - Interesting subject, look forward to your build.
Jesper – nice start!
Tom – Bummer about your leg..can’t use fast acting CA on broken bones! Nice start in your Puma; I also have the old Italieri, saving your pics as future reference to “dress up” my old kit when I finally build it.
Jesper – nice start!
Tom – Bummer about your leg..can’t use fast acting CA on broken bones!
 Nice start in your Puma; I also have the old Italieri, saving your pics as future reference to “dress up” my old kit when I finally build it.
SIERRA

Joined: September 29, 2009
KitMaker: 40 posts
Armorama: 39 posts

Posted: Wednesday, March 10, 2010 - 10:13 PM UTC
Quoted Text
Bienvenido Silfredo, welcome to the campaigns, Your English is good, dont worry about it; if you ever get "stuck", ask me for a translation. Look forward to your build, cheers
Thank you very much James. I appreciate very much your offert.
Posted: Thursday, March 11, 2010 - 12:12 AM UTC
Quoted Text
saving your pics as future reference to “dress up” my old kit when I finally build it.
James, If I did it again the main difference would be much finer wire from the smoke grenades...
Note that the jerry cans are terrible, and lack the correct mounting brackets. The picture I am following (of turret number 415, as seen in books & the web) doesn't have the cans or brackets on the front, so I only needed to sort out the two at the rear. Best to start with decent cans from the Italeri or Tamiya AM sets and scratch-build brackets...
When I post the 234/1 I'll describe how to "turn" the suspension.
Tom
pseudorealityx

Joined: January 31, 2010
KitMaker: 2,191 posts
Armorama: 1,814 posts

Posted: Thursday, March 11, 2010 - 02:39 AM UTC
Uploaded my Panzer II to the Campaign section of the kitmaker gallery. 

davehd

Joined: October 05, 2009
KitMaker: 10 posts
Armorama: 9 posts

Posted: Sunday, March 14, 2010 - 08:37 AM UTC
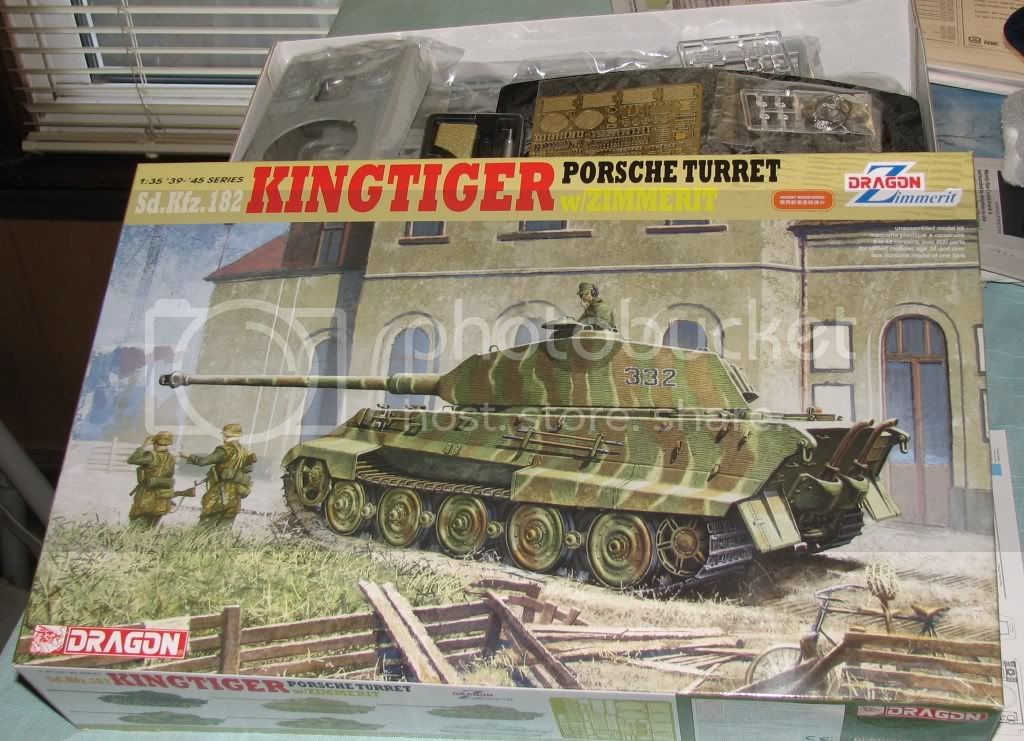
here's what i'm building.Using vallajo panzer aces and vallejo pigments for the first time.

Posted: Sunday, March 14, 2010 - 06:54 PM UTC
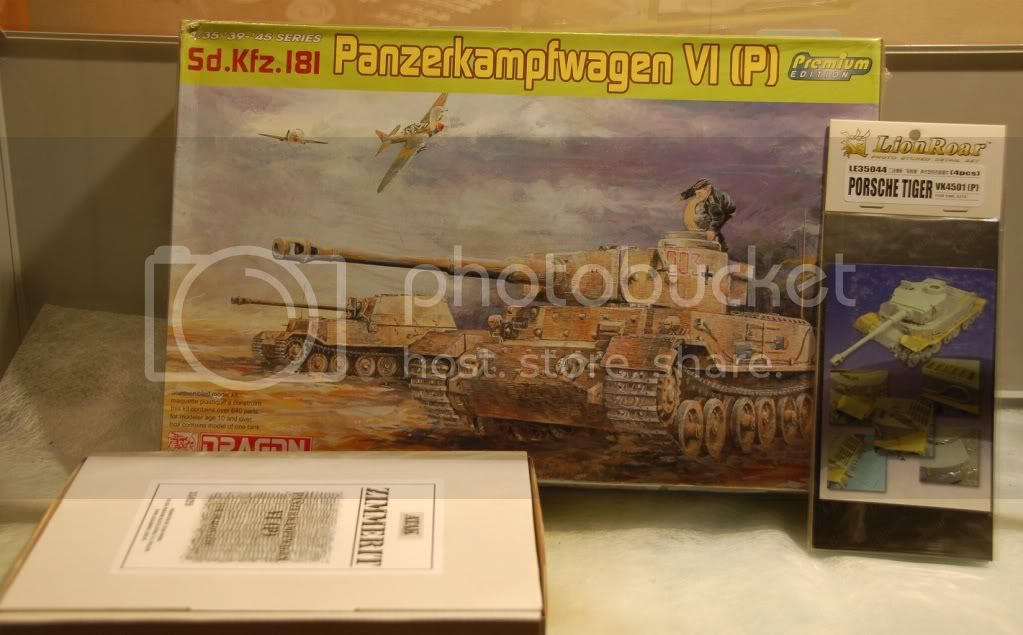
Hopefully this will be the first of a selection of tanks from the 503rd

SIERRA

Joined: September 29, 2009
KitMaker: 40 posts
Armorama: 39 posts

Posted: Thursday, March 18, 2010 - 10:12 PM UTC
Quoted Text
Uploaded my Panzer II to the Campaign section of the kitmaker gallery.
Have you finished yet?
I'm going to have a look


retiredyank

Joined: June 29, 2009
KitMaker: 11,610 posts
Armorama: 7,843 posts

Posted: Friday, March 19, 2010 - 04:35 AM UTC
Back from vacation. Here is my rendition of the Panzer Kampfwagen IV Ausf D:


For the mud, I mixed some acrylic paint with paint thinner. Discovered this after an oopsie


For the mud, I mixed some acrylic paint with paint thinner. Discovered this after an oopsie

ltb073

Joined: March 08, 2010
KitMaker: 3,662 posts
Armorama: 3,078 posts

Posted: Friday, March 19, 2010 - 03:21 PM UTC
tried to post my photos in the gallery today but it didn't work. I get the message that say image successfully uploaded but they don't show up. Anybody know why?

retiredyank

Joined: June 29, 2009
KitMaker: 11,610 posts
Armorama: 7,843 posts

Posted: Saturday, March 20, 2010 - 03:36 AM UTC
Quoted Text
tried to post my photos in the gallery today but it didn't work. I get the message that say image successfully uploaded but they don't show up. Anybody know why?
Not sure why the gallery is not working. I will see if I can fix the problem. In the meantime, just post your pics directly to the thread.
Thanks, Matt N.

Posted: Saturday, March 20, 2010 - 08:33 AM UTC
finished!


Posted: Sunday, March 21, 2010 - 03:47 AM UTC
Hi all,
Got a bit done on the Italeri 234/1 to accompany my Puma build. I've scratched up some interior details from Evergreen & the spares box since these are visible through the turret, but I cannot complete the hull until I paint up the interior. Note the details are not glued in yet - they mount on those white strips on the sides. (Those long white boxes are the sheet-metal covers for the steering linkages.)
Of course, I could have gone with the Dragon kit that has much of this done correctly, but that'd cost money...


I also "turned" the wheels by carefully slicing the hubs free from the suspension arms, bending the axles, and gluing it all together again. The outer axles turn twice as far as the inner ones, and they all turn together regardless of which driver's position is in use. I added brake lines too, but when the wheels go on they are almost invisible...


More to come...
Tom
PS: Matan, great work on that mkIV!
Got a bit done on the Italeri 234/1 to accompany my Puma build. I've scratched up some interior details from Evergreen & the spares box since these are visible through the turret, but I cannot complete the hull until I paint up the interior. Note the details are not glued in yet - they mount on those white strips on the sides. (Those long white boxes are the sheet-metal covers for the steering linkages.)
Of course, I could have gone with the Dragon kit that has much of this done correctly, but that'd cost money...


I also "turned" the wheels by carefully slicing the hubs free from the suspension arms, bending the axles, and gluing it all together again. The outer axles turn twice as far as the inner ones, and they all turn together regardless of which driver's position is in use. I added brake lines too, but when the wheels go on they are almost invisible...


More to come...
Tom
PS: Matan, great work on that mkIV!
pseudorealityx

Joined: January 31, 2010
KitMaker: 2,191 posts
Armorama: 1,814 posts

Posted: Thursday, March 25, 2010 - 01:53 AM UTC
Quoted Text
Quoted TextUploaded my Panzer II to the Campaign section of the kitmaker gallery.
Have you finished yet?
I'm going to have a look
Yup, done. What did you think?
raivo74

Joined: November 09, 2009
KitMaker: 132 posts
Armorama: 109 posts

Posted: Thursday, March 25, 2010 - 04:46 AM UTC
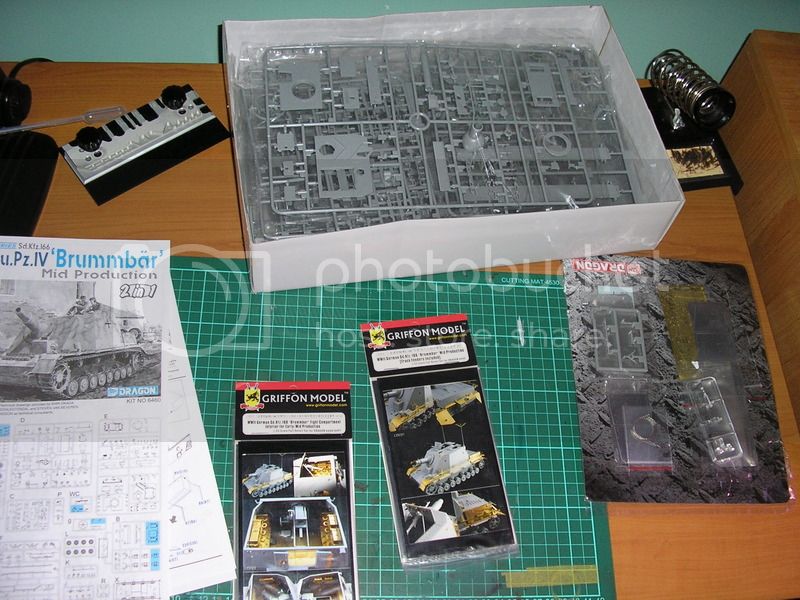
Here comes my input  Dragon Brummbar Mid-Prod, with Griffon PE (exterior+interior), Voyager gun barrel, maybe some AM tracks.


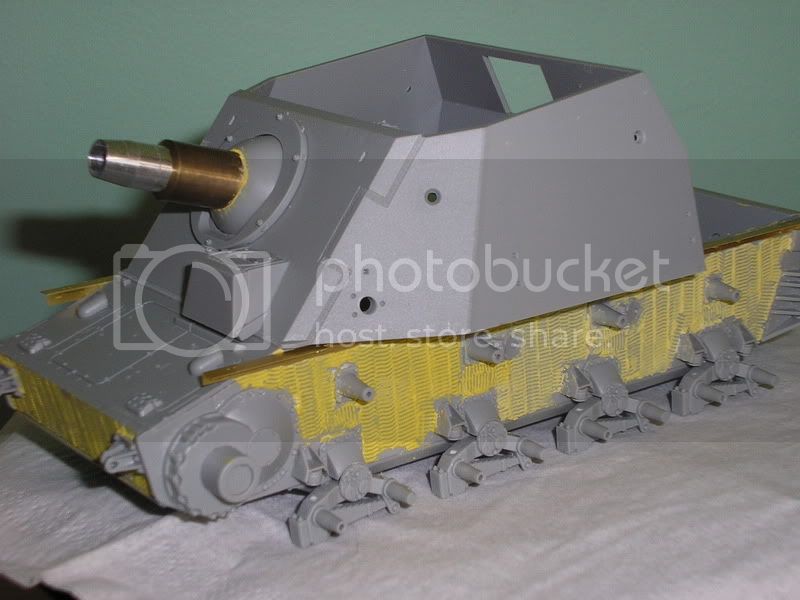
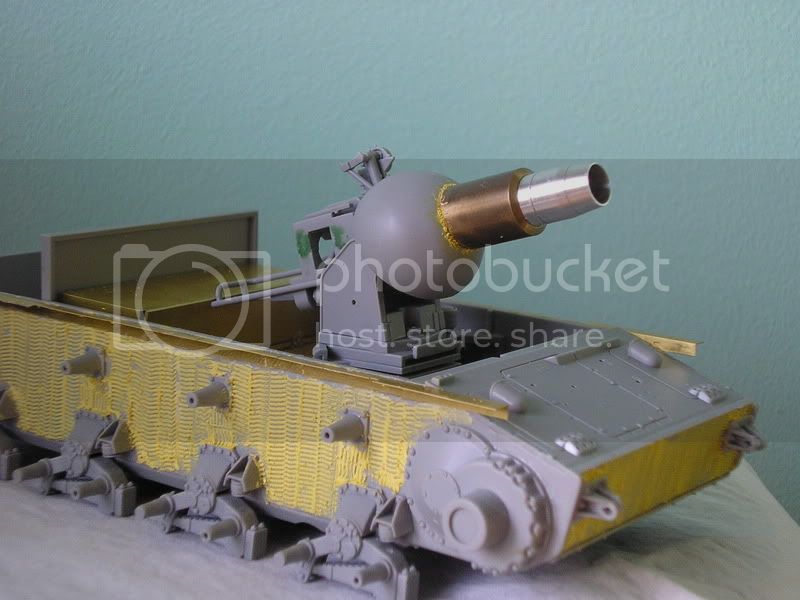
Forced to use original ball-bearing gun mask. Voyager provides resin mask, not suitable for full interior option, though. Cut barrel sleve and widened the opening with motor tool to suit metal sleeve. Also had to widen a bit internal hole for the best fit with gun supports.

Attached metal sleeve to the mask using 5 min epoxy, plastic barrel as guide for correct direction. Then cut the plastic barrel and replaced with metal.

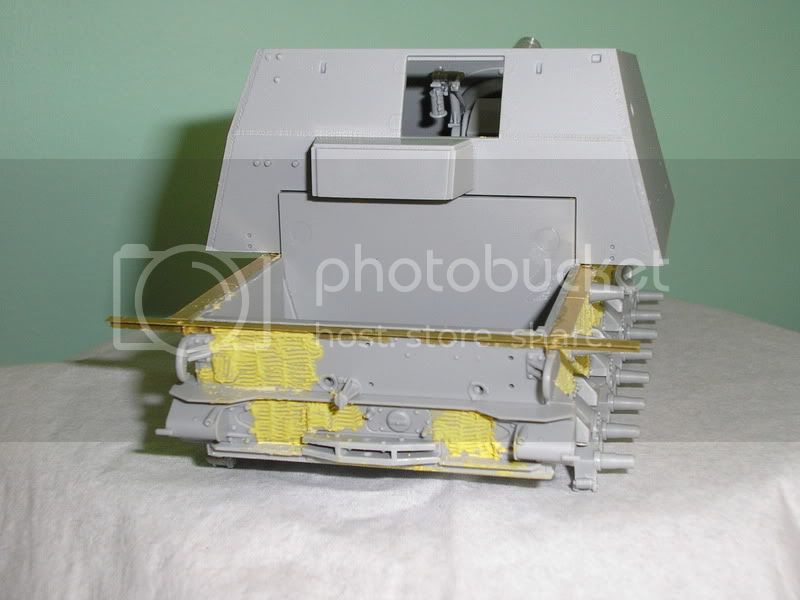
Added some Zimmerit on the lower hull using Tamiya tool & Tamiya polyesther putty. The result is average ant I will probably resort to epoxy putty and screwdriver method for the upper hull. BTW, mayby somebody has good reference pics of Zimmerit layout on transmission upper armor plate for mid-prod Brummbar or Panzer IV of that period? Did they cover all the inspection hatches?

That's for starters
 Dragon Brummbar Mid-Prod, with Griffon PE (exterior+interior), Voyager gun barrel, maybe some AM tracks.


Forced to use original ball-bearing gun mask. Voyager provides resin mask, not suitable for full interior option, though. Cut barrel sleve and widened the opening with motor tool to suit metal sleeve. Also had to widen a bit internal hole for the best fit with gun supports.

Attached metal sleeve to the mask using 5 min epoxy, plastic barrel as guide for correct direction. Then cut the plastic barrel and replaced with metal.

Added some Zimmerit on the lower hull using Tamiya tool & Tamiya polyesther putty. The result is average ant I will probably resort to epoxy putty and screwdriver method for the upper hull. BTW, mayby somebody has good reference pics of Zimmerit layout on transmission upper armor plate for mid-prod Brummbar or Panzer IV of that period? Did they cover all the inspection hatches?


That's for starters

Posted: Thursday, March 25, 2010 - 04:56 AM UTC
Quoted Text
Hi all,
PS: Matan, great work on that mkIV!
Thanks!
your puma is coming out real nice too; I like the interior parts you are adding. can't believe it's italeri


Tazoslo

Joined: October 29, 2007
KitMaker: 58 posts
Armorama: 52 posts

Posted: Friday, March 26, 2010 - 08:29 AM UTC
Well its time for me to join to. Its the first build in 16-17 years so I am a bit anxious about how it will turn out and how I will find the experience. Will I still find it fun and exiting or will it just be this one build? who knows... 
I have chosen a kit I found at a 50% closing sale, I just had to buy it because of the price and not as much because of the kit it self. However since I bought it I have become more and more interested in it. It's the Sd.Kfz.265 Kleine Panzerbefehlswagen from Dragon. I will depicted as it was during the invasion of Norway in april 1940. We are just 2 weeks shy of the 60'th "aniversary" of the invasion on the 9th of April, so its kind of fitting;
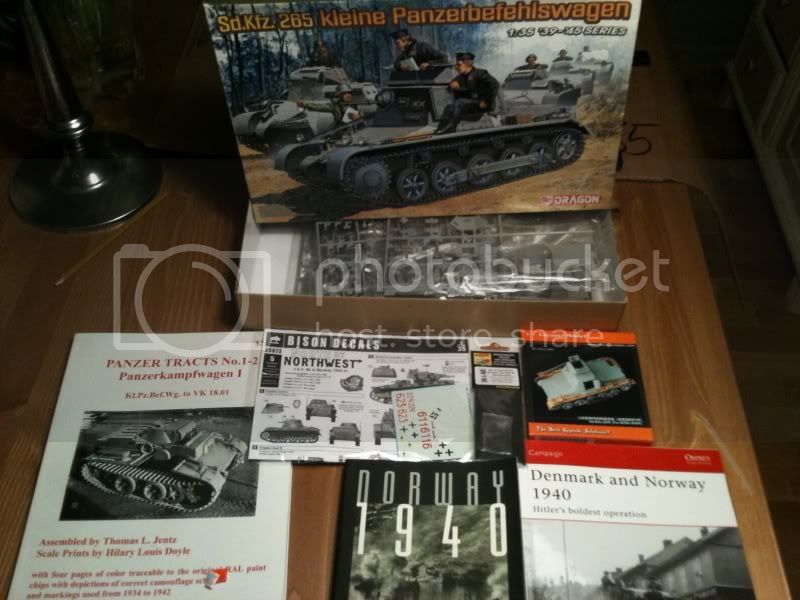
I addition to the kit I will use the following;
- PE upgrad from Voyager
- MG 34 barrels from Aber
- Decals of "z.b.v 40 in Norway 1940" by Bison
- Panzer Tracts no. 1-2 Panzerkampfwagen I
- Two insperational books about the campaign;
By Osprey Publishing; Denmark and Norway 1940 - Hilters boldest operation
By Francois Kersaudy; Norway 1940
As I said I haven't done this for 16-17 years so I am a bit low on tools and supplies. I have been doing some shopping the last days and this is my toolbox at the moment;

Not much, but I guess I don't need more just now. I also got some nailfiles but they have misteriously disapered in our newly moved into house. Must say i am especially pleased about the cutting set, just $6,61 which is hillariously cheap in a high cost country like Norway. The glue in comparison was $8,26. Just one problem at the moment, no paint. I don't want to invest in an airbrush, compressor etc at the moment before I know if will continue to build. Thought I just could pick up some Tamiya aerosols....but it looks like it would be easier to buy a winged pig. Its just impossible to get hold of it. But can't give up!
Well better start cracking, the missis is away for the next 2 days so I got make the best of my free time

PS: The camera has also dissapered during the move so had to use the phone for the pictures...with the expected quality...

I have chosen a kit I found at a 50% closing sale, I just had to buy it because of the price and not as much because of the kit it self. However since I bought it I have become more and more interested in it. It's the Sd.Kfz.265 Kleine Panzerbefehlswagen from Dragon. I will depicted as it was during the invasion of Norway in april 1940. We are just 2 weeks shy of the 60'th "aniversary" of the invasion on the 9th of April, so its kind of fitting;

I addition to the kit I will use the following;
- PE upgrad from Voyager
- MG 34 barrels from Aber
- Decals of "z.b.v 40 in Norway 1940" by Bison
- Panzer Tracts no. 1-2 Panzerkampfwagen I
- Two insperational books about the campaign;
By Osprey Publishing; Denmark and Norway 1940 - Hilters boldest operation
By Francois Kersaudy; Norway 1940
As I said I haven't done this for 16-17 years so I am a bit low on tools and supplies. I have been doing some shopping the last days and this is my toolbox at the moment;

Not much, but I guess I don't need more just now. I also got some nailfiles but they have misteriously disapered in our newly moved into house. Must say i am especially pleased about the cutting set, just $6,61 which is hillariously cheap in a high cost country like Norway. The glue in comparison was $8,26. Just one problem at the moment, no paint. I don't want to invest in an airbrush, compressor etc at the moment before I know if will continue to build. Thought I just could pick up some Tamiya aerosols....but it looks like it would be easier to buy a winged pig. Its just impossible to get hold of it. But can't give up!
Well better start cracking, the missis is away for the next 2 days so I got make the best of my free time

PS: The camera has also dissapered during the move so had to use the phone for the pictures...with the expected quality...
Posted: Friday, March 26, 2010 - 10:49 AM UTC
Hello Lars,
Good choice on your model. I have been doing a little bit of studying on the Norwegian campaign. It seems to be a topic that is overshadowed by the French campaign, The Royal Norwegian troops did a great job in blunting and fighting the invaders.
I have a great respect for all of the men that fought the invaders and after they surrendered, They fought on in the "small war" for 5 years.
Thanks for the photo's and updates and for reminding all of us that have forgotten the brave men that fought in 1940 to defend their country.
Cheers,
Bruce

 |


