Campaigns
Where Armorama group builds can be discussed, organized, and updates posted.
1/48 Scale
Dangeroo
#023
Visit this Community
Zurich, Switzerland
Joined: March 13, 2009
KitMaker: 2,058 posts
Armorama: 1,656 posts
Posted: Wednesday, January 05, 2011 - 06:37 AM UTC
Jose, your Sturmtiger looks excellent! Really nice work!

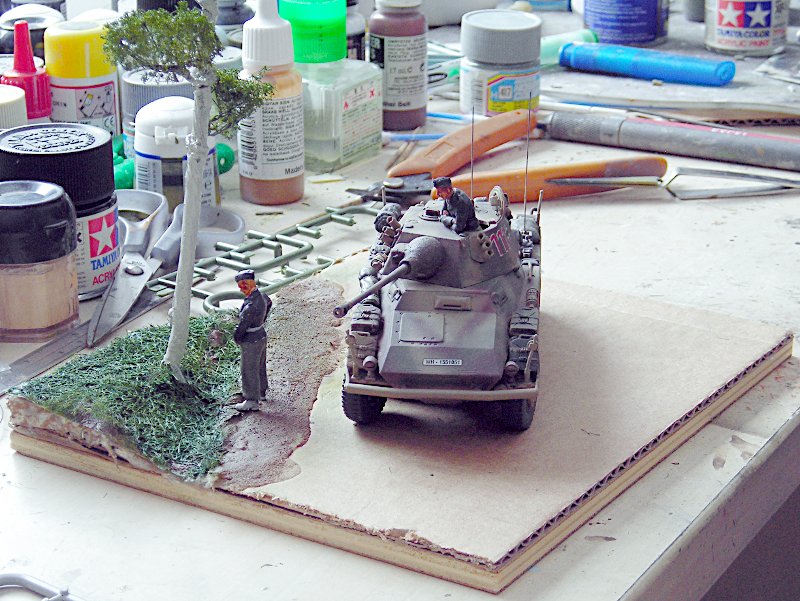
Here's the promised progress pics. Firstly the painted figures:


The overall view with the basecoated T34:


And some work started on the grass (pretty time consuming method but considering I'm using trash and it costs me nothing but a bit of white glue I'm pretty happy so far):


Hopefully I can get another hour or so in the cave tonight.

Cheers!
Stefan
GregCloseCombat
Visit this Community
California, United States
Joined: June 30, 2008
KitMaker: 2,408 posts
Armorama: 2,394 posts
Posted: Wednesday, January 05, 2011 - 05:07 PM UTC
@ Jose - looking good - good modulation job. Are you going to leave the engine deck screens off until Hauler comes through?

@ Stefan - Scene is coming together nicely. What r u using to make the grass?


@ Andy - there's really a lot of resin kits in 1/48 : Kengi, Gasoline, Faxon, workshop48, etc. Check out quarter-kit.com and Track48 gallery and links track48.com and 1/48 gallery onefortyeight.com
Dangeroo
#023
Visit this Community
Zurich, Switzerland
Joined: March 13, 2009
KitMaker: 2,058 posts
Armorama: 1,656 posts
Posted: Wednesday, January 05, 2011 - 07:46 PM UTC
Greg, the material I use is from our cat scratching post. I untwirl it, cut it in short lengths and add it bushel by bushel to a bed of white glue. Works pretty well once you get the hang of it. The method is described in "Let's Build a Diorama II".

I have some rather unfortunate news do deliver. Our XO, Bruce (grayghost666) will be absent from the forums several months for health reasons (see his post here). I wish him all the best.

Cheers!
Stefan
warreni
Visit this Community
South Australia, Australia
Joined: August 14, 2007
KitMaker: 5,926 posts
Armorama: 712 posts
Posted: Wednesday, January 05, 2011 - 08:10 PM UTC
Hi all.

My Stug finally turned up today! Can anyone think why Tamiya provided a diecast hull with it??

Regards
Warren
Dangeroo
#023
Visit this Community
Zurich, Switzerland
Joined: March 13, 2009
KitMaker: 2,058 posts
Armorama: 1,656 posts
Posted: Wednesday, January 05, 2011 - 10:08 PM UTC

Quoted Text

Can anyone think why Tamiya provided a diecast hull with it??


Why, to have a scale weight feeling of course! What a silly question...

All the early Tamiya 1/48 scale kits have it. It is probably a mistery to all but Mr. Tamiya San himself why this is the case. Limits the possibilities for adaption of the wheels to the terrain, not to mention lacking detail...

Good luck and have fun with xour StuG! Looking forward to pics!

Cheers!
Stefan
zontar
Visit this Community
Hawaii, United States
Joined: August 27, 2006
KitMaker: 1,646 posts
Armorama: 1,557 posts
Posted: Thursday, January 06, 2011 - 09:36 AM UTC
Jose: the streaking and color modulation looks really good.

Stefan: the figs and scene are coming along nicely. The shading on the pouch is fantastic.

I ordered AK-Interactive's Winter Streaking Grime, so as soon as that comes in, I will throw some crud on the Stug.

Happy Modelling, -zon
warreni
Visit this Community
South Australia, Australia
Joined: August 14, 2007
KitMaker: 5,926 posts
Armorama: 712 posts
Posted: Friday, January 07, 2011 - 06:38 AM UTC
Jose, that Jadgtiger looks awesome just as it is! I would leave it that way if I was you.. well, maybe stick some tracks on it..
wilbhi2
Visit this Community
New York, United States
Joined: May 22, 2005
KitMaker: 41 posts
Armorama: 27 posts
Posted: Friday, January 07, 2011 - 11:00 AM UTC
A quick update before my wife has my backside in a sling.
Finally, it's done. Tiger is now ready for paint.
If I thought the Hauler PE set for the Kubelwagon was fiddy...boy was I mistaken. This set for the early production tiger is even worse. more small parts than I care to comment on.

But it's done - YEAH!!!

The front and rear fender is wrong for a SpzAbt 501 tank - the kit ones are good.
But hey, what the hell. It was a good experience to learn soldering.

Without further ado, here are the picts


Thanks for looking.
wilbhi2
Visit this Community
New York, United States
Joined: May 22, 2005
KitMaker: 41 posts
Armorama: 27 posts
Posted: Saturday, January 08, 2011 - 03:27 AM UTC
Hey all,
Finally had sometime to go through the last couple of pages to look at everyone's build. all I can say is WOW!!!

Stephen V the crusader dio came out great. Thank you very much for the tut on your dio base.

Konrad That crab is shaping up nicely

Don S Your firefly is going to look great once painted, and I am sure it's going to be a PITA to paint the camo topping (I forget what they are called).

Jose: I am really impressed with your JagdTiger. It's a great looking build and finish you applied so far.

A while back, someone ask how I attached the PE parts relatively cleanly - Gator Glue is the answer. Great stuff as it holds better in most cases that CA and it cleans up easily with a light swab of ALchohol or water (when first applied),

Great work everyone and I can't wait to see more.
vonHengest
Visit this Community
Texas, United States
Joined: June 29, 2010
KitMaker: 5,854 posts
Armorama: 4,817 posts
Posted: Saturday, January 08, 2011 - 06:56 PM UTC
Bud: Are you using the new formula Gator Glue?
wilbhi2
Visit this Community
New York, United States
Joined: May 22, 2005
KitMaker: 41 posts
Armorama: 27 posts
Posted: Sunday, January 09, 2011 - 01:39 AM UTC

Quoted Text

Bud: Are you using the new formula Gator Glue?


No, but I wouldn't expect it to act any differently. I have a new bottle on it's way to me now, so I will see.
pebblemonkey
Visit this Community
England - West Midlands, United Kingdom
Joined: January 26, 2009
KitMaker: 180 posts
Armorama: 151 posts
Posted: Sunday, January 09, 2011 - 02:02 AM UTC
Hi All,
My first post in about four months,
As per usual I'm going to have to drop out of this build, My airbrush and compressor have both packed up. I can build and primer loads of models but cannot finish any .

Matt
--MRB--
Visit this Community
Uusimaa, Finland
Joined: May 03, 2010
KitMaker: 12 posts
Armorama: 9 posts
Posted: Sunday, January 09, 2011 - 12:21 PM UTC
Just for support here is a small vignette wich I made for another campaign on an another site

alpha_tango
Visit this Community
Germany
Joined: September 07, 2005
KitMaker: 5,609 posts
Armorama: 264 posts
Posted: Monday, January 10, 2011 - 04:15 AM UTC
Hi all

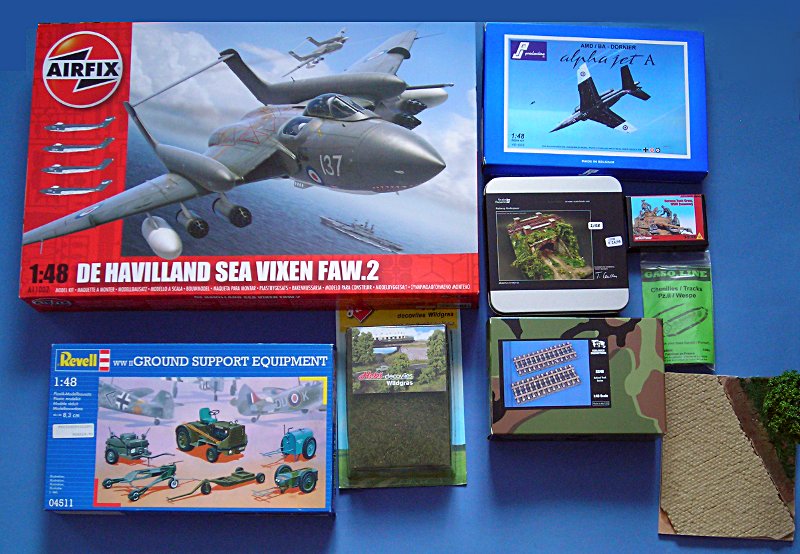
just got some bits for my 48 scale stuff .... that Railway underpass is great ... though I will probably not do it as nicely as on the box/website ... some other stuff too .. do not get distracted by the flying thingies ....


@Warren: have a look at the latest TMMI . Lars Richter built the Tamiya StuH 42, that one with the 10,5 cm gun ( http://www.tamiyamodelmagazine.com/ )

all the best

Steffen

alpha_tango
Visit this Community
Germany
Joined: September 07, 2005
KitMaker: 5,609 posts
Armorama: 264 posts
Posted: Tuesday, January 11, 2011 - 04:11 AM UTC
Hi again

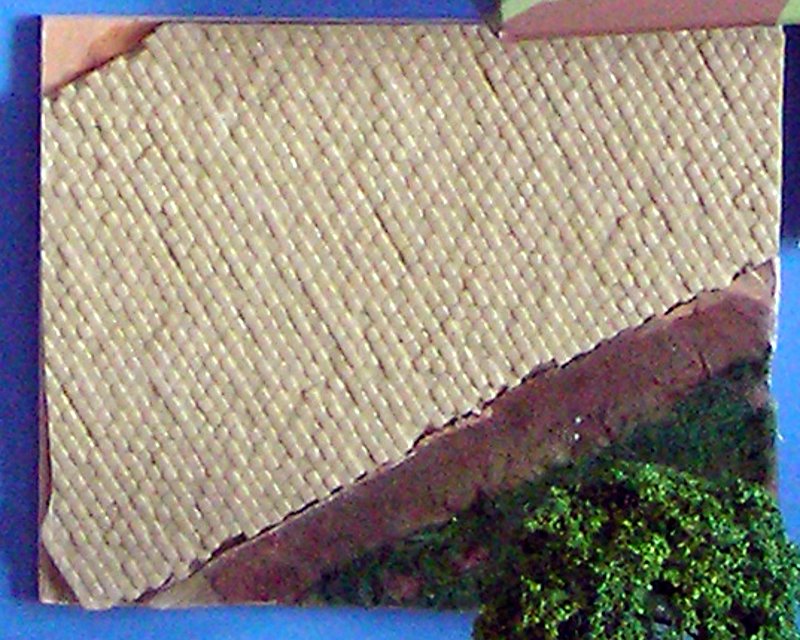
I am working a bit further on my little vignette for the Puma. I glued on the Verlinden Cobble stone road and started to paint it:

Before:


section of yesterdays picture:


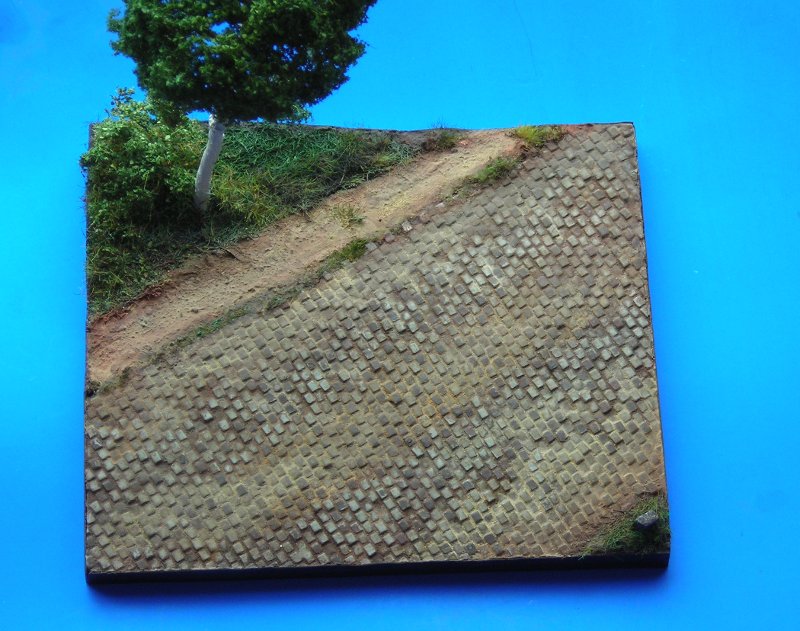
added some missing parts, grey primer, black, grey, umbra oil wash, some stones piced out with different colours (contrast will be much lower after the pigments are added)


I still work on the transition to the sand. Also I wanted to keep the cardboard on the corner, but it went loose when I cutout the road so I will fill it later...

all the best

Steffen


vonHengest
Visit this Community
Texas, United States
Joined: June 29, 2010
KitMaker: 5,854 posts
Armorama: 4,817 posts
Posted: Tuesday, January 11, 2011 - 08:11 AM UTC

Quoted Text

Hi all

just got some bits for my 48 scale stuff .... that Railway underpass is great ... though I will probably not do it as nicely as on the box/website ... some other stuff too .. do not get distracted by the flying thingies ....


@Warren: have a look at the latest TMMI . Lars Richter built the Tamiya StuH 42, that one with the 10,5 cm gun ( http://www.tamiyamodelmagazine.com/ )

all the best

Steffen


...huh, wha? I couldn't stop looking at that Sea Vixen... oh yeah, that bridge looks great
warreni
Visit this Community
South Australia, Australia
Joined: August 14, 2007
KitMaker: 5,926 posts
Armorama: 712 posts
Posted: Tuesday, January 11, 2011 - 09:15 AM UTC
Thanks for that Steffen. Mine is to be OOB except for the barrel I ordered by accident..
generalzod
Visit this Community
United States
Joined: December 01, 2001
KitMaker: 3,172 posts
Armorama: 2,495 posts
Posted: Tuesday, January 11, 2011 - 10:57 AM UTC
Tamiya M26,.I added some casting marks,some PE from Fighting48,and the mounts for the canvas on the mantlet are home made.


vonHengest
Visit this Community
Texas, United States
Joined: June 29, 2010
KitMaker: 5,854 posts
Armorama: 4,817 posts
Posted: Tuesday, January 11, 2011 - 12:09 PM UTC
Chad: Looking good! Where did you get 1/48 casting marks, if I may ask?
generalzod
Visit this Community
United States
Joined: December 01, 2001
KitMaker: 3,172 posts
Armorama: 2,495 posts
Posted: Tuesday, January 11, 2011 - 12:16 PM UTC

Quoted Text

Chad: Looking good! Where did you get 1/48 casting marks, if I may ask?


Thanks Jeremy

Those are from Archer surface details.The little black dimples are from an Archer rivet set.
Dangeroo
#023
Visit this Community
Zurich, Switzerland
Joined: March 13, 2009
KitMaker: 2,058 posts
Armorama: 1,656 posts
Posted: Wednesday, January 12, 2011 - 08:45 PM UTC
Once again the campaign is going faster than me...

Zon: Thanks for the comment, I kind of like the pouch as well, even though it's just two coats of regular vallejo on white primer, no special shading or anythin used. I must say I really like working with that brand (is there an icon for toothbrush-add-smile?)

Bud: the Tiger looks great! Looks like a lot of work! Why are the sides and fron a different color? Is that how far up the Tamiya metal hull goes?

Matt: sad to hear. Any chance aou will get your AB back up anytime soon? Maybe a little prolongation of the campaign could help you out? (just thought I'd throw that though into the ring for all of you to think about... )

MRB Thanks for the support. Unfortunately the pic is very small, any chance of another one?

Steffen why are you polluting our fine armor thread with flying things?!? Just kidding. Nice progress with the road. Looks like a fine job on fitting the Verlinden part in.

Chad nice details on the M26. The canvas mounts look great. Streched sprue and some rivets I assume? the light guards look a little on the thick side compared to the other PE though...

I will update the chart soon and post some of my progress after next weekend (although it is - once again - slow...)

Cheers everyone and keep the progress going!
Stefan
alpha_tango
Visit this Community
Germany
Joined: September 07, 2005
KitMaker: 5,609 posts
Armorama: 264 posts
Posted: Wednesday, January 12, 2011 - 09:08 PM UTC

Quoted Text

Steffen why are you polluting our fine armor thread with flying things?!? Just kidding. Nice progress with the road. Looks like a fine job on fitting the Verlinden part in.


Well the subject line just says "1/48 scale" ... I only build 48 scale

Some progress on my vignette ... I like it, but input is welcome anyway


all the best

Steffen
wilbhi2
Visit this Community
New York, United States
Joined: May 22, 2005
KitMaker: 41 posts
Armorama: 27 posts
Posted: Thursday, January 13, 2011 - 02:09 AM UTC

Quoted Text


Bud: the Tiger looks great! Looks like a lot of work! Why are the sides and fron a different color? Is that how far up the Tamiya metal hull goes?


Stefen - Thanks. The tamiya hull in this kit is metal and primed grey, which has a real nice hefty feeling to it. While the rest of the kit is plastic.

Steffen The dio base looks great. Someday I'll get enough chops to try my hand at it. The in progress photos are very helpful.

Chad Nice work on the weld seems. could you explain your process - I am a complee neophyte for targets...ehh, armor subjects. Wingy thingys is more my area.
generalzod
Visit this Community
United States
Joined: December 01, 2001
KitMaker: 3,172 posts
Armorama: 2,495 posts
Posted: Thursday, January 13, 2011 - 12:41 PM UTC

Quoted Text


Quoted Text


Bud: the Tiger looks great! Looks like a lot of work! Why are the sides and fron a different color? Is that how far up the Tamiya metal hull goes?


Stefen - Thanks. The tamiya hull in this kit is metal and primed grey, which has a real nice hefty feeling to it. While the rest of the kit is plastic.

Steffen The dio base looks great. Someday I'll get enough chops to try my hand at it. The in progress photos are very helpful.

Chad Nice work on the weld seems. could you explain your process - I am a complee neophyte for targets...ehh, armor subjects. Wingy thingys is more my area.

Thanks Bud.
Those are not weld seams.The casting numbers and letters are from the Archer Transfers set, Normally,that company makes dry transfer markins.The casting numbers are water slide,like normal decals.I did roughen up the truuet and some of the hull to make it look like real casting marks.I spread on some liquid glue,then took a brush over that area.
The white strips with the black dimples on the turret front are,.010 plastic strips,and some Archer .036mm rivets.
--MRB--
Visit this Community
Uusimaa, Finland
Joined: May 03, 2010
KitMaker: 12 posts
Armorama: 9 posts
Posted: Thursday, January 13, 2011 - 12:55 PM UTC

Quoted Text


MRB Thanks for the support. Unfortunately the pic is very small, any chance of another one?


Hmm... very interesting, on my screen it's in good size. Would it help if I post the direct link to the foto?

http://www.pienoismallit.net/media/kuvat/07/57/69/075769.jpg