Campaigns
Where Armorama group builds can be discussed, organized, and updates posted.
1/48 Scale
Tomek_K
Visit this Community
Wojewodztwo Dolnoslaskie, Poland
Joined: August 12, 2005
KitMaker: 150 posts
Armorama: 131 posts
Posted: Monday, January 31, 2011 - 12:57 PM UTC
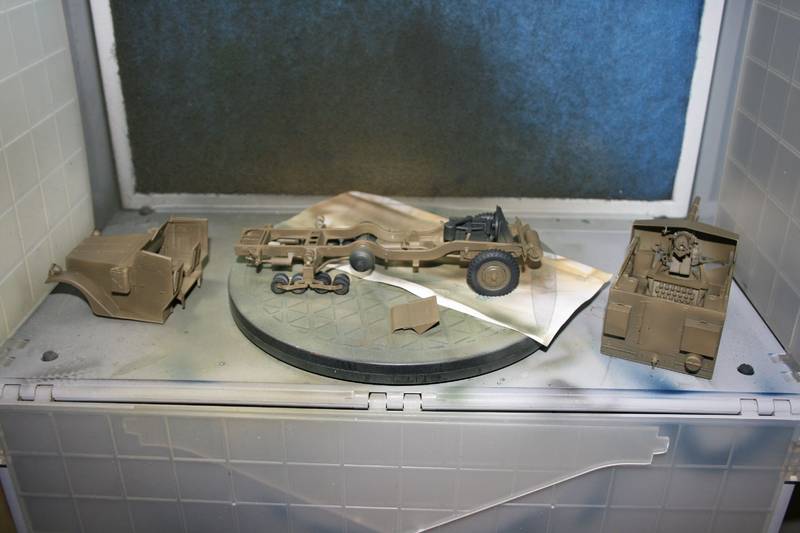
I made little progress. So far everything is dry fitted.


FirstMass
Visit this Community
Massachusetts, United States
Joined: August 15, 2004
KitMaker: 252 posts
Armorama: 146 posts
Posted: Monday, January 31, 2011 - 01:22 PM UTC
Andras: I have this HobbyBoss T34 and have been meaning to build it for two years. In answer to your concerns about covering up the interior -- if my memory serves me right the top part of the hull is a pretty good fit on the lower portion. Can't you just dry fit it an d leave it that way. That way you can pop the "lid" to expose the interior.

Brian
warreni
Visit this Community
South Australia, Australia
Joined: August 14, 2007
KitMaker: 5,926 posts
Armorama: 712 posts
Posted: Monday, January 31, 2011 - 02:37 PM UTC
OK. Rules are rules I suppose...

Inspection is over.. Back to fighting..


Dangeroo
#023
Visit this Community
Zurich, Switzerland
Joined: March 13, 2009
KitMaker: 2,058 posts
Armorama: 1,656 posts
Posted: Monday, January 31, 2011 - 08:23 PM UTC
Andras, nice work on the T-34 so far. I agree with Bryan, you could try to just dry fit it. About the missing decals: Since markings were sparse on Russian tanks you could try your luck at hand painting some numbers on the turret? I did it for the first time on a 1/76 scale T-34 for the Braille scale campaign and it turned out rather well. They were often hand painted on the originals anyway.

Jose Luis, a masterpiece! Congratulations!

Tomek cool looking vehicle, almost cartoonish... The only thing I don't like is the tarp. Or does it really look that stiff in real life?

Warren, yeah, sorry... But it's what campaigns are about, seeing eachothers progress. And also to keep cheaters out who bring in their old builds. Anyway, was just wondering if you mixed up some photos while uploading as you now have two of the same each in your gallery...

My own build is almost done, just some gasoline marks on the tanks and a few details here and there and I will take some final pics.

Cheers!
Stefan
warreni
Visit this Community
South Australia, Australia
Joined: August 14, 2007
KitMaker: 5,926 posts
Armorama: 712 posts
Posted: Monday, January 31, 2011 - 10:38 PM UTC
No, it would appear that the photo archive is up to its old tricks again. I deleted the old pictures from the campaign gallery, but kept the old pictures in my gallery. But the dumb software program has overwritten the old ones. Oh well..
Tomek_K
Visit this Community
Wojewodztwo Dolnoslaskie, Poland
Joined: August 12, 2005
KitMaker: 150 posts
Armorama: 131 posts
Posted: Tuesday, February 01, 2011 - 12:37 PM UTC

Quoted Text

The only thing I don't like is the tarp. Or does it really look that stiff in real life?


Maybe after painting it would look better.

GregCloseCombat
Visit this Community
California, United States
Joined: June 30, 2008
KitMaker: 2,408 posts
Armorama: 2,394 posts
Posted: Tuesday, February 01, 2011 - 09:04 PM UTC
Jose - congrats again

Andras - looking good, keep going. You can always pull off the turret to see the interior.

Warren - congrats to finishing too. The Stug wasn't my favorite to build either. You should try another one before leaving the scale


I need the groups help.

I can't seem to figure out how to finish up this barn. It's painted with Vallejo and has some snow coat on it. Is there a certain color wash or pigment anyone could recommend for the walls or trim??? I don't know but something's missing.

Any help to make this better is appreciated


Dangeroo
#023
Visit this Community
Zurich, Switzerland
Joined: March 13, 2009
KitMaker: 2,058 posts
Armorama: 1,656 posts
Posted: Tuesday, February 01, 2011 - 09:42 PM UTC
Greg, I painted my fence black first, then added a coat of thinned buff over it. I then added several very thin coats of chocolate brown on top. This gave me kind of a faded look.

In your case the wood is probably painted or stained with dark brown. If it is well maintained it will probably still look quite good. Maybe this pic can give you some inspiration. Maybe airbrush a little variety into the tone, top of panels a bit more grayish, drybrush the corners with a lighter/grayish tone or something like that.

Or you could try for a more rustic and less well maintained look like this one.

Hope this helps a bit...

Cheers!
Stefan

EDIT: Forgot, the walls: lighter overspray int he center portions then a dark brown/black/grey (just dirty!) wash for some grime?
JoseLuisLopez
Visit this Community
Spain / España
Joined: August 21, 2010
KitMaker: 19 posts
Armorama: 18 posts
Posted: Tuesday, February 01, 2011 - 11:05 PM UTC
Impressive work Greg!

If you want to add some color variation to the snow, using natural umber oil highly diluted, add small amount of this mix in order to get dirty and melt snow.

Also add some gloss varnish higly diluted to have a moisture effect.


alvaro_rm
Visit this Community
Santa Cruz de Tenerife, Spain / España
Joined: August 28, 2010
KitMaker: 17 posts
Armorama: 16 posts
Posted: Wednesday, February 02, 2011 - 08:57 AM UTC
Hi gang!

This GB is getting hot as hell! I´m lovin´it!

Scot You got it! Perfect! It´s great to see the same level of care and work in the tank, the accesories and the crew. I love those highly populated Shermans! Great work!

Jeremy I´m for one using Gator glue for p.e. parts and not only for that. It is quite useful to glue resin, i.e. No secrets here. Just apply a little of glue with the help of an old brush and, latter, wipe off the excess with some water. Be sure to not to let it dry because then it is (quite) more difficult to remove!

Don Keep that Firefly fliying... I mean going!! Now the fun starts!

Warren Beign your first 48th scale armour it is your best 48th scale armour indeed. A shame if you definately give up the scale.

Zon And talking about Stug´s III, Hope to see your finished here soon!

Thomas a Tug with a gift, I see! That´s an ambitious project indeed. I had finished a Tug recently. It´s posted here, some pages back.

Stephan Have you fixed the grass colour yet? Your russian party looks better and better! If you may accept the humble advice about the figures, next time try to add a little hue variation in the uniforms... just add a drop of green -i.e., or kakhi drab- to your favourite uniform colour and paint the jacket -in one figure and the trousers in another- with that different shade. That way your figures will look richer, more interesting visualy and not soooooo uniform! Just take a look at any colour pics of any troops and you will notice that even with the same uniform, there is no one like another.

Tomek That one looks like Mickey Mouse´s car indeed! Jokes apart, looks like a quite nice tiny kit. I´m keen to see it qith some paint on it.

Greg Great to see you Lego city once more. Not much to add to Stephan and Jose advices. Just start addind some wheatering to the barn and keep in mind that you won´t get a richer finish in just one step or just with an unique technique! The key -to me- is to make those walls a little more interesting. And, as suggested before, just a wash and a little of drybrush would be enough!

Jose Speechless. What really amazes me is that waching the pics of your Trontiger looks the part! I mean, you can feel it weigths a lot of tons!

On my side, today I have airbrushed the Humvee. I hope to have some modelling time within next days to give it a thin layer of future and to take some pics to post asap!

Keep the fun going!
zontar
Visit this Community
Hawaii, United States
Joined: August 27, 2006
KitMaker: 1,646 posts
Armorama: 1,557 posts
Posted: Wednesday, February 02, 2011 - 11:25 AM UTC
Aloha All,

It is good to see all the wonderful entries for this campaign. Some extraordinary work going on here.

For my part, I think I've done about as much damage as I can do to the Stug, so I'm calling it finished.


Though I've only participated in a few campaigns so far, I just want to say this one has been the best by far. My thanks to all who participated and to Stefan for running it and all the others that gave so much comment.

Happy Modelling, -zon
GregCloseCombat
Visit this Community
California, United States
Joined: June 30, 2008
KitMaker: 2,408 posts
Armorama: 2,394 posts
Posted: Wednesday, February 02, 2011 - 04:39 PM UTC
Thanks guys for the tips - I got some creative ideas flowing now. I really appreciate it.


Zon - congrats on the finish. I think it has turned out very good.
Dangeroo
#023
Visit this Community
Zurich, Switzerland
Joined: March 13, 2009
KitMaker: 2,058 posts
Armorama: 1,656 posts
Posted: Wednesday, February 02, 2011 - 08:30 PM UTC
Alvaro, thanks for the tip. Much appreciated, I will try it on my next figures.

Zon, congrats on the finish! Looking good!

I will take some pics of my finished piece tonight and with all the progress going on it's probably time for another update of the chart.

Cheers!
Stefan

PS: I've been getting requests to change projects during the campaigns. Please note that the chart has in no way the idea of fixing you on a particular project. If you want to change projects just post new before and build pics and you're good to go! I will then adapt the chart.
zontar
Visit this Community
Hawaii, United States
Joined: August 27, 2006
KitMaker: 1,646 posts
Armorama: 1,557 posts
Posted: Thursday, February 03, 2011 - 08:37 AM UTC
Greg and Stefan, Thanks for the kind words.

Happy Modelling! -zon
Dangeroo
#023
Visit this Community
Zurich, Switzerland
Joined: March 13, 2009
KitMaker: 2,058 posts
Armorama: 1,656 posts
Posted: Thursday, February 03, 2011 - 08:40 AM UTC
Jose Luis I just noticed that your final pics are not in the official gallery. This is not another one of my quirks , it is a must have for awarding the ribbon.

So this goes to everyone: Post at least one pic of your final build in the official gallery here. If you don't know how, there is a tutorial here. As I will be making a feature of this campaign in the end I wouldn't mind several pics of your build. It is easier for me to get them all in one place than to collect them throughout the pages of this thread.

So, enough of this administrative stuff and back to modeling...

Dangeroo
#023
Visit this Community
Zurich, Switzerland
Joined: March 13, 2009
KitMaker: 2,058 posts
Armorama: 1,656 posts
Posted: Thursday, February 03, 2011 - 08:43 AM UTC
So here are my final pics. I'm calling this one done and though it's not a masterpiece I'm quite happy with the result. Any comments or tips for improvement welcome as always.


Cheers!
Stefan
zontar
Visit this Community
Hawaii, United States
Joined: August 27, 2006
KitMaker: 1,646 posts
Armorama: 1,557 posts
Posted: Thursday, February 03, 2011 - 12:55 PM UTC
Stefan: Looks good. I like the wood, both on the fence and the box on the tank. Also, the dust on the tank is well done.

-zon
warreni
Visit this Community
South Australia, Australia
Joined: August 14, 2007
KitMaker: 5,926 posts
Armorama: 712 posts
Posted: Thursday, February 03, 2011 - 03:33 PM UTC
Thanks for that Greg. Only thing is I have over one hundred 1/35 kits to build so I have to concentrate there I am afraid..

GregCloseCombat
Visit this Community
California, United States
Joined: June 30, 2008
KitMaker: 2,408 posts
Armorama: 2,394 posts
Posted: Thursday, February 03, 2011 - 03:54 PM UTC
Stefan - congrats. I really like the head-on view pic. Looks like the whole army is coming at you.


Warren - e-bay will help you swap that 1/35 collection over to 1/48. You'll never have enough time or space for them anyway
Newer kits have a lot going for them too
alvaro_rm
Visit this Community
Santa Cruz de Tenerife, Spain / España
Joined: August 28, 2010
KitMaker: 17 posts
Armorama: 16 posts
Posted: Saturday, February 05, 2011 - 11:17 AM UTC
UPDATE #5: U.S. Modern 4x4 Utility Vehicle w/Grenade Launcher

Hi all!

Here you got the Humvee just with the main airbrush work done.

I have used Tamiya acrylics thinned with some Tamiya Lacquer.

For the undersides, I sprayed Flat Earth, Wooden Deck and Buff ramdomly. Both frame and tyres were supposed to be black but I started painting them grey (mixing NATO Black with some Buff) and airbrushing, latter, the previous brown / sand / dust colours.

When moving to the upper surfaces, I airbrushed first some NATO black and Green in the sides, where those (of unknown purpose to me!) coloured rectangles are. The same applies for the chevron at the cargo door. Needless to say, I used then masking tape to preserve those areas before to continue.

Tamiya NATO colours for doors and bonnet, overspraying after a ligther shade mixing them with buff as well.

About the CARC Tan -that is, the sand colour- I used a mix of White, Desert Yellow and Buff in a 3:1:1 ratio because, afaik, that colour is not available in the Tamiya range.

And, to finish the airbrush work, I applied a thin layer of Future to seal it.


And that´s all for now.

Time for brushes has finally arrived! Now the fun starts!

Best regards!
Alvaro
alvaro_rm
Visit this Community
Santa Cruz de Tenerife, Spain / España
Joined: August 28, 2010
KitMaker: 17 posts
Armorama: 16 posts
Posted: Saturday, February 05, 2011 - 11:34 AM UTC
Zon Nice Stug with the plus of a figure! Always add value to any armour!

SteFan (a) Sorry for having been misstyping your name lately! (b) Is it not a masterpiece a tank, half dozen figures and a base? I´m not for one to say that, believe me! That seems to me a quite dynamic scene!

Congratulations to both as you have already reached the finish line!

OMG, just 3 weeks to go!


Regards!
Alvaro
JoseLuisLopez
Visit this Community
Spain / España
Joined: August 21, 2010
KitMaker: 19 posts
Armorama: 18 posts
Posted: Sunday, February 06, 2011 - 09:58 PM UTC
Alvaro: I love the way you´re painting your little 4x4 ... neat colors, impressive look!

Can you tell me the color references you used for that really nice sand color?

Finally, those wheels are impressive!

Can´t wait to see more advances!

tic tac tic tac time is finishing ! ....
JoseLuisLopez
Visit this Community
Spain / España
Joined: August 21, 2010
KitMaker: 19 posts
Armorama: 18 posts
Posted: Sunday, February 06, 2011 - 10:02 PM UTC
Stefan: Absolutely dynamic vignette! ... I love all those figures in action!

Zon: Nice and neat finish! ... congratulations!

zontar
Visit this Community
Hawaii, United States
Joined: August 27, 2006
KitMaker: 1,646 posts
Armorama: 1,557 posts
Posted: Monday, February 07, 2011 - 06:55 AM UTC
Alvaro and Jose: Thank you for the kind words.

Alvaro: I really like the "spare parts" mix of Nato and Desert colors. Also thanks for the mix recipe on the sand color. For the soft skinned campaign I did a similar mix with Dark Yellow as a base and it came out way too dark. Now the next one will be better, thanks to you!!

Happy Modelling!! - zon
minas-ithil
#110
Visit this Community
Florida, United States
Joined: September 20, 2005
KitMaker: 248 posts
Armorama: 224 posts
Posted: Monday, February 07, 2011 - 07:39 AM UTC
Stefan,
Excellent finish. I really like the weathering on the T-34 and the incline combined with the infantry in action really makes the scene. Nice job.

Stephen