Campaigns
Where Armorama group builds can be discussed, organized, and updates posted.
Where Armorama group builds can be discussed, organized, and updates posted.
Hosted by Darren Baker, Richard S.
Killer KVs
Posted: Sunday, January 02, 2011 - 09:57 AM UTC
As the campaign leader this is in your court. I don't have a problem with it myself.
GaryKato

Joined: December 06, 2004
KitMaker: 3,694 posts
Armorama: 2,693 posts

Posted: Sunday, January 02, 2011 - 10:17 AM UTC
The SU 152 was based on the KV hull. The ISU or JSU 152 was based on the IS-1 hull. The ISU-152 has a taller fighting compartment than the SU 152.
Source is "Soviet Tanks and Combat Vehicles of World War Two" by Steve Zaloga and James Grandsen.
Source is "Soviet Tanks and Combat Vehicles of World War Two" by Steve Zaloga and James Grandsen.

warreni

Joined: August 14, 2007
KitMaker: 5,926 posts
Armorama: 712 posts

Posted: Sunday, January 02, 2011 - 11:02 AM UTC
Looks like the SU-152 is fine then, but not the ISU-152..

Bigrip74

Joined: February 22, 2008
KitMaker: 5,026 posts
Armorama: 1,604 posts

Posted: Sunday, January 02, 2011 - 11:16 AM UTC
@ Warren:
1. as Darren stated you are the BOSS so what you conclude is law.
2. Gary has stated that the SU was based on the KV (confermation) but no. 1. still outranks no. 2.
@Sal: Ditto what Panzerdoc said regarding the round / hex plastic rod. As for finding the material, it may be easier to find it online if you are unable to find locally. I use EVERGREEN and PLASTRUC brands of plastic. There are suppliers of what you can use but their website escapes me at the moment. When I locate one I will let you know.
Bob
ltb073

Joined: March 08, 2010
KitMaker: 3,662 posts
Armorama: 3,078 posts

Posted: Sunday, January 02, 2011 - 04:14 PM UTC
Quoted Text
I just dug this set up from the vault, of course the directions are missing but it looks straightforward. Again, I can't see why you would need a jig. Looks like the fender brackets are in 3 pieces. there is a groove down the rectangular pieces to help you align the triangular bracket. Glue or solder away.
Panzerdoc, Thanks for your help and explanation I will take a closer look at the directions and the parts again in the morning.
@Bob, Thanks I'll check the local craft store for some of the stuff


warreni

Joined: August 14, 2007
KitMaker: 5,926 posts
Armorama: 712 posts

Posted: Sunday, January 02, 2011 - 05:17 PM UTC
Good to see that people are helping others. Bolts should be easy to do with the hex rod. Much easier than the method used by Tristar with the bolt heads moulded on short rod pieces and you have to try and slice them off without destroying them.
My KV is coming along slowly as can be seen in my Build Blog for the six kits I started on New Years day. Has some issues with warping at the rear. lots of clamping etc but I should be past that now. Everything else seems to fit nicely.
Good luck all. And in case anyone missed it, the SU-152 is fine.
And here is a progress pic of my glacially slow KV-2 build...
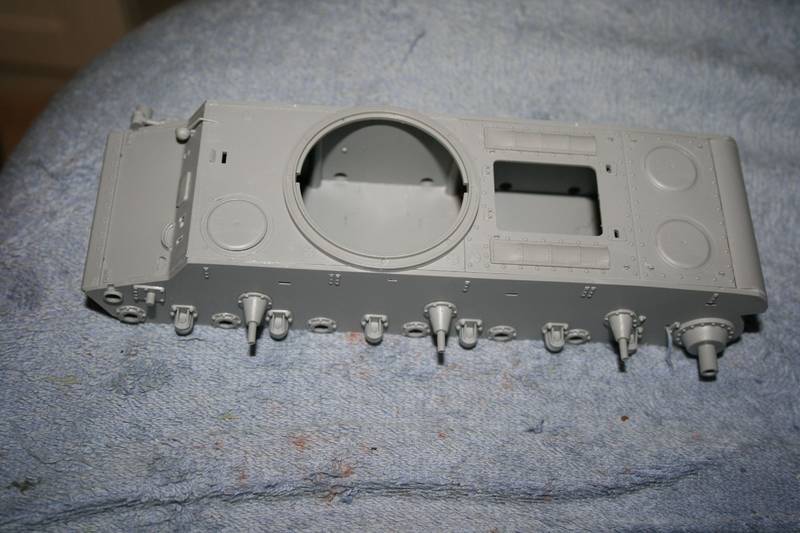
More pics later..
Regards
Warren
My KV is coming along slowly as can be seen in my Build Blog for the six kits I started on New Years day. Has some issues with warping at the rear. lots of clamping etc but I should be past that now. Everything else seems to fit nicely.
Good luck all. And in case anyone missed it, the SU-152 is fine.
And here is a progress pic of my glacially slow KV-2 build...

More pics later..
Regards
Warren

shopkin4

Joined: March 29, 2009
KitMaker: 1,135 posts
Armorama: 1,030 posts

Posted: Thursday, January 06, 2011 - 01:59 PM UTC
Here is a link to my build log
Trumpeter KV-1 Heavy Cast Turret
But here are images as to what I have done since this morning.


Also, I asked this in my topic, but where was the KV-1 Heavy Cast Turret used in combat operations?
I want to try and build a dio around it but I just want to get an idea as to what I will be doing.
Trumpeter KV-1 Heavy Cast Turret
But here are images as to what I have done since this morning.


Also, I asked this in my topic, but where was the KV-1 Heavy Cast Turret used in combat operations?
I want to try and build a dio around it but I just want to get an idea as to what I will be doing.

Bigrip74

Joined: February 22, 2008
KitMaker: 5,026 posts
Armorama: 1,604 posts

Posted: Thursday, January 06, 2011 - 06:04 PM UTC
Posted: Thursday, January 06, 2011 - 10:09 PM UTC
Nice progress on your build, Bob. The KV-2 was definitely a beast - especially if you are a German soldier manning a 37mm PAK!!
I have not started yet, but expect to start in a month or two.
I have not started yet, but expect to start in a month or two.

Herchealer

Joined: July 31, 2003
KitMaker: 1,523 posts
Armorama: 710 posts

Posted: Friday, January 07, 2011 - 05:09 AM UTC
Here is my completed entry for the campaign.


Hope you all all like it. Comments are welcome
Herky
Hope you all all like it. Comments are welcome
Herky

Posted: Friday, January 07, 2011 - 06:26 AM UTC
Quoted Text
Here is my completed entry for the campaign.
Hope you all all like it. Comments are welcome
Herky
You built, painted, and weathered that in 7 days! I am in the wrong hobby.

vonHengest

Joined: June 29, 2010
KitMaker: 5,854 posts
Armorama: 4,817 posts

Posted: Friday, January 07, 2011 - 06:31 AM UTC
Nice progress in this campaign! I'm still trying to figure out which version I want to build 
Herky: That's crazy fast, great job! What did you use for the mud texture, and how did you apply it?

Herky: That's crazy fast, great job! What did you use for the mud texture, and how did you apply it?

Bigrip74

Joined: February 22, 2008
KitMaker: 5,026 posts
Armorama: 1,604 posts

Posted: Friday, January 07, 2011 - 06:49 AM UTC
@ Jeremy: how about building a KVI or a KVII:D, Sorry I could not reisit, especially to a fello Texan.
@ Jesper: I wish the photo had shown the relitive size difference between the KV and the M4.
@ Herky: nice job on the grass and mud. What color green did you use?
Bob
@ Jesper: I wish the photo had shown the relitive size difference between the KV and the M4.
@ Herky: nice job on the grass and mud. What color green did you use?
Bob

warreni

Joined: August 14, 2007
KitMaker: 5,926 posts
Armorama: 712 posts

Posted: Friday, January 07, 2011 - 06:50 AM UTC
Well done Herky!! A man after my own heart with Camppaign builds. Get 'em done fast!.. BTW, what scale etc is the wee beasty?
Does any one know how to generate a campaign gallery?
Keep on slogging away peoples..

Does any one know how to generate a campaign gallery?
Keep on slogging away peoples..


Herchealer

Joined: July 31, 2003
KitMaker: 1,523 posts
Armorama: 710 posts

Posted: Friday, January 07, 2011 - 08:14 AM UTC
Thanks Guys!
@ Darren... I was very lucky to have an extended holiday and I also fly at night sometimes (3 times this week) which gives me about 6 hours in the house all to myself everyday.
@ Jeremy... For the mud texture was a mixture of Mr. Surfacer 500 (thinned) woodland scenics harvest grass cut into small pieces and some woodland scenics fine dirt. This was stippled on prior to painting. Model was then painted and powders were used. I used Mig russian earth and europe dust.
@ Bob... I used MM russian tank armor and then used russian earth and europe dust (mig powders) to vary the tone
@ Warren... 1/35 trumpeter.
Did I miss anyone questions?? Oh and the wifes hair dryer speed up the whole curing process!!!!!
Herky


warreni

Joined: August 14, 2007
KitMaker: 5,926 posts
Armorama: 712 posts

Posted: Friday, January 07, 2011 - 08:52 AM UTC
My flying days are over. I used to like flying over the Northern Territory on a clear night.. Would have been nice and peaceful except for those two turbofans down the back making lots of noise.. 

GaryKato

Joined: December 06, 2004
KitMaker: 3,694 posts
Armorama: 2,693 posts

Posted: Friday, January 07, 2011 - 09:11 AM UTC
Quoted Text
Does any one know how to generate a campaign gallery?
That is something that the Campaign Manager (or higher) has to do. There is already a gallery for this campaign Killer KVs. I usually create them when a campaign starts.

warreni

Joined: August 14, 2007
KitMaker: 5,926 posts
Armorama: 712 posts

Posted: Friday, January 07, 2011 - 10:52 AM UTC
Thanks for that Gary.
panzerdoc

Joined: August 22, 2010
KitMaker: 147 posts
Armorama: 81 posts

Posted: Friday, January 07, 2011 - 11:14 AM UTC
Bob,
Is it too late to take the fuel tank and the spare track off the fender? These are simple things you could do to make the build more correct.
Is it too late to take the fuel tank and the spare track off the fender? These are simple things you could do to make the build more correct.

Bigrip74

Joined: February 22, 2008
KitMaker: 5,026 posts
Armorama: 1,604 posts

Posted: Friday, January 07, 2011 - 11:39 AM UTC
Quoted Text
Bob,
Is it too late to take the fuel tank and the spare track off the fender? These are simple things you could do to make the build more correct.
Nah! I will leave em where they are and destroy eveything with paint and oils for rust and weathering.
Bob

vonHengest

Joined: June 29, 2010
KitMaker: 5,854 posts
Armorama: 4,817 posts

Posted: Friday, January 07, 2011 - 12:31 PM UTC
Bob: Lol, well done 
 Whereabouts in TX? And I may indeed actually build a KVII
Jeremy: Thanks for sharing. It turned out very convincing on your build. I think I'm going to pick up the rest of the materials I need and give it a try once I'm ready for weathering and all that good stuff

 Whereabouts in TX? And I may indeed actually build a KVII
Jeremy: Thanks for sharing. It turned out very convincing on your build. I think I'm going to pick up the rest of the materials I need and give it a try once I'm ready for weathering and all that good stuff


Bigrip74

Joined: February 22, 2008
KitMaker: 5,026 posts
Armorama: 1,604 posts

Posted: Friday, January 07, 2011 - 12:41 PM UTC
Jeremy  I just read my thread again and my glasses must not have been worn when I was typing, wow what a mess
  any way born and raised in the Dallas area, NAVY everywhere, Colorado (13 yrs) now with my brother in CA.
Bob
 I just read my thread again and my glasses must not have been worn when I was typing, wow what a mess
  any way born and raised in the Dallas area, NAVY everywhere, Colorado (13 yrs) now with my brother in CA.
Bob

warreni

Joined: August 14, 2007
KitMaker: 5,926 posts
Armorama: 712 posts

Posted: Saturday, January 08, 2011 - 04:17 PM UTC
Here are some progress shots...
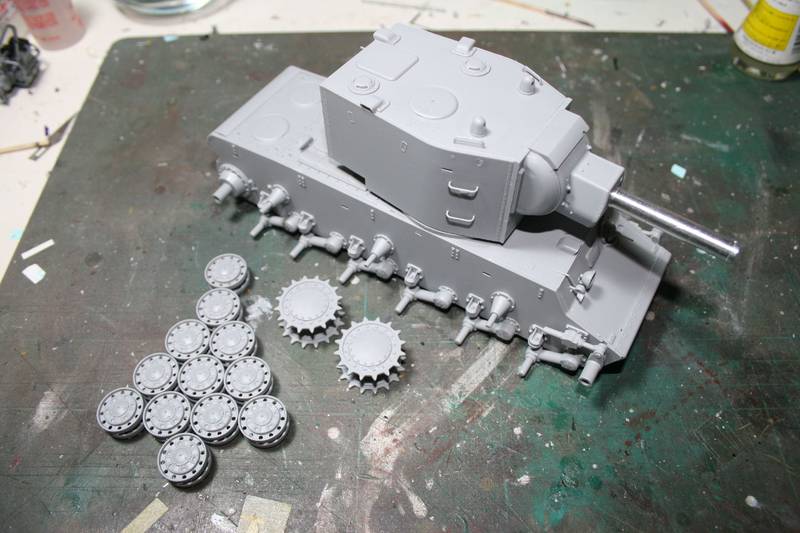
Here she is pre-final assembly and painting.
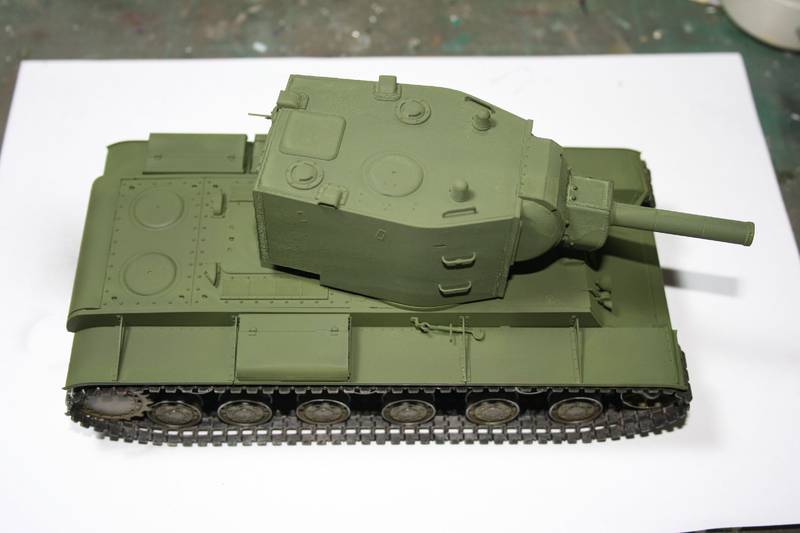
Here she is all gussied up and ready for decals etc.
Keep up the great work guys and gals.


Here she is pre-final assembly and painting.

Here she is all gussied up and ready for decals etc.
Keep up the great work guys and gals.


vonHengest

Joined: June 29, 2010
KitMaker: 5,854 posts
Armorama: 4,817 posts

Posted: Saturday, January 08, 2011 - 05:48 PM UTC
Quoted Text
JeremyI just read my thread again and my glasses must not have been worn when I was typing, wow what a mess
any way born and raised in the Dallas area, NAVY everywhere, Colorado (13 yrs) now with my brother in CA.

Bob
Now worries
 I've been around most of south central TX, and southern CA, but never Colorado. Which do you prefer?
Warren: Awesome! It's amazing how those massive turrets suddenly start looking almost normal when the tracks and fenders are added


Bigrip74

Joined: February 22, 2008
KitMaker: 5,026 posts
Armorama: 1,604 posts

Posted: Saturday, January 08, 2011 - 06:24 PM UTC
@ Warren: not fair your build is tooooo! clean (no glue marks, did you use any  ) and no knife marks where the flash was removed
  plus that green looks too much like the color should) and finally your exhausts are too uniform
  . Actually great build so far Warren, can't wait to see the finished product. What brand paint do you use, I have always had trouble determining which green to use for Russian armor. What after maket barrel are you attach and are they resonable here in the US?
@ Jeremy: it is a toss up, down deep my Texas roots still love my home state and how I remember the people but, I also love the weather in Colorado plus the different types of terrain where the grasslands / highplains desert ends and the foothills begin (where the Rockies start west of Denver out I70)
Bob
 ) and no knife marks where the flash was removed
  plus that green looks too much like the color should) and finally your exhausts are too uniform
  . Actually great build so far Warren, can't wait to see the finished product. What brand paint do you use, I have always had trouble determining which green to use for Russian armor. What after maket barrel are you attach and are they resonable here in the US?
@ Jeremy: it is a toss up, down deep my Texas roots still love my home state and how I remember the people but, I also love the weather in Colorado plus the different types of terrain where the grasslands / highplains desert ends and the foothills begin (where the Rockies start west of Denver out I70)
Bob
 |


