South Australia, Australia
Joined: August 14, 2007
KitMaker: 5,926 posts
Armorama: 712 posts
Posted: Saturday, January 08, 2011 - 06:25 PM UTC
Agree 100% Jeremy H.
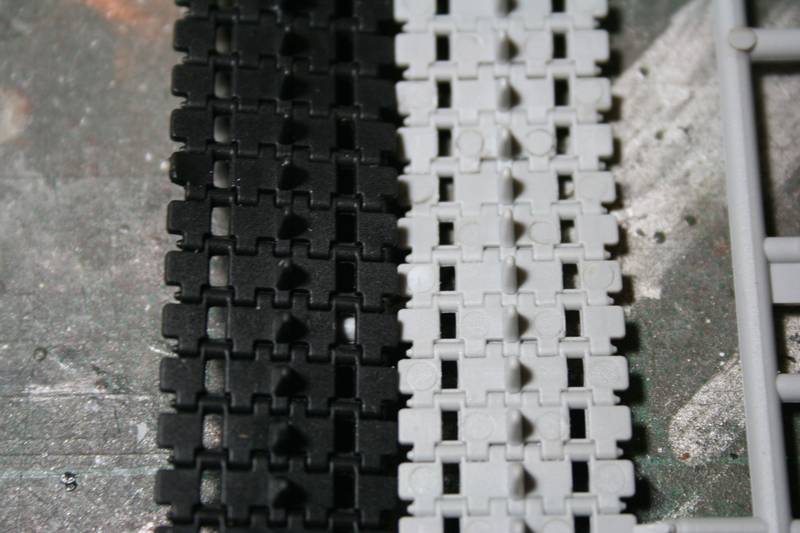
I used the rubber band tracks on this one as the link and length ones were covein ejector pin marks.

After a bit of paint and weathering the rubber tracks look just as good as the link and length ones in my opinion.
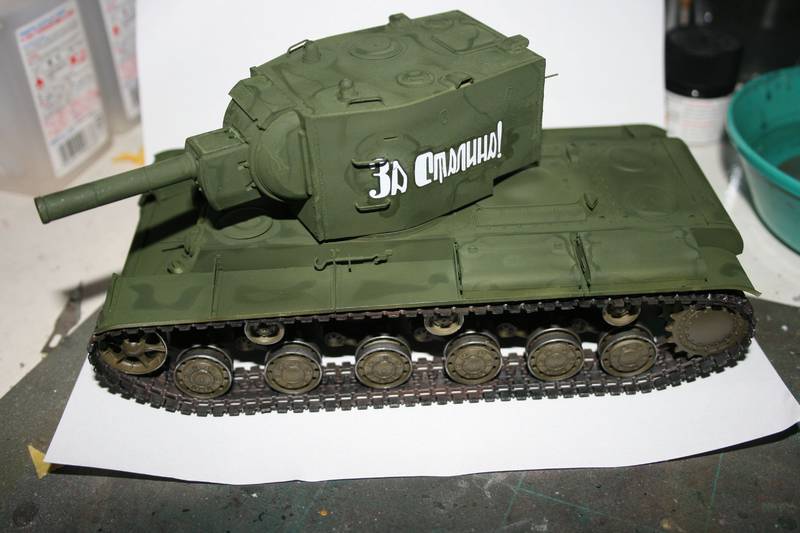
The KV is now drying after having the four decals applied, then I will do a little weathering but not as much as Jeremy C did on his terrific KV.
You may be right, I may be crazy.
South Australia, Australia
Joined: August 14, 2007
KitMaker: 5,926 posts
Armorama: 712 posts
Posted: Saturday, January 08, 2011 - 08:07 PM UTC
Hi Bob.
Thanks for the kind words. I am getting the hang of it after a few decades or so,,
The paint on the top sections is Tamiya XF-58, and on the bottom parts it is Gunze Aqueous 78. I am trying to get a new effect using two different colours, one os which looks like it has been stained by mud, etc... I hope..
I know I said I was going to build all these OOB, but the Trumpeter muzzle was about 1mm off centre, yes it was that bad. I had a Lion Roar set sitting there which had the aluminium barrel in it so I used that. I will get another barrel and use the rest of the PE stuff on my next KV-2, one I will take a bit more time on. So it is a Lion Roar barrel from their set which I do not think is too expensive. Let me go and check.
You may be right, I may be crazy.
South Australia, Australia
Joined: August 14, 2007
KitMaker: 5,926 posts
Armorama: 712 posts
Posted: Saturday, January 08, 2011 - 08:12 PM UTC
http://www.luckymodel.com/scale.aspx?item_no=LR%20E35060Here ya go.. Under $15 for the set with free shipping. Bargain!!
Or you can buy Barrels made by RB Production on Ebay for under a fiver...
You may be right, I may be crazy.
CMOT
 Editor-in-Chief
England - South West, United Kingdom
Joined: May 14, 2006
KitMaker: 10,954 posts
Armorama: 8,571 posts
Posted: Saturday, January 08, 2011 - 09:39 PM UTC
I will be starting on my KV soon and as I am being tight fisted the Finnish additions to the KV will have to be scratched. The part I am concerned about is the headlight guard on this tank, any suggestions on just how I should tackle it?
South Australia, Australia
Joined: August 14, 2007
KitMaker: 5,926 posts
Armorama: 712 posts
Posted: Sunday, January 09, 2011 - 09:18 AM UTC
Greetings one and all!!
Firstly, lots of good work happening here. Maintain the rage and get those KVs finished!
Secondly, as I am about as good at computer graphics as I am at remembering peoples names (crap!) can everyone come up with some campaign ribbons for this campaign? Then we can choose what people like best.
Keep at it peoples!
Warren
Fearful Campaign Leader
You may be right, I may be crazy.
New York, United States
Joined: March 08, 2010
KitMaker: 3,662 posts
Armorama: 3,078 posts
Posted: Sunday, January 09, 2011 - 09:49 AM UTC
Warren,
Me thinks you have been hoffing too much glue fumes

Jeremy made some a while back and there is 1 on the campaign page

Active Campaigns on the bench:
Operation Fall Gelb - Pz.Kpfw. IV Ausf. C
Engineering the Future - M-26 Recovery Vehicle
115 Campaigns completed
New York, United States
Joined: March 08, 2010
KitMaker: 3,662 posts
Armorama: 3,078 posts
Posted: Sunday, January 09, 2011 - 04:35 PM UTC
Hi guys, my KV is just about completely built but now tomorrow I will be on a quest to find some Evergreen Styrene to make the bolt heads for the fenders and then I will add the photoech fender brackets. Here is what it is looking like now

If I don't find what I need at some of the LHS I will order it on line then the KV will be put to the side until the stuff arrives

Got lots of other builds that are waiting there turn in line

Active Campaigns on the bench:
Operation Fall Gelb - Pz.Kpfw. IV Ausf. C
Engineering the Future - M-26 Recovery Vehicle
115 Campaigns completed
Texas, United States
Joined: February 22, 2008
KitMaker: 5,026 posts
Armorama: 1,604 posts
Posted: Sunday, January 09, 2011 - 05:00 PM UTC
Sal, what do you have in your scrap/extra parts box? I have used sprue trees, some are round and small enough. Use a fresh exacto blade to kinda shave off thin slices that will look like bolds. Or take some sprue hold it over a candle flame (far enough away that it does not catch fire) let it soften just so then stretch it out to the thicknes that you require and when cold cut into bolts ( practice a little bit it works) and this will save a trip to the LHS, use up some of the trash on the work bench, and save ya some money. PM me. BTW that KV looks pretty good so far.
Bob
If it aint broke dont fix it.
South Australia, Australia
Joined: August 14, 2007
KitMaker: 5,926 posts
Armorama: 712 posts
Posted: Sunday, January 09, 2011 - 05:01 PM UTC
Hmmm.. You may be right Sal.. Maybe 10 models on the go at once is too many.. all those cement and paint fumes..

Forget my last post peoples. There is a nice, shiny ribbon sitting there already.. But now I must return to my bench.. Slave at work all day and then slave at the model bench when I return... A real modellers work is never done..

You may be right, I may be crazy.
South Australia, Australia
Joined: August 14, 2007
KitMaker: 5,926 posts
Armorama: 712 posts
Posted: Sunday, January 09, 2011 - 07:27 PM UTC
Well here she is.. my KV-2

I tried to get it to look like it was early in the morning and the dew was still evaporating from the tank.. Do you think it worked?
Keep up the great work Everyone. Anyone with a spare sandbag or two may want to send them my way..

You may be right, I may be crazy.
Texas, United States
Joined: February 22, 2008
KitMaker: 5,026 posts
Armorama: 1,604 posts
Posted: Sunday, January 09, 2011 - 08:05 PM UTC
Warren, how did you achieve the effect?
Bob
If it aint broke dont fix it.
South Australia, Australia
Joined: August 14, 2007
KitMaker: 5,926 posts
Armorama: 712 posts
Posted: Sunday, January 09, 2011 - 08:14 PM UTC
I knew someone would ask that..

Basically I washed the model in a very weak alkiline solution (salty) and it came out like that. I don't know if I could repeat it, but this one worked fine!..

You may be right, I may be crazy.
Texas, United States
Joined: June 29, 2010
KitMaker: 5,854 posts
Armorama: 4,817 posts
Posted: Monday, January 10, 2011 - 12:39 AM UTC
Warren and Sal: Both of your builds are coming along nicely!
Nova Scotia, Canada
Joined: October 25, 2010
KitMaker: 121 posts
Armorama: 121 posts
Posted: Tuesday, January 18, 2011 - 06:30 AM UTC
Hi folks. Seeing how I was starting my KV-1 I thought I might as well join the campaign. I'm using the model 1942 lightweight cast turret version. This is what I have so far.

I'm in need of some photos. None of the photos I'm finding have the flat angled piece on the back off the engine deck.

Every KV-1 pick I'm finding has the rounded rear piece. I'd appreciate it if someone could point me in the right direction.


Texas, United States
Joined: February 22, 2008
KitMaker: 5,026 posts
Armorama: 1,604 posts
Posted: Tuesday, January 18, 2011 - 06:52 AM UTC
Collins, nice clean build so far.
Bob
If it aint broke dont fix it.
Texas, United States
Joined: June 29, 2010
KitMaker: 5,854 posts
Armorama: 4,817 posts
Posted: Tuesday, January 18, 2011 - 03:41 PM UTC
Quoted Text
I'm in need of some photos. None of the photos I'm finding have the flat angled piece on the back off the engine deck.
Every KV-1 pick I'm finding has the rounded rear piece. I'd appreciate it if someone could point me in the right direction.


I would suggest that you take a look at Neil's dedicated site 4bogreen. He knows his stuff when it comes to the KV series and has a section dedicated to modeling accurate replicas from the Trumpeter kits. Check out his recipes
here . More than likely your question will be addressed here, and if not he's a friendly guy and I'm sure he would be more than happy to answer any questions you have.
South Australia, Australia
Joined: August 14, 2007
KitMaker: 5,926 posts
Armorama: 712 posts
Posted: Tuesday, January 18, 2011 - 08:56 PM UTC
I would say that as you are building the simplified version they simplified at the back as well and used a flat plate of steel rather than the much more difficult to produce and afix curved piece.. Just a guess..
You may be right, I may be crazy.
Nova Scotia, Canada
Joined: October 25, 2010
KitMaker: 121 posts
Armorama: 121 posts
Posted: Wednesday, January 19, 2011 - 01:53 AM UTC
I think I have it sorted guys. It looks like the earlier version would be the easier way to go. I can use the shorter driver comp. armour that comes with the kit and the 6 bolt hubs. Everything else is a matter of some did some didn't. The only thing I will be missing as far as I can see is the earlier swing arms with squared ends. Just don't tell anybody okay.

Nova Scotia, Canada
Joined: October 25, 2010
KitMaker: 121 posts
Armorama: 121 posts
Posted: Friday, January 21, 2011 - 01:50 AM UTC
I'm getting close to having this built before painting. I decided to go with the three bolt hub as Neil suggested the six bolt hub is for the earlier swing arm not included in the kit. I used some Tamiya putty to try and create a little cast texture. Not sure if I went about that the right way.

I'm trying to figure out if I will be able to get the tracks on after painting and the fenders are installed. Looks like it will be a bit tight. I was planning on using the styrene tracks not the rubber ones. How does everyone else usually do it?
Texas, United States
Joined: June 29, 2010
KitMaker: 5,854 posts
Armorama: 4,817 posts
Posted: Friday, January 21, 2011 - 02:54 PM UTC
A lot of builders install the tracks first and then install the fenders. That's the way I'm going to do it.
Nova Scotia, Canada
Joined: October 25, 2010
KitMaker: 121 posts
Armorama: 121 posts
Posted: Saturday, January 22, 2011 - 01:10 AM UTC
Maybe I'll do like I did with my KV-2 and put it completely together and then paint it. It's a little tricky painting around the already installed fenders and track but can certainly be done.
New York, United States
Joined: March 08, 2010
KitMaker: 3,662 posts
Armorama: 3,078 posts
Posted: Saturday, January 22, 2011 - 02:06 AM UTC
My KV build has been stalled still trying to figure out the AM PE fender brackets

but all hope is not lost I plan on attacking it Monday afternoon when I have some extra time

Active Campaigns on the bench:
Operation Fall Gelb - Pz.Kpfw. IV Ausf. C
Engineering the Future - M-26 Recovery Vehicle
115 Campaigns completed
South Australia, Australia
Joined: August 14, 2007
KitMaker: 5,926 posts
Armorama: 712 posts
Posted: Saturday, January 22, 2011 - 07:09 AM UTC
How I do it is paint everything below the fenders, build the tracks, paint and install them. Then I paint underneath the fenders and install them. Then when I have finished the top all you have to do while painting is to slip a piece of paper between the tracks and fenders and that protects your finished undercarriage from any paint. Pieces of paper are much cheaper than masking tape and if you seal the ends are just as good.
You may be right, I may be crazy.
Nova Scotia, Canada
Joined: October 25, 2010
KitMaker: 121 posts
Armorama: 121 posts
Posted: Saturday, January 22, 2011 - 12:31 PM UTC
That is a pretty good way to do it Warren. The paper makes sense.
New York, United States
Joined: March 08, 2010
KitMaker: 3,662 posts
Armorama: 3,078 posts
Posted: Sunday, January 30, 2011 - 04:46 PM UTC
Ok got the time and the courage to tackle this AM PE on my KV-1 here is where I'm @

Comments please this is my 1st time using this type of PE


Active Campaigns on the bench:
Operation Fall Gelb - Pz.Kpfw. IV Ausf. C
Engineering the Future - M-26 Recovery Vehicle
115 Campaigns completed


