Hi, guys,
This is my first post on Armorama, and I intend to build the Academy Tiger I with interior.
Any suggestion and tip will be welcomed. I'll post progress pictures as it (I expect) go forward.
Regards,
Antonio Plais
Brazilian modeler
Campaigns
Where Armorama group builds can be discussed, organized, and updates posted.
Where Armorama group builds can be discussed, organized, and updates posted.
Hosted by Darren Baker, Richard S.
Tiger Campaign

AntonioPlais

Joined: June 21, 2011
KitMaker: 8 posts
Armorama: 0 posts

Posted: Thursday, June 23, 2011 - 06:03 PM UTC
BigSmitty

Joined: October 01, 2008
KitMaker: 597 posts
Armorama: 439 posts

Posted: Thursday, June 23, 2011 - 06:10 PM UTC
Antonio,
Welcome to the campaign. Looking forward to that interior!
Greg,
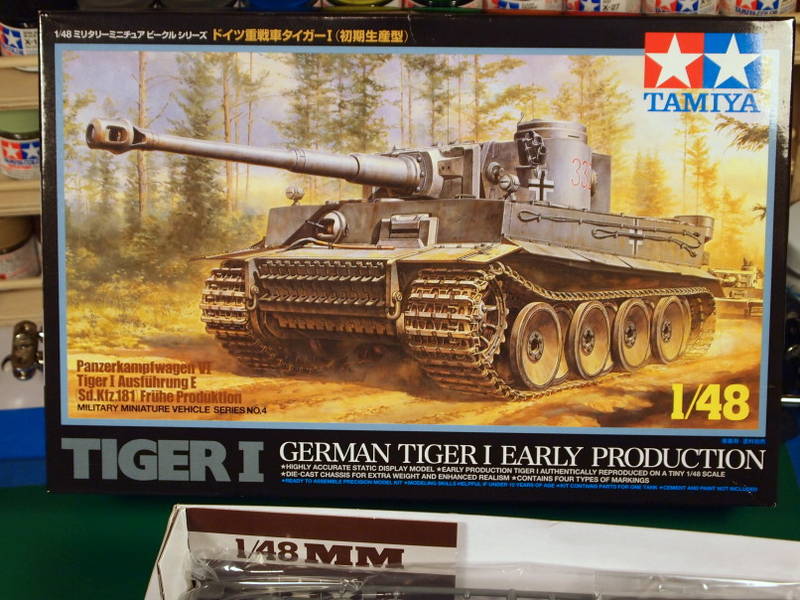
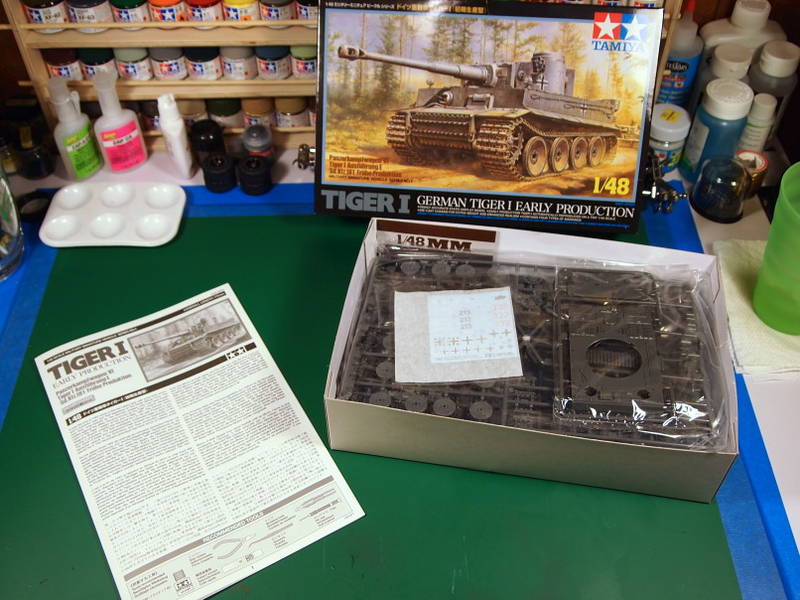
Wish I would have waited for your response on the Tiger I. However, since I get a club discount at my hobby shop, I went ahead and picked up the 1/48 Tiger I Early, although they did have the AFV Club Tiger I Late Production that I may pick up as well, since it was about $7.00 cheaper before my discount. I'm not crazy about the die cast hulls on most of the Tamiya 1/48 kits, but on my M10 Tank Destroyer I did for the 1:48 campaign, it wasn't too horrible, and I imagine with the amount of road wheels on the Tiger, most won't be seen anyways.
Here's my entry for the campaign. I will be doing the Dark Yellow/Green camo for the 2nd Pz Reg, Kursk, Summer 1943.


GregCloseCombat

Joined: June 30, 2008
KitMaker: 2,408 posts
Armorama: 2,394 posts

Posted: Thursday, June 23, 2011 - 07:54 PM UTC
The Kursk version is a great choice.
Check out kit tips and 1/35 comparison here:
http://www.perthmilitarymodelling.com/reviews/48/tamiya/tam32504.htm
and look through the galleries on track48.com and onefortyeight.com
Have fun
Check out kit tips and 1/35 comparison here:
http://www.perthmilitarymodelling.com/reviews/48/tamiya/tam32504.htm
and look through the galleries on track48.com and onefortyeight.com
Have fun

Matt182

Joined: May 20, 2010
KitMaker: 269 posts
Armorama: 243 posts

Posted: Friday, June 24, 2011 - 02:05 AM UTC
Hi all,
I have been flicking through the whole thread, the builds so far are excellent. Great work guys.
I have just enlisted and I will be entering 2 builds for the campaign. First will be the Trumpeter 1/16 King tiger which I started in April. Second will be the AFV club 1/48 Tiger 1 early.
I have spure/box shots of the trumpeter KT before I started which I will post later. The afv club kit is still in the post somewhere so that will have to wait.
Here is a pic of the KT after my last session

Seeing as Graham has already done the Porsche version it only seems right to have the Henschel version in the campaign too
I have been flicking through the whole thread, the builds so far are excellent. Great work guys.

I have just enlisted and I will be entering 2 builds for the campaign. First will be the Trumpeter 1/16 King tiger which I started in April. Second will be the AFV club 1/48 Tiger 1 early.
I have spure/box shots of the trumpeter KT before I started which I will post later. The afv club kit is still in the post somewhere so that will have to wait.
Here is a pic of the KT after my last session
Seeing as Graham has already done the Porsche version it only seems right to have the Henschel version in the campaign too


BigSmitty

Joined: October 01, 2008
KitMaker: 597 posts
Armorama: 439 posts

Posted: Friday, June 24, 2011 - 03:02 AM UTC
Greg,
The PMMS site was the first place I looked for reviews and then the comparison they had with the Skybow kit. I can live with some of the minor issues with the bolt detail missing on the road wheels, and the one piece muffler caps. I still have a couple of 1/35 Tigers that I can look at and scratch the little 5 piece rods for the caps. I also have the German Infantry set from Tamiya that includes four tank commander figures, and a couple look good for this Tiger, so I'll probably throw him in as well.
The PMMS site was the first place I looked for reviews and then the comparison they had with the Skybow kit. I can live with some of the minor issues with the bolt detail missing on the road wheels, and the one piece muffler caps. I still have a couple of 1/35 Tigers that I can look at and scratch the little 5 piece rods for the caps. I also have the German Infantry set from Tamiya that includes four tank commander figures, and a couple look good for this Tiger, so I'll probably throw him in as well.

AntonioPlais

Joined: June 21, 2011
KitMaker: 8 posts
Armorama: 0 posts

Posted: Friday, June 24, 2011 - 03:39 AM UTC
Guys,
Just an initial question... does all Tiger I early production have Zimmerit applied or is it correct to build one for the Kursk campaign without it? If Zimmerit is mandatory, is there an aftermarket add-on you could recommend?
I intend to build mine on 2nd SS Panzer Division, "Das Reich", Kursk, 1943, three colour scheme.
Regards,
Matt182

Joined: May 20, 2010
KitMaker: 269 posts
Armorama: 243 posts

Posted: Friday, June 24, 2011 - 03:50 AM UTC
Hi Antonio,
Zimmert was not introduced until late in 1943, therefor you don't need to apply zimmerit to any vehicle that fought at Kursk.
regards
Matt
Zimmert was not introduced until late in 1943, therefor you don't need to apply zimmerit to any vehicle that fought at Kursk.
regards
Matt


BigSmitty

Joined: October 01, 2008
KitMaker: 597 posts
Armorama: 439 posts

Posted: Friday, June 24, 2011 - 03:59 AM UTC
Quoted Text
Guys,
Just an initial question... does all Tiger I early production have Zimmerit applied or is it correct to build one for the Kursk campaign without it? If Zimmerit is mandatory, is there an aftermarket add-on you could recommend?
I intend to build mine on 2nd SS Panzer Division, "Das Reich", Kursk, 1943, three colour scheme.
Regards,
Antonio,
As stated, no Tiger at Kursk had Zimmerit. Also I read that the "Das Reich" Tigers at Kursk had some modifications to their Tigers, one of the biggest was the removal of the smoke grenade launchers, which were prone to catching fire randomly. There were some other mods, but I'll have to find the references to get them all down.

BigSmitty

Joined: October 01, 2008
KitMaker: 597 posts
Armorama: 439 posts

Posted: Saturday, June 25, 2011 - 04:29 AM UTC
Update from late last night and this morning.
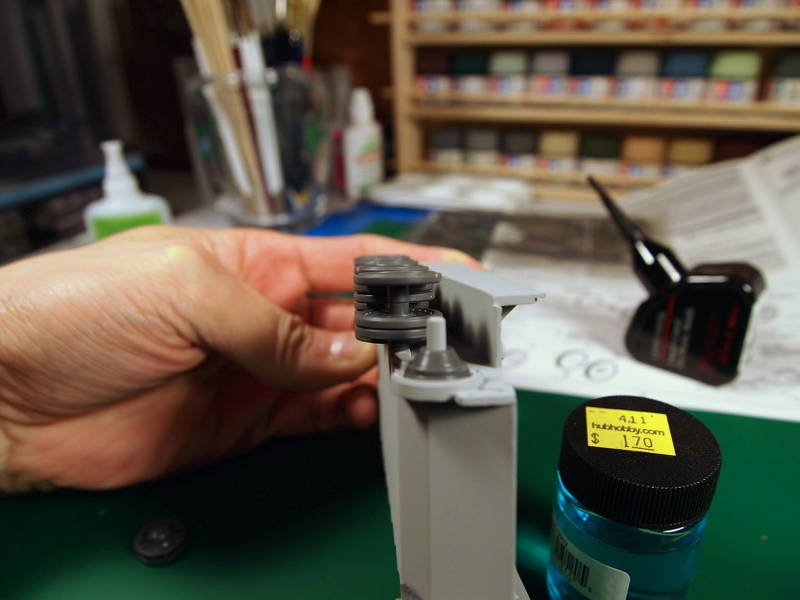
Finished the lower hull basic construction. The road wheels were not nearly as tiresome as the 1/35 Tamiya Tiger Is. The sprue connection points on the wheels were very small, and most required no cleanup after clipping them off long from the sprue and using a new #11 blade tip and the cutting mat to clip the sprue runners off.
They also lined up really well:
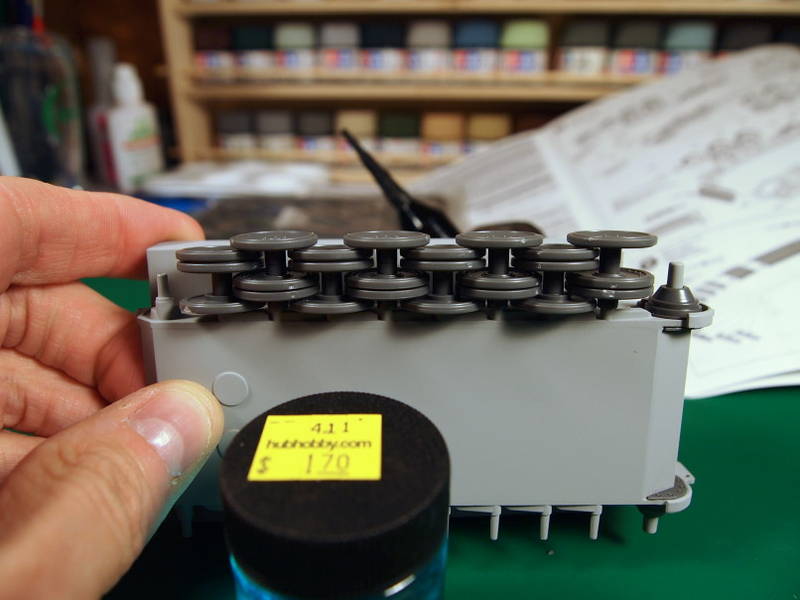
Now painting roadwheels is the single biggest thing I despise, but I have a plan that works pretty well, and is quick.
First I paint the black (lightened black for rubber) on the parts of the wheels that are rubber. No need to be careful, as I'll show in the next couple of photos:
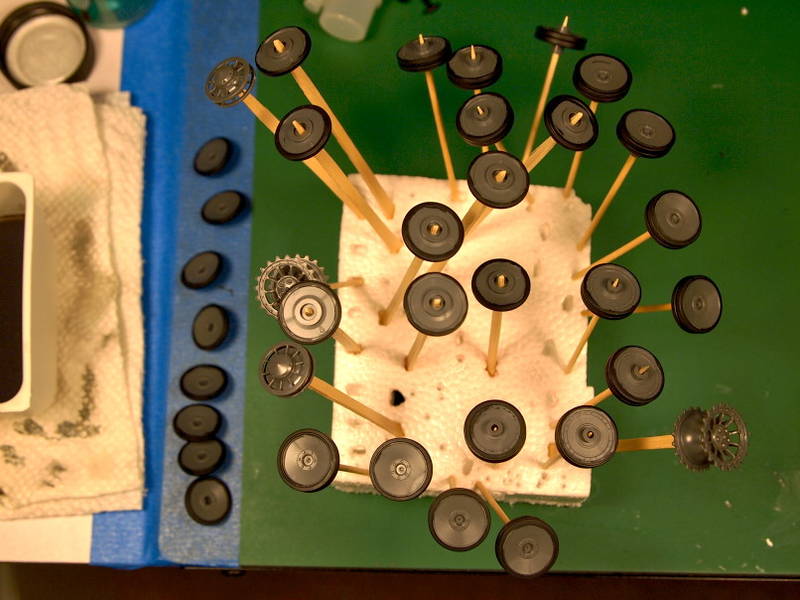
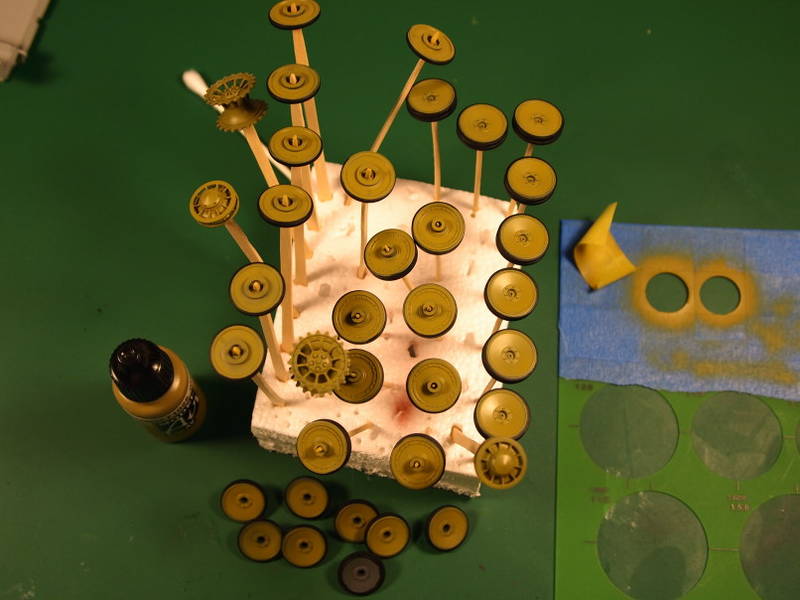
I use a draftsman's template for the circles. Of course this is not a perfect world, or Murphy's Law, or whatever, but most of the 1/48 road wheels are right between the two sizes on my template. I will normally overshoot some of the dark yellow, and go back with some thinned black to recover the edges. But I did all of these in the picture is less than five minutes, with probably another five minutes needed to clean up the overspray:
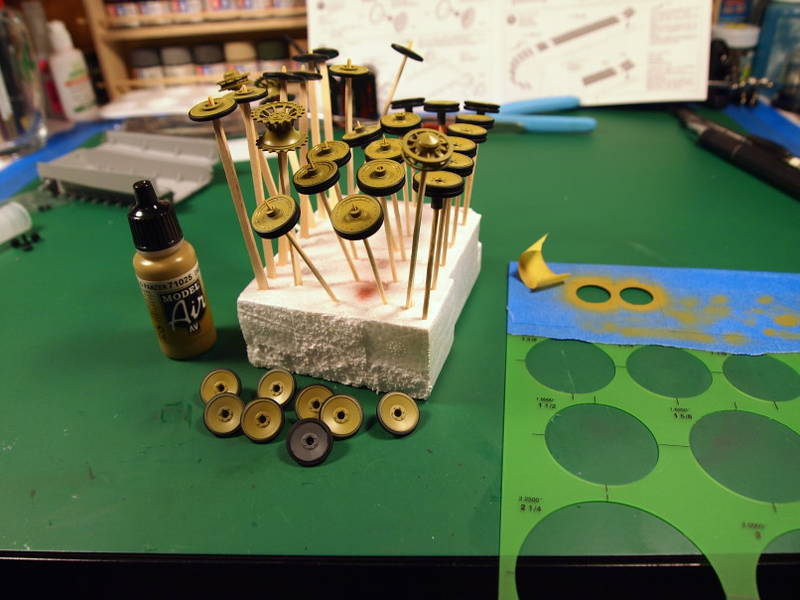
And yes, I know I missed one. Evidently I can't count to eight at 9AM on a Saturday morning...
That's all for now, looking forward to getting more done this weekend, spousal and daddy duties permitting...
Finished the lower hull basic construction. The road wheels were not nearly as tiresome as the 1/35 Tamiya Tiger Is. The sprue connection points on the wheels were very small, and most required no cleanup after clipping them off long from the sprue and using a new #11 blade tip and the cutting mat to clip the sprue runners off.
They also lined up really well:


Now painting roadwheels is the single biggest thing I despise, but I have a plan that works pretty well, and is quick.
First I paint the black (lightened black for rubber) on the parts of the wheels that are rubber. No need to be careful, as I'll show in the next couple of photos:


I use a draftsman's template for the circles. Of course this is not a perfect world, or Murphy's Law, or whatever, but most of the 1/48 road wheels are right between the two sizes on my template. I will normally overshoot some of the dark yellow, and go back with some thinned black to recover the edges. But I did all of these in the picture is less than five minutes, with probably another five minutes needed to clean up the overspray:

And yes, I know I missed one. Evidently I can't count to eight at 9AM on a Saturday morning...
That's all for now, looking forward to getting more done this weekend, spousal and daddy duties permitting...
rebelsoldier

Joined: June 30, 2004
KitMaker: 1,336 posts
Armorama: 757 posts

Posted: Saturday, June 25, 2011 - 05:06 AM UTC
lookin good!
i like how you have the wheels on those strirring sticks, carved to fit works for me, or else i am seeing wrong, loll.
i like how you have the wheels on those strirring sticks, carved to fit works for me, or else i am seeing wrong, loll.

BigSmitty

Joined: October 01, 2008
KitMaker: 597 posts
Armorama: 439 posts

Posted: Saturday, June 25, 2011 - 05:39 AM UTC
Reb,
Not carved to fit per se, they are just tapered on one end. I think I picked up a bag of 500 at Michael's in the craft section for $2.50 or something like that. Most of the 1/35 wheels fit onto them pretty well, and the larger 1/48 openings as well (drive sprocket, return roller,etc). The foam block is a corner from the packing box my HDTV came in. I figure for the money I spent on it, I can use every bit of the packing, the box, the plastic sheet, everything!
Not carved to fit per se, they are just tapered on one end. I think I picked up a bag of 500 at Michael's in the craft section for $2.50 or something like that. Most of the 1/35 wheels fit onto them pretty well, and the larger 1/48 openings as well (drive sprocket, return roller,etc). The foam block is a corner from the packing box my HDTV came in. I figure for the money I spent on it, I can use every bit of the packing, the box, the plastic sheet, everything!

GregCloseCombat

Joined: June 30, 2008
KitMaker: 2,408 posts
Armorama: 2,394 posts

Posted: Saturday, June 25, 2011 - 07:58 AM UTC
Great start Matt!

AntonioPlais

Joined: June 21, 2011
KitMaker: 8 posts
Armorama: 0 posts

Posted: Saturday, June 25, 2011 - 09:29 AM UTC
First step (not always following the instruction sheet order  ).
).
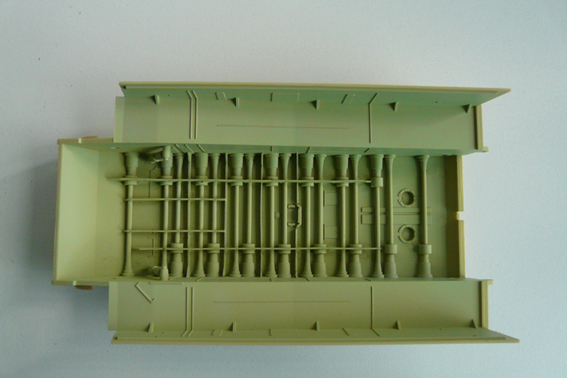
This picture shows the lower hull with the torsion bars installed. I added stiffeners made of 0,040" sheet styrene. Next step... wheels. I'm waiting for some Aber photoetch detailing sets to continue the interior hull. Meanwhile I'll move forward with some sub-assembies.
Regards,
 ).
).This picture shows the lower hull with the torsion bars installed. I added stiffeners made of 0,040" sheet styrene. Next step... wheels. I'm waiting for some Aber photoetch detailing sets to continue the interior hull. Meanwhile I'll move forward with some sub-assembies.
Regards,

Matt182

Joined: May 20, 2010
KitMaker: 269 posts
Armorama: 243 posts

Posted: Saturday, June 25, 2011 - 12:55 PM UTC
great start Matt, I remember when i did the early tiger in 1/48. road wheels drove me insane! So what do I do, buy another one!
Antonio, good start. I think it is easier to build a kit with interior in your own steps. Lots to think about and it will make painting easier if you plan and build in your own steps.
Antonio, good start. I think it is easier to build a kit with interior in your own steps. Lots to think about and it will make painting easier if you plan and build in your own steps.

BigSmitty

Joined: October 01, 2008
KitMaker: 597 posts
Armorama: 439 posts

Posted: Sunday, June 26, 2011 - 06:03 AM UTC
Matt,
I have three other 1/35 Tiger kits, including the old Tamiya "Otto Carius" Mid Production that was the original kit for this campaign. I (rather my 3 year old) stepped on it last month in the middle of our move, and I was probably 80% finished with it. Those road wheels were a bit of a pain. These had such small sprue attachment points, and hardly any mold seam to speak of. MUCH easier that the original one.
To update y'all from last night and this morning:
Decided to change my usual steps a bit, mainly due to the fact that the lower hull has zero detail, and install the roadwheels and sprockets prior to finishing the basic assembly. I airbrushed the lower hull first, and allowed it to dry most of yesterday and overnight, then cleaned up 24 of the 32 road wheels. I ended up not liking how dark my regular "dark rubber" dried, so I redid all the wheels with the Panzer Aces "Dark Rubber" lightened with a drop or two of the Panzer Aces "Splinter Base", sort of a very very light grey color. I like the results better. Let all the wheels dry overnight, then attached each "layer" at a time, applying a thin wash before installing the next outer layer.
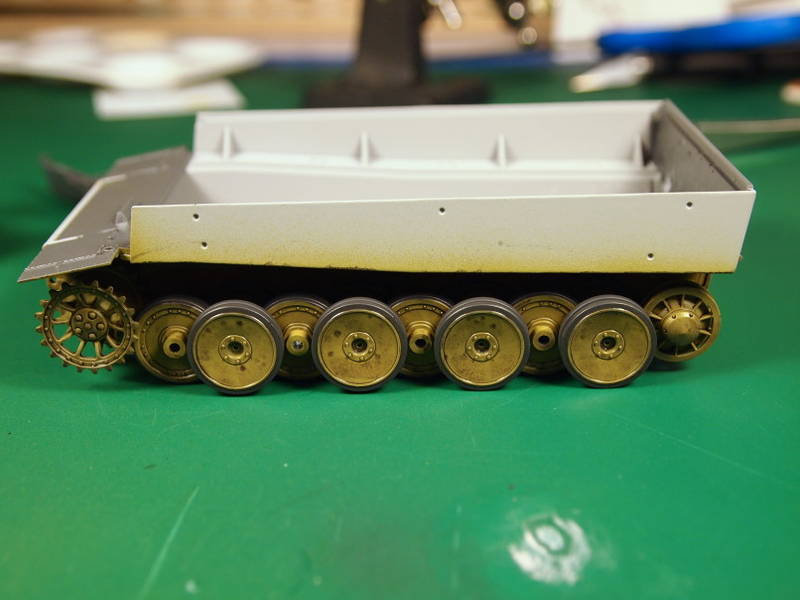
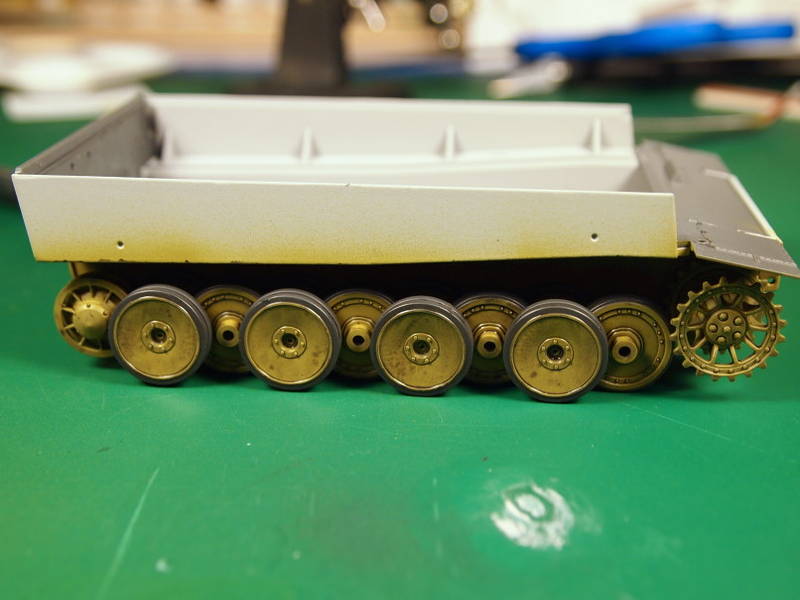
The outer two layers (only one shown above) will be a little heavier wash, but I'm taking a little Windex to remove a bit of the splotchiness. These will get some dusting at the end of the build, so I'm not too worried. Just wanted to make sure the bolt detail got some attention.
Since I forgot to paint one of the last wheels, I am thinking of either using the "cap" to show a removed wheel or do something like this:
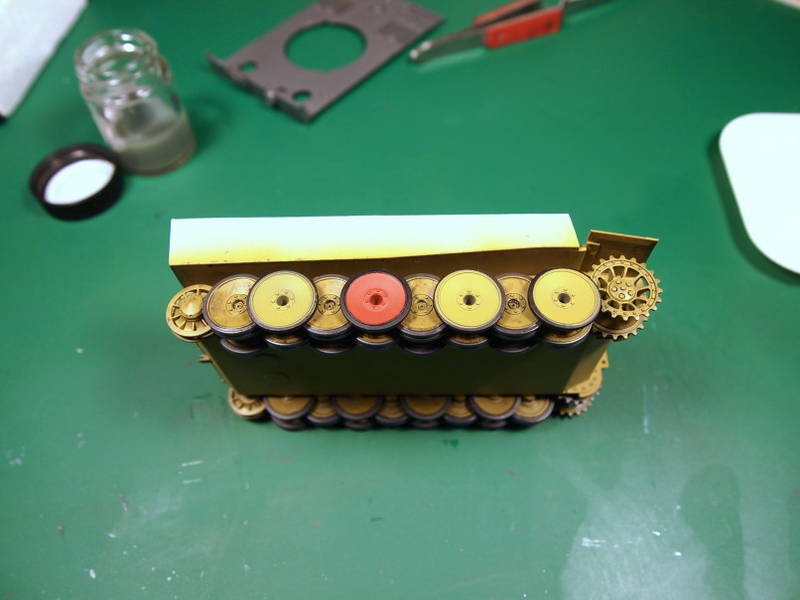
This would show a replaced road wheel, still in red oxide primer. If I go this route, I'll probably bang up the skirt above that wheel a bit. What do you guys think would be more appropriate? This is Kursk, summer 1943.
Guess that's about it for now. Getting ready for a cookout this afternoon, so I may be cited for MWI later on this evening. Una mas cerveza, por favor!
I have three other 1/35 Tiger kits, including the old Tamiya "Otto Carius" Mid Production that was the original kit for this campaign. I (rather my 3 year old) stepped on it last month in the middle of our move, and I was probably 80% finished with it. Those road wheels were a bit of a pain. These had such small sprue attachment points, and hardly any mold seam to speak of. MUCH easier that the original one.
To update y'all from last night and this morning:
Decided to change my usual steps a bit, mainly due to the fact that the lower hull has zero detail, and install the roadwheels and sprockets prior to finishing the basic assembly. I airbrushed the lower hull first, and allowed it to dry most of yesterday and overnight, then cleaned up 24 of the 32 road wheels. I ended up not liking how dark my regular "dark rubber" dried, so I redid all the wheels with the Panzer Aces "Dark Rubber" lightened with a drop or two of the Panzer Aces "Splinter Base", sort of a very very light grey color. I like the results better. Let all the wheels dry overnight, then attached each "layer" at a time, applying a thin wash before installing the next outer layer.


The outer two layers (only one shown above) will be a little heavier wash, but I'm taking a little Windex to remove a bit of the splotchiness. These will get some dusting at the end of the build, so I'm not too worried. Just wanted to make sure the bolt detail got some attention.
Since I forgot to paint one of the last wheels, I am thinking of either using the "cap" to show a removed wheel or do something like this:

This would show a replaced road wheel, still in red oxide primer. If I go this route, I'll probably bang up the skirt above that wheel a bit. What do you guys think would be more appropriate? This is Kursk, summer 1943.
Guess that's about it for now. Getting ready for a cookout this afternoon, so I may be cited for MWI later on this evening. Una mas cerveza, por favor!


GregCloseCombat

Joined: June 30, 2008
KitMaker: 2,408 posts
Armorama: 2,394 posts

Posted: Sunday, June 26, 2011 - 07:11 PM UTC
I liked the grey wheel, but red works too. Coming along nicely.
Here's the 1/48 AFV Club I'm still working on. I glue Everything together and then paint around.


Here's the 1/48 AFV Club I'm still working on. I glue Everything together and then paint around.


Matt182

Joined: May 20, 2010
KitMaker: 269 posts
Armorama: 243 posts

Posted: Sunday, June 26, 2011 - 10:40 PM UTC
Matt,
Sorry to hear about your original build, models always seem to be the first victim of moving. I had just finished a U-boat before we moved and my girlfriend decided to drop a box on it
Your tiger is looking great, nice job on painting those wheels. The clean up is very easy on that kit, compared to the larger kits. Just the painting of 48 wheels is far from fun. As for the redoxide wheel, I think it looks cool but i'm not too sure if it would be accurate. As far as I know, most equipment/replacments at that time were still being painted dark yellow before leaving the factory. I'd say leave it redoxide though, adds a nice, personal touch to the model.
Just one question. Have you glued the front fenders/plate to the hull? If you have, you may have a hard time fitting the tracks.
Greg,
Looking good! Did you have any problems with the decals in that kit? I found they just fall apart at the slightest touch.
Sorry to hear about your original build, models always seem to be the first victim of moving. I had just finished a U-boat before we moved and my girlfriend decided to drop a box on it

Your tiger is looking great, nice job on painting those wheels. The clean up is very easy on that kit, compared to the larger kits. Just the painting of 48 wheels is far from fun. As for the redoxide wheel, I think it looks cool but i'm not too sure if it would be accurate. As far as I know, most equipment/replacments at that time were still being painted dark yellow before leaving the factory. I'd say leave it redoxide though, adds a nice, personal touch to the model.
Just one question. Have you glued the front fenders/plate to the hull? If you have, you may have a hard time fitting the tracks.
Greg,
Looking good! Did you have any problems with the decals in that kit? I found they just fall apart at the slightest touch.

GregCloseCombat

Joined: June 30, 2008
KitMaker: 2,408 posts
Armorama: 2,394 posts

Posted: Monday, June 27, 2011 - 03:38 AM UTC
I used Archer transfers: 1/35 numbers and 1/48 crosses. Guess I lucked out then

BigSmitty

Joined: October 01, 2008
KitMaker: 597 posts
Armorama: 439 posts

Posted: Monday, June 27, 2011 - 03:58 AM UTC
Matt,
Yeah I not only glued the front plate on, but I wasn't thinking and glued the rear guards on as well. Which means I can't get the L&L tracks on. I tried them earlier, and didn't like the look of the way the track sagged from the drive sprocket on back. Luckily I found a set of AFV's 1/48 Tiger I Early workable tracks on Sprue Brothers, so I'll have those on Wednesday. Yeah, definitely one of those MWI (modelling while intoxicated) moments with the rear fender "flaps".
Here's how the Cat sits now:
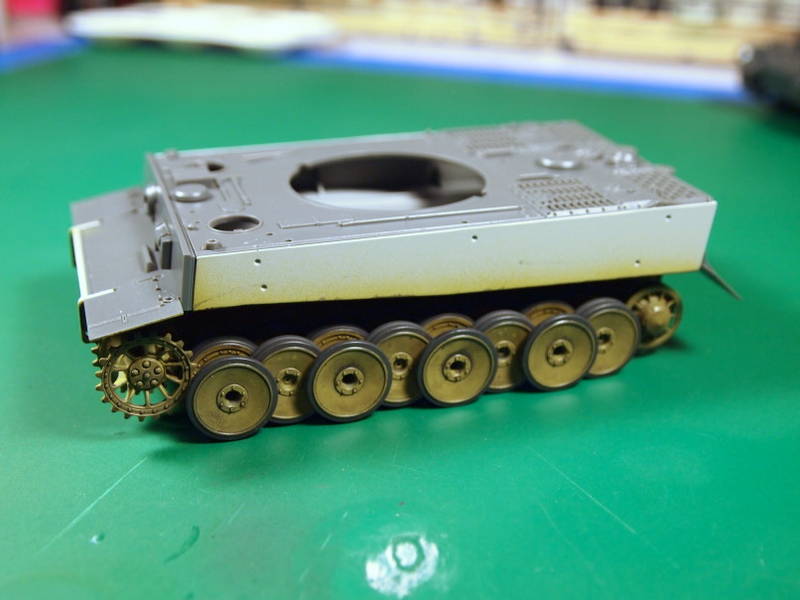
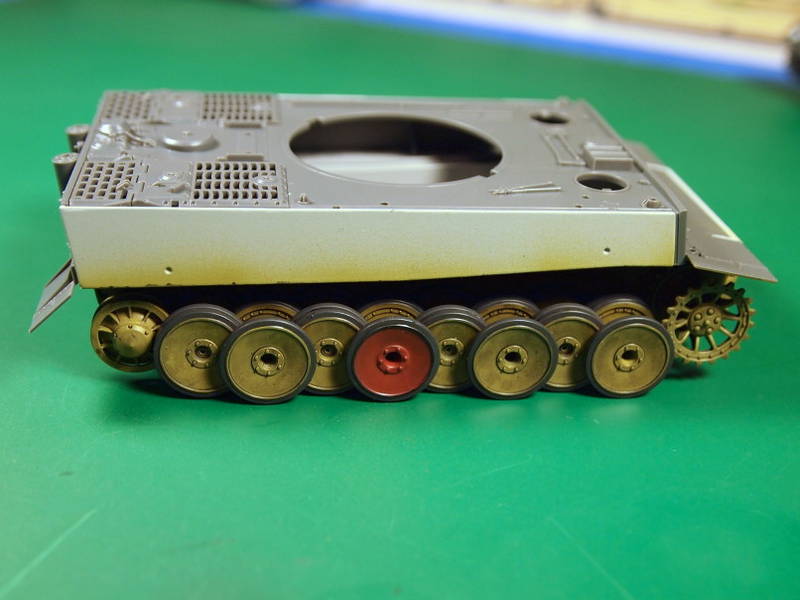
I agree with both you and Greg that the red wheel, while cool and "personal" wasn't right. I'll go back with some Dark Yellow and fix it. Spent a lot of time last night looking for photos of "S33" the "Das Reich" Tiger I I'm doing, and it looks like the smoke grenade launchers were removed (leaving the brackets), along with the muffler exhaust "covers" over the tops of the exhausts. But then I read that the photos I found of "S33" where actually the old "S22" and changed when they got 6 new Tigers in the summer of 1943. Probably a case of modeller's TMI.
Yeah I not only glued the front plate on, but I wasn't thinking and glued the rear guards on as well. Which means I can't get the L&L tracks on. I tried them earlier, and didn't like the look of the way the track sagged from the drive sprocket on back. Luckily I found a set of AFV's 1/48 Tiger I Early workable tracks on Sprue Brothers, so I'll have those on Wednesday. Yeah, definitely one of those MWI (modelling while intoxicated) moments with the rear fender "flaps".
Here's how the Cat sits now:


I agree with both you and Greg that the red wheel, while cool and "personal" wasn't right. I'll go back with some Dark Yellow and fix it. Spent a lot of time last night looking for photos of "S33" the "Das Reich" Tiger I I'm doing, and it looks like the smoke grenade launchers were removed (leaving the brackets), along with the muffler exhaust "covers" over the tops of the exhausts. But then I read that the photos I found of "S33" where actually the old "S22" and changed when they got 6 new Tigers in the summer of 1943. Probably a case of modeller's TMI.
Matt182

Joined: May 20, 2010
KitMaker: 269 posts
Armorama: 243 posts

Posted: Monday, June 27, 2011 - 06:20 AM UTC
Matt,
Those wheels are looking great. I guess if you want to be accurate then painting that wheel yellow would be the best thing to do. I look forward to seeing the AFV club tracks as I am considering them for my build.
My tiger turned up today.

Unfortunetly my kit as come with the lower hull from the late version so I will wait for the replacement before I start.
Also theres the box pictures from the 1/16 King Tiger


Those wheels are looking great. I guess if you want to be accurate then painting that wheel yellow would be the best thing to do. I look forward to seeing the AFV club tracks as I am considering them for my build.
My tiger turned up today.

Unfortunetly my kit as come with the lower hull from the late version so I will wait for the replacement before I start.
Also theres the box pictures from the 1/16 King Tiger

rebelsoldier

Joined: June 30, 2004
KitMaker: 1,336 posts
Armorama: 757 posts

Posted: Monday, June 27, 2011 - 08:52 AM UTC
big smitty
thanks for the tip, will get a bag just because, and know they will be used for all objects, lol.
i save styrofoam as well. for uses like yours and some i have cut to fit to hold bottom hull and models for painting and glueing, etc, its all good and fair as far as styrofoam is concerned, its an added benny with packages recieved, lol.
reb


BigSmitty

Joined: October 01, 2008
KitMaker: 597 posts
Armorama: 439 posts

Posted: Monday, June 27, 2011 - 08:58 AM UTC
Matt,
The AFV tracks shipped today, so I should have some updates on Wednesday evening. They are "clickable" I guess is the right term. No pin through the entire link, but little pins on the outermost "socket" that allows you to attach them together. Sort of like Magic Tracks that are workable. Like I said, the sag at the front of the tracks just didn't look right with the Tamiya tracks, although the guide they provide on the sprue itself is a really neat touch.
I'm going to repaint the wheel back to the factory applied dark yellow. While doing my research I found some AWESOME photos of the Henschel production line, from start to finish. If we ever have another "Modelling a Photograph" campaign, I know exactly what I'm going to do.

recceboy

Joined: July 20, 2006
KitMaker: 706 posts
Armorama: 665 posts

Posted: Monday, June 27, 2011 - 01:34 PM UTC
Started my prototype SturmTiger, will post photos soon.
Anthony
Anthony


BigSmitty

Joined: October 01, 2008
KitMaker: 597 posts
Armorama: 439 posts

Posted: Wednesday, June 29, 2011 - 07:41 AM UTC
Quick update from my lunch hour. The AFV Club tracks showed up (as did my MiniArt Su-76(r) for the Captured Vehicles campaign) and I really like them. Two little baggies of tracks, two tracks to a sprue, with the sprue connection points very small and easy to clean up. Although they are "workable", in 1/48 scale the two little pins that hold the tracks together are very small, and even the slightest pressure can pull them apart.
However, they are a really nice AM set for those 1/48 scale Tigers out there (they also make late production tracks) and a much more realistic alternative than the link and length tracks from Tamiya. Photos later on tonight, once I have time to clean up the links and test fit them.
However, they are a really nice AM set for those 1/48 scale Tigers out there (they also make late production tracks) and a much more realistic alternative than the link and length tracks from Tamiya. Photos later on tonight, once I have time to clean up the links and test fit them.

ejasonk

Joined: October 14, 2007
KitMaker: 314 posts
Armorama: 226 posts

Posted: Wednesday, June 29, 2011 - 07:48 AM UTC
Quoted Text
Matt,
Those wheels are looking great. I guess if you want to be accurate then painting that wheel yellow would be the best thing to do. I look forward to seeing the AFV club tracks as I am considering them for my build.
My tiger turned up today.
Unfortunetly my kit as come with the lower hull from the late version so I will wait for the replacement before I start.
Also theres the box pictures from the 1/16 King Tiger

I see 2 round hatches on the lower hull through the plastikbag. Your hull is correct! I´m building that kit right now..
This is an early/middle style hull which is right for the Kursk and DAK Tigers.
 |


