Great Panzer III and M13/40 Commando, erich. Nice builds and a very fine figure.
Thanks for sharing
Campaigns
Where Armorama group builds can be discussed, organized, and updates posted.
Hosted by Darren Baker, Richard S.
The Desert Fox
Posted: Monday, July 04, 2011 - 08:35 AM UTC
vonHengest
Texas, United States
Joined: June 29, 2010
KitMaker: 5,854 posts
Armorama: 4,817 posts
Joined: June 29, 2010
KitMaker: 5,854 posts
Armorama: 4,817 posts
Posted: Thursday, July 07, 2011 - 11:42 AM UTC
Hey guys, we've got a good thing going here, don't let the momentum slow down fellas
AgentG
Nevada, United States
Joined: December 21, 2008
KitMaker: 1,109 posts
Armorama: 1,095 posts
Joined: December 21, 2008
KitMaker: 1,109 posts
Armorama: 1,095 posts
Posted: Thursday, July 07, 2011 - 05:20 PM UTC
It's not slowing, it's resting............................
G
G
vonHengest
Texas, United States
Joined: June 29, 2010
KitMaker: 5,854 posts
Armorama: 4,817 posts
Joined: June 29, 2010
KitMaker: 5,854 posts
Armorama: 4,817 posts
Posted: Thursday, July 07, 2011 - 05:37 PM UTC
Ah yes, must be something to do with intense summer desert heat
edoardo
Milano, Italy
Joined: November 30, 2007
KitMaker: 642 posts
Armorama: 234 posts
Joined: November 30, 2007
KitMaker: 642 posts
Armorama: 234 posts
Posted: Saturday, July 09, 2011 - 07:43 PM UTC
Hi all!
Nearing the 100s here... and with the humidity and all, it is difficult even to move... anyway, since my workbech is in the basement, I manage to survive as it is a little cooler in there...
Now, after the weather forecast for Northe Italy, I am ready to share some pics of my finished Panzer III !
I hope you'll enjoy, as usual, any comment is most welcome!
ciao!
Edo
spacewolfdad
England - West Midlands, United Kingdom
Joined: May 23, 2010
KitMaker: 642 posts
Armorama: 593 posts
Joined: May 23, 2010
KitMaker: 642 posts
Armorama: 593 posts
Posted: Sunday, July 10, 2011 - 03:23 AM UTC
Hi Everyone,
I have begun the SdKfz222 build, I had hoped to use the Goffy interior detail resin set. Unfortunately there was a problem with this. I had cleaned all the parts in warm soapy water, to get rid of any release agent.
All the parts are beautifully cast and I was anticipating an exciting build, however, I noticed when the Goffy upper hull was next to the ICM one a scale disparity. The difference is about 1mm and this meant the top plate wouldn't fit. To make it fit would have destroyed the part and I, reluctantly, had to abandon this idea.
The Goffy parts..
The disparity of the top-plate and Goffy hull...
Sorry, not the best photo in the world.
I have decided to build the ICM kit as a 21st Panzer Division vehicle. I also decided to open the vision slits for the driver, as I had seen a photo with this apparent. The turret will be detailed with the Goffy set, as this is still usable and I want to have the grenade mesh open with a crew member on the top of the turret
Here is the progress so far....
The upper and lower hull with the vision ports removed..
To facilitate the easy removal of the vision slits I thinned down the plastic behind them and this made it easier to cut them away.
I will post again when I have made more progress.
All the best,
Paul
swoop411
New York, United States
Joined: February 05, 2011
KitMaker: 16 posts
Armorama: 16 posts
Joined: February 05, 2011
KitMaker: 16 posts
Armorama: 16 posts
Posted: Monday, July 11, 2011 - 07:42 AM UTC
I have been ridiculously busy, and on top of that I was trying to wrap up another build before I began my DAK build. But, while I was in the holding pattern I did read a lot about the DAK as well as procuring two models to work with.
So consider this my pre-build still in the box photos. I am still getting back into modeling after a 15 year or so hiatus, so mine will likely look nothing as awesome as what I have seen posted thus far. But I will still give it a whirl!
spacewolfdad
England - West Midlands, United Kingdom
Joined: May 23, 2010
KitMaker: 642 posts
Armorama: 593 posts
Joined: May 23, 2010
KitMaker: 642 posts
Armorama: 593 posts
Posted: Monday, July 11, 2011 - 12:32 PM UTC
Some more progress on the 222.
The upper and lower hull are joined, the PE rear deck attached, and the suspension completed...
Work on detailing the turret area. The mesh screens are going to be open so this will enhance the appearance of the turret interior...
The gun cradle and barrel upgraded...
The completed turret assembly...
And in place on the vehicle...
Well that's it for tonight's modelling fun, tomorrow will be the fenders and details, until then,
All the best,
Paul
scttgillies
Scotland, United Kingdom
Joined: November 16, 2009
KitMaker: 23 posts
Armorama: 23 posts
Joined: November 16, 2009
KitMaker: 23 posts
Armorama: 23 posts
Posted: Tuesday, July 12, 2011 - 12:58 AM UTC
Hi Gents, i have a question, I have near completely finished the Tamiya 251/1 C with the interior added from the Zvezda 251/10 B to make a 251/10 C of the 21 Pz Div. My question is that because i have not put a photo in of the items still in the box, can i still enter this as i have not finished it. I have only to join the hull halves and weather and paint. I only just found out about this campaign.
Scott.
Scott.
vonHengest
Texas, United States
Joined: June 29, 2010
KitMaker: 5,854 posts
Armorama: 4,817 posts
Joined: June 29, 2010
KitMaker: 5,854 posts
Armorama: 4,817 posts
Posted: Tuesday, July 12, 2011 - 08:49 AM UTC
Edo: Your scene is really starting to come together!
Paul: I have never worked with a conversion in 1/72 and am looking forward to more of your good work here
Justin: I'm in the same boat as you myself. Just keep slowly clinking away at your workbench and you should be fine. Nice choices btw
Scott: When did you start your build? Also feel free to show us a few photos and tells us a little more about it.
scttgillies
Scotland, United Kingdom
Joined: November 16, 2009
KitMaker: 23 posts
Armorama: 23 posts
Joined: November 16, 2009
KitMaker: 23 posts
Armorama: 23 posts
Posted: Wednesday, July 13, 2011 - 09:39 AM UTC
Hi
my build is a Sdkfz 251/10 ausf c from kit bashing a tamiya 251/1 ausf c( yes we are talking real retro here) and a zvezda 251/10 ausf b. The reason for this is that the tamiya and zvezda both have the wrong crew compartment for their type, however the benches in the B are the correct type for the c, the ones in the early tamiya fitting *** knows what. The worst part so far was getting the floor flat on the tamiya part..
As for painting, the vehicle was base coated with revell panzer grey and then coated with Revell Afrika braun. the stowage gear inside came from the zvezda kit with ammo boxes, canteens and the rest coming from the spares box.
For a crew i am planning to use the Miniart German armoured car crew, suitibly adjusted for the task and adorned with the new tamiya Afrika Korps unifrom markings.
Soz there are no photos of the build before i started, but i built and painted the vehicle to where it is just now last week. Weather is crap here in Scotland.
zontar
Hawaii, United States
Joined: August 27, 2006
KitMaker: 1,646 posts
Armorama: 1,557 posts
Joined: August 27, 2006
KitMaker: 1,646 posts
Armorama: 1,557 posts
Posted: Wednesday, July 13, 2011 - 11:40 AM UTC
Edo: Very nice scene and great colors!! I like it all a lot!
Paul: Looking great. Is your 222 in 72nd or 48th? I'm doing Tamiya's 1/48th, which is ICM's re-boxed. Anyway, looking forward to seeing more of your build.
Happy Modelling, -zon
Paul: Looking great. Is your 222 in 72nd or 48th? I'm doing Tamiya's 1/48th, which is ICM's re-boxed. Anyway, looking forward to seeing more of your build.
Happy Modelling, -zon
spacewolfdad
England - West Midlands, United Kingdom
Joined: May 23, 2010
KitMaker: 642 posts
Armorama: 593 posts
Joined: May 23, 2010
KitMaker: 642 posts
Armorama: 593 posts
Posted: Wednesday, July 13, 2011 - 12:51 PM UTC
Quoted Text
Paul: Looking great. Is your 222 in 72nd or 48th? I'm doing Tamiya's 1/48th, which is ICM's re-boxed. Anyway, looking forward to seeing more of your build.
Happy Modelling, -zon
Hi Zon,
It's the 1/72 one, which is the 1/48 shrunk down. I have done the fenders and have a few other bits to add, then it's detailing the vision ports. I am using photographs of the real thing as I have no drawings, so they will be an approximation, but at this scale I don't think it will be all that noticeable. Thanks for the compliment.
All the best,
Paul
zontar
Hawaii, United States
Joined: August 27, 2006
KitMaker: 1,646 posts
Armorama: 1,557 posts
Joined: August 27, 2006
KitMaker: 1,646 posts
Armorama: 1,557 posts
Posted: Wednesday, July 13, 2011 - 01:23 PM UTC
Quoted Text
Quoted TextPaul: Looking great. Is your 222 in 72nd or 48th? I'm doing Tamiya's 1/48th, which is ICM's re-boxed. Anyway, looking forward to seeing more of your build.
Happy Modelling, -zon
Hi Zon,
It's the 1/72 one, which is the 1/48 shrunk down. I have done the fenders and have a few other bits to add, then it's detailing the vision ports. I am using photographs of the real thing as I have no drawings, so they will be an approximation, but at this scale I don't think it will be all that noticeable. Thanks for the compliment.
All the best,
Paul
Paul: If it will help you, I can PDF you the marking drawings from my Tamiya instructions, but not 'til tomorrow as they are at home and I'm at work.
Happy Modelling, -zon
Posted: Wednesday, July 13, 2011 - 01:39 PM UTC
Great diorama, Edoardo. It looks nice and the burnt out look of the Samovente is very convincing.
The only little nickpick is the driver of the panzer III. I do not think a person could sit down through the front hatch. It looks a little unrealistic. The hatches were only for accessing the transmission and gears. Not for moving in and out of the tank.
None the less a very nice diorama overall.
Very nice 222, Paul. Looks like a great little kit with nice details. Looking forward to see more.
edoardo
Milano, Italy
Joined: November 30, 2007
KitMaker: 642 posts
Armorama: 234 posts
Joined: November 30, 2007
KitMaker: 642 posts
Armorama: 234 posts
Posted: Wednesday, July 13, 2011 - 06:22 PM UTC
hi Jasper!
Whoops! Actually I never thought of that..... you are completely right of course....
I'll eliminate the figure and close the hatch.
thank you very much for the pic....
ciao
edo
Whoops! Actually I never thought of that..... you are completely right of course....
I'll eliminate the figure and close the hatch.
thank you very much for the pic....
ciao
edo
scttgillies
Scotland, United Kingdom
Joined: November 16, 2009
KitMaker: 23 posts
Armorama: 23 posts
Joined: November 16, 2009
KitMaker: 23 posts
Armorama: 23 posts
Posted: Thursday, July 14, 2011 - 09:46 AM UTC
Here are some better resolution pics of my build. Probably looks quite higglty pigglety just know but it will come together.
Hope that they look better than the ones i posted yesterday.
GaryKato
California, United States
Joined: December 06, 2004
KitMaker: 3,694 posts
Armorama: 2,693 posts
Joined: December 06, 2004
KitMaker: 3,694 posts
Armorama: 2,693 posts
Posted: Thursday, July 14, 2011 - 08:23 PM UTC
Scott,
I fixed up the links for your images. There is a section that shows how to post pictures from the Kitmaker gallery in this thread:
TUTORIAL: Armorama Campaigns
I fixed up the links for your images. There is a section that shows how to post pictures from the Kitmaker gallery in this thread:
TUTORIAL: Armorama Campaigns
scttgillies
Scotland, United Kingdom
Joined: November 16, 2009
KitMaker: 23 posts
Armorama: 23 posts
Joined: November 16, 2009
KitMaker: 23 posts
Armorama: 23 posts
Posted: Friday, July 15, 2011 - 04:38 AM UTC
Thanx Gary, that was much appreciated..
zontar
Hawaii, United States
Joined: August 27, 2006
KitMaker: 1,646 posts
Armorama: 1,557 posts
Joined: August 27, 2006
KitMaker: 1,646 posts
Armorama: 1,557 posts
Posted: Friday, July 15, 2011 - 09:14 AM UTC
Scott: Looks good!! What is the white stuff?
Happy Modelling, -zon
eoinryan
Cork, Ireland
Joined: April 30, 2010
KitMaker: 232 posts
Armorama: 134 posts
Joined: April 30, 2010
KitMaker: 232 posts
Armorama: 134 posts
Posted: Saturday, July 16, 2011 - 05:28 AM UTC
Hi folks,
I've been away for ages, but I'm back and back to building Tamiya's 1/35 Sdkfz 222.
@ Paul- it's great to see your 1/72 222! Pity about the interior parts though- it would have looked great. Good luck with the rest of the build.
@ Eduardo- I love your diorama, especially the burned out Cromwell? Crusader? 9I always get those tanks mixed up).
@ Scott- Wow- I really like your paint job. I'm using a similar technique- I've used German fieldgrey as an undercoat like you, but instead of using blu-tac, I'm using Humbrol's Maskol in very small applications, to try and create a chipping effect. Anyway, we'll see in a few days if it worked or not!
Progress photos:
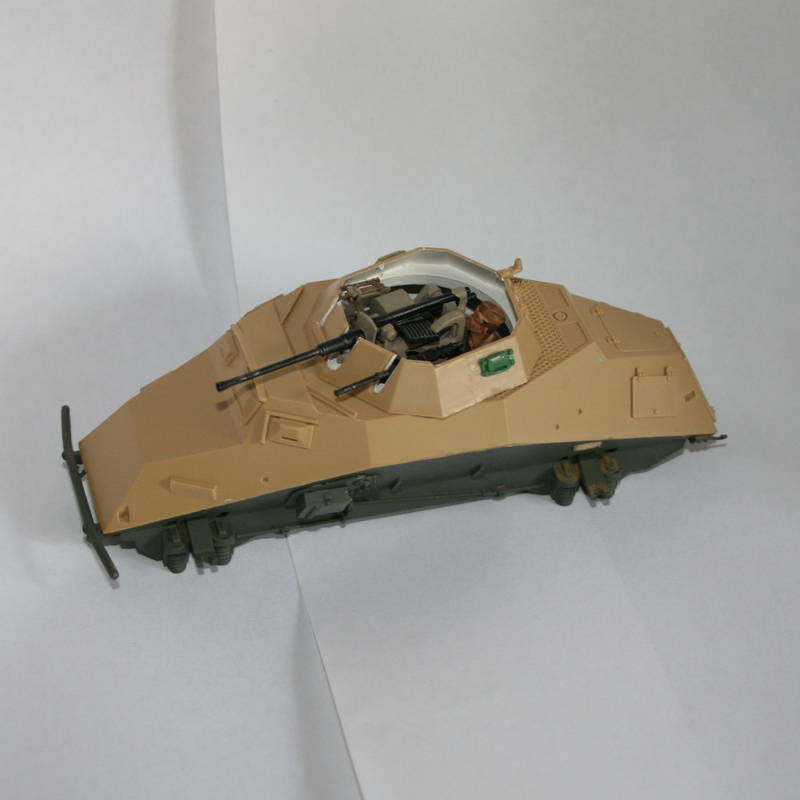
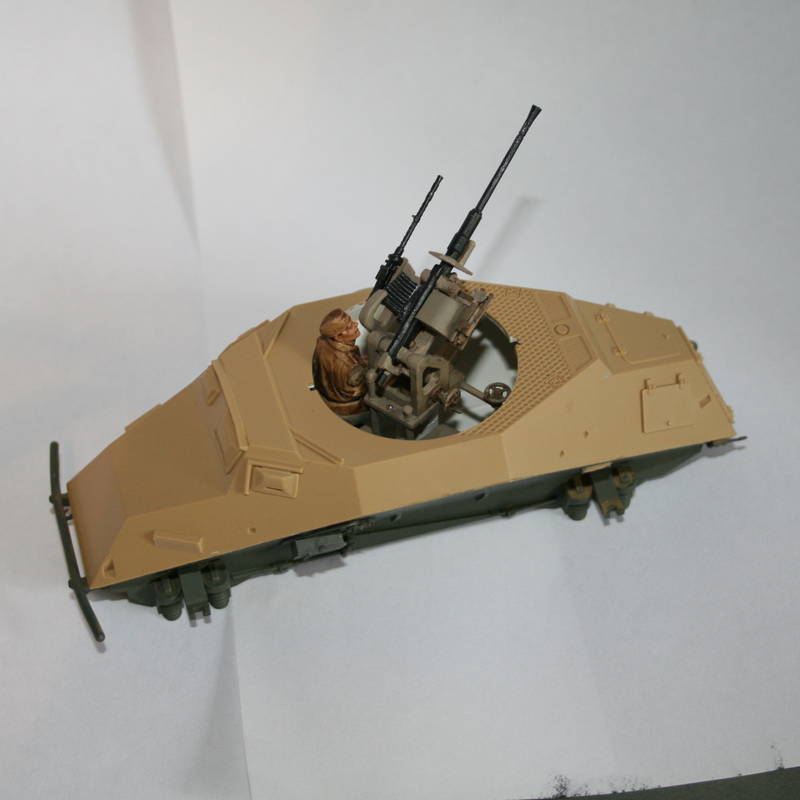
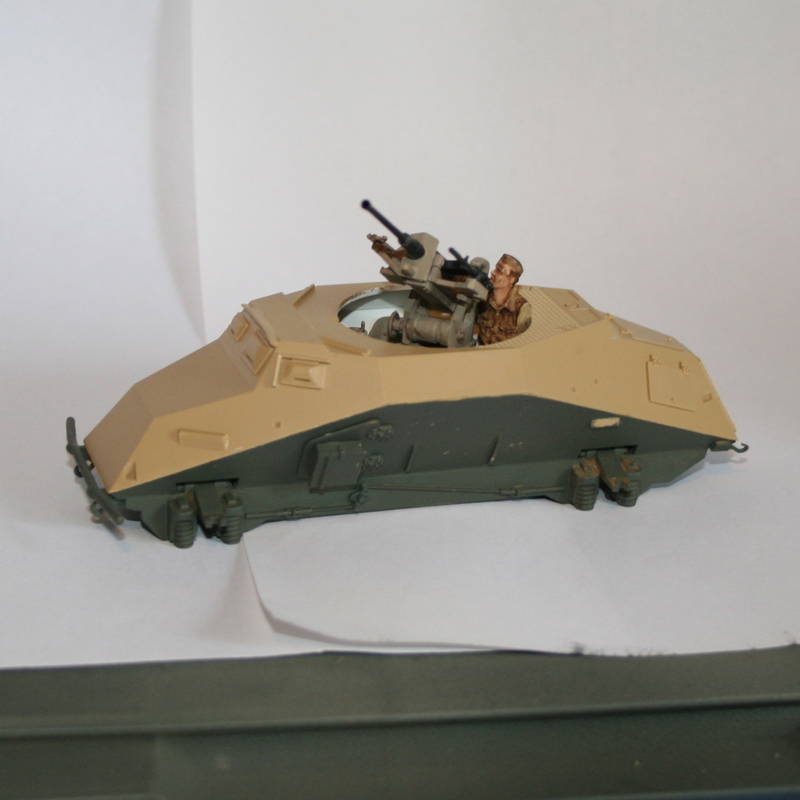
I had to build and fit the gun before I closed the hull. You can see where the carpet monster got a vision slit so I had to make another out of milliput.
'Look Ma, no hands!' To get the figure low down into the turret, I had to remove not one, but both arms. When the hull is on and the grenade mesh in place, you'll only see his head poking out.
As you can see, the lower hull is German fieldgrey. I was using some in an airbrush so I just sprayed it on the lower hull so it wouldn't go to waste. Because the 222 is so angular, there'll always be spots that I always miss or don't cover properly with the airbrush, so it was no harm to apply it.
Later,
Eoin
scttgillies
Scotland, United Kingdom
Joined: November 16, 2009
KitMaker: 23 posts
Armorama: 23 posts
Joined: November 16, 2009
KitMaker: 23 posts
Armorama: 23 posts
Posted: Saturday, July 16, 2011 - 07:55 AM UTC
Quoted Text
Scott: Looks good!! What is the white stuff?
Happy Modelling, -zon
Hi Mate, its Blu Tac. A putty like glue for putting up posters.
spacewolfdad
England - West Midlands, United Kingdom
Joined: May 23, 2010
KitMaker: 642 posts
Armorama: 593 posts
Joined: May 23, 2010
KitMaker: 642 posts
Armorama: 593 posts
Posted: Saturday, July 16, 2011 - 01:18 PM UTC
@ Paul- it's great to see your 1/72 222! Pity about the interior parts though- it would have looked great. Good luck with the rest of the build
Hi Eoin,
Yes it is a bit sad, but all is not lost as I will attempt to use it with the ICM SdKfz 260. The top plate can be modified without too much trouble, the only drawback being I will have to model the extra radio sets. You will be able to see the interior better with the mesh cover up, as well. Seeing your fine build has reminded me to make sure I put the rain guards back above the vision ports, thanks for that.
All the best,
Paul
trex10
Upper Austria, Austria
Joined: January 17, 2011
KitMaker: 70 posts
Armorama: 69 posts
Joined: January 17, 2011
KitMaker: 70 posts
Armorama: 69 posts
Posted: Saturday, July 16, 2011 - 08:29 PM UTC
Now I can even report my 2nd campaign build ready:
Hope the figure is acceptable.
Many thanks for sharing,
Erich
Hope the figure is acceptable.
Many thanks for sharing,
Erich
spacewolfdad
England - West Midlands, United Kingdom
Joined: May 23, 2010
KitMaker: 642 posts
Armorama: 593 posts
Joined: May 23, 2010
KitMaker: 642 posts
Armorama: 593 posts
Posted: Sunday, July 17, 2011 - 12:17 AM UTC
Excellent job Erich, really nice little Panzer III and the figure is great.
All the best,
Paul
All the best,
Paul