It DID go into production, just none were completed. They did build the Schmalturm turret ( but awaiting the range finders) and there is proof some F chassis were being produced with one or two found on the line.
As far as "late" and "early"? Got me on that one.
~ Jeff
Campaigns
Where Armorama group builds can be discussed, organized, and updates posted.
Where Armorama group builds can be discussed, organized, and updates posted.
Hosted by Darren Baker, Richard S.
Panther Campaign

PantherF

Joined: June 10, 2005
KitMaker: 6,188 posts
Armorama: 5,960 posts

Posted: Sunday, November 06, 2011 - 03:32 PM UTC
Posted: Sunday, November 06, 2011 - 03:44 PM UTC
Jeff it was my understanding that the Panther 2 kit is not a Panther 2 at all. This model represents a Schmalturm turret mounted on a Panther G, I fully agree that the Schmalturm turret was built as I have seen what is left of one after the Royal Artillery used it as a target before it was rescued by Bovington Tank Museum.
The Panther II I believe was only a conception vehicle as it was supposed to be the same size nearly as the KT but none were built or at the very least completed.
I also believe some Schmalturm turrets were mounted on finished Panther G hulls after the war finished.
The Panther II I believe was only a conception vehicle as it was supposed to be the same size nearly as the KT but none were built or at the very least completed.
I also believe some Schmalturm turrets were mounted on finished Panther G hulls after the war finished.

PantherF

Joined: June 10, 2005
KitMaker: 6,188 posts
Armorama: 5,960 posts

Posted: Sunday, November 06, 2011 - 06:16 PM UTC
Ummm, we're talking about the Panther F, Not the Panther II which is a completely different story on it's own.
One of the Panther F kits ( I have both) has BOTH the G and F hull/chassis to choose from to make the version of Panther F the modeler wants. Yes, there were prototypes using the G chassis but on the assembly line were a few F chassis being built, but as I said, non were completed. So it did go into production. Many of the Schmalturm turrets were just awaiting the range finders.
And speaking of the Panther II, it went beyond the "conception vehicle" status as one lower hull was completed, just no "Panther II" turrets were ever built. But the Panther II program was cancelled long before all other Panthers were created and the Panther F was to be the last of the series of Panther versions.
~ Jeff
Posted: Monday, November 07, 2011 - 02:20 AM UTC
What is the difference between the Panther F and G hull?
Posted: Monday, November 07, 2011 - 02:50 AM UTC
@CMOT - Darren,
The main difference between the Panther F and G was the turret. The hull essentially remained the same with the exception of the armor thickness in some areas and thinner plates in other areas to offset the weight increase of the thicker armor. There were a few minor changes such as the hatches for the driver and RO.
I don't have my references in front of me but that just about covers the exterior of the vehicle. I hope someone will chime in with all of the other outside details.
I'll hopefully get my build photos up this weekend with an outline of what I will be doing with the build. For now, been busy writing on a book review for this site.
~ Eddy


PantherF

Joined: June 10, 2005
KitMaker: 6,188 posts
Armorama: 5,960 posts

Posted: Monday, November 07, 2011 - 05:16 AM UTC
Panzer Tracts No. 5-4 explains it and shows it all. Plus another essential reference material to own is "Germany's Panther Tank: The Quest for Combat Supremacy" by Jentz.
You'll be close to an expert in no time with these on Panthers.
~ Jeff
You'll be close to an expert in no time with these on Panthers.

~ Jeff
Posted: Monday, November 07, 2011 - 07:00 AM UTC
Here is a short update on the Jagdpanther. The wheels have been added and they have taken quite a beating which is something we as modellers rarely bother with anymore preferring to buy beaten up rubber wheels. So let me know what you think.
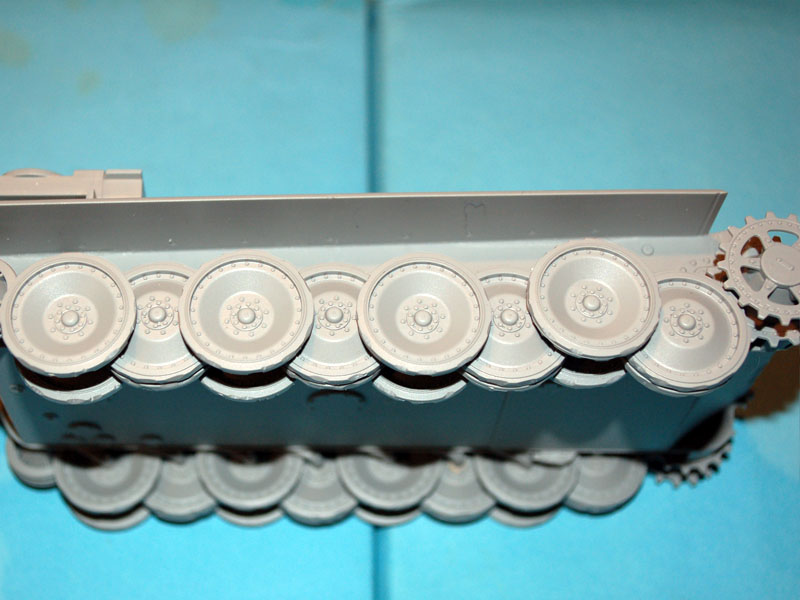
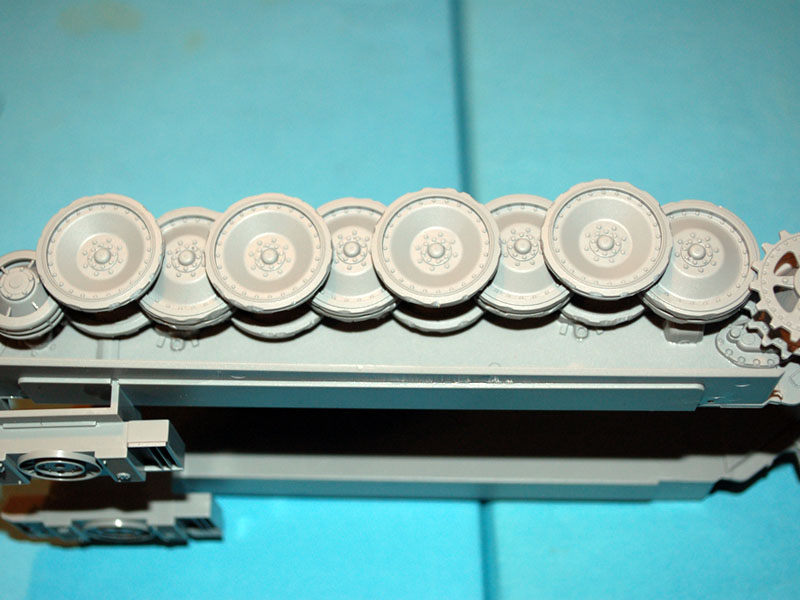
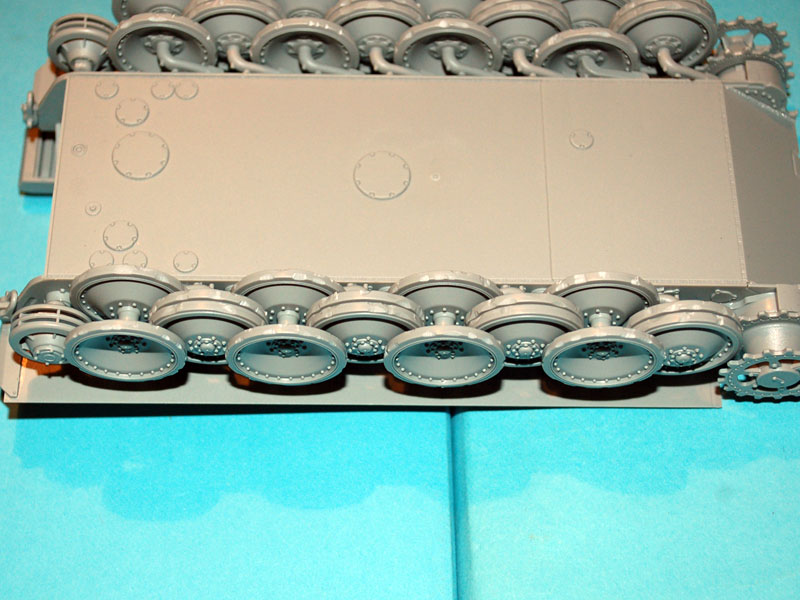
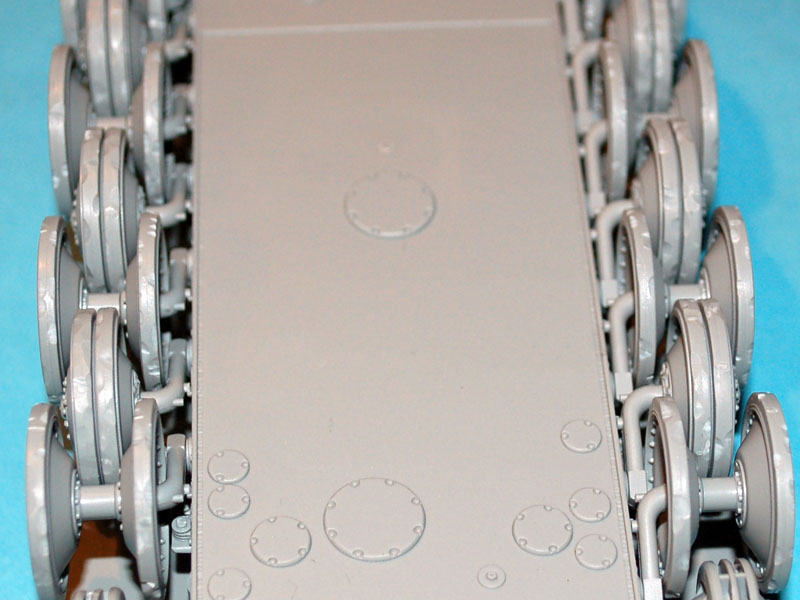


Posted: Monday, November 07, 2011 - 07:12 AM UTC


Campaign Bail Out
I know that this isnít the usual campaign post, never the less I feel compounded to let you all know the reason Iím bailing out of this campaign. Of late I have been finding building to a deadline soul destroying in as much as I have begun cutting corners, building very quickly, and making a right hash of the project I happen to be building. The bottom line is I have no longer been enjoying the hobby, and in all honesty it is a hobby and should be enjoyed as such, and it shouldnít be seen as a chore, and thatís how I feel itís become, a chore. So Iím going to go back to building whatever I like, at my own pace. Enjoy the rest of the campaign, and Iím sure Iíll see you all on a campaign in the future.
Jason


Tojo72

Joined: June 06, 2006
KitMaker: 4,691 posts
Armorama: 3,509 posts

Posted: Monday, November 07, 2011 - 07:48 AM UTC
Looks great ,Darren,thanks for showing the way to go with your postings
Posted: Monday, November 07, 2011 - 08:27 AM UTC
Quoted Text


Campaign Bail Out
I know that this isnít the usual campaign post, never the less I feel compounded to let you all know the reason Iím bailing out of this campaign. Of late I have been finding building to a deadline soul destroying in as much as I have begun cutting corners, building very quickly, and making a right hash of the project I happen to be building. The bottom line is I have no longer been enjoying the hobby, and in all honesty it is a hobby and should be enjoyed as such, and it shouldnít be seen as a chore, and thatís how I feel itís become, a chore. So Iím going to go back to building whatever I like, at my own pace. Enjoy the rest of the campaign, and Iím sure Iíll see you all on a campaign in the future.
Jason
@ - Jason,
I for one understand where your coming from. I recently bailed out of a dozen campaigns and cleared off the bench just to to get a little breathing room. So no worry here. I'm now just involved with a few reviews, one build log and this campaign. Having fun is what this is all about, it isn't a golf game or real life. I think its about enjoying the moment and sharing that with others that share the same interest. I know you'll be back in the saddle again. See you in another campaign in the near future or near the end of this one?
~Eddy

Posted: Monday, November 07, 2011 - 08:36 AM UTC
Jason judging by what you have said I can understand bailing out of this campaign as it is a very envolved one as you have to show all the stages. I hope you get your enjoyment back.
Posted: Monday, November 07, 2011 - 09:36 AM UTC
Jason, Having dropped a few campaigns recently I fully understand that feeling of losing your mojo. One thing I realised after hitting the silk the first couple times was that there is no need for guilt - this is just for fun! So, while I'm about to drop another two campaigns I can still have fun with those that do fit my own schedule. No doubt you'll dip a toe in the campaigns section again, but on your own terms...
Darren, I won't be able to start my APG Panther A until Christmas, when I've cleared away a few other builds. (Sadly, one of my upcoming drops is the Bovington KT you kindly snapped for me - it's so far behind schedule it won't even be finished basic surgery by the deadline... Oh, well, another entry for next year's Getter Done campaign...)
Tom
Posted: Monday, November 07, 2011 - 10:07 AM UTC
Well if this campaign goes well (we do have 14 months) then I am looking at a King Tiger campaign to start in 8 months or so.
Posted: Monday, November 07, 2011 - 10:36 AM UTC
Quoted Text
Well if this campaign goes well (we do have 14 months) then I am looking at a King Tiger campaign to start in 8 months or so.
At the risk of being truly OT, would you welcome a part-bake?... (Well, mostly raw, barely mixed, to be exact!)
Tom
ltb073

Joined: March 08, 2010
KitMaker: 3,662 posts
Armorama: 3,078 posts

Posted: Monday, November 07, 2011 - 01:25 PM UTC
Quoted Text
Well if this campaign goes well (we do have 14 months) then I am looking at a King Tiger campaign to start in 8 months or so.
Guess I'll be saving my KT for that 1
@ Jason, sorry to see you go but the most important thing to remember is that this is a hobby for enjoyment and sometimes even your hobbies can become overwhelming so take it easy and we'll see you back soon
As far as my Panther F goes Jeff thanks for the info what I am finding with the directions is that "early" means production and "late" means proto-type
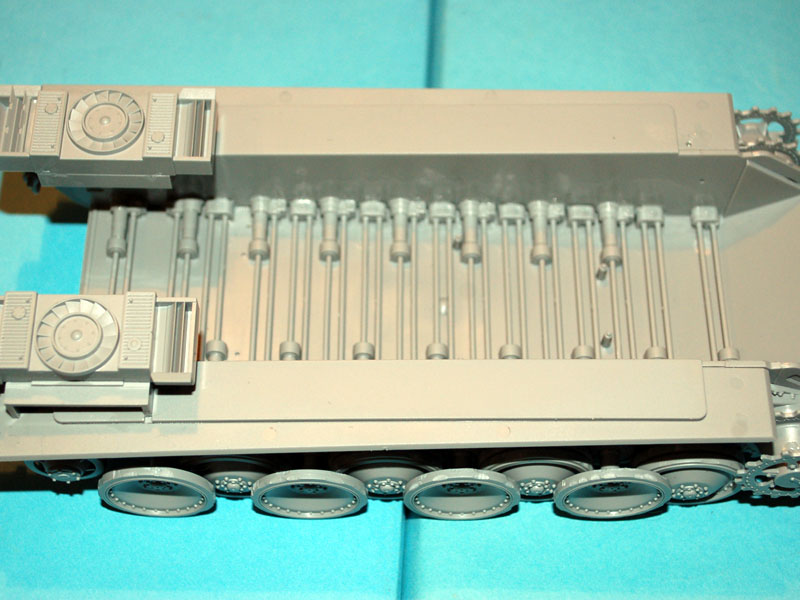
 A few parts are miss labeled as well with this kit, but we are moving on step 3 road wheels
Step 4 and 5 was the rear plate so 1 photo

looks like i need to get out a file and some putty there on that exhaust


PantherF

Joined: June 10, 2005
KitMaker: 6,188 posts
Armorama: 5,960 posts

Posted: Monday, November 07, 2011 - 02:14 PM UTC
With all due respects, your column light bracket is installed incorrectly (upside down and pointed the wrong way) and should be pointed towards the left side of the tank. (The bracket attached to the bottom of the left exhaust)
Here are a few examples, one a model and the other a Panther A I believe.
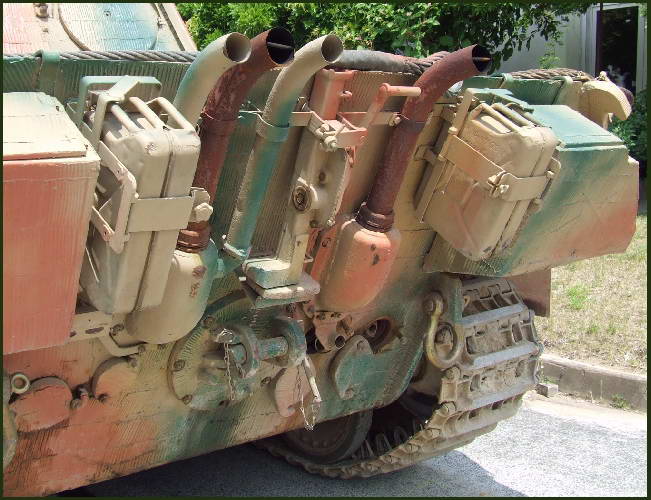

I don't want to come across as a rivet counter (because I'm far from that) I just try to answer questions the best I can. Maybe sometimes I should just keep it to myself. I make a lot more friends that way than trying to help. Just like the "G" VS "F" chassis.
Anyway, take a look and please tell me I'm wrong. All my references and model instructions say I am right.
~ Jeff
Here are a few examples, one a model and the other a Panther A I believe.


I don't want to come across as a rivet counter (because I'm far from that) I just try to answer questions the best I can. Maybe sometimes I should just keep it to myself. I make a lot more friends that way than trying to help. Just like the "G" VS "F" chassis.
Anyway, take a look and please tell me I'm wrong. All my references and model instructions say I am right.
~ Jeff
Posted: Monday, November 07, 2011 - 04:41 PM UTC
Sal; this is looking good and apart from the steel wheels could be my build. Please can I ask that you make a point of adding incorrectly numbered parts to your post in order that others know about the problems when they start there builds.
Good catch Jeff and fairly easy for Sal to fix, in the position it is in on the model it would interfere with the starter if I am correct.
Tom; as I know what you are doing and providing you have some supporting pictures I am sure it could be accomodated.
Good catch Jeff and fairly easy for Sal to fix, in the position it is in on the model it would interfere with the starter if I am correct.
Tom; as I know what you are doing and providing you have some supporting pictures I am sure it could be accomodated.

Tojo72

Joined: June 06, 2006
KitMaker: 4,691 posts
Armorama: 3,509 posts

Posted: Monday, November 07, 2011 - 11:32 PM UTC
Nice progress Sal,looking good
ltb073

Joined: March 08, 2010
KitMaker: 3,662 posts
Armorama: 3,078 posts

Posted: Tuesday, November 08, 2011 - 12:47 AM UTC
Hey Guys thanks for the complements
@Jeff, Thanks for the help, I dont consider that rivet counting the piece is on wrong, so I will attempt to correct that without braking it And now that you said it was a light bracket, I have found the light piece that i thought was missing
  In the directions thats were it looks like it goes, So
@Darren the top part of the jack was numbered K1 but should be K11. K1 is the base of an antenna
@Jeff, Thanks for the help, I dont consider that rivet counting the piece is on wrong, so I will attempt to correct that without braking it
 And now that you said it was a light bracket, I have found the light piece that i thought was missing
  In the directions thats were it looks like it goes, So
@Darren the top part of the jack was numbered K1 but should be K11. K1 is the base of an antenna

Posted: Tuesday, November 08, 2011 - 02:46 AM UTC
Darren,
I will be building a 1/16 Jagdpanther from a Stripped down RC kit from Tamiya.
Because the RC stuff was removed, I don't have the box. Can I find a picture from the web to show the box top, or just a photo of the instructions.
What do I need to do to qualify for this campaign?
The intent is to build this kit with the Aber Panther G PE set, and Atak zimmerit along with scale hardware nuts and bolts to replace the plastic nuts and bolts with in scale sized brass nuts and bolts.
Thanks,
Tom
Posted: Tuesday, November 08, 2011 - 07:15 AM UTC
Tom the idea behind this thread is to have fun while at the same time building a a Panther and Jagdpanther ref area, I mean by this that your build is updated on the site in stages pointing out any problem areas such as misnumbered or poor fit issues.
4-BO-Green

Joined: March 30, 2011
KitMaker: 270 posts
Armorama: 230 posts

Posted: Tuesday, November 08, 2011 - 09:03 AM UTC
Hey guys,
This is my contribution to the campaign. Photo was taken yesterday. I didn't have the time to upload...
I want to build a early Kursk panther ausf. D.
This are my weapons of choice;
-DML kit 6299
- Voyager PE 35083 (basic upgrades)
- Voyager PEA 071 Panther D in kursk 1943 (early box + grills)
- Bronco early movable panther tracks
- Armorscale Panther metal barrel

I also added some of my main books for information.
The things i have to change in the kit are the following:
- 32 bolt drive sprockets (early sprockets had 16 bolts)
- Late single headlight (early had two)
- asymmetrical barrel travel lock (early was a bit different)
- Late tool storage with revised axe position (early was different)
- Provision for the 540mm C hook (was not on that location)
- Late enginedeck layout ( late has circular intakes. Thats were the voyager grills are kicking in)
- Raingards over the sight apertures and pistol ports (early didn't has these)
- Elevation limiter on top of the mantlet (early didn't has one, added on late panthers)
Regards,
Remco

This is my contribution to the campaign. Photo was taken yesterday. I didn't have the time to upload...
I want to build a early Kursk panther ausf. D.
This are my weapons of choice;
-DML kit 6299
- Voyager PE 35083 (basic upgrades)
- Voyager PEA 071 Panther D in kursk 1943 (early box + grills)
- Bronco early movable panther tracks
- Armorscale Panther metal barrel
I also added some of my main books for information.
The things i have to change in the kit are the following:
- 32 bolt drive sprockets (early sprockets had 16 bolts)
- Late single headlight (early had two)
- asymmetrical barrel travel lock (early was a bit different)
- Late tool storage with revised axe position (early was different)
- Provision for the 540mm C hook (was not on that location)
- Late enginedeck layout ( late has circular intakes. Thats were the voyager grills are kicking in)
- Raingards over the sight apertures and pistol ports (early didn't has these)
- Elevation limiter on top of the mantlet (early didn't has one, added on late panthers)
Regards,
Remco


fireontheway

Joined: May 17, 2006
KitMaker: 370 posts
Armorama: 368 posts

Posted: Tuesday, November 08, 2011 - 09:47 AM UTC
OK, first what do I do with the circled raised lines? In 1 pic on instructions they are there, the next they are gone.

The next issue is what about the 2nd set of what I assume are weld marks for the hull hatches, there are only 1 set of handles. And are the holes on the front hull just recessed boltheads?

Poor instructions for installing bow MG arm and what do you attach the MG to?

Where would you know where to install MA30? Diagram is poor, J10 is the only help but the mounting point is for J10 not MA30


Any help would be appreciated, thx.

The next issue is what about the 2nd set of what I assume are weld marks for the hull hatches, there are only 1 set of handles. And are the holes on the front hull just recessed boltheads?

Poor instructions for installing bow MG arm and what do you attach the MG to?

Where would you know where to install MA30? Diagram is poor, J10 is the only help but the mounting point is for J10 not MA30


Any help would be appreciated, thx.

PantherF

Joined: June 10, 2005
KitMaker: 6,188 posts
Armorama: 5,960 posts

Posted: Tuesday, November 08, 2011 - 02:17 PM UTC
fireontheway;
Absolutely none of my reference pictures/photos are any of these shown. My guess is that it's an anomaly in the moulding.
TMoon;
What Atak zimm kit are you using to have work on the 1/16 Jagd? I want to make mine a mid so I'll be interest to see your build!
~ Jeff
Absolutely none of my reference pictures/photos are any of these shown. My guess is that it's an anomaly in the moulding.
TMoon;
What Atak zimm kit are you using to have work on the 1/16 Jagd? I want to make mine a mid so I'll be interest to see your build!
~ Jeff
MLD

Joined: July 21, 2002
KitMaker: 3,569 posts
Armorama: 2,070 posts

Posted: Tuesday, November 08, 2011 - 02:57 PM UTC
Ok, so the MADD (modelers Attention Defecit Disorder) has already kicked in..
luckily I have built a few of these so I am pretty comfortable hopping around the sequence.
All the aftermarket is going to make staying focused a challenge.
Glued the read hull plate on and then carved away the mounting points for the rear deck.. Loosely scribed a line for the old lip of the rear deck to serve in mounting the engine compartment.


Cut the rear hull deck plate to be able to install and then still see the engine compartment, while I was there I glued a few bits to the rear deck. Crew comp heater, etc.
Did the gun tube lock and added the mg ball mount to the front hull as well.
Got the Verlinden Engine comp main bits cleaned up

one side wall looks a little warped here, will have to tidy that up before I get it bottoned up.
Painted with a poly scale 'special red oxide' for the primer, Vallejo blue grey for the gas tanks, and some Reaper metalics for base paint for the engine and radiators Nothing is glued in place yet, but progress is being made.

luckily I have built a few of these so I am pretty comfortable hopping around the sequence.
All the aftermarket is going to make staying focused a challenge.
Glued the read hull plate on and then carved away the mounting points for the rear deck.. Loosely scribed a line for the old lip of the rear deck to serve in mounting the engine compartment.


Cut the rear hull deck plate to be able to install and then still see the engine compartment, while I was there I glued a few bits to the rear deck. Crew comp heater, etc.
Did the gun tube lock and added the mg ball mount to the front hull as well.
Got the Verlinden Engine comp main bits cleaned up

one side wall looks a little warped here, will have to tidy that up before I get it bottoned up.
Painted with a poly scale 'special red oxide' for the primer, Vallejo blue grey for the gas tanks, and some Reaper metalics for base paint for the engine and radiators Nothing is glued in place yet, but progress is being made.

 |


