Operation Afghanistan Campaign
Kildare, Ireland
Joined: November 21, 2007
KitMaker: 3,212 posts
Armorama: 2,807 posts
Posted: Friday, September 07, 2012 - 12:45 PM UTC
Got back at this again after a bit of a lull. The top is only dry-fitted as I still want to do more detailing to the interior. Cabeling for the BFT and Rhino also need to be added plus decals and weathering...


Right, time for bed
Kildare, Ireland
Joined: November 21, 2007
KitMaker: 3,212 posts
Armorama: 2,807 posts
Posted: Saturday, September 08, 2012 - 06:12 AM UTC
And more pics of the inside:


I'm almost afraid to start weathering....it's the one step I tend to make a major dog's dinner of.
England - South East, United Kingdom
Joined: July 17, 2012
KitMaker: 111 posts
Armorama: 107 posts
Posted: Tuesday, September 11, 2012 - 09:53 PM UTC
'Morning Gents, I would like to take part in this Campaign - it will be my first on Armourama. having just completed a model that would have been perfect (Bar Armoured Scimitar - see link in sig) I now have the knowledge, technique and materials to build bar armour again... hmmm wonder if I have the patience again to do it though! So my proposal would be to build a CRV(T) Samson recovery vehicle, kitted out for Operation Herrick, with bar armour and the latest ECM upgrades.
I have an Accurate Armour resin Samson kit and a whole load of Evergreen plastic strip so all the materials are accounted for! The Scimitar I built was a 2006 version which had bar armour but not the ECM upgrade, so this one will allow me to extend my knowledge into how to build all the ECM stuff since I now know the "best" way to build the bar armour.
This is another step in my plan to build a Scimitar 2 from an Accurate Armour Spartan and a AFV Club Scimitar turret... one day...
I'll post photos later when I get home. I suspect the Samson kit will need updates to the LEP version - ie changing the grilles on the top deck to conform to the new diesel engines rather than the older Jag petrol engines, but I've got a stock of photos of modern Samsons thanks to the very generous guys on the Plain Military site.
Fingers crossed this won't finally break my sanity...
Completed Builds on Armorama:
1:35 FV107 Scimitar w/Bar Armour, OP Herrick 2006
Arkansas, United States
Joined: June 29, 2009
KitMaker: 11,610 posts
Armorama: 7,843 posts
Posted: Tuesday, September 11, 2012 - 10:21 PM UTC
You're best off leaving sanity at the door, when it comes to this past time. Looking forward to your build.
Ideals are peaceful. History is violent.
England - South East, United Kingdom
Joined: July 17, 2012
KitMaker: 111 posts
Armorama: 107 posts
Posted: Wednesday, September 12, 2012 - 04:01 AM UTC
Please excuse my ignorance but what is the normal procedure here - I know I'm supposed to post a pre-build kit photo, a pre-painted build photo and the finished goods in the Campaign thread, but is it normal practice to do a build thread/blog in the main Armour/AFV forum?
Completed Builds on Armorama:
1:35 FV107 Scimitar w/Bar Armour, OP Herrick 2006
Arkansas, United States
Joined: June 29, 2009
KitMaker: 11,610 posts
Armorama: 7,843 posts
Posted: Wednesday, September 12, 2012 - 04:15 AM UTC
Quoted Text
Please excuse my ignorance but what is the normal procedure here - I know I'm supposed to post a pre-build kit photo, a pre-painted build photo and the finished goods in the Campaign thread, but is it normal practice to do a build thread/blog in the main Armour/AFV forum?
I have no problem with you doing a blog, outside of the campaign. The finished photo must be posted in the campaign gallery. A photo of the kit, before you start it is preferred. Happy modelling.
Ideals are peaceful. History is violent.
Indiana, United States
Joined: June 10, 2005
KitMaker: 6,188 posts
Armorama: 5,960 posts
Posted: Wednesday, September 12, 2012 - 08:36 AM UTC
I'm STILL working on mine Matt! Just figured out the stupid

doors.
All by myself too.

Hopefully I'll get some progress pics up. I really want to make a big dent in the Guardian. It's really a neat vehicle!
~ Jeff
Arkansas, United States
Joined: June 29, 2009
KitMaker: 11,610 posts
Armorama: 7,843 posts
Posted: Wednesday, September 12, 2012 - 08:58 AM UTC
Quoted Text
I'm STILL working on mine Matt! Just figured out the stupid  doors.
All by myself too. 
Hopefully I'll get some progress pics up. I really want to make a big dent in the Guardian. It's really a neat vehicle!
~ Jeff
It's seems to me that the easiest steps leave me dumb founded. Like gluing the mine roller arms on backwards.

I may have been able to salvage it had I noticed before I got to the last step in the sub-assembly.

Ideals are peaceful. History is violent.
New Jersey, United States
Joined: October 28, 2006
KitMaker: 491 posts
Armorama: 462 posts
Posted: Wednesday, September 12, 2012 - 11:11 AM UTC
Quoted Text
You're best off leaving sanity at the door, when it comes to this past time.
Truer words have never been spoken.
On the workbench:
Mk II Male, Takom Conversion
Hobby Boss T-18
England - South East, United Kingdom
Joined: July 17, 2012
KitMaker: 111 posts
Armorama: 107 posts
Posted: Wednesday, September 12, 2012 - 11:06 PM UTC
So here goes!
This is what I will be attempting to build:

(Photo Copyright Tony From Plain Military, used with permission)
and this is what I'll be using to build it:

From the left:
Accurate Armour's Samson kit
Fruilmodel Tracks
Echelon wing Mirrors
Spares left over from Scimitar build
Spare PE from the Eduard Scorpion and Scimitar sets left over from previous builds
Evergreen and Plastruct plastic strip!
My first task will be to create a plan of the shape of the bar armour on the Samson. What is interesting (and a bit easier!) about the Samson is it doesn't have the bar armour over the rear because of the deployable earth anchor. I know the general measurements of the bar armour from the Scimitar build, but the shape and extent of the panels on the Samson is different.
Wish me luck!
Completed Builds on Armorama:
1:35 FV107 Scimitar w/Bar Armour, OP Herrick 2006
Indiana, United States
Joined: June 10, 2005
KitMaker: 6,188 posts
Armorama: 5,960 posts
Posted: Wednesday, September 12, 2012 - 11:36 PM UTC
Quoted Text
So here goes!
Wish me luck!
I think you need more patience than luck! Man! What an ambitious project.

I want to do the same but will wait out for more of an instant kit where you just spray or add water and then... POOF!!!
They're done!

Please update us with plenty of pics and by the way... you're our hero!

~ Jeff

#226
British Columbia, Canada
Joined: February 20, 2012
KitMaker: 1,909 posts
Armorama: 1,066 posts
Posted: Thursday, September 13, 2012 - 12:55 AM UTC
Andrew,
That looks like a nice project.

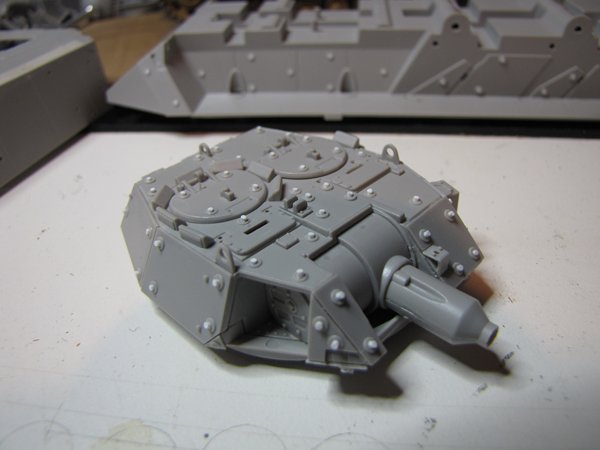
I did some more on the Lav III, I finally sourced some Plastruct hex rod and this works much better for the bolt heads. Which is good because the ones on the lower hull were round

and it is easier and a better result doing it with rod than cutting them off and re attaching them like I did on the top. (I may redo the top not sure) anyway here is a pic of the turret before sanding them down to size.

If anyone wants to know how I did this let me know before I get too far.
Cheers Rob.

Anything without guns is a target!
27 completed campaigns and counting :)
Arkansas, United States
Joined: June 29, 2009
KitMaker: 11,610 posts
Armorama: 7,843 posts
Posted: Thursday, September 13, 2012 - 02:14 AM UTC
Andrew: I wish you many hours of uninterrupted patience. I'm looking forward to the bar armor.
Rob: It seems as though you already explained it. The turret is looking very good. I sourced hexagonal rod from megahobby.com(no affiliation). Took me some months to find it.
Ideals are peaceful. History is violent.
Kildare, Ireland
Joined: November 21, 2007
KitMaker: 3,212 posts
Armorama: 2,807 posts
Posted: Thursday, September 13, 2012 - 07:20 PM UTC
Andrew, that will be an interesting build...Good Luck
Rob, you must have the same patience as Rob. They do look a lot better though
Anyway, here's where I'm at with the Academy M1151:

Still some dry-brushing to do, cables for the Rhino and BFT and then fix the roof in place. On the final stretch now...
England - West Midlands, United Kingdom
Joined: February 16, 2008
KitMaker: 597 posts
Armorama: 530 posts
Posted: Monday, September 17, 2012 - 01:27 AM UTC
Hello all
I thought I'd enlist in this campaign after seeing some of the amazing builds so far. I'll be building the academy M1151 using a couple of AM sets, spare parts and some styrene strip/sheet:

Hopefully, the model will turn out looking like the one in this
walkaroundA bit of progress so far, just the chassis started etc, but I'll post and update later this week, where hopefully the interior will be taking shape.
Cheers
Anirudh
Kildare, Ireland
Joined: November 21, 2007
KitMaker: 3,212 posts
Armorama: 2,807 posts
Posted: Monday, September 17, 2012 - 10:52 PM UTC
I've just finished mine Anirudh.
Only added a Rhino from Legend and comms gear from Voyager as the main body of the radio was missing. Stowage is from the kit and lots from the spares box....can't remember where all of it came from. The piece on the back hatch is from a new Irish company called
Value GearBut looking at the pictures again I think I can do a bit more weathering....especially the Rhino and spare wheel: both too clean


Wojewodztwo Slaskie, Poland
Joined: February 18, 2007
KitMaker: 978 posts
Armorama: 977 posts
Posted: Monday, September 17, 2012 - 11:40 PM UTC
Sean - nice looking Humvee

But I'd do some retouches with small brush:
- instruments on dashboard (and as a finish a drop of gloss varnish to imitate a glass),
- window bays, between grey covering on inner areas of doors and base tan calor,
- borders between green and tan color in door bays, on pillars between the doors and under the roof,
- areas over Airco vents.
Also I'd repaint the BFT antenna. Yours is too greenish, IMHO very good colour is Humbrol 121 Pale Stone.
Where can I see a decent gallery of this model? These three photos are not quite good, not mentioning that three pics there are not enough

Kildare, Ireland
Joined: November 21, 2007
KitMaker: 3,212 posts
Armorama: 2,807 posts
Posted: Tuesday, September 18, 2012 - 12:17 AM UTC
Thanks Kuba, and you're right on all points except over the Aircon....the roof is not set in place yet. First I have to go get my eyes tested. It's amazing what you see when posting the pics that you can't see sitting at the bench. I can't believe I completly forgot the instrument panel!
Once I've done those bits I'll take more pics...
England - South East, United Kingdom
Joined: July 17, 2012
KitMaker: 111 posts
Armorama: 107 posts
Posted: Tuesday, September 18, 2012 - 03:24 AM UTC
I'm always amazed at the things I see when I take photos that are not obvious when you look at it with Mk 1 Eyeball! I think I need an upgrade!
Nice looking Hummer though

Completed Builds on Armorama:
1:35 FV107 Scimitar w/Bar Armour, OP Herrick 2006
Alberta, Canada
Joined: February 18, 2003
KitMaker: 1,728 posts
Armorama: 1,629 posts
Posted: Friday, September 21, 2012 - 03:44 PM UTC
Finally had time to start on my entry, a German Marder 1A5:


I'm partial to the sand/brown camo rather than the sand/green. Pre-Barracuda too!
Using the Revell-Germany Marder 1A5 kit, Eduard p.e. set and maybe PSM details.

Jim
"Fire all weapons and open a hailing frequency for my victory yodel" - Zapp Brannigan
New Jersey, United States
Joined: October 28, 2006
KitMaker: 491 posts
Armorama: 462 posts
Posted: Sunday, September 23, 2012 - 09:38 AM UTC
Hi folks!! There's some good looking models here. Keep up the good work!
I did a little work on my M1151. Got the undercarriage finished, and made a front bumper from .040 brass rod and .020 styrene sheet. Soldering is one of those things that I want to be good at, but I have a way to go yet. The finished bumper is a little off center, but I can live with it.

I'm thinking of putting the completed model in a vignette, so I printed out some signs to see how they'd look. I cropped some pics I took in Afghanistan last year and printed them out. Kinda cool, but a little grainy, so I'm going to try printing them at work to see if I get better results.

Thanks for looking!
Chris
On the workbench:
Mk II Male, Takom Conversion
Hobby Boss T-18
England - West Midlands, United Kingdom
Joined: February 16, 2008
KitMaker: 597 posts
Armorama: 530 posts
Posted: Monday, September 24, 2012 - 02:42 AM UTC
That looks great Sean! Really nice job on the M1151. It seems to be a popular vehicle for this campaign.
The bumper assembly looks really nice, Chris, great job mate! I'm looking forward to seeing more of yours.
I've made some progress on the M1151: The interior has been modified/painted to represent the vehicle in the walkaround I found, using styrene stock, Voyager PE, and Pro Art radios. The turret is from Legends, and the weapons are a combination of Blast and Live Resin sets. I'm waiting to get some headphones from Live Resin, so I can install them, wire up the interior and glue the roof on, then I can move on the weathering.


I know the arrangement of the interior, and the interior door colour is very different from the instructions, but the vehicle in the walkaround seems to have had a lot of modifications made to it.
Cheers
Anirudh
Connecticut, United States
Joined: May 12, 2010
KitMaker: 546 posts
Armorama: 538 posts
Posted: Monday, September 24, 2012 - 03:59 AM UTC
I lived with some Polish Infantry and MP's from the 21st Podhale Rifles (forgive me if I said it wrong) in Ghazni in 2010, good dudes, crazy in a fight. One thing to keep in mind, many of their weapons have been converted to NATO ammo, so the NSV fired .50 BMG and uses the same ammo cans we do, their PKM's are not actually PKM's anymore, but UKM-2000's, a redesigned PKM in 7.62 NATO, and their AKs, (Beyrls and Mini Beyrls) are all in 5.5k and they are using Mk-19's as well so they all use the same ammo cans as us for the most part. They still have the older spam cans floating around, and they are still using the original PKM's but many have been replaced with UKM's.
Arkansas, United States
Joined: June 29, 2009
KitMaker: 11,610 posts
Armorama: 7,843 posts
Posted: Tuesday, September 25, 2012 - 10:42 AM UTC
Nice progress, everyone!
I'm foregoing the slat armor on this build, as I would prefer to do it on my M1126. I will start the top coat, tomorrow. Hopefully have this little beasty done in a couple of weeks.
Ideals are peaceful. History is violent.
Nordjylland, Denmark
Joined: July 19, 2012
KitMaker: 194 posts
Armorama: 188 posts
Posted: Tuesday, September 25, 2012 - 08:00 PM UTC

Where did you get the folded sleeping cots from?... haven't seen those before..
On the workbench:
M1 Panther II
CV9035


 doors.


doors.

 I may have been able to salvage it had I noticed before I got to the last step in the sub-assembly.


 and it is easier and a better result doing it with rod than cutting them off and re attaching them like I did on the top. (I may redo the top not sure) anyway here is a pic of the turret before sanding them down to size.


 But I'd do some retouches with small brush:


