Campaigns
Where Armorama group builds can be discussed, organized, and updates posted.
End of Days 2 Campaign
bdanie6
Visit this Community
New Hampshire, United States
Joined: November 09, 2008
KitMaker: 615 posts
Armorama: 60 posts
Posted: Sunday, August 18, 2013 - 03:20 AM UTC
@Thanks Sean, I'm going to try that in a few minutes, just wanted to post these photos of LR's Mini. It is really impressive


I built the tallest of the 3 stands for the gun, but the barrels just barely cleared the rear deck so I cobbled together a box for it. In this picture also is the 3000 round ammo can and the SLAB battery, as well as the ammo chutes and the electrical wire to tie it all together.

The next picture is a close up of the gun itself.


putting everything in the back of the trailer and then wiring it all up just wasn't going to happen so I decided to mount everything on a diamond plate base and glue that into the compartment. I'll let you know how that goes next time.
Thanks for looking
Later
JScicluna
Visit this Community
Tasmania, Australia
Joined: March 11, 2013
KitMaker: 77 posts
Armorama: 52 posts
Posted: Sunday, August 18, 2013 - 09:20 PM UTC

Quoted Text

@Thanks Sean, I'm going to try that in a few minutes, just wanted to post these photos of LR's Mini. It is really impressive


I built the tallest of the 3 stands for the gun, but the barrels just barely cleared the rear deck so I cobbled together a box for it. In this picture also is the 3000 round ammo can and the SLAB battery, as well as the ammo chutes and the electrical wire to tie it all together.

The next picture is a close up of the gun itself.


putting everything in the back of the trailer and then wiring it all up just wasn't going to happen so I decided to mount everything on a diamond plate base and glue that into the compartment. I'll let you know how that goes next time.
Thanks for looking
Later


Hi Bruce. It's looking good, can't wait to see it completed. Where did you get the diamond plate and who makes it? I need to get one for a build I have planned. Thanks in advance
bdanie6
Visit this Community
New Hampshire, United States
Joined: November 09, 2008
KitMaker: 615 posts
Armorama: 60 posts
Posted: Sunday, August 18, 2013 - 11:29 PM UTC
Hi Jimmy, I got the diamond plate from my LHS. It's made by Plastistruct and there are 2 sheets to a package. Most online hobby shops should carry it.
By the way on the package its labeled "double diamond, G scale"
Later
WARDUKWNZ
Visit this Community
Auckland, New Zealand
Joined: June 01, 2011
KitMaker: 1,716 posts
Armorama: 1,638 posts
Posted: Sunday, August 18, 2013 - 11:34 PM UTC
Alex ,, sounds like a plan sam ,,sounds like your trying to get the feeling right for the dio ,,i know that feeling all to well..something just dont sit right and its plain annoying ..cant wait to see the revamp dude

Jimmy ,,Mate try Evergreen or Plastruct sheet styrene ,,they do a heap of different types of styrene and i am pretty sure they do diamond plate ..if not then there's PE diamond plate ,,Lionroar, Aber, Voyager and Eduard all make it .

Phill
JScicluna
Visit this Community
Tasmania, Australia
Joined: March 11, 2013
KitMaker: 77 posts
Armorama: 52 posts
Posted: Monday, August 19, 2013 - 12:06 AM UTC
Thanks fella's. Ill start checking my LHS aka Internet store
Bluestab
Visit this Community
South Carolina, United States
Joined: December 03, 2009
KitMaker: 2,160 posts
Armorama: 1,906 posts
Posted: Monday, August 19, 2013 - 07:40 AM UTC
Updates:

First up are some pictures from the Road diorama. I probably am not going to follow through with the entire idea. However, I do have the Mutt built, so I'll do something with it. I dug out a figure and a trailer for a Willys Jeep. I'll have to see how this one goes.


So now back to the Outbreak Diorama. The first thing is to remove everything from the base. I put the pieces in a box just to keep the pieces together. With the change from the checkpoint, back to a patrol, I sort of wasted my time removing the cab roof from the Humvee. You can also see where I had already removed part of the sidewalk. I always hated that extension.


Time to clean up the base. I used a palm sander to sand off pieces of glue and garbage that was left on the base from the vehicles and figures.
I am probably going to cut the base down to a smaller size. I'm going to wait until I am ready to place items before deciding just how much is being cut off.


Now the figures. Several of these are going to be modified into walking poses. I grabbed a couple of sets of legs from the spares. The tan pair are from Tamiya's old DAK figure set. The other pair is from one of Tamiya's old US Infantry sets. I sanded down the features and filled them over. And no I didn't use the palm sander for that.


That's it for now.
bdanie6
Visit this Community
New Hampshire, United States
Joined: November 09, 2008
KitMaker: 615 posts
Armorama: 60 posts
Posted: Tuesday, August 20, 2013 - 02:11 AM UTC
Holy make-overs Alex! More power to you my friend, if I had gotten that far on a dio (read finished!) I certainly wouldn't scrap it and start all over again. I would have called it done and finished.
Speaking of done, the vehicle build on mine is now officially "done". I still need to modify my figures and put the base together, but since available funds are a bit short at the moment, I might not get it finished in time, even with the extension.
All I can say to that is I will keep posting photos here as the dio develops

All that being said, on with the pictures!

AS I said last time, putting the gun into the rear compartment and then hooking up the ammo chutes and electrical connections was a non-starter. My solution was a platform that would slide in after everything was attached.


Back to the ammo chutes, I tried putting the resin into boiling water for a minute to soften the resin, but even then as I bent the chutes into a curve form, they broke...

Answer to that was wrapping the broken pieces in tissue paper soaked with white glue. This helped keep the proper width for the chute and keep the cloth look.


Sliding the assembled gatling gun into the rear compartment went without a hitch (go figure ) and wound up looking like this


A slightly elevated view from the back, you can see the loading platform on the right and one of the figures attached to the tanker


with the tractor attached


on the workbench (somebody committed a neatness here! )


The rest of these photos are "beauty shots" that I took outside.


So that is the Apocalypse Truck. Still have the dio itself to finish, but hopefully that will get done before the end of September
Later
Bluestab
Visit this Community
South Carolina, United States
Joined: December 03, 2009
KitMaker: 2,160 posts
Armorama: 1,906 posts
Posted: Tuesday, August 20, 2013 - 04:12 AM UTC
Thanks Bruce. I really am my own worst critic. I think the changes will be better. I really let it get out of hand and what I had really was a disappointment. I really was on the fence about even turning in final pictures.

Last night I added some road damage. Like they had did some water line work, dug up the road, and then patched it. One of my issues with the road was that it was too clean. The asphalt was way too dark and I really didn't care for the layout. Lots of lessons learned for EOD3.

Anyway, I do like the truck-a-death. The diamond plate really sets it off and gives it a tank like feel. What was the Clint Eastwood movie where he armored up the bus? The Gauntlet? It has that sort of feel.

And good luck on the base.
bdanie6
Visit this Community
New Hampshire, United States
Joined: November 09, 2008
KitMaker: 615 posts
Armorama: 60 posts
Posted: Wednesday, August 21, 2013 - 02:05 AM UTC
What the heck
I tried to post some finished pictures to the campaign gallery and it won't let me!
It says that my images are oversized for the space I have left in my gallery, but I'm not posting in my gallery, I'm posting in the EOD2 gallery. I also got a message saying I could open up more space if I deleted older pictures, but I can't find anyway TO delete them!
So...now what?
Nito74
Visit this Community
Lisboa, Portugal
Joined: March 04, 2008
KitMaker: 5,386 posts
Armorama: 4,727 posts
Posted: Wednesday, August 21, 2013 - 03:21 AM UTC
Bruce, the KitMaker Gallery has a limited space for every user, I'm guessing you can either resize your photo to fit the available space you have , or delete some older photos.
Also another possible solution is posting them on the thread but don't forget to tell the Campaign Manager where your posted photos are located so that he can sent you the ribbon award.

Almost forgot, being a KitMaker Subscriber lets you have more free storage space .

gcdavidson
Visit this Community
Ontario, Canada
Joined: August 05, 2003
KitMaker: 1,698 posts
Armorama: 1,563 posts
Posted: Monday, August 26, 2013 - 03:56 AM UTC
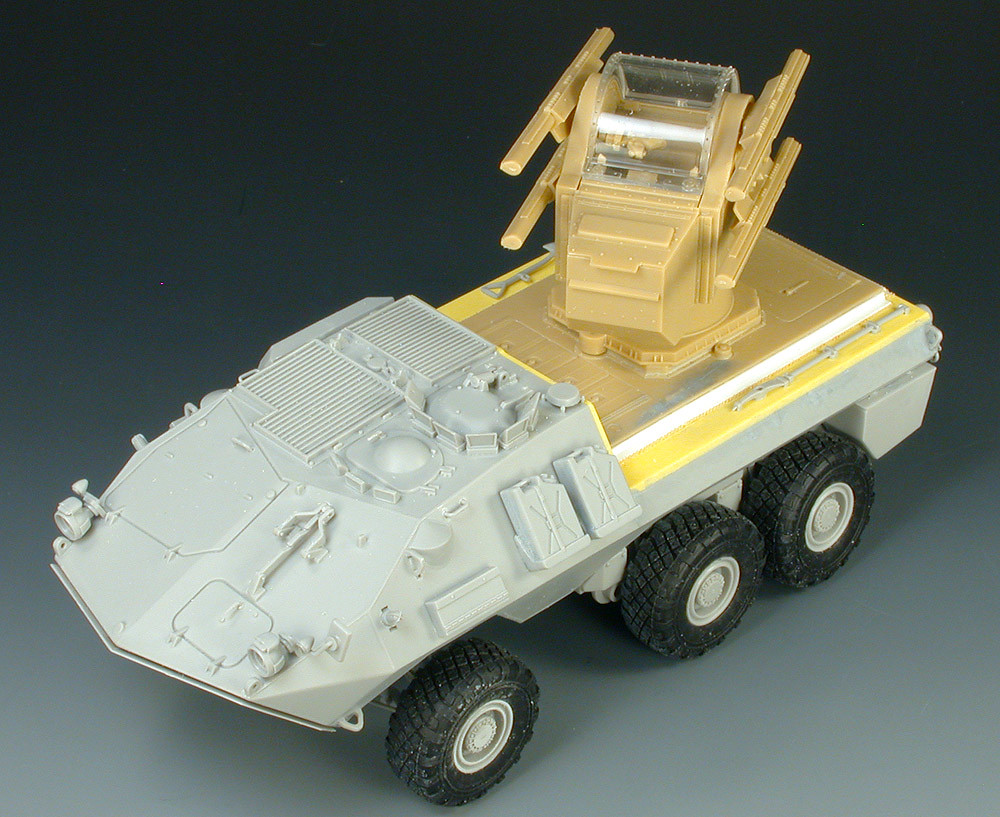
I need some painting ideas for this. Getting pressed of time...we're under a month now?

For armament, I'm looking at a recovered Soviet rocket pod (its 32nd scale, but close enough for end of days), a pair of Hellfires, and some Sidewinders.

35th-scale
Visit this Community
Kildare, Ireland
Joined: November 21, 2007
KitMaker: 3,212 posts
Armorama: 2,807 posts
Posted: Monday, August 26, 2013 - 09:13 AM UTC
That looks nice Graeme. I suppose the paint scheme will depend on your end-of-days scenario....

Ice age: white
Global warming and rising sea levels: blue(s)
Nuclear holocaust: grey(s) & black tiger stripe camo
Zombies: blood red
Bluestab
Visit this Community
South Carolina, United States
Joined: December 03, 2009
KitMaker: 2,160 posts
Armorama: 1,906 posts
Posted: Tuesday, August 27, 2013 - 04:04 AM UTC
It looks great Graeme.

As far as paint, I have to agree with Sean that alot will depend on what EOD scenario you're going with. Since it's an anti-air vehicle I'm going to assume zombies are out.

I'd go alien attack. I think it's sudden and can have a worldwide affect. Most other scenarios have a scenario development period. If you have the vehicle defending a city, I'd go with a urban scheme of grays.
gcdavidson
Visit this Community
Ontario, Canada
Joined: August 05, 2003
KitMaker: 1,698 posts
Armorama: 1,563 posts
Posted: Tuesday, August 27, 2013 - 04:15 AM UTC
I hadn't thought about urban cam..that sounds like a plan.
Bluestab
Visit this Community
South Carolina, United States
Joined: December 03, 2009
KitMaker: 2,160 posts
Armorama: 1,906 posts
Posted: Tuesday, August 27, 2013 - 04:30 AM UTC
Winter camo would look cool too (white, med gray, dark gray/black). Maybe explain that the aliens don't like the cold and humanity has withdrawn in to colder climates. The invaders have stepped up air attacks against these strongholds, requiring more air defenses. The real threat is the fast approaching spring. Many of the safe zones will be thawing and subject to alien attacks.

As an aside, I'm wrapping up my own Outbreak project this week.
Bluestab
Visit this Community
South Carolina, United States
Joined: December 03, 2009
KitMaker: 2,160 posts
Armorama: 1,906 posts
Posted: Friday, August 30, 2013 - 06:36 AM UTC
Big update.

Took the revamp as an opportunity to work on the figures as well. Even the figures I was not going to rework, I repainted.


I tried a few layouts and ended up with my revised base size. I cut the base with a jigsaw. I would then sand the edges and repaint the road surface.


Recut and repainted, I added the Mini and the figures. The Mini had its front wheels turned and some minor damage added. The figures were added and propped up. Miscellaneous signs were added. I'm not sure if you can read the For Lease sign. But it's Jenny Realty and the number pays homage to Tommy Tutone.


Sort of all-together. The guy next to the Mini, aiming back, really didn't fit in so....


...I removed him. I think he took away from the flow of the figures.


Some closer views.


And with that...I'm calling this one done...well sort of. There's still some clean-up needed. All in all, I am much happier with this version. And, I think it works better.

35th-scale
Visit this Community
Kildare, Ireland
Joined: November 21, 2007
KitMaker: 3,212 posts
Armorama: 2,807 posts
Posted: Saturday, August 31, 2013 - 08:35 AM UTC
It does look good...but then so did your first version. I really like how you did those figures though.
strongarden
Visit this Community
Florida, United States
Joined: May 14, 2012
KitMaker: 730 posts
Armorama: 624 posts
Posted: Saturday, August 31, 2013 - 08:51 AM UTC
Gents,

@Alex- You have it now, nice job man. A Govt Squad patroling is kinda creepy in itself, so glad you stuck it out and finished!

@Bruce- SWEEEEET! Dude that rig is awesome, and w/ a stinger in it's tail!

@Graeme- That ride is bad-as*! And what a great scenario from Alex, this will be cool when painted.

Cheers
Dave
Nito74
Visit this Community
Lisboa, Portugal
Joined: March 04, 2008
KitMaker: 5,386 posts
Armorama: 4,727 posts
Posted: Saturday, August 31, 2013 - 12:14 PM UTC
This one ends next month, still no ribbon..
Bluestab
Visit this Community
South Carolina, United States
Joined: December 03, 2009
KitMaker: 2,160 posts
Armorama: 1,906 posts
Posted: Saturday, August 31, 2013 - 02:40 PM UTC
Thanks guys. I think this incarnation is a lot cleaner and self-explanatory than the other one. As said, the creepiness is there and quite intentional. I think not seeing the threat works better. Before, I tried to add elements of the threat and it didn't work out. I prefer the use of the Mini this way as well. Before, it was just part of the scenery. This way, it reflects damage and that something happened without saying what happened.

I was going to add a narrative but I kind of think the whole thing speaks for itself.

John,
I may try to work up something for a ribbon. I tried making one a while back but it was horrible. I was hoping someone would step in.
WARDUKWNZ
Visit this Community
Auckland, New Zealand
Joined: June 01, 2011
KitMaker: 1,716 posts
Armorama: 1,638 posts
Posted: Thursday, September 05, 2013 - 07:17 PM UTC
Alex ,, Really nice redo mate .. got what ya wanted in the end and well worth it ..well done dude

Bruce,, Ya know i could see that monster lurking around waiting for the scouts to return with a horde on the arse's and then just laying waste to everything
A really cool build mate .
Graeme ... Man this looks just so right ..like why wasn't built for real ,,its like ,,"why the hell didnt i think of that ?"
Keep working mate ,,its gonna look very cool

And John is so right ,,we aint got a ribbon and with how things have gone in my world i'm not surprised i forgot ..ok the call goes out ..anyone got some ideas for one ? ,,any help here would be brilliant .

Phill
Bluestab
Visit this Community
South Carolina, United States
Joined: December 03, 2009
KitMaker: 2,160 posts
Armorama: 1,906 posts
Posted: Sunday, September 08, 2013 - 02:47 AM UTC
How about one of these? I included a larger version of the background without the lettering to show you what they are. I chose yellow text because it stood out against the backgrounds better to me.


Let me know what you think. If these will work just tell me which one and I think they can be cut, passed, and resaved as a gif...and done.
1967er
Visit this Community
Nordrhein-Westfalen, Germany
Joined: March 12, 2012
KitMaker: 224 posts
Armorama: 201 posts
Posted: Sunday, September 08, 2013 - 06:32 AM UTC
Hi Alex,

I like your idea for the ribbon - thank you for your work!
I would prefer the larger skulls (because you can see them better on the screen) and the writing "EOD 2".

By the way - I like your second scenery.
It is a story with so much open questions - like "what happened" or "what's behind that wall" or "who are they searching for".
... very misterious

Bruce, your truck has really come alive - great job on the payload and weapons.

Graeme, nice weapons on your six-wheeler.
Is this weapons station a model of a real rocket-launcher?
I haven't seen something similar anywhere, so I am curious...

Cheers
Thomas

Bluestab
Visit this Community
South Carolina, United States
Joined: December 03, 2009
KitMaker: 2,160 posts
Armorama: 1,906 posts
Posted: Sunday, September 08, 2013 - 03:24 PM UTC
Thanks Thomas. And thanks all for the positive comments on the diorama. I'm fixing to upload my finished pictures into the Gallery. I'm just using three of the ones I've already posted.

That's one vote for ribbon #3. That's the one I prefer as well.

I'm pretty fired up for EOD #3.
35th-scale
Visit this Community
Kildare, Ireland
Joined: November 21, 2007
KitMaker: 3,212 posts
Armorama: 2,807 posts
Posted: Sunday, September 08, 2013 - 07:21 PM UTC
I'd go for ribbon #3 also Alex. And EoD 3 too!