

Hi Kevin,
I have to say the AFV kit is an impressive kit so far. The suspension supports seem to be the most complicated bit of the build, but they may well be much easier than I think when I get to them, just cleaning up the parts at the moment.
I can understand you frustration when things don't turn up. I have some stuff on order from TMD that in theory should have been hear around last week, so I'm waiting on that front too. I PM'd Chris on your behalf, so hopefully he will get in touch with an update.
Cheers
Al
Hosted by Darren Baker
Churchill Mk III Interior Build

AlanL

Joined: August 12, 2005
KitMaker: 14,499 posts
Armorama: 11,675 posts
Posted: Saturday, April 03, 2010 - 09:53 PM UTC

KEVINT

Joined: August 29, 2005
KitMaker: 191 posts
Armorama: 176 posts
Posted: Saturday, April 03, 2010 - 10:54 PM UTC
Al once you get past the suspension section it is all down hill as they say.
I wouldn't be surprised if you end up getting another Churchill it is a lovely kit.
The problem with the delivery isn't Chris's fault. It was despatched on the 22nd of March and using the RM track and trace I was able to discover that the parcel is "being processed through our network for delivery". That obviously must mean via Wales, Ireland and Scotland and back to England! As the average person walks at 4 miles an hour a postman with a long round should be able to deliver it in 2 days!
Sorry I will get off my box now.
Cheers
Kevin
AlanL
Joined: August 12, 2005
KitMaker: 14,499 posts
Armorama: 11,675 posts
Posted: Saturday, April 03, 2010 - 11:11 PM UTC
Quoted Text
:Al once you get past the suspension section it is all down hill as they say.
I wouldn't be surprised if you end up getting another Churchill it is a lovely kit.
The problem with the delivery isn't Chris's fault. It was despatched on the 22nd of March and using the RM track and trace I was able to discover that the parcel is "being processed through our network for delivery". That obviously must mean via Wales, Ireland and Scotland and back to England! As the average person walks at 4 miles an hour a postman with a long round should be able to deliver it in 2 days!
Sorry I will get off my box now.
Cheers
Kevin
 - Yes, that could be true. I have some stuff coming for Netmerchants also but Easter has held it up as Mikes stuff usually arrives the next day which is amazing coming form N Ireland and about 6 timees faster than if I order on the mainland.
Well at least you know it's coming.
I already have a 2nd Mk III, one for conversion to the ARK Mk I and their AVRE Mk III and I'll probably get another to conver to a Mk IV and add a facine to. They have made a cracking kit here so no doubt the Churchill collection will grow especially if they do some alternative 'Funnies' I particularly like the fact that the side secions of the 'fender are separate items this gives so much choice of finish.
Patience Grasshopper, Patience
Cheers
Al
AlanL
Joined: August 12, 2005
KitMaker: 14,499 posts
Armorama: 11,675 posts
Posted: Sunday, April 04, 2010 - 03:31 AM UTC
Hi Guys,
Well onto the next stage. I cleaned up the road wheels last night and glued parts D2/D15 and D1/D16 together this morning. The separating plates are Parts D17, D18, D19 and D 20. Terry recommends you number these so you don't mix them up, I'm just going to cut and fit them individually once the side bracings are dry.
 .
.
Al
Well onto the next stage. I cleaned up the road wheels last night and glued parts D2/D15 and D1/D16 together this morning. The separating plates are Parts D17, D18, D19 and D 20. Terry recommends you number these so you don't mix them up, I'm just going to cut and fit them individually once the side bracings are dry.
.Al
AlanL
Joined: August 12, 2005
KitMaker: 14,499 posts
Armorama: 11,675 posts
Posted: Monday, April 05, 2010 - 06:36 AM UTC
Hi Guys,
Well after a slight interlude to make these two chaps:

I got on with making the cross members for the outer suspension mountings. These need to dry before I move on to add the axel mountings, but I did glue the front idler parts together. I have also cleaned up the wheels which I stored in bags as you have no spares if the carpet monster gets one.


Al
Well after a slight interlude to make these two chaps:
I got on with making the cross members for the outer suspension mountings. These need to dry before I move on to add the axel mountings, but I did glue the front idler parts together. I have also cleaned up the wheels which I stored in bags as you have no spares if the carpet monster gets one.
Al
AlanL
Joined: August 12, 2005
KitMaker: 14,499 posts
Armorama: 11,675 posts
Posted: Tuesday, April 06, 2010 - 01:21 AM UTC
Hi Guys,
Well after a little battle I have attached the suspension ubnits and wheels. A set of rubber bnands is recommend here to hold them down. The LHS fitted with ease, the RHS just didn't want to sit snug so a bit of brutc force and elestic bands finally did the trick.
The axle mountings are not a big problem, just remember there are 3 different types parts D22 x 2 which got at the front Parts D 21 x 8 the centre and Part D 23 comes at the rear. I thought this might have been tricky but if you add each aprt individualy it is fairly easy.


I also added the front idler and rear drive wheels at this point.
Now onto the conversion.
At the start of the interior conversion instructions is a reminder to remove 0.5mm from the top of parts D5 the suspension posts) . Naturally I missed this, but it is not a problem as I just need to sand down the tops of the suspension posts so that when I add part P 1 it sits flush within the sponson.
A bit on the painting. All British tanks up to 1942 were finished in a silver aluminium colour, after that they went white for a period to the eara of the Comet. This was due to a shortage of paint and to a degree the interior finish also depended on who make the tank. whether this change took place early, mid or late 42 I'm not sure. As this is going to be a pre Dieppe Canadian Churchill my thinking is on aluminium for the interior colour. Not as cool as white perhaps. Any thoughts? Also it would make sense to me to paint this in subsenctionas I go along otherwise trying to get into the nooks and crannies might be a bit hard.
Back to the sanding.
Al
Well after a little battle I have attached the suspension ubnits and wheels. A set of rubber bnands is recommend here to hold them down. The LHS fitted with ease, the RHS just didn't want to sit snug so a bit of brutc force and elestic bands finally did the trick.
The axle mountings are not a big problem, just remember there are 3 different types parts D22 x 2 which got at the front Parts D 21 x 8 the centre and Part D 23 comes at the rear. I thought this might have been tricky but if you add each aprt individualy it is fairly easy.
I also added the front idler and rear drive wheels at this point.
Now onto the conversion.
At the start of the interior conversion instructions is a reminder to remove 0.5mm from the top of parts D5 the suspension posts) . Naturally I missed this, but it is not a problem as I just need to sand down the tops of the suspension posts so that when I add part P 1 it sits flush within the sponson.
A bit on the painting. All British tanks up to 1942 were finished in a silver aluminium colour, after that they went white for a period to the eara of the Comet. This was due to a shortage of paint and to a degree the interior finish also depended on who make the tank. whether this change took place early, mid or late 42 I'm not sure. As this is going to be a pre Dieppe Canadian Churchill my thinking is on aluminium for the interior colour. Not as cool as white perhaps. Any thoughts? Also it would make sense to me to paint this in subsenctionas I go along otherwise trying to get into the nooks and crannies might be a bit hard.
Back to the sanding.
Al
AlanL
Joined: August 12, 2005
KitMaker: 14,499 posts
Armorama: 11,675 posts
Posted: Tuesday, April 06, 2010 - 01:21 AM UTC
Hi Guys,
Well after a little battle I have attached the suspension ubnits and wheels. A set of rubber bnands is recommend here to hold them down. The LHS fitted with ease, the RHS just didn't want to sit snug so a bit of brutc force and elestic bands finally did the trick.
The axle mountings are not a big problem, just remember there are 3 different types parts D22 x 2 which got at the front Parts D 21 x 8 the centre and Part D 23 comes at the rear. I thought this might have been tricky but if you add each aprt individualy it is fairly easy.
ChrisDM

Joined: January 01, 2010
KitMaker: 717 posts
Armorama: 697 posts

Posted: Tuesday, April 06, 2010 - 01:31 AM UTC
Nice work Al (x 3 )
Are you still planning on doing this as a Calgary Tank before Dieppe?
Chris
)Are you still planning on doing this as a Calgary Tank before Dieppe?
Chris
AlanL
Joined: August 12, 2005
KitMaker: 14,499 posts
Armorama: 11,675 posts
Posted: Tuesday, April 06, 2010 - 01:51 AM UTC
Hi Chris,
Yes, the one on page 78 of Mr Churchill's Tank, showing 14th Canadian Army Tank Regiment (The Calgarys) just prior to the Dieppe Raid. I like the look of the vehicles and I though it would be the perfect setting for having all the hatches open, engine deck and so on with the troops preparing the tanks. I have a couple of the Ultracast figures that would suit this type of setting well and a Tilly would also fit nicely into the time frame lol, lol.
Sanding the suspension posts down at this point is fairly easy.. I did read the instructions before hand, but was concentrating on the suspenson build.
Cheers
Al
AlanL
Joined: August 12, 2005
KitMaker: 14,499 posts
Armorama: 11,675 posts
Posted: Tuesday, April 06, 2010 - 02:34 AM UTC
Hi Folks,
First up will be the RHS panier. The posts are sanded down and as you can see you add a broad strip of PE to form a flat base. I ahd roughtened up the rear of the pannier and I will paint that silver/metalic grey before I start adding the parts. Pic is a test fit only and I will roganise and paint the stowage pprior tofixing every thing down. As you can see there are some ejection marks that will need dealt with too.


Cheers
Al
First up will be the RHS panier. The posts are sanded down and as you can see you add a broad strip of PE to form a flat base. I ahd roughtened up the rear of the pannier and I will paint that silver/metalic grey before I start adding the parts. Pic is a test fit only and I will roganise and paint the stowage pprior tofixing every thing down. As you can see there are some ejection marks that will need dealt with too.
Cheers
Al
ChrisDM
Joined: January 01, 2010
KitMaker: 717 posts
Armorama: 697 posts
Posted: Tuesday, April 06, 2010 - 02:48 AM UTC
I've had a look through my Dieppe pics, looks like you have plenty of options on which one to do 
AlanL
Joined: August 12, 2005
KitMaker: 14,499 posts
Armorama: 11,675 posts
Posted: Tuesday, April 06, 2010 - 03:31 AM UTC
Hi Chris,
Yes, plenty of choice. Just starting to clean up the parts for the RHS stowage, but need to pause and do a few life things lol, lol.
Al
Yes, plenty of choice. Just starting to clean up the parts for the RHS stowage, but need to pause and do a few life things lol, lol.
Al
NebLWeffah

Joined: October 13, 2004
KitMaker: 1,683 posts
Armorama: 1,248 posts

Posted: Tuesday, April 06, 2010 - 09:37 AM UTC
Hi Alan;
Looks great!! I really like your project, it's going great and I'm very interested in following this. I have the AFV Club Churchill kit to so your project will help me alot when I get around to building mine.
If you haven't seen it already, you should check out Carmen Manning's Dieppe Churchill build in this thread here on Armorama: https://armorama.kitmaker.net/forums/147113&page=1
Hope this helps and I look forward to your progress.
Cheers;

Bob
Looks great!! I really like your project, it's going great and I'm very interested in following this. I have the AFV Club Churchill kit to so your project will help me alot when I get around to building mine.
If you haven't seen it already, you should check out Carmen Manning's Dieppe Churchill build in this thread here on Armorama: https://armorama.kitmaker.net/forums/147113&page=1
Hope this helps and I look forward to your progress.
Cheers;
Bob

AlanL
Joined: August 12, 2005
KitMaker: 14,499 posts
Armorama: 11,675 posts
Posted: Tuesday, April 06, 2010 - 05:54 PM UTC
Hi Bob,
Thanks. I haven't look in on Carmen's build for a while. He's doing an excellent job on the Churchill.
AFV have certainly produced a cracking kit.
Al
Thanks. I haven't look in on Carmen's build for a while. He's doing an excellent job on the Churchill.
AFV have certainly produced a cracking kit.
Al
AlanL
Joined: August 12, 2005
KitMaker: 14,499 posts
Armorama: 11,675 posts
Posted: Thursday, April 08, 2010 - 07:30 AM UTC
Hi Guys,
Following on from my review of the Mk II Interior set, Chris is kindly sending out an A4 size sheet of the parts list. This will make life much easier especially for the visually challenged like me. Thanks Chris. This is a picture of the PDF file.
Al

No progress these last 2 days, as I've been busy at work, but hope to press on with the RHS fittings over the weekend.
Al
Following on from my review of the Mk II Interior set, Chris is kindly sending out an A4 size sheet of the parts list. This will make life much easier especially for the visually challenged like me. Thanks Chris. This is a picture of the PDF file.
Al
No progress these last 2 days, as I've been busy at work, but hope to press on with the RHS fittings over the weekend.
Al
AlanL
Joined: August 12, 2005
KitMaker: 14,499 posts
Armorama: 11,675 posts
Posted: Friday, April 09, 2010 - 10:07 PM UTC
Well Guys, I hope to get a bit more of the RHS stowage cleaned up today.
The parts are good but need a bit of sanding down to get a good fit. The bedrolls sit vertically and the ammo rack needs the top and bottom sanded down a little to slide in. I squared it up at the rear and probably took a little too much off the inside end but I can add a piece of plastic card so that it sits flush to the inner wall, not a problem unless you intend to leave the side door open which I do.
In the front stowage area there were 5 groundsheets, 1x 37 patt haversack, 2 anti gas capes and a couple of pairs of gloves. On the RHS of the instrument panel was a small container for spare bulbs. The small fitting is the jar/hose bleeding for the lockheed system. The other the Binnace. Also in this area were an oil can with angel sput , 2 pd hammer, wire cutters,intercom headset and harness, log book Ab 413, instruction book and tool list, all this forward of the side door opening lol, lol.
Nothing glued in yet, just gettig an idea where things go. There is a small sloped piece of PE to fit first at the door opening.


Al
The parts are good but need a bit of sanding down to get a good fit. The bedrolls sit vertically and the ammo rack needs the top and bottom sanded down a little to slide in. I squared it up at the rear and probably took a little too much off the inside end but I can add a piece of plastic card so that it sits flush to the inner wall, not a problem unless you intend to leave the side door open which I do.
In the front stowage area there were 5 groundsheets, 1x 37 patt haversack, 2 anti gas capes and a couple of pairs of gloves. On the RHS of the instrument panel was a small container for spare bulbs. The small fitting is the jar/hose bleeding for the lockheed system. The other the Binnace. Also in this area were an oil can with angel sput , 2 pd hammer, wire cutters,intercom headset and harness, log book Ab 413, instruction book and tool list, all this forward of the side door opening lol, lol.
Nothing glued in yet, just gettig an idea where things go. There is a small sloped piece of PE to fit first at the door opening.
Al
AlanL
Joined: August 12, 2005
KitMaker: 14,499 posts
Armorama: 11,675 posts
Posted: Saturday, April 10, 2010 - 04:35 AM UTC
Hi Guys,
RHS pannier stowage has been cleaned up and is almost ready for insertion. A bit more painting to do first.

Al
RHS pannier stowage has been cleaned up and is almost ready for insertion. A bit more painting to do first.
Al
AlanL
Joined: August 12, 2005
KitMaker: 14,499 posts
Armorama: 11,675 posts
Posted: Sunday, April 11, 2010 - 03:29 AM UTC
Afternoon folks,
Lots of Churchills around ar the moment
I have added the rear RHS pannier stowage and some plumbing as necessary.


Will complete the front stowage and instruments this afternoon if all goes well, just want to studty some pics be for I glue it down.
Cheers
Al
Lots of Churchills around ar the moment
I have added the rear RHS pannier stowage and some plumbing as necessary.
Will complete the front stowage and instruments this afternoon if all goes well, just want to studty some pics be for I glue it down.
Cheers
Al
AlanL
Joined: August 12, 2005
KitMaker: 14,499 posts
Armorama: 11,675 posts
Posted: Sunday, April 11, 2010 - 05:41 AM UTC
Hi Guys,
A little feedback on the parts. You will need patience , a good sharp saw and a sanding block. Tthe way the parts are cast it is not always immedicately obvious where to cut so, take your time. The ammo rack was a little off square and the top and bottom need sanded down a good bit to get a fit. The front bin threw me as it actually needs to have the gas capes stacked up and becasuse it has a flat back you are left with a little gap at the front which would have held kit. I don't thing this is an issue as I believe when the front armout is fitted ther gap may disapear but I will put in a little plate, just in case.
Make sure you have a copy of the internal stowage sketch as this will help a lot.
Any one know what the Binnical was used for?
Looking at the stowage sketch there appears to be a intercome connecting box on the top of the front front stowage area. Chris doesn't provide any roof fittings but I'll add one anyway to plug a headset into.
You are provided with wiring and fittings to secure the wire/cable to the sides of the huill. I chose to used lead wire and rolled lead wire brackets as I find it easier to work with.
Cheers
Al
ChrisDM
Joined: January 01, 2010
KitMaker: 717 posts
Armorama: 697 posts
Posted: Sunday, April 11, 2010 - 06:11 AM UTC
Hi Al,
The compass binnacle was so the driver knew which way he was going. The commander might say 'turn x degrees to port' and the driver would keep an eye on the binnacle until he was on the correct heading.
Accurate turns were essential in a churchills as the driver's view was so restricted by the idler 'horns' that he relied upon the commander for precise instruction on any movement outside of that narrow field of vision
Interestingly, in the matilda, the binnacle is in the basket in front of the commander's pedestal, although the driver still has a direction indicator on a 'clock' style dial
AlanL
Joined: August 12, 2005
KitMaker: 14,499 posts
Armorama: 11,675 posts
Posted: Sunday, April 11, 2010 - 06:15 AM UTC
Hi Chris,
Thanks that makes sense of where it sits.
Cheers
Al
Thanks that makes sense of where it sits.
Cheers
Al
AlanL
Joined: August 12, 2005
KitMaker: 14,499 posts
Armorama: 11,675 posts
Posted: Sunday, April 11, 2010 - 07:08 AM UTC
Hi Guys,
Well that the RHS pannier complete, I donlt thik I've left anything out. Added a formations junction box to plug any headsets into,


Al
Well that the RHS pannier complete, I donlt thik I've left anything out. Added a formations junction box to plug any headsets into,
Al
AlanL
Joined: August 12, 2005
KitMaker: 14,499 posts
Armorama: 11,675 posts
Posted: Thursday, April 15, 2010 - 07:23 AM UTC
Hi Guys,
Not much done this week, busy at work. Weekends coming though, so should get soem parts cleaned up for the LHS pannier.
This is what's up next:


Al
Not much done this week, busy at work. Weekends coming though, so should get soem parts cleaned up for the LHS pannier.
This is what's up next:
Al
AlanL
Joined: August 12, 2005
KitMaker: 14,499 posts
Armorama: 11,675 posts
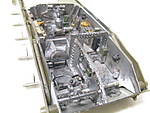
Posted: Friday, April 16, 2010 - 06:42 AM UTC
Hi folks,
These are the main players for the LHS pannier. Hopefully I shall get them cleaned up, painted and installed this weekend.


Al
These are the main players for the LHS pannier. Hopefully I shall get them cleaned up, painted and installed this weekend.
Al
 |

WEB HOSTING BY


Copyright ©2021 Armorama and Kitmaker Network, a subsidiary of Silver Star Enterprises
All Rights Reserved. Please read our Conditions of Use and Privacy Policy.
All Rights Reserved. Please read our Conditions of Use and Privacy Policy.