Hi Mike,
You're welcome and thanks for your support throughout the build.
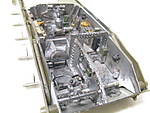
On the interior I would added the welds under the panier sides before mating them to the hull. On fitting the engine, I removed all the triangle supports as necessary and cut the base plug off the engine. This actually dropped the engine by about 2mm so I would either simply square off the plug and leave it in place or place the engine on two 2mm runners to get the correct height. it would also avoid the problem of the engine sticking like a rock to the floor when I mounted it. Clearly making the turret basket early is important as you need to constantly test fit when you add the interior fitting to make sure nothing is obstructing it. Getting the rear firewall in the correct location is pretty critical and 94mm from front end of the floor worked for me. Similiarly the cross member on the floor needs to be right, mine is about 2mm to far up the floor, so the fit was super tight when I started to add in the jack and I ended up having to leave out the oil can for that reason. There isn't a lot of room to play with but if you get these two cross sections in the right place everything else will fit.
On the external AFV kit, paint the clear periscopes, you'll get a better ides of their shape and placement, complete the periscope guards before fitting the hatches and also add the top turret hatch fittings at an earlier stage, they lie flat so won't catch on things which was why I initially left them till later. If you are going to use AM grills then make sure the vents don't bow in as mine did, I had to switch to the kit parts to get them to straighten out. These are small things but I could have made life easier for my self.
Above all check you references there are many small variations to the Mk III depending on what you want to build. Glue the front and rear boggies in place so they don't want to slide in when fixing the track.
With a build like this you tend to jump around from on thing to another, I do that anyway when I'm building so just double check the instructions before you move on. I left off the slides above the side doors until the very end as there was a lot of handling of the kit otherwise I would have knocked them off numerous times and for the same reason I haven't yet fitted the holding brackets on the rear of the panniers. I'll just scratch off a bit of paint to get a good fix for the PE and add then towards the end.
After that sit back and enjoy you build, AFV have given us a kit that has numerous possibilities.
I've talk with Chris about fixes that could be made to the set and he has seen through the build and from customer feedback some of the issues with the kit. He has re-mastered and re-designed a number of parts and these will be available in all new kits from next month. Due to the cost involved he can't send them out for free to all those who have already bough the set but I believe he will offer them at cost and if anyone wants them they should contact Inside the Armour directly.
Overall this was a very challenging and enjoyable build and I'm pretty pleased with the result so far. It's certainly busy in there and busy looking is exactly what I like.
Cheers
Al