Armor/AFV: British Armor
Discuss all types of British Armor of all eras.
Hosted by Darren Baker
Churchill Mk III Interior Build
AlanL
Visit this Community
England - East Anglia, United Kingdom
Joined: August 12, 2005
KitMaker: 14,499 posts
Armorama: 11,675 posts
Posted: Sunday, May 16, 2010 - 12:55 AM UTC
Some pics,


This might not seem like a big deal but now I have the correct setting for the rear firewall all other work can proceed as I can fix the engine in and build forward from there.

Al
AlanL
Visit this Community
England - East Anglia, United Kingdom
Joined: August 12, 2005
KitMaker: 14,499 posts
Armorama: 11,675 posts
Posted: Sunday, May 16, 2010 - 03:58 AM UTC
Right Oh, a bit more.

I finished adding the seating and fittings to the lower basket and also added the back plate to the turret. The plate is indented and quite thick and as a result you will need to adjust the back of the turret ring slightly to take acoount of this. Also this thickness and indentation effects the radio and stowage box that sit at the back of the turret. You need to take about 4mm off the back of these as mentioned in the instructions. A bit of cutting/filing and I have a reasonbly good fit.

Indented back plate:


Altered turret ring


Test fitting the radio/stoweage box


Completed lower basket


Al
AlanL
Visit this Community
England - East Anglia, United Kingdom
Joined: August 12, 2005
KitMaker: 14,499 posts
Armorama: 11,675 posts
Posted: Monday, May 17, 2010 - 05:13 AM UTC
Hmmm,

Well after 9 updates and one reply, and that being from Chris, you have to ask yourself if build blogs are even remotely worth the effort?

Like blood from a stone!

Al
SteveReid
Visit this Community
Massachusetts, United States
Joined: September 07, 2007
KitMaker: 212 posts
Armorama: 159 posts
Posted: Monday, May 17, 2010 - 04:02 PM UTC
Alan-
Let not your heart be troubled!

4000 views my friend-- FOUR THOUSAND!

Very impressed with your build here- it is coming along beautifully.

A real showcase of your skills. This is going to look great through those hatches!

Steve
AlanL
Visit this Community
England - East Anglia, United Kingdom
Joined: August 12, 2005
KitMaker: 14,499 posts
Armorama: 11,675 posts
Posted: Tuesday, May 18, 2010 - 05:49 AM UTC
Hi Steve,

Many thanks. Blogs tend to be rather lonely affaires. A lot of work, and often little response, thoughts or encouragement so your comments are much appreciated.

I shall plod on, working on the gun mantle at the moment, finishing the fittings on the rear firewall and looking to getting the turret completed some time this week.

Cheers

Al
afv_rob
Visit this Community
England - East Anglia, United Kingdom
Joined: October 09, 2005
KitMaker: 2,556 posts
Armorama: 2,199 posts
Posted: Tuesday, May 18, 2010 - 06:18 AM UTC
Ok, well while this isnt my area of interest, I agree with you that there seems to be a bit of a problem with people not bothering to comment on build blogs so i'll comment! The build is looking good Alan, looks like a little bit of work is required on the resin interior set but you have it coming along nicely.
AlanL
Visit this Community
England - East Anglia, United Kingdom
Joined: August 12, 2005
KitMaker: 14,499 posts
Armorama: 11,675 posts
Posted: Tuesday, May 18, 2010 - 07:57 AM UTC
Hi Rob,

Thanks for dropping in and the comments, agreed there.

Here' this evening porgress:

I have fitted the fixtures to the rear firewall, I added some retaining brackets and the little wing nuts to either side of the air filters. Also added some base paint to the basket.

Chris didn't do the fitting for the front LHS of the turret so I'll botch a bit there to add some plumbing from. It only needs a basic outline of the part as it won't be seen when the turrte is joined, which is probably why he didn't bother. I also trimmed a little off the brackets for the gun, and botched a bit more work there.

Firewall - needs some plumbing added


There are small ammunition boxes to add to the flooring infront of the firewall and also the floor divide on which one of the Co2 bottles sits.


With the turret ring and basket in place. You can see there isn't much room to play with.


Main gun added and some additional fittings


Looking a bit tank like, dry fitting the parts:


Cheers

Al


SteveReid
Visit this Community
Massachusetts, United States
Joined: September 07, 2007
KitMaker: 212 posts
Armorama: 159 posts
Posted: Tuesday, May 18, 2010 - 11:30 AM UTC

Quoted Text

Hi Steve,
Many thanks. Blogs tend to be rather lonely affaires. A lot of work, and often little response, thoughts or encouragement so your comments are much appreciated.
Cheers
Al


Al-
this is another topic entirely- but you are correct. A blog is a big effort and those comments really fuel the bloggers enthusiasm.

The first armor model I ever built was the Airfix 1/76 (or 1/72nd) scale Churchill in 1974 or 75!

I enjoy projects with interiors most of all. When I get time I'd like to do one of these myself.

Steve
AlanL
Visit this Community
England - East Anglia, United Kingdom
Joined: August 12, 2005
KitMaker: 14,499 posts
Armorama: 11,675 posts
Posted: Tuesday, May 18, 2010 - 06:07 PM UTC
Hi Steve,

The AFV kit is a gem and the interior a challenge for me. I'm no expert in anything I build, Churchill's included so feedback is quite important.

Thanks again for looking in and the thouoghts.

Cheers

Al
AlanL
Visit this Community
England - East Anglia, United Kingdom
Joined: August 12, 2005
KitMaker: 14,499 posts
Armorama: 11,675 posts
Posted: Saturday, May 22, 2010 - 10:18 PM UTC
Hi Guys,

A bit more porgress:

I've been working across the model with some success and some failure! I have added the internal fittings to the turret less the raido which still need painting and plumbing.


Added some weapons to the basket and started to pauint some of the items


Did a little more work on the gun:


Dry fitted the front Armour


Added a missing cross member to the engine deck


Started on the hull floor and fitted the engine and filled in the gaps either side of the firewall


More dry fitting


OK where is the failure you ask, well that part applles to the engine. After much cutting sanding and dry fitting to get the firewall in the correct place, when I added some glue dropped it in it stuck fast lol, lol, so the position is not exactly where I wanted it. Also because of my own stupitidy plus some other factors it actually site about 2mm lower than it should. I sawed the plug off, and also removed the small side plates form the internal hull. To get the firwall and engine as one I also sanded the edges so that the whole thing could slide in and out to get the placement right. So the combination of all this and fitting the firewall to the engine means that it sits slightly lower than it should. 1 or 2 mm doesn't seem a lot but in modelling it stands out a mile, but as the engine is stuck like a rock I shall have to live with my error. I did pick up that AFV left out the cross member on the engine deck so at least that is a bonus


Oh I did make a small fitting for the front LHS of the turret but ir might be too big?


Work continues


Al
AlanL
Visit this Community
England - East Anglia, United Kingdom
Joined: August 12, 2005
KitMaker: 14,499 posts
Armorama: 11,675 posts
Posted: Sunday, May 23, 2010 - 07:22 AM UTC
Evening folks,

A bit more progress.

I just realised when I started on the fornt seating that there isn't a reference to this in the instructions. Anyway the seats sat on a couple of runners and I've added these in plastic [ strip. Also raised the level from the floor using the same. There are a lot of small detail you may want to add here. A small cross beam ran behind the seating so I'll add that which should allow me to line them up. Fortunately I have have some fairly good reference pics for this area so I shall add what I can toi what is already provided in the kit.

Also I've added the elevation rod to the main gun. Some Churchills may have had free elevation, but from what I've read they had the ratachet type as the free elevation was presumed to be more suitable for the fast moving Crusaders who would shoot on the move.


the ratchjet needs to be set so that it also rests on the turret ring when instered into the basket. Not as hard as it sounds.


Al
AlanL
Visit this Community
England - East Anglia, United Kingdom
Joined: August 12, 2005
KitMaker: 14,499 posts
Armorama: 11,675 posts
Posted: Monday, May 24, 2010 - 05:58 AM UTC
Hi Guys,

Well a bit more work on the interior,

Added the gear box affaire and the piping running from it on the RHS. There should be some brackets over the piping, I'm not sure if these are in the set, if not I'll make some fixings from old bits of PE or lead wire.


Ran a bracket across the back of the drivers seat slide rails which should allow me to line up the seats. Probably should have run it right across but there are stowage items behind the gunners seat I need to make and fit.


I think the positioning of the seats is about right!!

Al
RedwingNev
Visit this Community
England - East Midlands, United Kingdom
Joined: February 07, 2004
KitMaker: 911 posts
Armorama: 348 posts
Posted: Monday, May 24, 2010 - 10:09 PM UTC
Well, I'm no expert, but I think it looks great.

Only question is - how are you going to ensure all this work is going to be seen?
AlanL
Visit this Community
England - East Anglia, United Kingdom
Joined: August 12, 2005
KitMaker: 14,499 posts
Armorama: 11,675 posts
Posted: Tuesday, May 25, 2010 - 12:33 AM UTC
Hi Neil,

Thanks. I don't take my stuff to shows or competitions so who's to look, but me and a few folks on site who will have followed the build.

I could simply finish it and leave it in sub sections, or raise the top hull on 4 legs or just build it as normal.

All the hatches will be left open so there should be a good bit of detail visible and with interiors well, you know they are there, and there is something satisifying about that.

Cheers

Al
afv_rob
Visit this Community
England - East Anglia, United Kingdom
Joined: October 09, 2005
KitMaker: 2,556 posts
Armorama: 2,199 posts
Posted: Tuesday, May 25, 2010 - 12:41 AM UTC
Coming along very nicely Alan. All that detail will look fantastic through the hatches once the build is complete.
AlanL
Visit this Community
England - East Anglia, United Kingdom
Joined: August 12, 2005
KitMaker: 14,499 posts
Armorama: 11,675 posts
Posted: Tuesday, May 25, 2010 - 02:39 AM UTC
Hi Rob,

Thanks for dropping in, yip, coming along slowly .

Some more work.

I realsied last night when studying some internal pipcs that I should have added a weld seem at the bottom of the pannier/hull. This would have been easier before I joined the hull but it wasn't too much of a problem.


Next I tacklet the small ammo bodes and fitttings for the rear of the hull. I had a problem getting both ammo boxes to fit on the rear RHS. they should look like this:


However, no matter which way I placed them one edge kept catching on the basket so I've opted for one and added the other to the basket as this was turret ammo.


This one went in fine although I added some strapping


and this is the one I placed in the basket. Also here is the fitting I made for the LHS turret ring top, hardly a brillient copy of the part but close enough for the illusion!!


The set provides the drivers controls and pedals, which I almost missed!! I must be getting old!!

Dry fit


how things fit


Al
SteveReid
Visit this Community
Massachusetts, United States
Joined: September 07, 2007
KitMaker: 212 posts
Armorama: 159 posts
Posted: Tuesday, May 25, 2010 - 06:45 AM UTC
Hi Al-
steady progress and it is looking great! I like what you do with the ammunition stowage and the part you scratchbuilt.

I have a question about this though:


Quoted Text


Dry fit


Quoted Text


how things fit


Quoted Text


Al


Tough to tell which pic was taken first- but the pic labeled 'dry fit' looks like the parts will fit pretty well.

The 'how things fit' picture looks like the parts won't fit at all??

Was that just to show how the AFV club part slides up to meet the Inside the Armour resin part?

Are you having a fit problem? If so is it the Inside the Armour part? the AFV Club part? or both?

Steve
AlanL
Visit this Community
England - East Anglia, United Kingdom
Joined: August 12, 2005
KitMaker: 14,499 posts
Armorama: 11,675 posts
Posted: Tuesday, May 25, 2010 - 07:40 AM UTC
Hi Steve,

Just to show how the AFV part slides in, the parts are a good fit although the top bolt on either side needs removed to get the inside front plate flush with the top hull but that won't matter in the end.

Just finished fitting the pedals etc but I'm looking for a good picture of the Mk III drivers position to see what other wiring and stuff I can add in.

Thanks for the PM.

Cheers

Al
AlanL
Visit this Community
England - East Anglia, United Kingdom
Joined: August 12, 2005
KitMaker: 14,499 posts
Armorama: 11,675 posts
Posted: Wednesday, May 26, 2010 - 05:24 AM UTC
Hi Folks,

some more progress:

These are the drivers pedals. I made the two pedals from lead wire as one of the PE bits supplied broke through my light touch!!

Hopefully you can see the handle bar steering, the kit comes with this part supplie but I made my own working on the assumption I would probably break the original! I need to add a small fitting on the gunners side to which a linking bar from the steering runs.


This is the fitting for the front lower hull plate and in truth I am not exactly sure what it is, neither anm I sure if I have it the correct way up. Hopefully someone will enlighten me there.


This is the current state of the gun. I have tried to loose the kit look to the mounting and I was thinking about it, as you do, and it occurred to me that the guns would most probably be made else where and transported to the main factory and one assumes (ho ho) arrive already painted to be fitted. The long and short of that is I was thinking of painting it green as there is already enough metalic silver on show!


These are the seats and I hope to get them finished off and installed this evening.


I'm adding some plumbing to the front of the hull to run up to the pedals and other places.


And here is a shot of some large nuts I added to the engine sides plus another shot of the weld under the panniers.


I don't have too many parts left to fit an dthen I can get to finsihing the internal painting.

Al
ChrisDM
Visit this Community
England - South West, United Kingdom
Joined: January 01, 2010
KitMaker: 717 posts
Armorama: 697 posts
Posted: Wednesday, May 26, 2010 - 06:02 AM UTC
Hi Al,

The 'thingy' on the inside of the front bow panel is the right way up, and is the interchange for the hydraulic steering (and handbrake) the round disc on the front is a pressure guage

incidentally the two tall things between the co2 cylinders are yet more besa stowage (the churchill was regularly called upon for a 'besa shoot' apparently and ate through the stuff like it was going out of production. These are tall boxes with just the top of the besa boxes poking out. I'd paint the ends scc15 or a similar green

I believe the 6pdr would have been painted green. this time though a lighter 'greener' green (no brown in it)except the breech block itself which was bare dark steel. All the ones I've seen are well greased though, so it would have a brown tinge to it. Certainly none of the shiney bare metal look you see on some builds though. it would rust and jam.

these photos are from a MkVII but are the same fittings for a MkIII. Note the drivers control panel is missing the fuse box cover


note in this one too that lever at the bottom of the glacis is MkVII specific (it opens the driver's hatch)


And this one should help show how the handbrake connects to the hydraulic interchange


Thanks for your help identifying 'grey areas' in the kit. Future customers can thank you as I will soon be introducing instructions on a disc to replace the paper instructions, and including various bits of reference that I was unable to add before due to copywrite issues (I've since just just taken my own photos such as these!) I am also working on a colour painting guide

chris
AlanL
Visit this Community
England - East Anglia, United Kingdom
Joined: August 12, 2005
KitMaker: 14,499 posts
Armorama: 11,675 posts
Posted: Wednesday, May 26, 2010 - 07:07 AM UTC
Hi Chris,

Many thanks for the additional pics. Knew about the Besa Boxes just haven't gotten around to painting the tops yet, but glad you reminded me.

Also good confirmation on the 6pdr, that's kinda what I thought. The painting tips will help.

Adding some wiring into the lower hull.

Many thanks

Al

AlanL
Visit this Community
England - East Anglia, United Kingdom
Joined: August 12, 2005
KitMaker: 14,499 posts
Armorama: 11,675 posts
Posted: Friday, May 28, 2010 - 04:24 AM UTC
Hi Gentlemen,

Some updates and corrections:

Firstly, and incorrectly stated above there are instructions for the seats, front fight compartment etc. I received two sets from Chris the 2nd being an updated repalcement set. My missing pages were in the first set and I never thought to look there!!!

On the Turret Travers Mechanishm, again this part exsists, it isn't clearly marked on the instructions and appears on the last page under the wiring diagram for the Travers Mechanism and is in fact part No 2 on the listing, but I only dicovered that as I am nearing the end of the conversion and therefore it stood out, so I went in search of where it might belong.


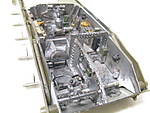
Chris tells me that the generator mould went missing somewhere in transit so I have made my own the MCN Generator Mk I from some bits from the old Italeri set.


This is stowed behind the drivers seat.

Also on looking at the stowage diagrams I noticed what I belive is some piping running down the LHS floor. I could not get a good picture of this area as it is mainly covered in kit but I have added a single pipe in as it look like one belongs there. If anyone can clarify that that would help.


On the small handle on the underside of the gunners area, again there is a PE part provided for this in the kit but as I hadn't found my missing pages at that stage, I added one from spur.


I've done some work o the seats, which just need the painting finished.


And lastly a better picture of the fittings I added to the main gun.


Not a lot left to do but some small delicate areas that will take me a few days and then onto the raelly fun part of finishing the internal painting.

Oh, one last thing. On the turret interior RHS there is quite a bit of 'unused space'


This is how it appears on the official stowage diagrams, but looking at the kit I could see no water bottle stowage and some may weel have/have not been positioned there!!?

Al
SdAufKla
Visit this Community
South Carolina, United States
Joined: May 07, 2010
KitMaker: 2,238 posts
Armorama: 2,158 posts
Posted: Friday, May 28, 2010 - 06:58 AM UTC
Al, it's just getting better and better.

Those weld beads you added look really good. How did you do them?

Looking forward to the next up-date!

Mike
AlanL
Visit this Community
England - East Anglia, United Kingdom
Joined: August 12, 2005
KitMaker: 14,499 posts
Armorama: 11,675 posts
Posted: Friday, May 28, 2010 - 09:12 AM UTC
Hi Mike,

Many thanks, I'm looking forward to getting the interior completed and the parts painting properly finshed.

Cheers

Al
AlanL
Visit this Community
England - East Anglia, United Kingdom
Joined: August 12, 2005
KitMaker: 14,499 posts
Armorama: 11,675 posts
Posted: Friday, May 28, 2010 - 11:59 PM UTC
Hi Guys,

This mornings work was to fit and finish the drivers seats, frontal aromour and generator and associated bits.


Drivers seats, genney and controls which are now wired in!


.

Next will be to finish and install the No 19 radio.

Al