Armor/AFV: British Armor
Discuss all types of British Armor of all eras.
Hosted by Darren Baker
Churchill Mk III Interior Build
AlanL
Visit this Community
England - East Anglia, United Kingdom
Joined: August 12, 2005
KitMaker: 14,499 posts
Armorama: 11,675 posts
Posted: Sunday, June 06, 2010 - 11:22 PM UTC
Hi Chris,

Thanks. I shall leave it off. I have been looking at the upper set of rivetts on the lower rear plate. My thiking is that on the examples I have looked at these are the left overs of later fittings for the smoke dischargers and wouldn't have been on the early versions, so I'll go with what I have at the moment.

These are my altered vents using the kit parts:


Placement of the small eye bolts on the hatches and upper hull. The additional indent has been filled with milliput.


Cheers

Al
SdAufKla
Visit this Community
South Carolina, United States
Joined: May 07, 2010
KitMaker: 2,238 posts
Armorama: 2,158 posts
Posted: Monday, June 07, 2010 - 03:37 AM UTC
Al,

Just a quick note to say that the build looks like it's going very nicely!

FWIW, I concur with your assessment re: the upper row of bolts with the holes in them. When you asked the question a few posts earlier, a connection with the smoke discharger boxes was also my thought. I think you have the Mr. C's tank book, and that's the best reference that I have, so I can't offer any better observations than what I'm sure you've already made. It seems you've made as reasoned a guess as possible.

At any rate, I'm very much looking forward to seeing what you do on your dio to show off all this great interior work!

Mike
AlanL
Visit this Community
England - East Anglia, United Kingdom
Joined: August 12, 2005
KitMaker: 14,499 posts
Armorama: 11,675 posts
Posted: Monday, June 07, 2010 - 04:40 AM UTC
Hi Mike,

Yes, looking at the patttern of them and the rather untidy one at that, I think they are the left overs from the smoke dischargers too. Thanks for your thoughts.

I'll prbably be proved worng but I can live with it.

Fitted the front hatches. Don't know if this was a good move at this stage, but easier to work with. The front two have additional tiny grab handles to attach, kit part E18 and all 4 have the PE part G4 to add as well.

There was a slight gap between the upper hull and the front armoured plate and rather than fill that later, I've added a thin strip of plastic to fill this out.


The AFV Club side intakes tend to bend inwards in the centre. I don't kow if anyone else found that. The only way I can think of getting the to square up is to use the kit part E12 which is rather ugly. At the moment I've added some left over PE grills I had, not sure about them though, as the overhang a bit given the inward bend.


This is my home fix for the back grills, having cut down parts B23 and B24.


On the finish I had thought about adding part of the deep wading kit, but this would really be a waste of a kit, so I'm probably going to finish it pretty much as per the C Sqn picture on page 78 Mr C's Tanks. If I was to build an earlier Mk I or Mk II to match I could split the kit between the two but that is perhaps something for the future, I'll concnetrate on getting this one buildt first.

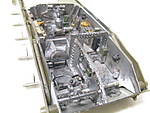
I'll need to mix up some sort of green/blue for the engine as per some of the pictures I've seen. This I hope will make it stand up and out of the hatches a bit more, so some experimentation needed on the paint front.

Al
AlanL
Visit this Community
England - East Anglia, United Kingdom
Joined: August 12, 2005
KitMaker: 14,499 posts
Armorama: 11,675 posts
Posted: Monday, June 07, 2010 - 05:20 AM UTC
With a bit of colour on the engine??


I could do the block like this and then wear it down again, any thoughts?

Al
ChrisDM
Visit this Community
England - South West, United Kingdom
Joined: January 01, 2010
KitMaker: 717 posts
Armorama: 697 posts
Posted: Monday, June 07, 2010 - 05:31 AM UTC
The engine looks very good to me Alan

If it was mine (and its obviously not) I'd be inclined to keep the weathering very light Not much though as I think you've really brought the detail out already and it would be a shame to lose it!
CMOT
Staff MemberEditor-in-Chief
ARMORAMA
Visit this Community
England - South West, United Kingdom
Joined: May 14, 2006
KitMaker: 10,954 posts
Armorama: 8,571 posts
Posted: Monday, June 07, 2010 - 05:41 AM UTC
Despite my earlier reservation about the use of an interior kit, I have to say Alan this is coming along really well. It is a pity that a lot of your work on it will not really be seen.
StukaJr
Visit this Community
California, United States
Joined: April 26, 2010
KitMaker: 346 posts
Armorama: 36 posts
Posted: Monday, June 07, 2010 - 05:45 AM UTC
Wow, that is impressive amount of work since I've last checked in! Very detailed and great attention to detail! Can't wait to see it in final pictures - WIP's look amazing already, though.

One general question - what color is the British AFV interior? I have a pot of Polyscale's British Interior Green (which is a relatively light salad green) but I don't know whether it would apply to modern or WWII vehicles? From the pictures of the build, the paint looks pretty dark or is it the lighting?
AlanL
Visit this Community
England - East Anglia, United Kingdom
Joined: August 12, 2005
KitMaker: 14,499 posts
Armorama: 11,675 posts
Posted: Monday, June 07, 2010 - 06:19 AM UTC
Hi Guys,

Chris,

i've gone for a blue/green colour across the engine base and will weather it in for the reasons you mentioned, the engines were likely to be in reasonable nick.

Darren,

Time will tell, but then you know it's there!

Ivan,

Thnaks for looking in. Interior for British tanks would have been metalic silver up until 1942, there after white or cream and than back to metalic silver from 1945 onwards. The change was due to sa shortage of paint.

Shermans would have been white inside.

Cheers

Al
SteveReid
Visit this Community
Massachusetts, United States
Joined: September 07, 2007
KitMaker: 212 posts
Armorama: 159 posts
Posted: Monday, June 07, 2010 - 04:20 PM UTC
Alan-
great fun following this blog. I know what everyone is saying about some of the work on an interior being hidden- but they are a lot of fun to do!

I like the look on peoples faces when they look at a nice model then look into the open hatches and realize that it all there.

Very cool-

Steve
AlanL
Visit this Community
England - East Anglia, United Kingdom
Joined: August 12, 2005
KitMaker: 14,499 posts
Armorama: 11,675 posts
Posted: Monday, June 07, 2010 - 09:57 PM UTC
Hi Steve,

Thanks for dropping in and the comments. I couldn't agree more. There are only 3 British plastic tank kits that I know of that come with partial/full interiors, the Academy Grant and the recently released MiniArt Valentine and the M10. They are a large amount of fun to do and you tend to learn a lot more about the vehicle. I build the M3 Grant and it was a hoot, one of the most enjoyable builds I've done.

Once you have done one, you are also in a much better position to have a go at making you're own stuff. I was down at Duxford on Sunday and bought 2 more The Resicast M4A4 kit from Graham and the Matilda interior form Chris, so lots more fun ahead.

Right back to the build. I have re-vamped the engine which is not only more appropriate but hopefully will make it lift out of the hull a bit when viewed.


I also replaces the PE grills with the kit part to help straighten up the warp in the side vents.

On with the hatches and the tracks are steeping in some soapy water.

Cheers

Al
AlanL
Visit this Community
England - East Anglia, United Kingdom
Joined: August 12, 2005
KitMaker: 14,499 posts
Armorama: 11,675 posts
Posted: Tuesday, June 08, 2010 - 01:36 AM UTC
Update on the rear latches,

The latches for the rear hatches are showen as Parts E40, I missed this. The rods are Parts E39, these don't, as far as I can see, apppear on the AVF instructions. I may try making the rods out of brass for a little extra strength.

Al
barkingdigger
Staff MemberAssociate Editor
ARMORAMA
#013
Visit this Community
England - East Anglia, United Kingdom
Joined: June 20, 2008
KitMaker: 3,981 posts
Armorama: 3,403 posts
Posted: Tuesday, June 08, 2010 - 02:43 AM UTC
Alan,

I have to say this is an excellent build! You aren't by any chance coming to our (Essex MAFVA) club show "Present Arms" in Romford in August? I'd love to see this beast in person...

Tom
AlanL
Visit this Community
England - East Anglia, United Kingdom
Joined: August 12, 2005
KitMaker: 14,499 posts
Armorama: 11,675 posts
Posted: Tuesday, June 08, 2010 - 03:18 AM UTC
Hi Tom,

Thank you kind Sir. I don't get around many of the shows Tom. A yearly visit to Duxford and I try and make the show at Milton Keynes, I think there is one there in August too, but I would have to check.

Well having discovered were the parts were I needed, I've fitted the rear hatches. I made some brass rods for a bit of extra strength.

I have also adjusted the brightness in some of the pics to give you an idea what you see.

Normal shot


brightness adjusted


Normal shot etc:


same


A couple that I took earlier of the engine again with the brightness adjusted.


A question on the exhaust pipes. Does anyone have a picture of how the piping runs fron the engine deck back into the engine compartment? There is opportunity to add the piping in from the exhausts if I can determine which way the pipes run, also if these were lagged in any way it might add a bit of additional colour.

BTW: after making my fuel tanks at a best gues I discovered this site which has a fabulous amount of infomration. I only wish I had found it earlier;

www.churchilltank.com


It's behaving a bit odly so run a virus check first, but it is a terrific site.

Cheers

Al
AlanL
Visit this Community
England - East Anglia, United Kingdom
Joined: August 12, 2005
KitMaker: 14,499 posts
Armorama: 11,675 posts
Posted: Tuesday, June 08, 2010 - 10:16 PM UTC
Hi Guys,

I just finished fitting the 4 small periscopes to the kit. These come in clear plastic and I cannot for the life of me think why they did them in clear plastic? These are going to get painted over anyway and being in clear plastic makes it even harder to locate them the correct way up. even through my 'extra eye' I found it hard to determine which way they sould go.

Anyone any thoughts on this?


Al
ChrisDM
Visit this Community
England - South West, United Kingdom
Joined: January 01, 2010
KitMaker: 717 posts
Armorama: 697 posts
Posted: Tuesday, June 08, 2010 - 10:26 PM UTC
No they aren't the easiest are they Alan?

Great link by the way. I feel a visit to the isle of Wight coming on....
AlanL
Visit this Community
England - East Anglia, United Kingdom
Joined: August 12, 2005
KitMaker: 14,499 posts
Armorama: 11,675 posts
Posted: Tuesday, June 08, 2010 - 10:33 PM UTC
Hi Cris,

Yes, me too and Yes, they are footery. Any thoughts on the exhaust pipe returning into the engine compartment? I can't find a picture or diagram showing me the direction but I would have thought it would be visable through the open hatches.

Back to work tomorrow so only a few hours of modelling left before I need to get on with the routne things in life.

AL
ChrisDM
Visit this Community
England - South West, United Kingdom
Joined: January 01, 2010
KitMaker: 717 posts
Armorama: 697 posts
Posted: Tuesday, June 08, 2010 - 10:41 PM UTC
Sorry Alan, I forgot that question.

The exhausts go directly through the deck onto those four inverted Y-shaped ribbed parts on the resicast engine.

I found the resicast parts just a little short for this, or possibly I didn't sit my engine high enough

Chris
AlanL
Visit this Community
England - East Anglia, United Kingdom
Joined: August 12, 2005
KitMaker: 14,499 posts
Armorama: 11,675 posts
Posted: Tuesday, June 08, 2010 - 10:47 PM UTC
Thanks Chris, a picture would help lol, lol.

Cheers

Al
ChrisDM
Visit this Community
England - South West, United Kingdom
Joined: January 01, 2010
KitMaker: 717 posts
Armorama: 697 posts
Posted: Tuesday, June 08, 2010 - 10:52 PM UTC
Hi Alan,

I've undoubtedly got one somewhere, but not on my computer. I'll have to scan it first which means I can't post it till this evening probably

Chris
AlanL
Visit this Community
England - East Anglia, United Kingdom
Joined: August 12, 2005
KitMaker: 14,499 posts
Armorama: 11,675 posts
Posted: Tuesday, June 08, 2010 - 11:27 PM UTC
Hi Chris,

No hurry I won't be closing it up for some time as I have additional personal items, magazines and stuff I want to add.

These are probably the last of the updates for now as I have to get on with a few other things.

I have added the periscope guards and lenses, the part trunking on the exhaust pipes and a little paint. I was thinking that the exhaust box would eb a good candidate for a bit of rusty weathering as the one on this example was exposed to the elements.


I did a review a while back on the Resicast Early Tracks and the link with pics is below:

https://armorama.kitmaker.net/review/3899

These are washed and awaiting removal of the pour stubs. Still some small fittings to be added to the top of the turret and also above the side doors. The lights, and some fittings still need added to the front , but got a lot done these last few days though which was good and also a lot of fun.

Cheers

Al
AlanL
Visit this Community
England - East Anglia, United Kingdom
Joined: August 12, 2005
KitMaker: 14,499 posts
Armorama: 11,675 posts
Posted: Wednesday, June 09, 2010 - 04:21 AM UTC
Hi guys,

Thought I was about done for today, but got through the chores faster than expected.

Some pics of the Resicast tracks, Very easy to remove from the plug (sharp knife), no warping and come with a handy little diagram to aid building.


Al

AlanL
Visit this Community
England - East Anglia, United Kingdom
Joined: August 12, 2005
KitMaker: 14,499 posts
Armorama: 11,675 posts
Posted: Wednesday, June 09, 2010 - 06:37 AM UTC
Hi Guys,

I was going to crack on with the tracks tonight, but I shall leave them until Saturday morning when I have more time. The first sections are a breeze.


Lets hope the reat are too.

Al
AlanL
Visit this Community
England - East Anglia, United Kingdom
Joined: August 12, 2005
KitMaker: 14,499 posts
Armorama: 11,675 posts
Posted: Wednesday, June 09, 2010 - 07:37 AM UTC
Slight cock up.

All the drivers hatches should have the bracing bar to the inside and not the outside as I have them fitted. My thanks to Steve over on SMW for pointing that out. A fix has bben made, by reversing the hatches.

Al
metooshelah
#011
Visit this Community
Jerusalem, Israel
Joined: February 06, 2009
KitMaker: 1,507 posts
Armorama: 1,304 posts
Posted: Wednesday, June 09, 2010 - 07:51 AM UTC
simply superb.
I went for the AFV tracks, which are workable and easy to assemble.
AlanL
Visit this Community
England - East Anglia, United Kingdom
Joined: August 12, 2005
KitMaker: 14,499 posts
Armorama: 11,675 posts
Posted: Wednesday, June 09, 2010 - 08:43 AM UTC
Hi Matan,

Many thanks, appreciated. AFV are supposed to be releasing an early set of Churchill tracks but they are not out yet as far as I know. The later style are available, I have a set in the stash but needed the early style for this one.

Cheers

Al