Armor/AFV: British Armor
Discuss all types of British Armor of all eras.
Hosted by Darren Baker
Churchill Mk III Interior Build
AlanL
Visit this Community
England - East Anglia, United Kingdom
Joined: August 12, 2005
KitMaker: 14,499 posts
Armorama: 11,675 posts
Posted: Saturday, April 17, 2010 - 04:11 AM UTC
Hi Guys,
A dry fit of the LHS pannier parts.


Question for Chris. Is part 72 meant to run longer than the PE base?

Thanks

Al
Removed by original poster on 04/18/10 - 09:30:44 (GMT).
AlanL
Visit this Community
England - East Anglia, United Kingdom
Joined: August 12, 2005
KitMaker: 14,499 posts
Armorama: 11,675 posts
Posted: Saturday, April 17, 2010 - 10:33 PM UTC
Hi guys,

I thought it might alsobe a good time to start to construct the engine.

This is the Resicast Drop in Engine for the Churchill Tank I reviewed a while ago here:

https://armorama.kitmaker.net/review/4012


I shall add some additional plumbing to busy it up a bit more as best I can.

On with the plumbing on the LHS pannier.

Al
ChrisDM
Visit this Community
England - South West, United Kingdom
Joined: January 01, 2010
KitMaker: 717 posts
Armorama: 697 posts
Posted: Sunday, April 18, 2010 - 12:23 AM UTC
Hi Al,

Part 72 should run back past the line of the firewall, whereas the PE runs, more or less, to the firewall. I wanted to try and ensure therewould be no visible gap in the joint between the firewall and pannier wall

Chris
AlanL
Visit this Community
England - East Anglia, United Kingdom
Joined: August 12, 2005
KitMaker: 14,499 posts
Armorama: 11,675 posts
Posted: Sunday, April 18, 2010 - 12:49 AM UTC
Hi Chris,

Thanks, do you know what went into the panniers behind the firewall? - Fuel Tanks?

Cheers

Al
AlanL
Visit this Community
England - East Anglia, United Kingdom
Joined: August 12, 2005
KitMaker: 14,499 posts
Armorama: 11,675 posts
Posted: Sunday, April 18, 2010 - 05:37 AM UTC
Hi guys,

this is todays effort:

I have added the parts to the LHS panier, still to add are some holders with Thompson SMG clips and some PE bracksets to hold the Thompson. You don't get one with the set so I will use an Old Tamiya one rather than thisn one that I like and want to use with some Brits in Italy figures. Also still to add are some PE fittings/levers to link in with the top wiring.

On the engine I have added some additinal detail and given it a coat of paint.


When I finish with the LHS I'll go back and finish painting the detail.

Al
Gundam-Mecha
Visit this Community
England - South East, United Kingdom
Joined: August 05, 2009
KitMaker: 1,019 posts
Armorama: 933 posts
Posted: Sunday, April 18, 2010 - 07:33 AM UTC
Great looking work Alan and nice to see an update on this!

That engine is a great little part, and the extra plumbing really helps spice it up.
ChrisDM
Visit this Community
England - South West, United Kingdom
Joined: January 01, 2010
KitMaker: 717 posts
Armorama: 697 posts
Posted: Sunday, April 18, 2010 - 08:05 AM UTC
Hi Alan,

The panniers either side of the engine held the internal fuel tanks and radiators, one of each on each side

The fuel tank sat on the bottom with the radiator on top. Which I guess makes sense as air would be drawn in through the side air intakes, over the radiators, cooling it, then over the engine before being sucked out by the large fan, over the transmission and out through the rear air outlet

According to Bryan Perrett's 'Churchill Tank' a favourite trick when generals inspected a churchill involved this rear outlet. Apparently they would invariably climb up on the engine deck to have a look, taking off their hat and resting it on the air intake while they climbed up. The driver would give then engine a quick rev and the hat would shoot up three or four feet into the air and hang for a second on a column of hot air, much to the generals' amazement!

Chris
AlanL
Visit this Community
England - East Anglia, United Kingdom
Joined: August 12, 2005
KitMaker: 14,499 posts
Armorama: 11,675 posts
Posted: Sunday, April 18, 2010 - 08:20 AM UTC
Hi John,

Thanks for dropping in and the comments.

Cheers

Al

Hi Chris,

That's what I thought, do you by any chance have a picture of the tanks, radiators and Fan??? Plus any piping, I might ass well go the whole hog and see what I could scratch up.

Thanks

Al
ChrisDM
Visit this Community
England - South West, United Kingdom
Joined: January 01, 2010
KitMaker: 717 posts
Armorama: 697 posts
Posted: Sunday, April 18, 2010 - 08:33 AM UTC
Hi Alan,

I'm a bit tied up tonight with getting out an announcement and later with packing some kits for the Hinckley show, but I'll email you some stuff tomorrow
AlanL
Visit this Community
England - East Anglia, United Kingdom
Joined: August 12, 2005
KitMaker: 14,499 posts
Armorama: 11,675 posts
Posted: Sunday, April 18, 2010 - 08:35 AM UTC
Glad to hear things are going well.

Thanks

Al
AlanL
Visit this Community
England - East Anglia, United Kingdom
Joined: August 12, 2005
KitMaker: 14,499 posts
Armorama: 11,675 posts
Posted: Tuesday, April 20, 2010 - 07:15 AM UTC
Hi Guys,

A bit more work on the LHS pannier and engine. I have added the two small handles that controlled the fuel tanks (thank Chris ) , the Thompson Mags and in addition a control box for the drivers radio phones and mike. I also added a Thompson SMG and by the exit a first aid box. This one looks a little big, so I may have to find something smaller to replace it with. I also added a fire extinguisher to the sloping pannier roof.


Both Panniers as they stand now


The current state of the engine - BTW does anyone know if they were a particular colour other than dirt and grime


Thanks

Al
ChrisDM
Visit this Community
England - South West, United Kingdom
Joined: January 01, 2010
KitMaker: 717 posts
Armorama: 697 posts
Posted: Tuesday, April 20, 2010 - 07:40 AM UTC
Great work again Alan

Here are a couple of pics I took of the Churchill engine from Cobbaton:


This is from a Crocodile, but as far as I'm aware the churchill engine always had plenty of power (enough for its job anyway) so was never really changed much

Its worth noting that this one has been out of a churchill for some time though. I expect a running one would be greasier and with more exhaust grime build-up

Hope that helps

Chris

AlanL
Visit this Community
England - East Anglia, United Kingdom
Joined: August 12, 2005
KitMaker: 14,499 posts
Armorama: 11,675 posts
Posted: Tuesday, April 20, 2010 - 07:48 AM UTC
Thanks Chris,

This will add a bit of colour too it.

Cheers

Al
AlanL
Visit this Community
England - East Anglia, United Kingdom
Joined: August 12, 2005
KitMaker: 14,499 posts
Armorama: 11,675 posts
Posted: Wednesday, April 28, 2010 - 05:05 AM UTC
Hi guys,

got a little diverted by these WIP;


and these about done


but with only one working day left before the Bank Holiday weekend and a few days off next week, next up will be the front of the drivers compartment and then I think I can set about assembling the lower hull pieces.


Al
AlanL
Visit this Community
England - East Anglia, United Kingdom
Joined: August 12, 2005
KitMaker: 14,499 posts
Armorama: 11,675 posts
Posted: Sunday, May 09, 2010 - 12:56 AM UTC
Hi Guys,

Well after a slight delay I decided to make some stuff to fill the rear pannniers. In this case the fuel tanks and cooling plant that was located in that area. The tanks I made form 0.2mm plastic card, of course you can't see them much lol, lol and the cooling system from the engine deck of the M4A3 Sherman. I only had a partial shot of each part but they will do, as once the engine is in you wil only see the top part of the cooling plant if anything.

There is a large warp in the floor of the tank and I have it under pressure to try and straighten it out a bit, another reason for the delay in pressing on.

Once the floor is on, I'll look at mounting the rear firewall and the engine. There may be a bit of adjustment necessary here but I'll find that out when I fit the parts.

Al


metooshelah
#011
Visit this Community
Jerusalem, Israel
Joined: February 06, 2009
KitMaker: 1,507 posts
Armorama: 1,304 posts
Posted: Sunday, May 09, 2010 - 02:36 AM UTC
great Job Alan, really inspiring.

Keep it up!
AlanL
Visit this Community
England - East Anglia, United Kingdom
Joined: August 12, 2005
KitMaker: 14,499 posts
Armorama: 11,675 posts
Posted: Sunday, May 09, 2010 - 03:16 AM UTC
Hi Matan,

Thanks.

After some glue and a lot of pressure I got the floor to fit pretty squarely despite the warp.

The next thing I looked at was test fitting the rear firewall and the engine. The firewall presents a bit of a problem as the base is not square so some adjustment will be needed to get the fit right. It should however, back up to the rear of the engine with no major filling necessary and any gaps on the bottom edge can be filled in with milliput.

I thought it was best to fit this first and then work forward as it will be the starting line for everything else. I need to let the whole hull dry completely first though, as you need to remove the small triangular fixing points before moving on with the hull floor.

Also when fitting the firewall make sure it doesn't press the sides of the hull out otherwise this will effect the fit of the upper hull plate.


Oh, and if you tilt the tank sideways then you can see part of the fuel tanks and cooling system, so not a complete waste of time there, otherwise just paint that area matt black.


Al

AlanL
Visit this Community
England - East Anglia, United Kingdom
Joined: August 12, 2005
KitMaker: 14,499 posts
Armorama: 11,675 posts
Posted: Sunday, May 09, 2010 - 05:12 AM UTC
Later

I've been having a think about the interior fairwall and the engine. The first thing I did was square up the bottom of the interior firewall. Then I removed the part number from the back of the engine. This allows the firewall to sit flush to the back of the engine. If you look at the base of the engine there is also a small lip it can sit on. However, whilst fitting the engine the firewall will need to ne held in place not glued becasue you need to allow a little up down movement. The top of the firwall should meet the top of the upper hull so I've had to allow for the fact this was not square to start with and that I've cut a tiny bit of to square it up.


I've also allowed for a little movement left/right so I'm not trying to squeeze it in. Any small gaps can be filled later.

The next thing to consider is exactly how far back the firewall needs to sit as it will be butting up against the engine front plate. Therefore I am thinking I will need to thin that plate down about 1mm to take account of the engine position and the new internal firewall. What I don't want to do is fix it all and then fnd the turret basket won't fit becasue it's catching on a fitting that should be .000001 futher back - as has been know to happen. As there are no exact measurements then it will be down to the Mk I eyeball to get it right!!!.

I shall look for some reference pictures to see how far back it shuold sit.

Al
ChrisDM
Visit this Community
England - South West, United Kingdom
Joined: January 01, 2010
KitMaker: 717 posts
Armorama: 697 posts
Posted: Sunday, May 09, 2010 - 05:28 AM UTC
Hi Al,

The fit of the Firewall and turret basket is a very tight fit (just like the real thing where this is about a 1mm gap!)

This is exacerbated by the fact that with my firewall and that chunky forward wall on the engine part, you end up with, in effect, a double thickness of firewall. To scale, I think this added thickness would work out at arround 35 to 45 mm at 1/1. This might sound small, but it makes a big difference.

When designing the kit, as the resicast engine was already out, I made my firewall as thin as possible in the knowledge that some might like to use both AM kits. To be fair to resicast, my kit didn't exist when they released the engine so they couldn't have known

I would strongly suggest that you don't fix the firewall and engine in place until the turret basket is built up and you can do a 'dry fit' of the upper hull, basket and firewall/ engine

To give you even more leeway, don't fix the toolbox and rib behind the driver's area until you have done the test fit, as this in effect 'brackets' the basket from the other side

With a lot of wiggling and test fitting you will get it to work
AlanL
Visit this Community
England - East Anglia, United Kingdom
Joined: August 12, 2005
KitMaker: 14,499 posts
Armorama: 11,675 posts
Posted: Sunday, May 09, 2010 - 06:04 AM UTC
Hi Chris,

Thanks for the tip. I intend to thin the Resicast front engine plate by about half. It may take a little time but will probably be worth it. I've made a good start this evening.

I'll take you're advice and build the turret basket in advance of fixing anything, but I would also like the firewall in place and to build forward form there rather than backwards form the pedels. I have already taken about .025mm off the thickness, so a ways to go yet.

Cheers

Al
AlanL
Visit this Community
England - East Anglia, United Kingdom
Joined: August 12, 2005
KitMaker: 14,499 posts
Armorama: 11,675 posts
Posted: Monday, May 10, 2010 - 08:40 AM UTC
Hi Guys,

A bit more progress, well 3 steps forward and 2 steps back

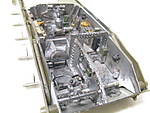
I filled down half of the front wall of the engine and then attached the kit firewall in it's place ensuring that it reached the top opf the upper hull. I need these parts to move as one otherwise I will have to grow another hand. In order to make things a bit easier I hope, I also smoothed the edges of both pieces to allow them to move freely once inside the hull.

There are measurements from the front of the armour to the fire wall but that wasn't much help as I haven't fitted that part yet,

Anyway from the front of the floor to where the firewall should be I recon it is 94mm and I marked a spot on the floor accordingly.

This has some advantages and some disadvantages. I should be able to build the part and slot the whole lot in. but by smothing the sides to allow easy movement to correctly place the part when ready I will have a small gap either side. Filling them hopefully won't be too much of a problem!

The firewall also sits slightly further back than the end of the part on the RHS, and this meant that I had to alter the length of my cooling system and make a small infill to cover the gap. This is covered on the LHS but not the RHS.


Next I looked at the lower turret mounting with a view to building the basket as Chris suggested. This has small groves to fit into the turret and these will need a light sand down. Don't think they are flash and ut them off!!

On the underside of the turret ring there appears to be a bit of moulding spillage and this needed cleaned up to allow the ring to fit the turret housing and I'm working on cleaning that up at the moment. See 2nd pic.


With a little patience and fair bit of sanding this will slot into the housing correctly.

AL

AlanL
Visit this Community
England - East Anglia, United Kingdom
Joined: August 12, 2005
KitMaker: 14,499 posts
Armorama: 11,675 posts
Posted: Friday, May 14, 2010 - 05:56 AM UTC
Hi Guys,

Well we continue with the loneliness of the build blog modeller

Been a week of sanding things down and not much else I'm afraid. The turret ring is not much better and I have sanded the base off the bottom of the basket ring. Still a bit of cleaning up to do but if all goes well I should get the turret basket completed this weekend and that should allow me to finsih the firewall and fix the engine in.


Al
AlanL
Visit this Community
England - East Anglia, United Kingdom
Joined: August 12, 2005
KitMaker: 14,499 posts
Armorama: 11,675 posts
Posted: Saturday, May 15, 2010 - 09:56 PM UTC
Morning folks,

A bit more progress. Due to the mould spillage the base of the turret ring needed a considerable amount of sanding, the same would be true for the actual basket floor as the plug, although quite thin still requires a good bit of sanding to remove.

One suggestion would be for the curved basket support wall to be cast without the small fire exrtinguisher and fitting so that is it is just smooth. That would allow it to bend more easily into the floor well.

I used some brass rod for the two supports rather than plastic rod as it will add a little more strength to this part.

There are a lot of odd angles and shapes happening in this area and it it quite hard to judge if all is properly lined up but I'm reasonable happy with the parts now, I don't think I'll get them much truer.


Next I'll clean up the remainder of the fittings for the turret basket and start on adding the internal features to the upper and lower turret. Also I can now add the remaining interior fittings for the rear fire wall and look to getting the engine fixed in place.

Al
AlanL
Visit this Community
England - East Anglia, United Kingdom
Joined: August 12, 2005
KitMaker: 14,499 posts
Armorama: 11,675 posts
Posted: Sunday, May 16, 2010 - 12:37 AM UTC
Hi Guys,

Well my first gust of 94mm from front of floor to start of the firewall seems to have been right. With the air filters attached to the rear firewall this leaves just sufficient room for the turret to rotate with out fouling on them. The remainder of the firewall fixings sit slightly further back so hopefully all will be well.

Al