

Al,
Sorry I missed your up-date from a day or so ago re: the clear periscopes. I see that you've already installed them. Hopefully, though, this might be helpful at sometime in the future.
What I do is mask the lenses (ordinary blue painter's tape cut to size) then airbrush the entire periscope a bright silver (Citadel Mithrel Silver). After the silver, I airbrush the 'scopes flat black. The I install them per the kit instructions using a non-solvent glue.
Finish the kit, and last remove the masks from the lenses. This leaves a very nice effect.
This link is to a couple of pics of a Bronco Staghound that has all the 'scopes finished using this method. It's also the way I'm finishing the 'scopes on my Tasca Firefly.
https://armorama.kitmaker.net/forums/158327#1328322
Your Churchill build is flying along! I need to check in on your build log more often.
Looking forward to seeing more.
Mike
Hosted by Darren Baker
Churchill Mk III Interior Build
SdAufKla

Joined: May 07, 2010
KitMaker: 2,238 posts
Armorama: 2,158 posts

Posted: Wednesday, June 09, 2010 - 01:09 PM UTC

AlanL

Joined: August 12, 2005
KitMaker: 14,499 posts
Armorama: 11,675 posts
Posted: Wednesday, June 09, 2010 - 06:59 PM UTC
Hi Mike,
Thanks for that. Useful tip for the future. Certainly painting them on the spur would make the details stand out much more clearly and thus make correct placement easier.
I could also have made it easier by adding them before I added the hatches! I tend to jump around the instructions a lot when I'm building which is propably why I missed the hatch issue
Cheers
Al
Thanks for that. Useful tip for the future. Certainly painting them on the spur would make the details stand out much more clearly and thus make correct placement easier.
I could also have made it easier by adding them before I added the hatches!
I tend to jump around the instructions a lot when I'm building which is propably why I missed the hatch issue Cheers
Al
ChrisDM

Joined: January 01, 2010
KitMaker: 717 posts
Armorama: 697 posts

Posted: Thursday, June 10, 2010 - 01:18 AM UTC
Referring to your comment on rusty exhausts Alan, go for it. By all accounts, the silencers on churchill exhausts got very hot.
The rapid heating and cooling lead to rapid oxidisation (this is also why you don't see churchills with the engine decks loaded with stores; they tended to catch fire)
Chris
The rapid heating and cooling lead to rapid oxidisation (this is also why you don't see churchills with the engine decks loaded with stores; they tended to catch fire)
Chris

CMOT

Joined: May 14, 2006
KitMaker: 10,954 posts
Armorama: 8,571 posts

Posted: Thursday, June 10, 2010 - 07:39 AM UTC
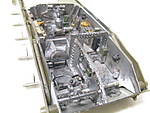
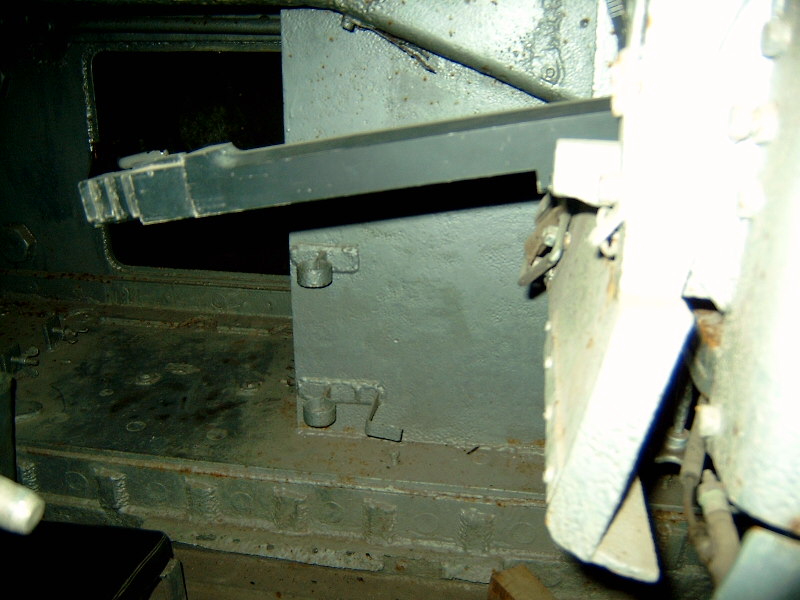
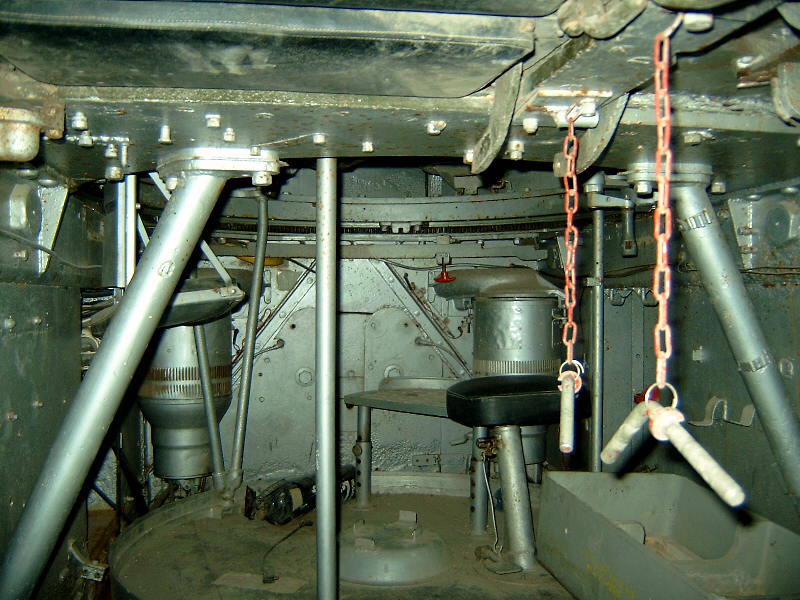
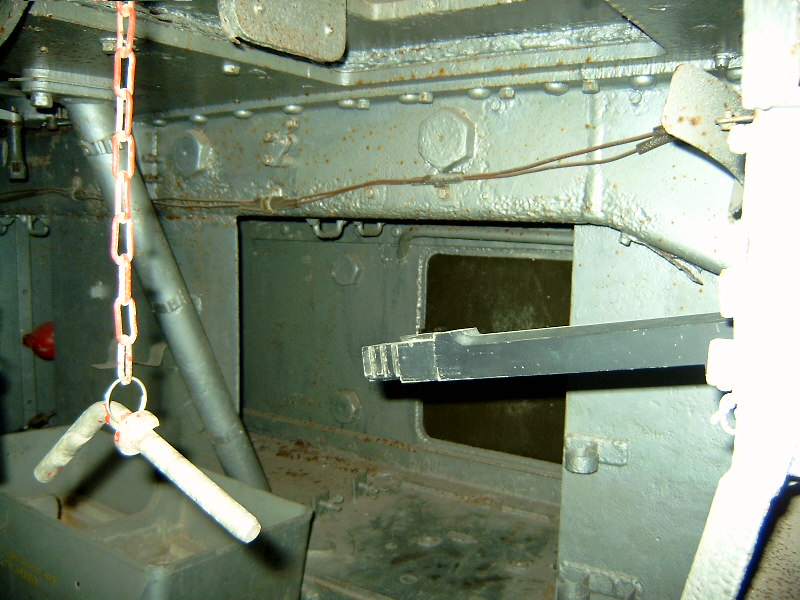
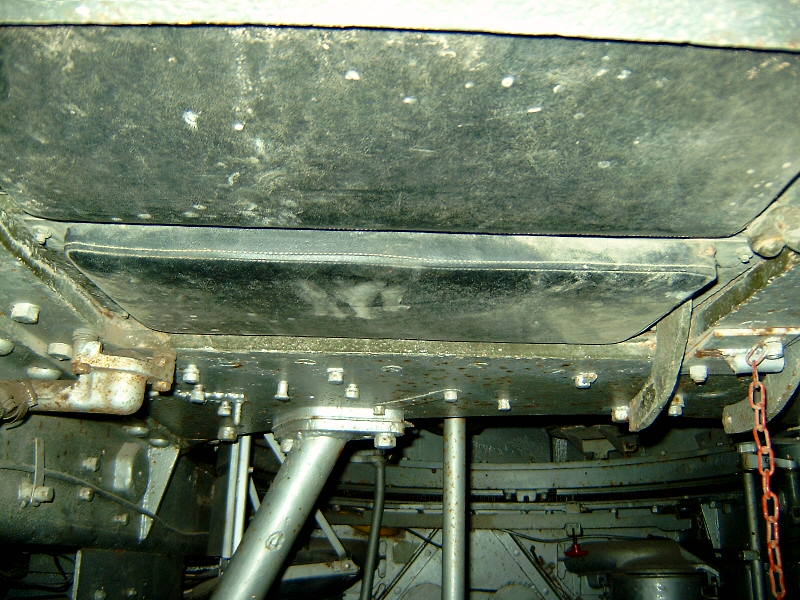
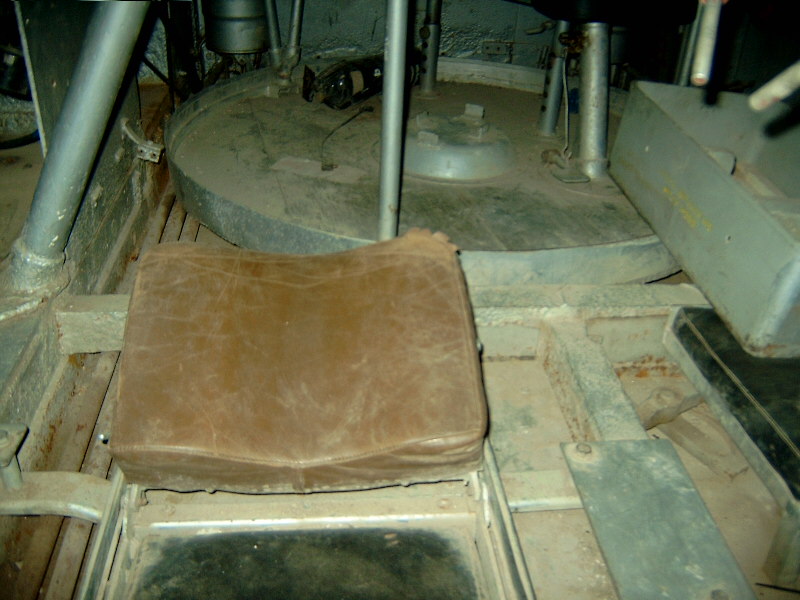
Alan here are some pictures I took of the interior of the Churchill Mk III AVRE at Bovington, they may be of some help to you.

AlanL
Joined: August 12, 2005
KitMaker: 14,499 posts
Armorama: 11,675 posts
Posted: Thursday, June 10, 2010 - 08:12 AM UTC
Hi Darren,
Are the two large poles something that has been added in for structural strength or are the part of the original?
You do know I riveted the inside of my M3 Grant you could start something here lol, lol.
Many thanks
Al
Are the two large poles something that has been added in for structural strength or are the part of the original?
You do know I riveted the inside of my M3 Grant
you could start something here lol, lol.Many thanks
Al
CMOT
Joined: May 14, 2006
KitMaker: 10,954 posts
Armorama: 8,571 posts
Posted: Thursday, June 10, 2010 - 09:17 AM UTC
While I don't know for sure I suspect it is original it could be some form of reinforcment for the weight of the turret and new ammunition.
ChrisDM
Joined: January 01, 2010
KitMaker: 717 posts
Armorama: 697 posts
Posted: Thursday, June 10, 2010 - 11:46 AM UTC
Oops :oops:
Yes those two slanting poles are orginal, structural and in every Churchill ever built, but sadly not in my kit. Somethinh I will have to rectify
Chris
Yes those two slanting poles are orginal, structural and in every Churchill ever built, but sadly not in my kit. Somethinh I will have to rectify
Chris
AlanL
Joined: August 12, 2005
KitMaker: 14,499 posts
Armorama: 11,675 posts
Posted: Friday, June 11, 2010 - 02:42 AM UTC
Hi Darren and Chris,
Many thanks, I will see if I can get something suitable to fit in.
Well a bit of an experiment for me, I've never tried a rusty exhaust box before, or a major rusty item for that matter - here's the development so far:

Al
Many thanks, I will see if I can get something suitable to fit in.
Well a bit of an experiment for me, I've never tried a rusty exhaust box before, or a major rusty item for that matter - here's the development so far:
Al
AlanL
Joined: August 12, 2005
KitMaker: 14,499 posts
Armorama: 11,675 posts
Posted: Friday, June 11, 2010 - 03:58 AM UTC
Hi Guys,
well I can fit the post on the RHS with not too much of a problem, but to get one to fit on the LHS I will have to move the generator forward. However, I'll give i a go.
Al
well I can fit the post on the RHS with not too much of a problem, but to get one to fit on the LHS I will have to move the generator forward. However, I'll give i a go.
Al
AlanL
Joined: August 12, 2005
KitMaker: 14,499 posts
Armorama: 11,675 posts
Posted: Friday, June 11, 2010 - 05:46 AM UTC
Hi Guys,
Removed a couple of the interior fittings and fitted a couple of posts, will paint them up when dry and re-instate the fittings.

Progress on the exhaust box:

Al
Removed a couple of the interior fittings and fitted a couple of posts, will paint them up when dry and re-instate the fittings.
Progress on the exhaust box:
Al
CMOT
Joined: May 14, 2006
KitMaker: 10,954 posts
Armorama: 8,571 posts
Posted: Friday, June 11, 2010 - 10:42 AM UTC
They look good to me Alan. It just goes to show that when Bovington leaves a hatch open it pays to stick your hand with a camera in the hole and click away.
ChrisDM
Joined: January 01, 2010
KitMaker: 717 posts
Armorama: 697 posts
Posted: Friday, June 11, 2010 - 11:24 AM UTC
I agree this is looking very good indeed Alan. That exhaust is certainly loking the corroded part
AlanL
Joined: August 12, 2005
KitMaker: 14,499 posts
Armorama: 11,675 posts
Posted: Saturday, June 12, 2010 - 12:07 AM UTC
Hi Darren & Chris,
Thanks for the comments and helpful information.
Right a bit of a picture intensive update, so apologies to those who don't like too many pics in one go.
The additional supports required the removal of a couple of parts. I took the opportunity to alter my home made genny slightly. It need re-located slightly forward of the original position.
Firstly a picture of things to do:

The Genny and and portable cooker and gas capes removed. on the genny I took off the driving wheel arrangement and added a pipe, a bit more in keeping with what it might look like:


The added supports:
These mean adding the top hull from and angle and then turning it to sit correctly, as the supports sit on the pannier sides.

Genny test fit:

Hull top back on with the supports in what I hope is roughly the correct place

Te cooker and capes will have to be added after this is in place, but the new arrangement doesn't interfer with the turret basket.

After that I got on with doing a bit more work on the turret to get the build more or less finished. I could have made life easier fr myself if I hadd added all the fittings at an earlier stage but .......I also added the turret decal once the additional bits had been done.


Back on the tank


A view of what's left, tracks, side and front hatches and timber blocks


Some potential crew I made some time ago. These 3 are the Ultracast figures and the Resicast mechanic would not be out of place here either.


So things moving along fairly well, I think - getting things finished off probably takes as long as the main build though
Al
Thanks for the comments and helpful information.
Right a bit of a picture intensive update, so apologies to those who don't like too many pics in one go.
The additional supports required the removal of a couple of parts. I took the opportunity to alter my home made genny slightly. It need re-located slightly forward of the original position.
Firstly a picture of things to do:
The Genny and and portable cooker and gas capes removed. on the genny I took off the driving wheel arrangement and added a pipe, a bit more in keeping with what it might look like:
The added supports:
These mean adding the top hull from and angle and then turning it to sit correctly, as the supports sit on the pannier sides.
Genny test fit:
Hull top back on with the supports in what I hope is roughly the correct place
Te cooker and capes will have to be added after this is in place, but the new arrangement doesn't interfer with the turret basket.
After that I got on with doing a bit more work on the turret to get the build more or less finished. I could have made life easier fr myself if I hadd added all the fittings at an earlier stage but .......I also added the turret decal once the additional bits had been done.
Back on the tank
A view of what's left, tracks, side and front hatches and timber blocks
Some potential crew I made some time ago. These 3 are the Ultracast figures and the Resicast mechanic would not be out of place here either.
So things moving along fairly well, I think - getting things finished off probably takes as long as the main build though
Al

RedwingNev

Joined: February 07, 2004
KitMaker: 911 posts
Armorama: 348 posts

Posted: Saturday, June 12, 2010 - 01:51 AM UTC
So true Al, the last 10% always takes 90% of the time! Although you've given yourself a headstart with the figures being done 
AlanL
Joined: August 12, 2005
KitMaker: 14,499 posts
Armorama: 11,675 posts
Posted: Saturday, June 12, 2010 - 02:44 AM UTC
Hi Neil,
Amen to that . Won't make much progress tday, orgaising a lot of stuff for review and just organising myself lol, lol.
Cheers
Al
Amen to that
. Won't make much progress tday, orgaising a lot of stuff for review and just organising myself lol, lol.Cheers
Al
SdAufKla
Joined: May 07, 2010
KitMaker: 2,238 posts
Armorama: 2,158 posts
Posted: Saturday, June 12, 2010 - 02:48 AM UTC
Looking really great, Al!
You're a persistant man to have a go at those angled pipe braces after doing so much of the interior.
Who was the manufacturer for the 3 figures that you're planning to use?
Mike
You're a persistant man to have a go at those angled pipe braces after doing so much of the interior.
Who was the manufacturer for the 3 figures that you're planning to use?
Mike
AlanL
Joined: August 12, 2005
KitMaker: 14,499 posts
Armorama: 11,675 posts
Posted: Saturday, June 12, 2010 - 04:15 AM UTC
Hi Mike,
Yes, - I was just going to ignore them but then though why not have a go at fitting them in. They show through the drivers hatch, so a bit more illusion.
The 4th figure I was thinking about was the Resicast Mechanic. He's dress in a similar style:

And I have this chap also

That said I have a Sherman and Sherman ARV Mk I build I want to do for the Sherman Campaign so might split the figs across the builds. The 2 standing chaps are in Canadian style shirts and the kneeling guy in British style shirt. I shall look for a good combination for both.
Cheers
Al
Yes,
- I was just going to ignore them but then though why not have a go at fitting them in. They show through the drivers hatch, so a bit more illusion.The 4th figure I was thinking about was the Resicast Mechanic. He's dress in a similar style:
And I have this chap also
That said I have a Sherman and Sherman ARV Mk I build I want to do for the Sherman Campaign so might split the figs across the builds. The 2 standing chaps are in Canadian style shirts and the kneeling guy in British style shirt. I shall look for a good combination for both.
Cheers
Al
CMOT
Joined: May 14, 2006
KitMaker: 10,954 posts
Armorama: 8,571 posts
Posted: Saturday, June 12, 2010 - 09:17 AM UTC
Alan I am really interested in your opinion of the AA tracks. I ask as I was given a set of AA resin tracks for the Elephant and while the detail was excellent the number of bubbles was terrible, and even with using boiling water to soften them as much as possible they broke as you looked at them. I should add the set I had came in 4 inch lengths or so unlike yours here.
ChrisDM
Joined: January 01, 2010
KitMaker: 717 posts
Armorama: 697 posts
Posted: Saturday, June 12, 2010 - 10:03 AM UTC
I hope you don't mind me jumping in Alan. Darren
Darren, personally I've used AA tracks three times now for Churchills. They have always been bubble free and a joy to work with (for resin!) I bend mine with a hairdryer. I put the hd on low speed, high heat and hold the track above it about 5 ot 6 inches away from the end of the hd (pointing the dryer up) you can tell when they're ready because they start to droop. Quickly form them onto the section in question and let them cool. It onlt takes a few second
Chris
CMOT
Joined: May 14, 2006
KitMaker: 10,954 posts
Armorama: 8,571 posts
Posted: Saturday, June 12, 2010 - 10:25 AM UTC
Thanks Chris perhaps it was just a weakness in that set or that type.
AlanL
Joined: August 12, 2005
KitMaker: 14,499 posts
Armorama: 11,675 posts
Posted: Saturday, June 12, 2010 - 10:49 AM UTC
Hi Darren,
I can't say about the AA tracks as these are the Resicast Set recently released for the AFV Club Churchill, which as far as I can tell are excellent.
I haven't used any AA tracks, although I have a set for the Crusader but haven't looked at them yet.
Al
I can't say about the AA tracks as these are the Resicast Set recently released for the AFV Club Churchill, which as far as I can tell are excellent.
I haven't used any AA tracks, although I have a set for the Crusader but haven't looked at them yet.
Al

PvtMutt
Joined: July 01, 2006
KitMaker: 614 posts
Armorama: 601 posts
Posted: Saturday, June 12, 2010 - 11:20 AM UTC
I still say the figures are perfect for this one buddy. 
Tony the Mutt
Tony the Mutt
CMOT
Joined: May 14, 2006
KitMaker: 10,954 posts
Armorama: 8,571 posts
Posted: Saturday, June 12, 2010 - 12:06 PM UTC
My bad Alan I just looked at the track colour and thought AA. Those damn alcoholics in disguise are always lying.
AlanL
Joined: August 12, 2005
KitMaker: 14,499 posts
Armorama: 11,675 posts
Posted: Saturday, June 12, 2010 - 08:13 PM UTC
Hi Tony,
Many thanks for dropping in and the comments.
Hi Darren,
- no worries.
Al
Many thanks for dropping in and the comments.
Hi Darren,
- no worries.Al
 |

WEB HOSTING BY


Copyright ©2021 Armorama and Kitmaker Network, a subsidiary of Silver Star Enterprises
All Rights Reserved. Please read our Conditions of Use and Privacy Policy.
All Rights Reserved. Please read our Conditions of Use and Privacy Policy.