Ontario, Canada
Joined: March 23, 2008
KitMaker: 2,847 posts
Armorama: 2,667 posts
Posted: Thursday, December 08, 2011 - 12:25 AM UTC
Texas, United States
Joined: June 29, 2010
KitMaker: 5,854 posts
Armorama: 4,817 posts
Posted: Thursday, December 08, 2011 - 08:36 AM UTC
Thanks for the vote of confidence!
Jan: You're a little farther ahead in your build than I am, I hope to be hot on your heals

Cork, Ireland
Joined: April 30, 2010
KitMaker: 232 posts
Armorama: 134 posts
Posted: Saturday, December 10, 2011 - 03:09 AM UTC
Hi folks,
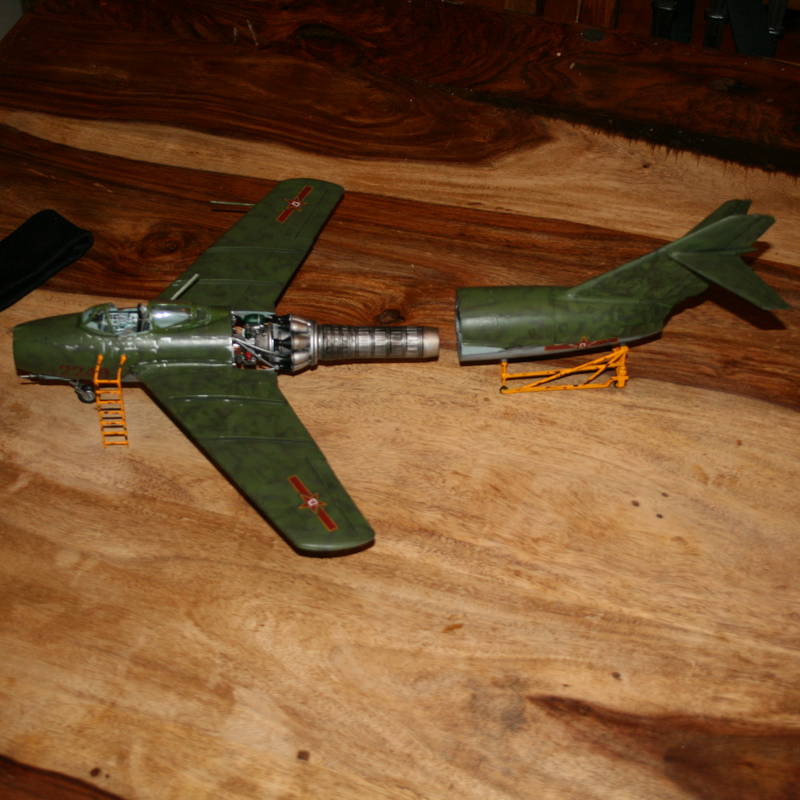
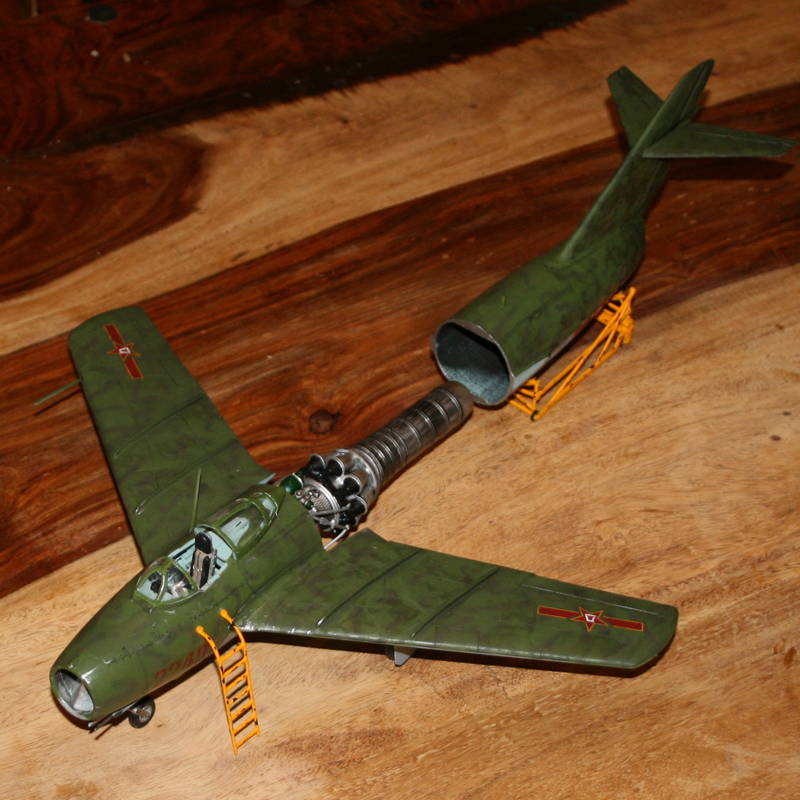
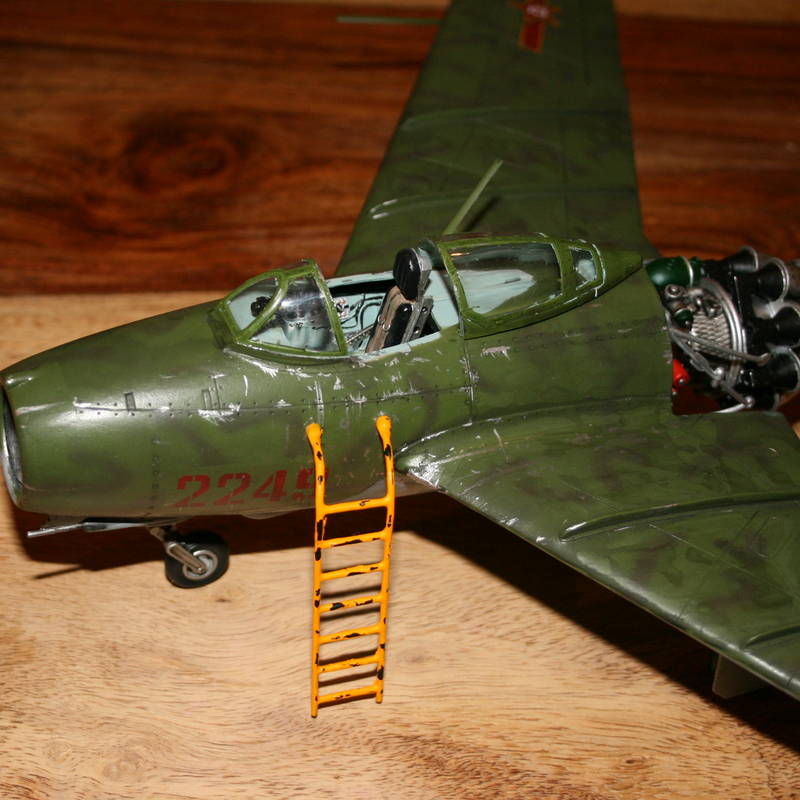
I'm finally finished my MiG-15! Here it is:
D'oh! Unfortunately due to the server's being switched last weekend and a small technical hitch with the Gallery right now, I can't show you the pics just yet.
While I feel a tad outnumbered I assure you that the MiG was not jumped by a pair of Hasegawa Sabre's on the way to the photo gallery. Rumours that the Sabre's turned it into a burning heap of plastic on my kitchen floor is patently untrue, although the pilot (as with all my aircraft builds) is missing.
That's my excuse and I'm sticking to it. I'll get those photo's up hopefully over the weekend.
Keep building,
Eoin
You don't learn nothing unless you make mistakes
Cork, Ireland
Joined: April 30, 2010
KitMaker: 232 posts
Armorama: 134 posts
Posted: Monday, December 12, 2011 - 08:05 AM UTC
Anywho, folks,
Here's my MiG15:

Keep building folks!
Eoin
You don't learn nothing unless you make mistakes
New York, United States
Joined: October 11, 2002
KitMaker: 142 posts
Armorama: 134 posts
Posted: Monday, December 12, 2011 - 10:15 AM UTC
Real Nice Mig Eoin. I like the paint chipping.

#023
Zurich, Switzerland
Joined: March 13, 2009
KitMaker: 2,058 posts
Armorama: 1,656 posts
Posted: Monday, December 12, 2011 - 06:54 PM UTC
Jan, nice progress! Keep it up!
Eoin, your MiG looks great, I especially like the camouflage! It's gonna give those Sabres a big MiG-raine...

Cheers!
Stefan
Too many models - too little time...
#439
Washington, United States
Joined: November 05, 2005
KitMaker: 4,950 posts
Armorama: 289 posts
Posted: Tuesday, December 13, 2011 - 06:28 AM UTC
So close, just 4 more painting steps.....Who ever thought that overall GSB was a simple scheme ought to be shot... Oh, that was me, never mind.

Hanger Queens in Waiting:
Monogram 1/72 F8F-1
Corsair the Sky Pirate - 1/72 Ace A-7D
Century Series - Airfix 1/72 F-105G
Anti Shipping - Academy 1/72 PBJ-1D
Academy 1/72 F-84E
#041
Kobenhavn, Denmark
Joined: July 20, 2006
KitMaker: 10,069 posts
Armorama: 4,677 posts
Posted: Tuesday, December 13, 2011 - 08:36 AM UTC
Great looking MiG, Eoin. What kit is this? It looks great. The cockpit is very well detailed and the chipping effect subtle, but realistic.
Thanks for participating.
Campaign'oholic - 252+ campaigns completed
Ontario, Canada
Joined: March 23, 2008
KitMaker: 2,847 posts
Armorama: 2,667 posts
Posted: Wednesday, December 14, 2011 - 05:10 AM UTC
Thanks for the encouragement guys.

I am committed to this build but also have another and some reviews that I'm alternating between.
Quoted Text
Jan: You're a little farther ahead in your build than I am, I hope to be hot on your heals
Waiting to see some pictures, Jeremy. But I'll take it that you are also doing a Pershing? I try to follow this thread but sometimes too much time goes by and I just can't catch up on all the happenings.
@ Eoin - Beautiful Mig there, Eoin. I just love the camo. What scale and manufacturer is it?
--------------------------------------------------------
More progress but I don't have pictures of every stage. I've been applying some of the techniques described in Alex Clarks " Small=Scale Armour Modelling" during this and another build. At the top of this page you could see the preliminary start of his pre-shading methods. I've applied something similar in the past but not to the extent he describes. In the following pictures I hope that it can be seen as well as it appears in iPhoto on my screen. The top and bottom hull are just dry fit, as is the turret.


Now for the really "fun" part, tackling that darned link and length track. There are only two real "lengths" and all the other pieces are single or double links.

Cheers,
Jan

#135
California, United States
Joined: August 05, 2007
KitMaker: 1,501 posts
Armorama: 1,485 posts
Posted: Sunday, December 18, 2011 - 10:07 AM UTC
@tread_geek Jan,
Youre doing a terrific job on this build. Ive read through your build progress here and through some of the other participants postings in the campaign too. I think that your build is turning out to be one of your best efforts to date. Great job on the base coat and your corrections on the turret seams turned out flawless behind the paint job, as I cant see any! I do see a seam line up front between the upper and lower hull and in back were the radiator resides, is this because you just placed the hulls together for the photo shoot? Sure is a nifty kit with lots of detail for its small size.
Did you mention link and length tracks? Precisely the reason Ive stalled on my Russian Kingtiger build!

~ Eddy

If you absolutely must have a city completely destroyed overnight . . . call the MARINES
Currently on the bench:
1:12 Bandia Star Wars K-2SO
1:35 Takom T-54B Late
Ontario, Canada
Joined: March 23, 2008
KitMaker: 2,847 posts
Armorama: 2,667 posts
Posted: Sunday, December 18, 2011 - 04:01 PM UTC
@Braille - Eddy,
Thanks for the comments.
I used your super glue method to get rid of the turret seams. ;-). The hull was only dry fit as the tracks wouldn't be easy to fit if it was glued. As I mention in my earlier post, there are only two real "length" pieces. All the rest are single and double link pieces. I am not impressed with the engineering of the Trumpeter suspension. :/ I have some roadwheels on but am still at a loss how to tackle the tracks. More images in a day or so.
Cheers,
Jan
Texas, United States
Joined: June 29, 2010
KitMaker: 5,854 posts
Armorama: 4,817 posts
Posted: Sunday, December 18, 2011 - 05:07 PM UTC
Jan: Actually I am building an M4A3E8. I would love to build up a Pershing in 1/35 sometime though, complete with tiger decor. I'm having some fit issues with the HobbyBoss kit so you'll have to wait a little longer for photos, but I'm working away on it.
#023
Zurich, Switzerland
Joined: March 13, 2009
KitMaker: 2,058 posts
Armorama: 1,656 posts
Posted: Sunday, December 18, 2011 - 05:37 PM UTC
Jan, nice Progress! Keep it up!
Jeremy, you have 12 days to go plus a possible extension of a week or so...
And just for reference: Tiger faces were only on M46, M24 and Shermans. The M26 was mechanically unreliable and mostly (if not all) replaced by the time the tiger faces appeared (Operation Ripper in March 1951 IIRC).
Soo... I finally finished my M46:


Pretty happy how it turned out. Any comments more than welcome!
Cheers!
Stefan
Too many models - too little time...
California, United States
Joined: June 30, 2008
KitMaker: 2,408 posts
Armorama: 2,394 posts
Posted: Monday, December 19, 2011 - 03:13 AM UTC
Awesome finish Stefan. Love the mud color and the gear on there that goes well with your tiger camo. A+
Kerry, Ireland
Joined: March 03, 2003
KitMaker: 201 posts
Armorama: 189 posts
Posted: Monday, December 19, 2011 - 05:17 AM UTC
Good work Stefan,very well done indeed.
regards
Ontario, Canada
Joined: August 05, 2003
KitMaker: 1,698 posts
Armorama: 1,563 posts
Posted: Monday, December 19, 2011 - 02:20 PM UTC
Finally got around to starting this campaign. Going to be BGen Rockingham's Tactical CP.

Why plan when you can react?
Ontario, Canada
Joined: August 05, 2003
KitMaker: 1,698 posts
Armorama: 1,563 posts
Posted: Monday, December 19, 2011 - 04:58 PM UTC
quick update, added some cam net and replaced the turret tie downs with brass. Wish I had some of those PE tie downs, as these ones are about twice the size. Nothing a little turret stowage can't hide..

Why plan when you can react?
#023
Zurich, Switzerland
Joined: March 13, 2009
KitMaker: 2,058 posts
Armorama: 1,656 posts
Posted: Monday, December 19, 2011 - 06:50 PM UTC
Graeme, nice choice, never heard of that vehicle before so I'll be watching.
You have any background info? Was the turret welded on or still tunable? How did one get into the turret? Why didn't they use an M20? What unit was it?
Cheers!
Stefan
EDIT: Oh... and what scale is it? 1/48 or 1/35? I suppose Tamiya?
Too many models - too little time...
Texas, United States
Joined: June 29, 2010
KitMaker: 5,854 posts
Armorama: 4,817 posts
Posted: Tuesday, December 20, 2011 - 04:31 AM UTC
Quoted Text
Jeremy, you have 12 days to go plus a possible extension of a week or so... And just for reference: Tiger faces were only on M46, M24 and Shermans. The M26 was mechanically unreliable and mostly (if not all) replaced by the time the tiger faces appeared (Operation Ripper in March 1951 IIRC).
Thanks, I keep getting mixed up with the designations for the early Cold War US tanks
I'll try to get some good photos up this week, work has been killing me so I'm doing well just to address the poor fit issues as they come up

Ontario, Canada
Joined: August 05, 2003
KitMaker: 1,698 posts
Armorama: 1,563 posts
Posted: Tuesday, December 20, 2011 - 05:13 AM UTC
Hi Stefan,
Info is a bit hard to come by. I believe it was a one-off modification of the M8. It was used by the Commander of 25th Canadian Infantry Brigade in Korea. There will be 2 hatches added to the turret, along with some supporting bars for when they are in the open position. I think the turret was welded in place. The radio antennas were relocated to spots behind the driver / signaller hatches. A Bren gun on a welded tri-pod will also be added along with some stowage for the rear deck. I have some of the new Bison LdSH(RC) in Korea decals on the way which I hope will be here on time BGen Rockingham used it. Base kit is 1/35 Tamiya.
I'll post a pic of the real vehicle shortly.
Why plan when you can react?
Ontario, Canada
Joined: August 05, 2003
KitMaker: 1,698 posts
Armorama: 1,563 posts
Posted: Tuesday, December 20, 2011 - 05:14 AM UTC
Here it is. I have another showing the rear of the vehicle.

Why plan when you can react?
Ontario, Canada
Joined: August 05, 2003
KitMaker: 1,698 posts
Armorama: 1,563 posts
Posted: Wednesday, December 21, 2011 - 04:08 PM UTC
Why plan when you can react?
Texas, United States
Joined: June 29, 2010
KitMaker: 5,854 posts
Armorama: 4,817 posts
Posted: Thursday, December 22, 2011 - 08:15 AM UTC
Graeme: Great choice and great build , I was hoping that someone would tackle one of these
Stefan: I'm working some poor fit issues with my kit, I really am not concerned with accuracy at this point. Work and family issues seem to continue to demand my attention, but I'll see what I can get done for you by the end date.
Ontario, Canada
Joined: March 23, 2008
KitMaker: 2,847 posts
Armorama: 2,667 posts
Posted: Thursday, December 22, 2011 - 08:56 AM UTC
Greetings all!
@Stefan - Your M46 is looking fantastic!

It (the Trumpeter 1/72 version) was my first build choice but they were all out at the LHS when I went there.
Slow and painful progress on the M26. The suspension is one of the worst fitting tracked suspensions that I've ever dealt with. The fit of the road-wheels is either too tight or too loose. For too tight I've had to drill them out, for too loose I've used gal gap filling CA glue.
Two afternoons to get to the point bellow.

A few hours the next day and it was finally more or less done. Broke a couple of axles in the process and had to reattach them.

The darn tracks were next and I assure you there is nothing "magic" or great about the fit. Each link needed filing.


Took all afternoon to get the one side done to the point below.

With any luck I can finish the rest of that side and then I'll have to suspend things due to holiday necessities. If I'd had any idea that this kit had so many problems I wouldn't have left it so late to start. Some time in the new year I'll have to do a build review of this monster. People need to be forewarned.

Cheers,
Jan
California, United States
Joined: June 30, 2008
KitMaker: 2,408 posts
Armorama: 2,394 posts
Posted: Thursday, December 22, 2011 - 10:56 AM UTC
Graeme - very nice work going there
Jan - sorry for your track pain


 Oh, and I almost forgot, I drilled out the main sight aperture and also for the coaxial MG which were not evident on the kit.