

Dioramas
Do you love dioramas & vignettes? We sure do.
Do you love dioramas & vignettes? We sure do.
Hosted by Darren Baker, Mario Matijasic
That Aussie's in Iraq Diorama, 2006

didgeboy

Joined: September 21, 2010
KitMaker: 1,846 posts
Armorama: 1,509 posts

Posted: Monday, January 24, 2011 - 01:54 PM UTC
Cheers.

marshaltito
Joined: December 02, 2007
KitMaker: 32 posts
Armorama: 30 posts
Posted: Monday, January 24, 2011 - 02:29 PM UTC
Wow. I admire your motives/philosophy as well as your ability! Subscribed. As a beginner, it's good to see what can be done by the pros - it's very encouraging! Also really good to hear your thought process behind the build. As much as I like pretty pictures, it really helps to know all those nitty-gritty details.
Adamskii

Joined: November 06, 2010
KitMaker: 537 posts
Armorama: 474 posts

Posted: Monday, January 24, 2011 - 03:52 PM UTC
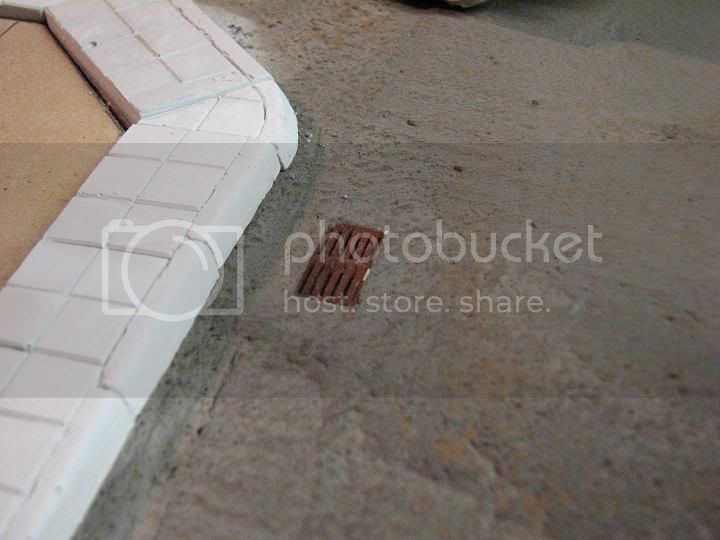
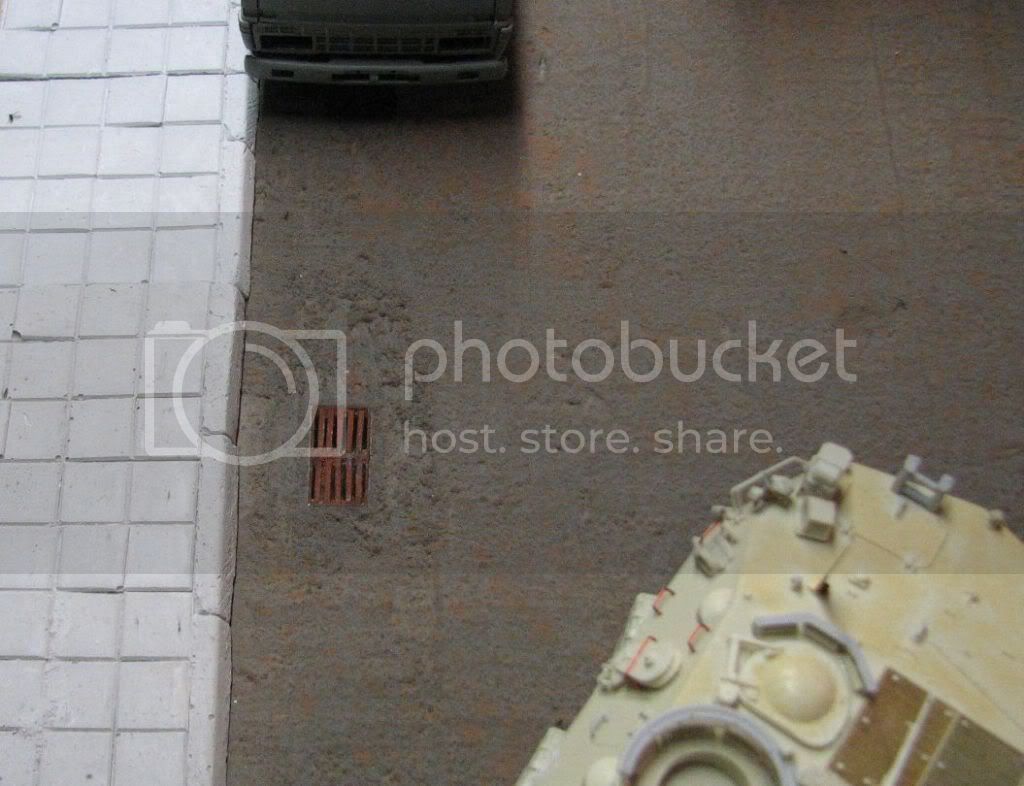
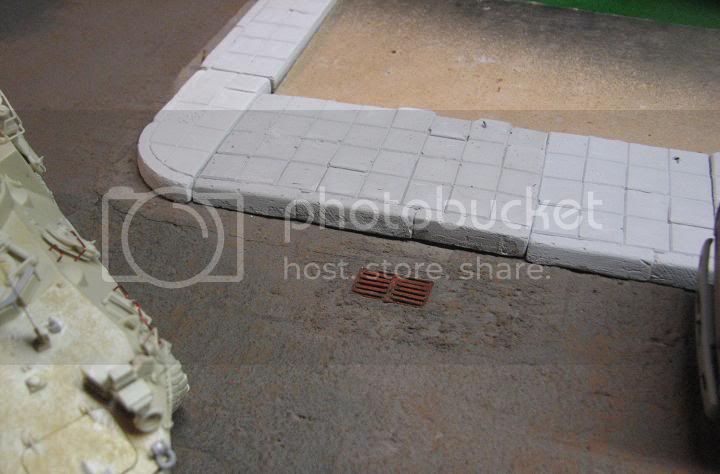
Sidewalk continued.
Working on the stormwater drain, I only have 2 pics that show any proper pattern on the stormwater grate. And of course associated scale/size.

I love that pic above - a treasure trove of details. note the patterns on the sidewalk tiles, the clothes, the woman carrying what I hope is a toy Ak47, the street colour and gutter, and of course the grate. This is my primary reference pic. The pic below is my spare, I went through about a 1000 street pics and these were only two that clearly showed what i want.
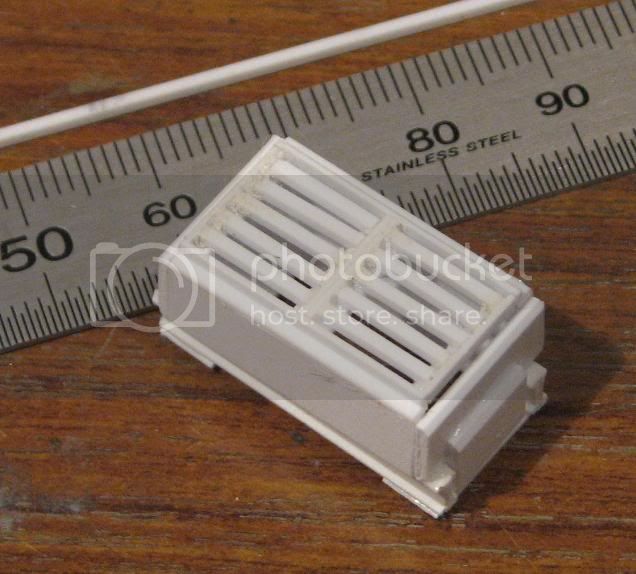
Anyways, the Grate i built. I used 2mm right angle styrene strip for the frame, and 1mm square styrene rod for the grills. the frames seem to have two halves, so mine are 10mm x 9mm each giving a total of 12mm wide frame by 20mm long. its a simple scratchbuild. The frame was then raised with scrap styrene strip to create a cavity under it of about 10mm high (same as the thickness the street will be. That way when you look down through the grill you do see some good depth in the cavity.
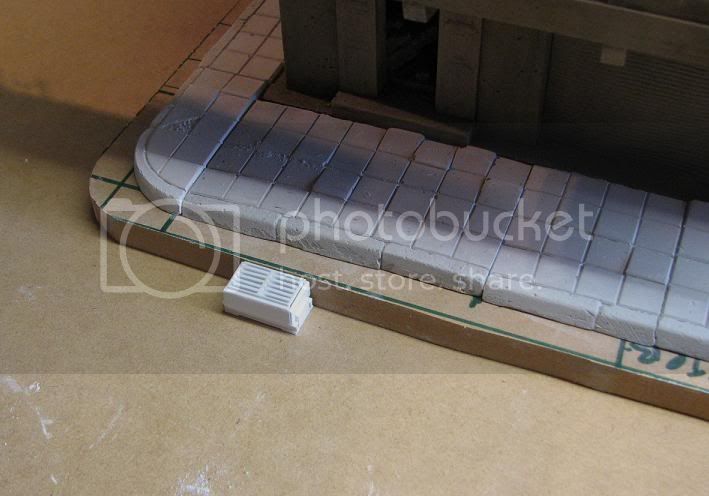
the stormwater frame against the kerb
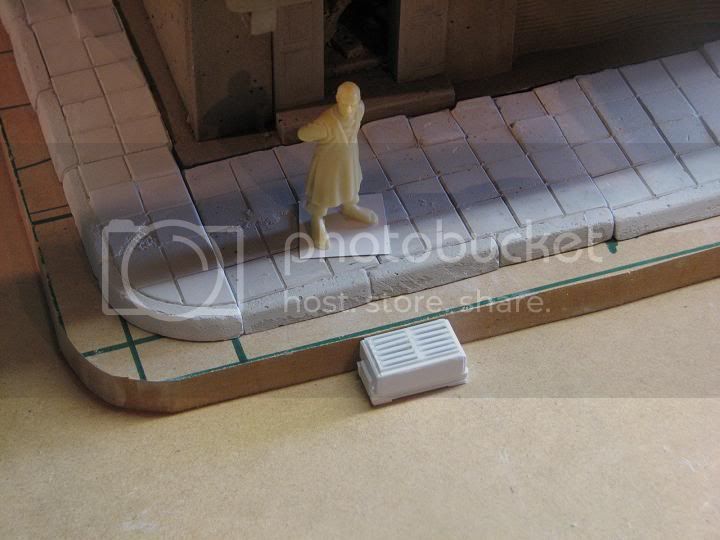
another view
Next to build another frame. and keep it the same size...
Adam
Working on the stormwater drain, I only have 2 pics that show any proper pattern on the stormwater grate. And of course associated scale/size.
I love that pic above - a treasure trove of details. note the patterns on the sidewalk tiles, the clothes, the woman carrying what I hope is a toy Ak47, the street colour and gutter, and of course the grate. This is my primary reference pic. The pic below is my spare, I went through about a 1000 street pics and these were only two that clearly showed what i want.
Anyways, the Grate i built. I used 2mm right angle styrene strip for the frame, and 1mm square styrene rod for the grills. the frames seem to have two halves, so mine are 10mm x 9mm each giving a total of 12mm wide frame by 20mm long. its a simple scratchbuild. The frame was then raised with scrap styrene strip to create a cavity under it of about 10mm high (same as the thickness the street will be. That way when you look down through the grill you do see some good depth in the cavity.
the stormwater frame against the kerb
another view
Next to build another frame.
and keep it the same size...Adam

majjanelson
Joined: December 14, 2006
KitMaker: 1,355 posts
Armorama: 979 posts
Posted: Monday, January 24, 2011 - 04:33 PM UTC
Adam,
This work is of a truly professional level.
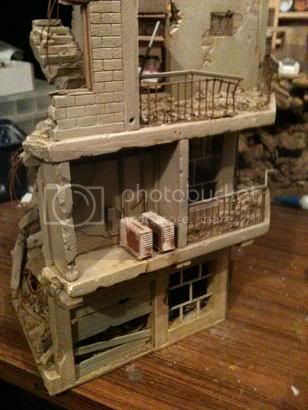
I very much like your final version of the winding street. It's much more interesting and pulls the viewer into the street much more so. The buildings are spot on, and I love the A/C condenser units on the ledges.

This work is of a truly professional level.
I very much like your final version of the winding street. It's much more interesting and pulls the viewer into the street much more so. The buildings are spot on, and I love the A/C condenser units on the ledges.

vonHengest
Joined: June 29, 2010
KitMaker: 5,854 posts
Armorama: 4,817 posts

Posted: Monday, January 24, 2011 - 07:06 PM UTC
This is GREAT stuff Adam! I don't care how slow it moves, just make sure you finish this one 

BRAVO3

Joined: February 18, 2009
KitMaker: 148 posts
Armorama: 144 posts
Posted: Monday, January 24, 2011 - 08:24 PM UTC
What a fantastic diorama!
I will follow this build blog, for sure.
Congratulations for this outstanding work!
I will follow this build blog, for sure.
Congratulations for this outstanding work!

trahe
Joined: April 03, 2006
KitMaker: 1,158 posts
Armorama: 950 posts
Posted: Tuesday, January 25, 2011 - 12:34 AM UTC
Absolutely amazing work! Thanks for sharing.
Adamskii
Joined: November 06, 2010
KitMaker: 537 posts
Armorama: 474 posts
Posted: Tuesday, January 25, 2011 - 01:42 AM UTC
The Road.
This is the meat of the blog - construction. Those of you familiar with how I blog would be used to this kind of step by step.
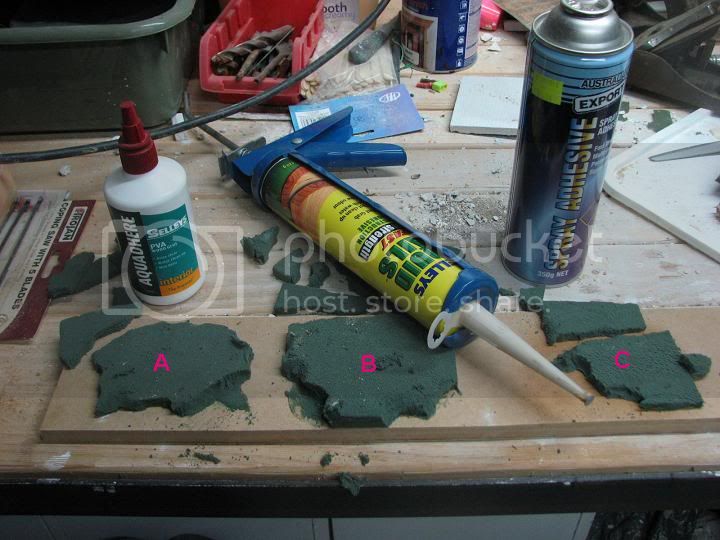
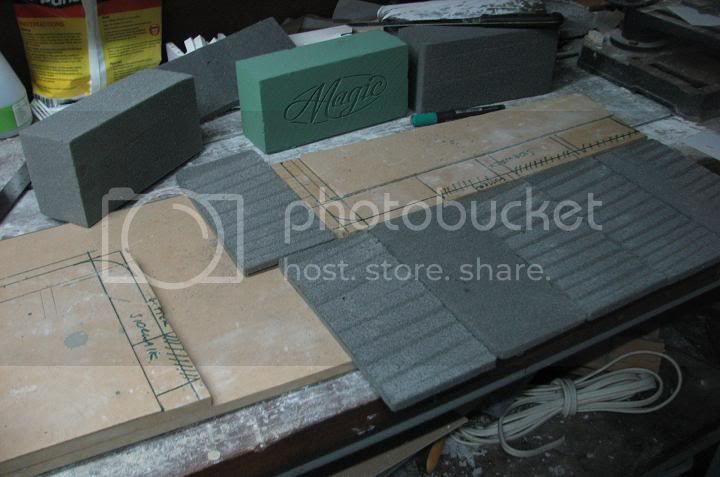
From suggestions from my road base techniques trial, I tried 3 types of adhesive. PVA glue (aquadhere), 'No Nails" adhesive, and a generic spray on craft adhesive. After each was trialled, the PVA and no nails worked pretty much the same, the spray adhesive was a total fail. SO I decided to use PVA, as it is alot less expensive by volume and it is water soluble for clean up.
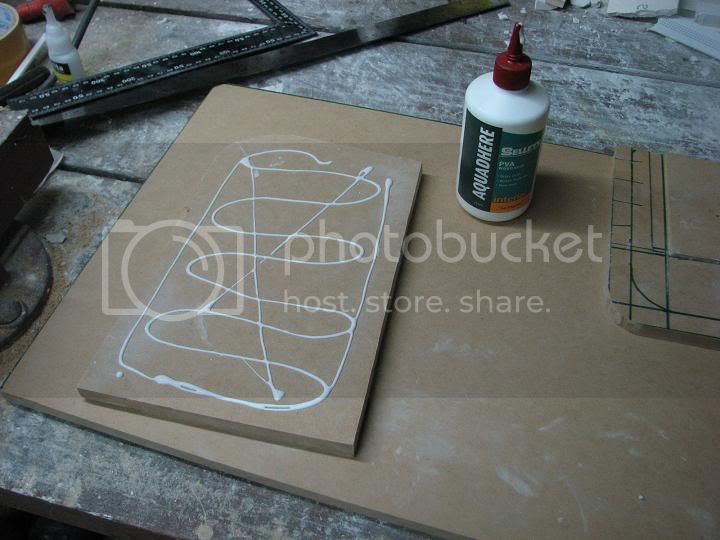
The first step was to glue down the building sub base. PVA again.
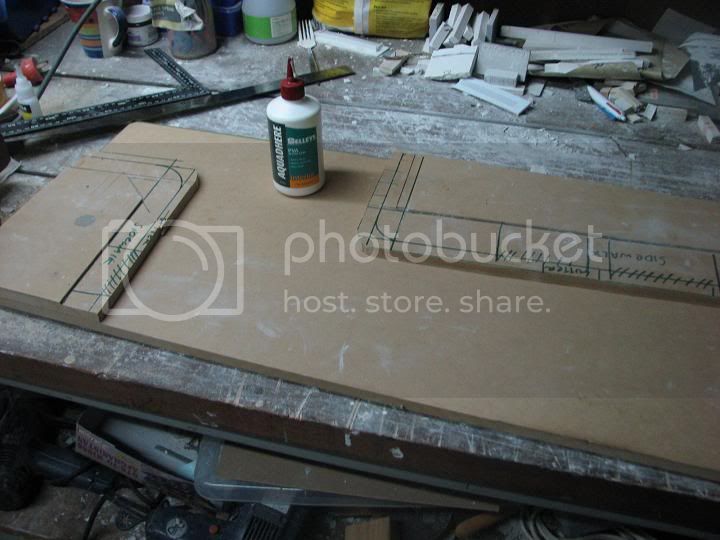
the two sub bases glued in place
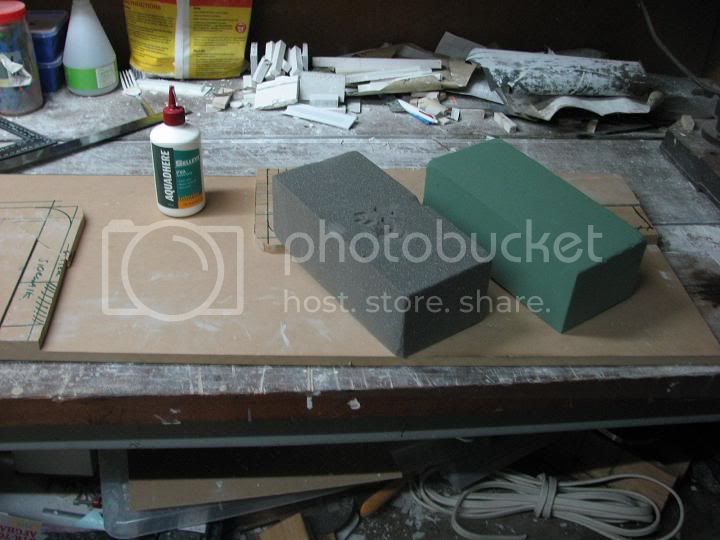
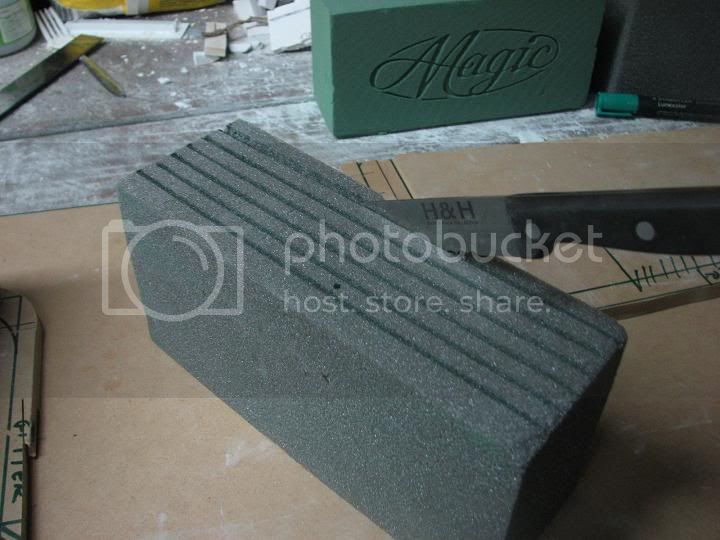
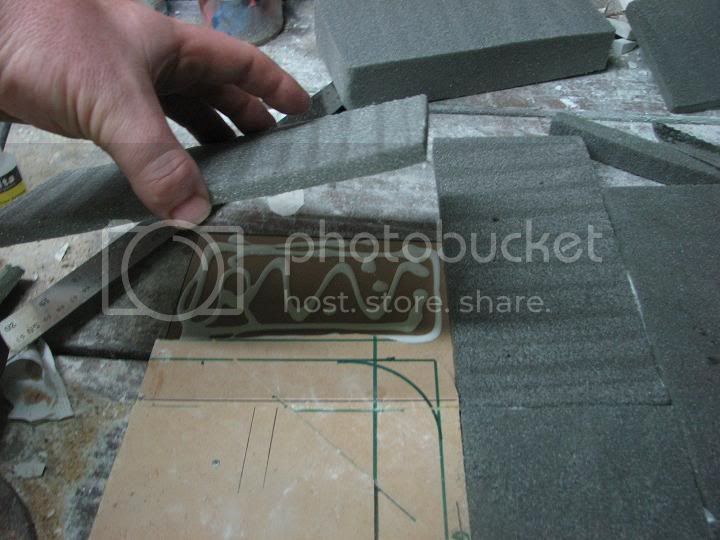
I trialled the green flower arranging foam and its very brittle, but that is called "wet" foam, I tried the grey "dry" version and its much stronger. So I decided to go with the dry flower foam. It still crushes well, but its more of an effort and I get a bit heavy handed so this might be my leash so to speak..
I mark the side of the block with 10mm lines - the thickness of the building sub base.
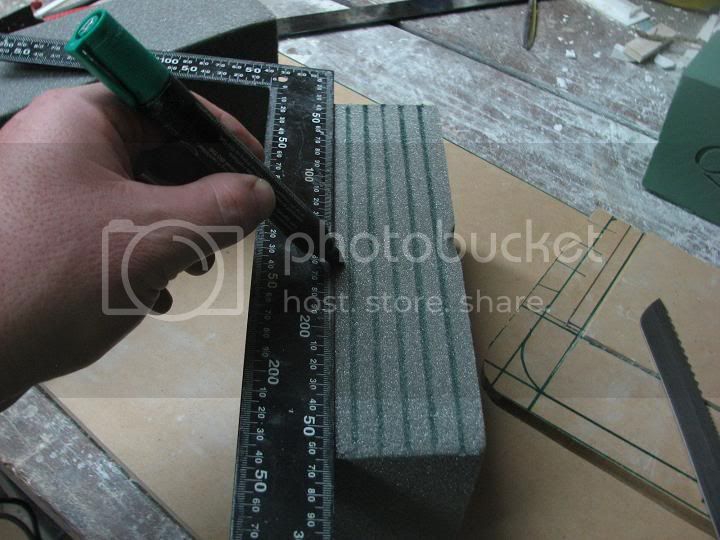
Then use an old bread knife to cut through the block - they dont have to be perfect but it will help if they are reasonably straight cuts.
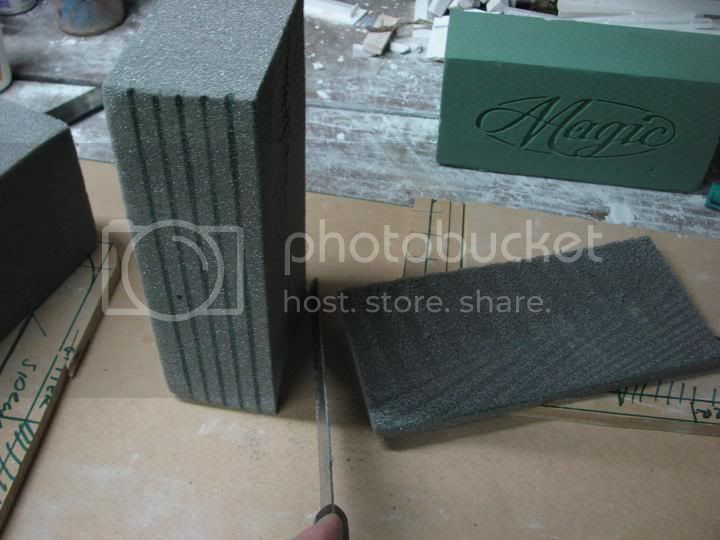
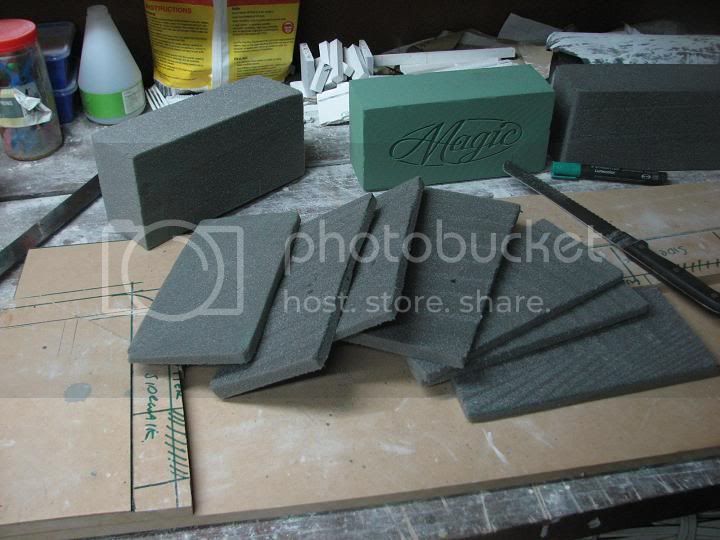
test fit the slices, to ensure you have enough!. The blocks are really cheap - about $2.50 each..
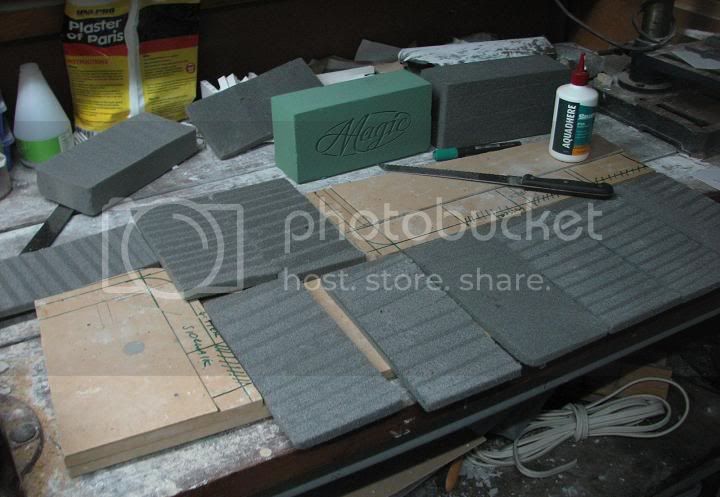
Once enough are cut, I start to glue them down with the PVA one at a time.
The first half glued down
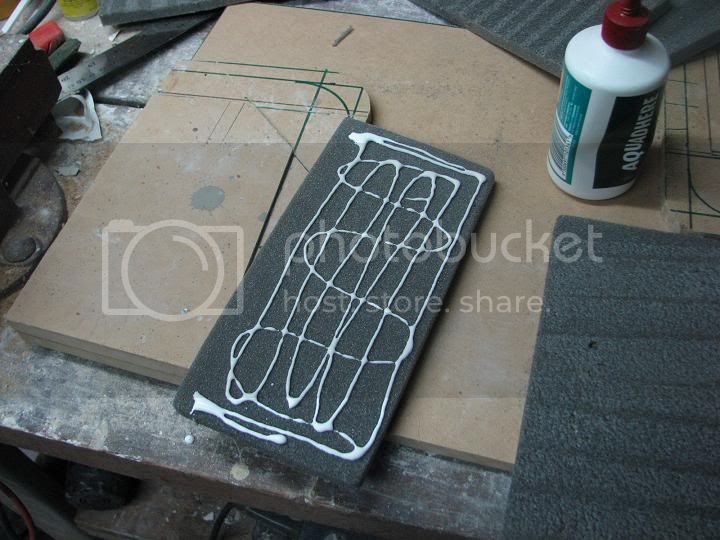
Bit of a technique change instead of applying glue to the slice - i apply it to the board.
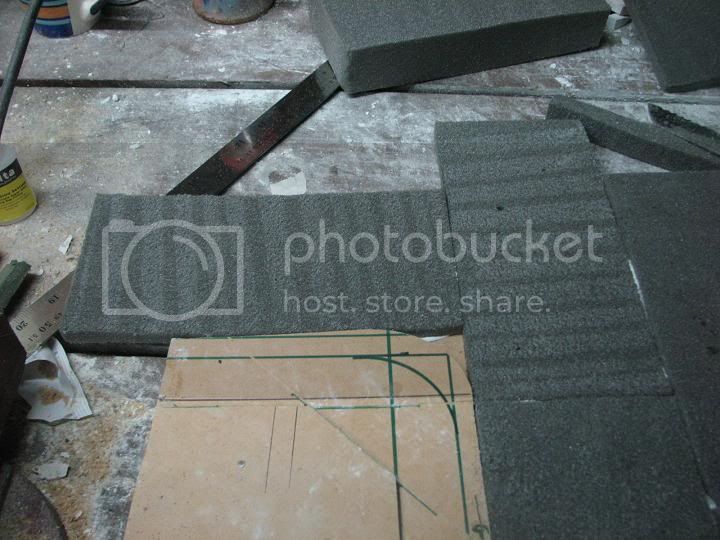
All the slices laid
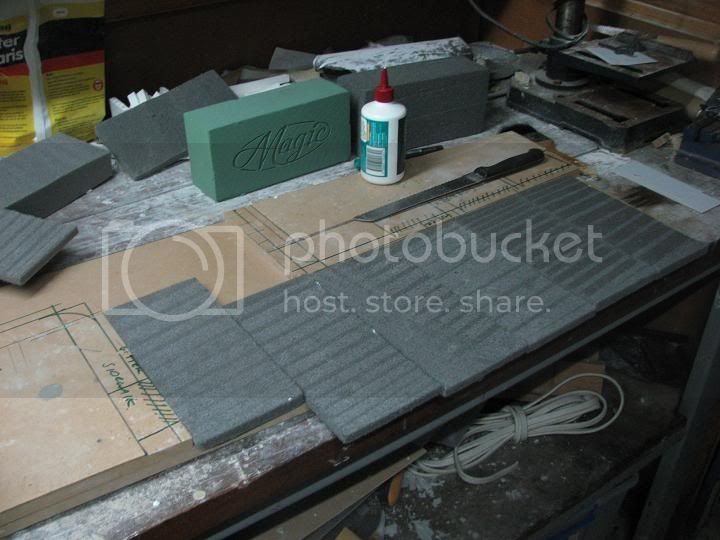
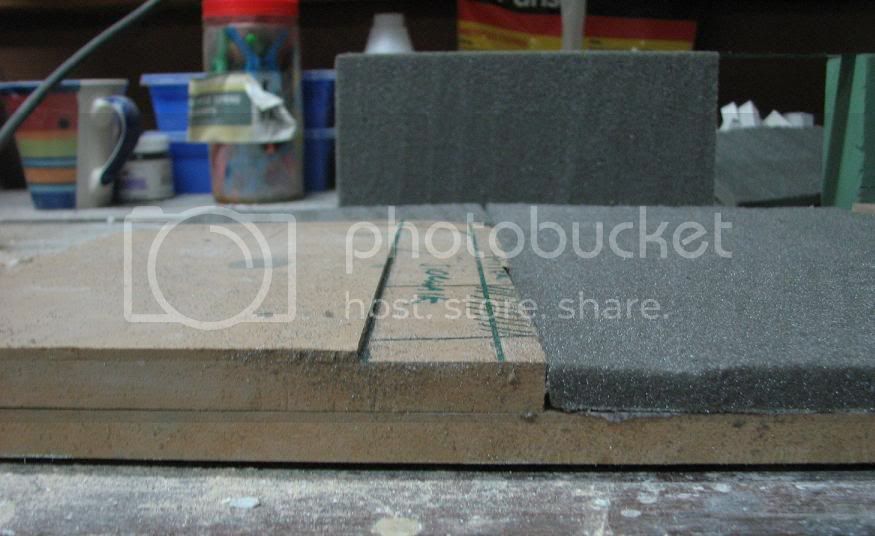
trim the edges - lay a long straight edge down, I used my trial board,
using my bread knife I trim the foam slices to size
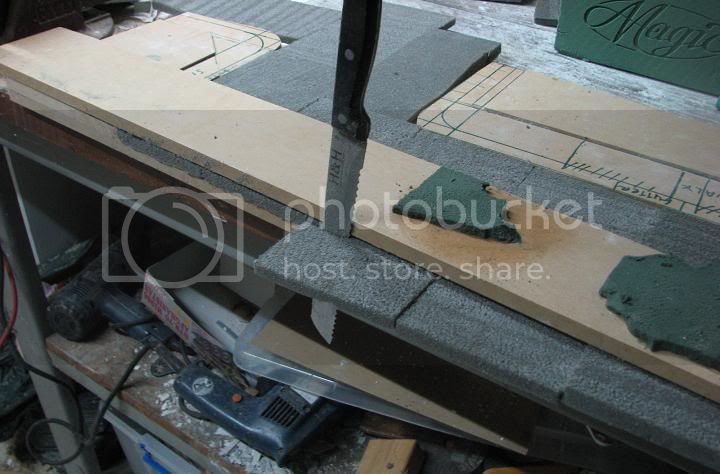
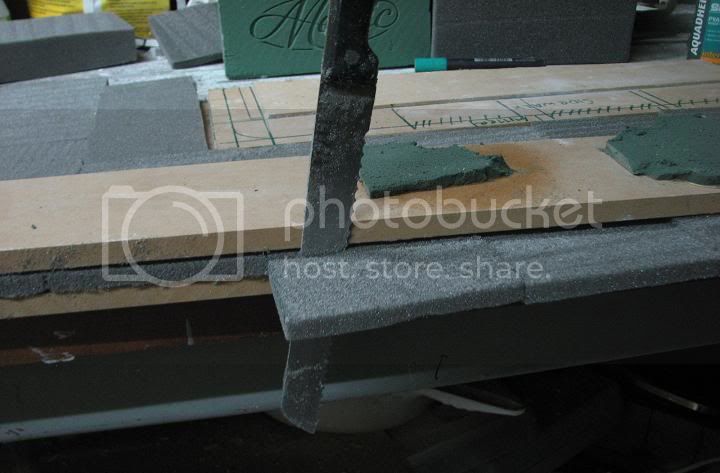
nice straight front edge
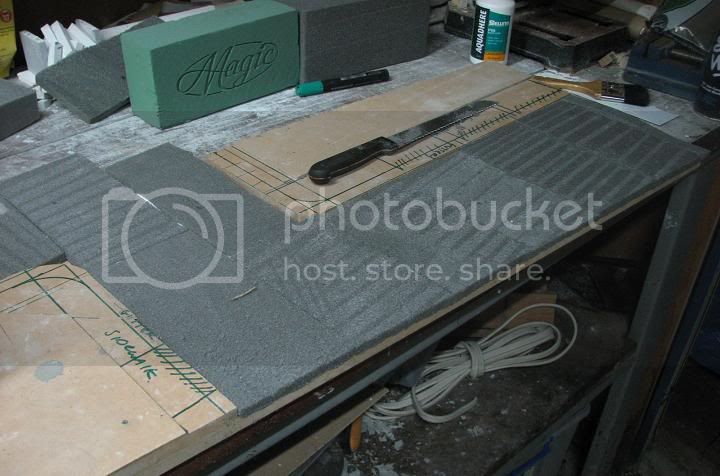
I do the whole board - all 4 edges.
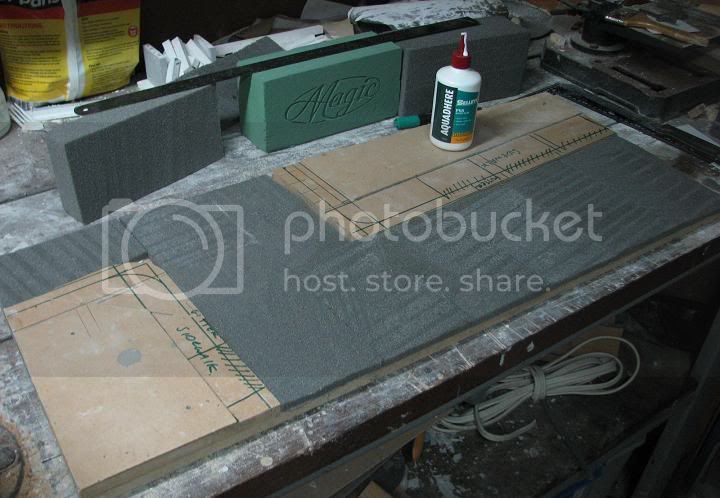
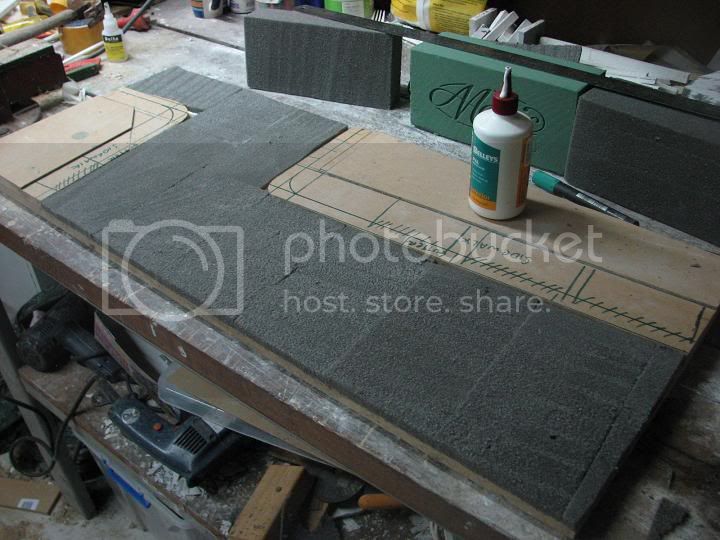
profile view.
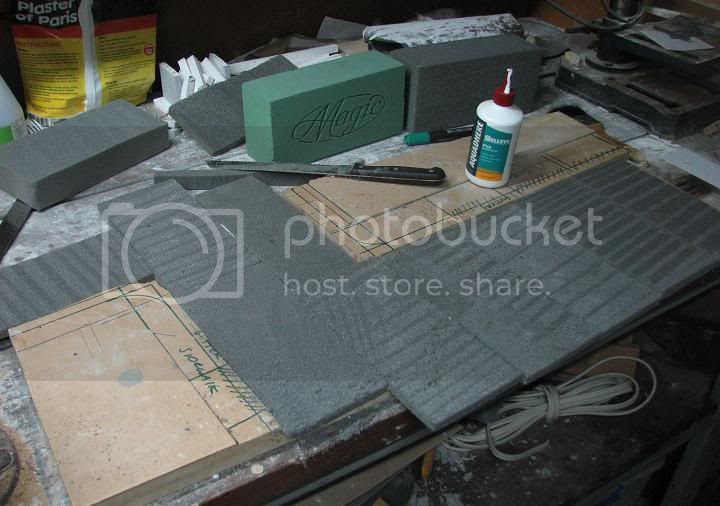
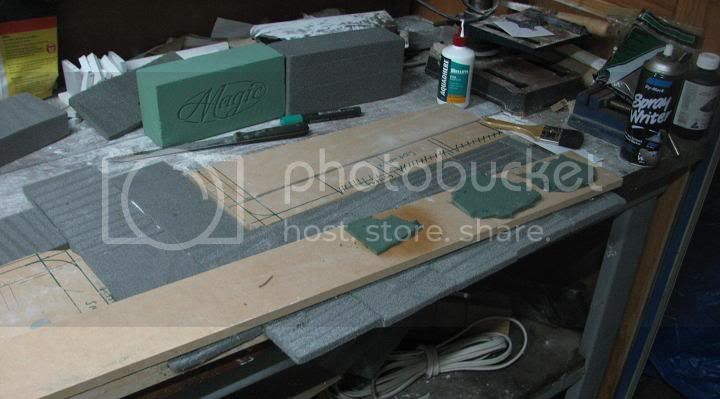
The next step is to let this dry. at least 12 hours ( so off to bed soon ). Once dry we will make the "crust" that represents the bitumen layer. I will try incorporate some of the good suggestions from the trial blog https://armorama.kitmaker.net/forums/170011&page=1 click there for a preview whats coming over the next few days.
One last thing - the storm drain. I didnt fit it yet as it will be easier to fit that to the foam than shape the foam to fit the box. It has to be fitted before plaster goes down though...
Adam
This is the meat of the blog - construction. Those of you familiar with how I blog would be used to this kind of step by step.
From suggestions from my road base techniques trial, I tried 3 types of adhesive. PVA glue (aquadhere), 'No Nails" adhesive, and a generic spray on craft adhesive. After each was trialled, the PVA and no nails worked pretty much the same, the spray adhesive was a total fail. SO I decided to use PVA, as it is alot less expensive by volume and it is water soluble for clean up.
The first step was to glue down the building sub base. PVA again.
the two sub bases glued in place
I trialled the green flower arranging foam and its very brittle, but that is called "wet" foam, I tried the grey "dry" version and its much stronger. So I decided to go with the dry flower foam. It still crushes well, but its more of an effort and I get a bit heavy handed so this might be my leash so to speak..
I mark the side of the block with 10mm lines - the thickness of the building sub base.
Then use an old bread knife to cut through the block - they dont have to be perfect but it will help if they are reasonably straight cuts.
test fit the slices, to ensure you have enough!. The blocks are really cheap - about $2.50 each..
Once enough are cut, I start to glue them down with the PVA one at a time.
The first half glued down
Bit of a technique change instead of applying glue to the slice - i apply it to the board.
All the slices laid
trim the edges - lay a long straight edge down, I used my trial board,
using my bread knife I trim the foam slices to size
nice straight front edge
I do the whole board - all 4 edges.
profile view.
The next step is to let this dry. at least 12 hours ( so off to bed soon ). Once dry we will make the "crust" that represents the bitumen layer. I will try incorporate some of the good suggestions from the trial blog https://armorama.kitmaker.net/forums/170011&page=1 click there for a preview whats coming over the next few days.
One last thing - the storm drain. I didnt fit it yet as it will be easier to fit that to the foam than shape the foam to fit the box. It has to be fitted before plaster goes down though...
Adam
VLADPANZER

Joined: December 20, 2010
KitMaker: 568 posts
Armorama: 549 posts
Posted: Tuesday, January 25, 2011 - 02:49 AM UTC
Hi Adam,
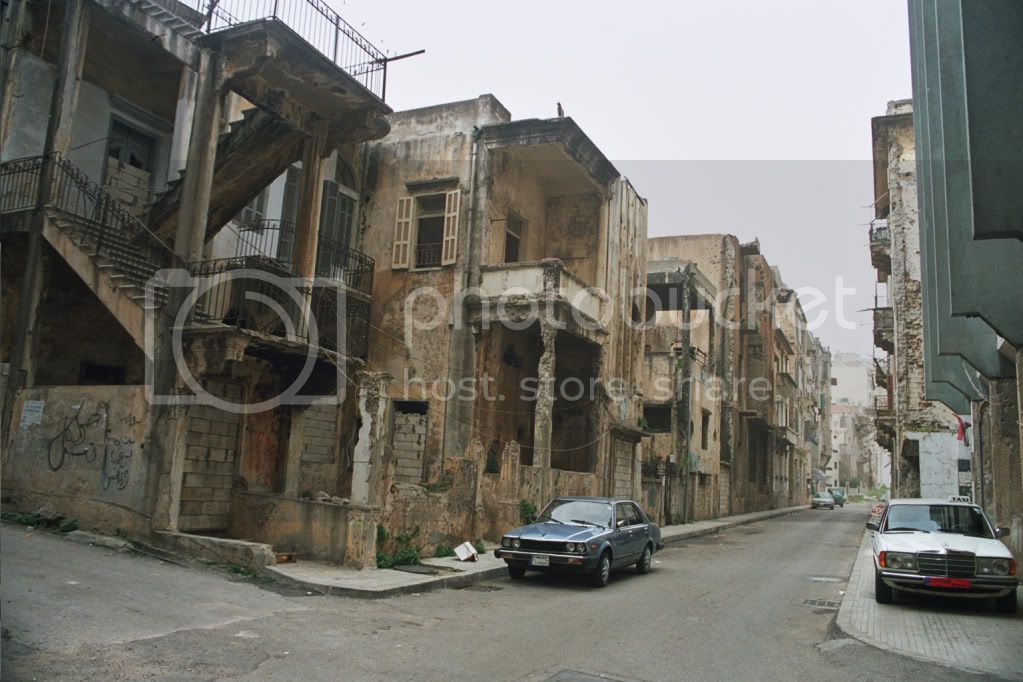
Nice progress, looking forward to seeing the figures painted (from where did you get them?). If I may correct you, I believe that the second picture of your gutter reference is actually from Lebanon, one of the older parts of Beirut. I guess it could be similar. Looking forward to seeing the end result!
Regards,
Adamskii
Joined: November 06, 2010
KitMaker: 537 posts
Armorama: 474 posts
Posted: Tuesday, January 25, 2011 - 05:46 AM UTC
Correct on the second pic, it's Beirut so not my primary reference.
Adam
Adam

DioRandy
Joined: October 04, 2007
KitMaker: 108 posts
Armorama: 84 posts
Posted: Tuesday, January 25, 2011 - 06:58 AM UTC
Supurb artistry, Adam
What do you plan to do with it when it's done? I certainly hope you have a place of honor to display it where it can be admired by all.
Peace and Love,
Randy
What do you plan to do with it when it's done? I certainly hope you have a place of honor to display it where it can be admired by all.
Peace and Love,
Randy
SGTJKJ

#041

Joined: July 20, 2006
KitMaker: 10,069 posts
Armorama: 4,677 posts

Posted: Tuesday, January 25, 2011 - 07:23 AM UTC
Excellent buildings. They look very realistic and the details are great.
Looking forward to see more.
Looking forward to see more.


tonypurdy
Joined: April 29, 2007
KitMaker: 9 posts
Armorama: 8 posts

Posted: Tuesday, January 25, 2011 - 09:03 AM UTC
Mate, good job. Currently crew commanding an ASLAV overseas on operations. Nice to see another quality dio with the Cav boys getting a showing. Appreciate it.
Adamskii
Joined: November 06, 2010
KitMaker: 537 posts
Armorama: 474 posts
Posted: Tuesday, January 25, 2011 - 01:22 PM UTC
Thanks for the comments overnight. Allow me to ellaborate on some questions.
What am I going to do with it when It's done?
Options. there are options. It would seem a shame to place in my Games room with the other dios. Not many people would see it who appreciate it. That leaves keeping it off site. But I get rather nervous trusting this amount of work and certainly the value of something like this, to someone else. It has been suggested to me that I offer it to the school of Armour for the Aussie Army as they have a museum with some good dios, and mine would be well received i am told. It would be an honor of course. Unfortunately thats in another state and 10 hours drive away. Also the total cost in dollars of the products used will get into the 2k mark, easily. Add the time to build and value adding of the work involved and this is a very expensive diorama. Insurance? how do people insure these things? There is virtually no market for them as collectors are few and no one would be willing to pay the price for something as significant as this (if selling was an option- and its not). It might be selfish but this has cost much in time and money and I would want to be compensated, and if damaged agreed value to repair/ replace, and I'm talking in the thousands.
I do have an armoured corps barracks one suburb over - (my old unit), but they recently lost their buckets and got recce rovers so their numbers dwindle and their museum is kinda minimalist - A Sergeants mess might be a good place though. The RAAF base has a museum, but its air force (thats also a 10 mins drive from here) and they are relocating a regiment there so maybe thats an option. The build attention to detail with the vehicles is such that it should withstand scrutiny from active service personell who work on them. So I guess they would appreciate it. There is only one model comp a year in my state - so only one opportunity to display it then. I will drive it interstate for other comp(s) so I am going to make it robust enough for travel by car.
In the short term When its finished I will have glass cut to make a case for it that matches my other dios, and store it in games room until first comp.
Then sit and think.
Adam
What am I going to do with it when It's done?
Options. there are options. It would seem a shame to place in my Games room with the other dios. Not many people would see it who appreciate it. That leaves keeping it off site. But I get rather nervous trusting this amount of work and certainly the value of something like this, to someone else. It has been suggested to me that I offer it to the school of Armour for the Aussie Army as they have a museum with some good dios, and mine would be well received i am told. It would be an honor of course. Unfortunately thats in another state and 10 hours drive away. Also the total cost in dollars of the products used will get into the 2k mark, easily. Add the time to build and value adding of the work involved and this is a very expensive diorama. Insurance? how do people insure these things? There is virtually no market for them as collectors are few and no one would be willing to pay the price for something as significant as this (if selling was an option- and its not). It might be selfish but this has cost much in time and money and I would want to be compensated, and if damaged agreed value to repair/ replace, and I'm talking in the thousands.
I do have an armoured corps barracks one suburb over - (my old unit), but they recently lost their buckets and got recce rovers
so their numbers dwindle and their museum is kinda minimalist - A Sergeants mess might be a good place though. The RAAF base has a museum, but its air force (thats also a 10 mins drive from here) and they are relocating a regiment there so maybe thats an option. The build attention to detail with the vehicles is such that it should withstand scrutiny from active service personell who work on them. So I guess they would appreciate it. There is only one model comp a year in my state - so only one opportunity to display it then. I will drive it interstate for other comp(s) so I am going to make it robust enough for travel by car. In the short term When its finished I will have glass cut to make a case for it that matches my other dios, and store it in games room until first comp.
Then sit and think.
Adam

zontar
Joined: August 27, 2006
KitMaker: 1,646 posts
Armorama: 1,557 posts
Posted: Tuesday, January 25, 2011 - 02:33 PM UTC
Awesome!!! Please keep it coming.
-zon
-zon
Adamskii
Joined: November 06, 2010
KitMaker: 537 posts
Armorama: 474 posts
Posted: Tuesday, January 25, 2011 - 07:32 PM UTC
Just let me back track a little, when I built the grate I kinda rushed through it. So doing the second one, here s quick photo essay of what I did.
the parts all laid out, the angles face a particular way for a reason.
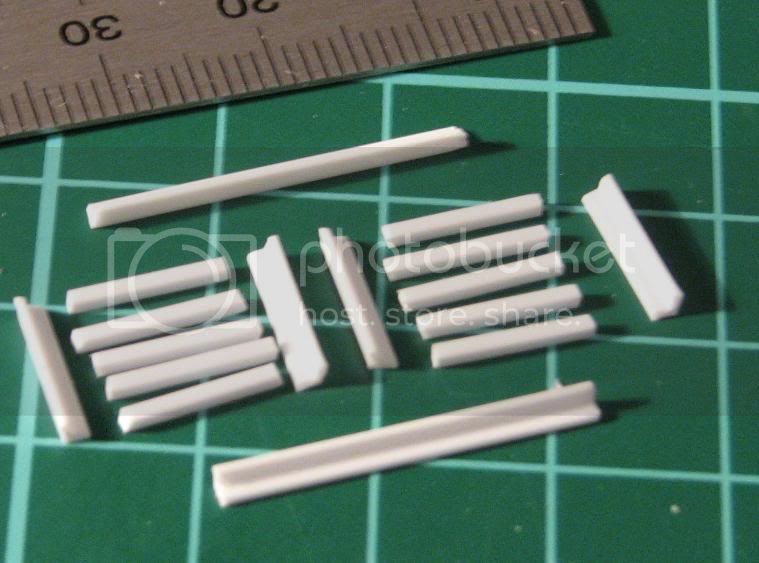
the frame built
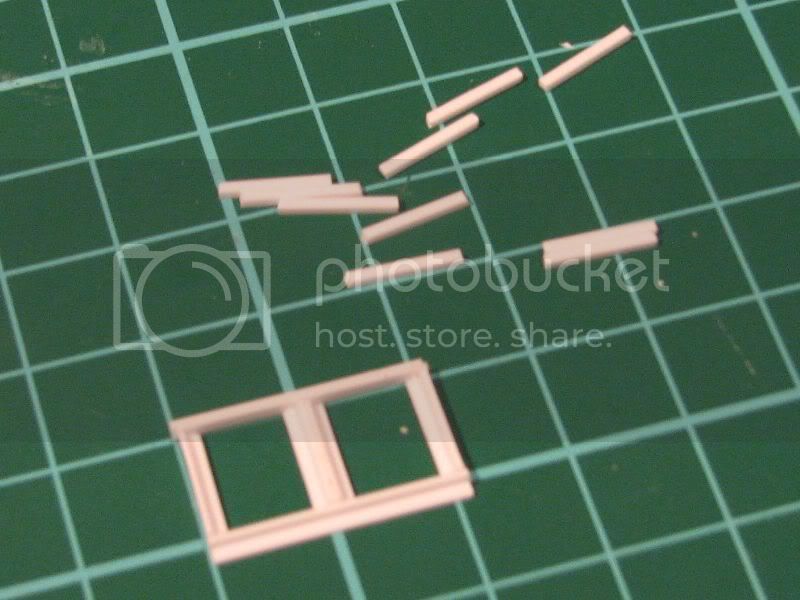
the grate rails added (poorly lol)
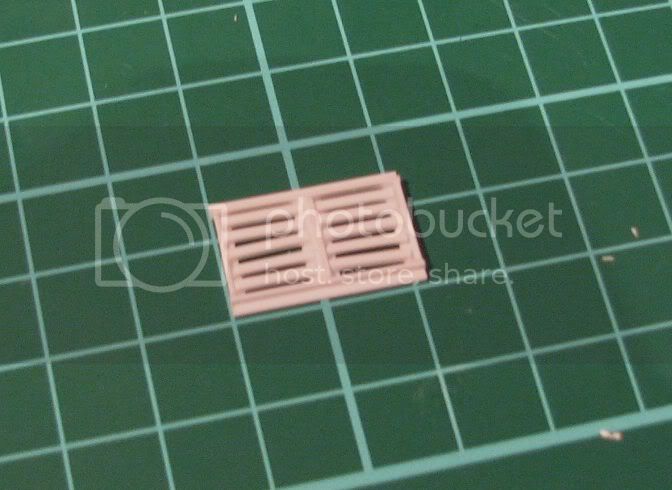
building up in height to match street level (using scrap card)
All done !
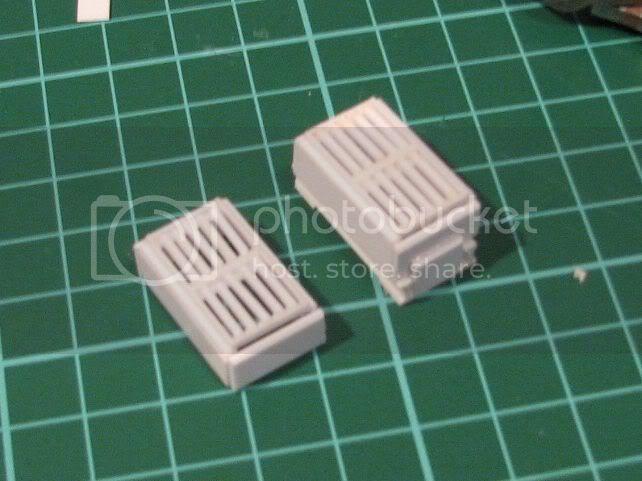
Now to paint it. Once installed, the inside will be inaccesible.
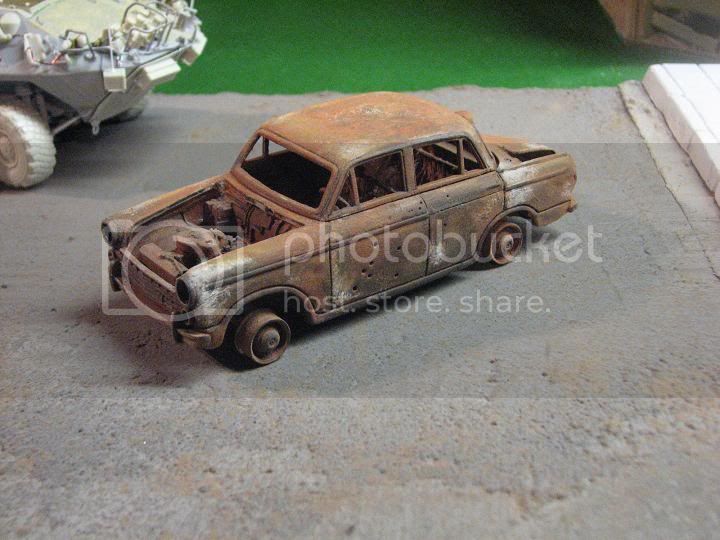
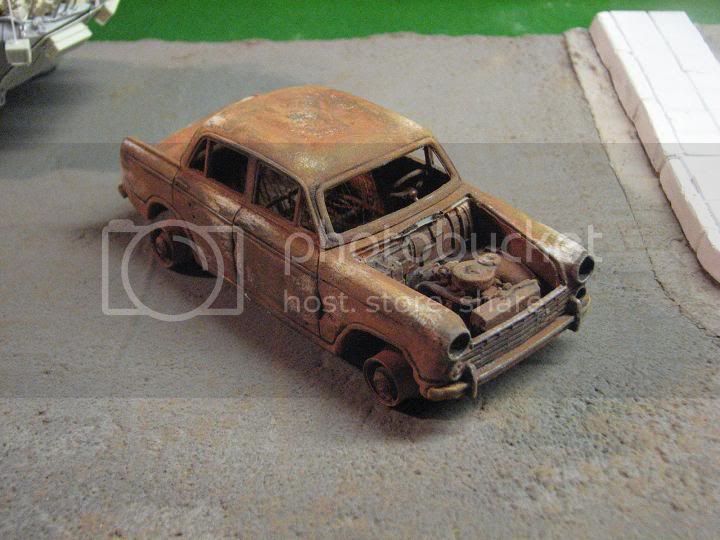
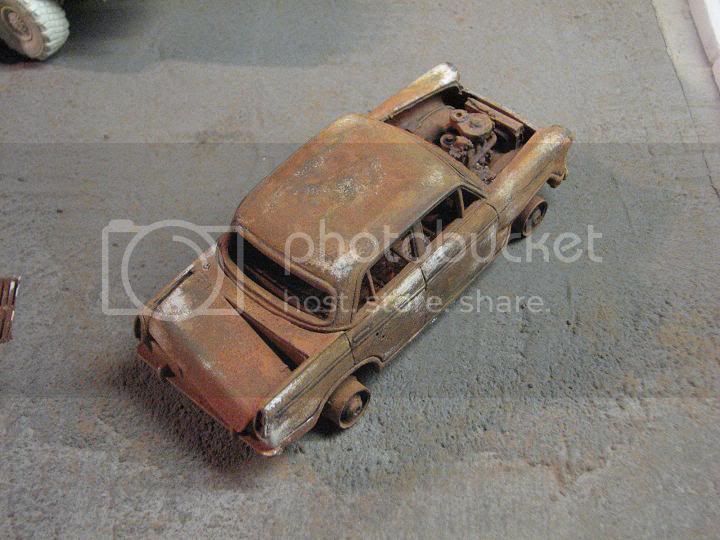
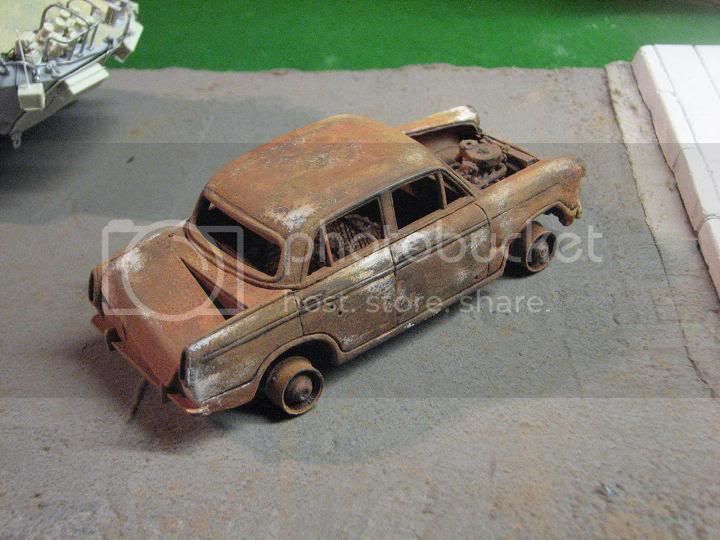
I have a technique for painting metal objects that rust. I have described this in detail previously but not here. basically I use a patina to chemically rust the surface. The result is real rust. In a nutshell you paint on an iron oxide liquid suspension, the while wet, paint on an acid that attacks it. When dry it is very real rust! I did my MIG car with it, and most of the metal elements of the buildings have this ( the washmachines and fridge was painted using this and then using the salt technique to put the white over the top - the white goods have NO washes or drybrushing!).
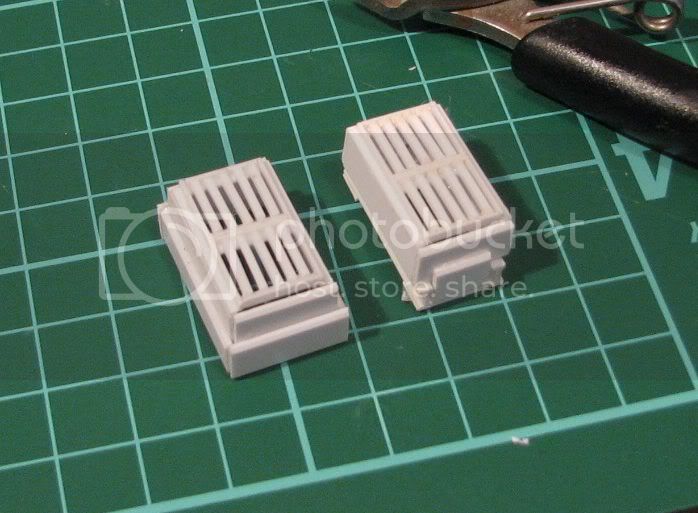
So here is the patina in action. hard to photo. Painting the grates with the suspension,
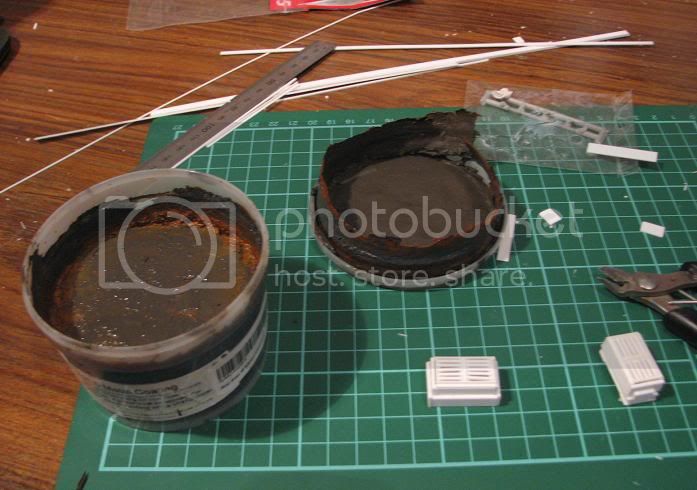
they're painted and allowed to skin for a few minuites, the acid is seen in the tall bottle.
I pour some acid into a lid to paint from

the painted grates! Ina few hours when dry they will look much better.
The patina I sourced from a moulding and casting suplies shop. Its proper use is to paint ceramic masks or garden ornaments and then make them look old and rusty. Usually a copper patina is common for a green look.
I developed this technique over a few years after being unable to source blacken it in Australia, and found that solenious acid (also a patina) was a suitable replacement. Solenious acid is used in leadlighting to colour the solder that joins the bars. However while trying to source it, I encountered the two part patina (as used above) and figured it would work on plastic. solenious acid works wonders on fruil tracks - its backens them and the longer left in it causes a deep red rust colour - very convincing.
here are some examples of the two part patina.
Firstly a whole power loader from Aliens, as an abandoned and uparmoured custom version 100% rusted
next are the two whitegoods - 100% rusted with two part patina, then using the salt method, spraying white over the top - Note this has no washes or drybrushing.
Airconditioners same method
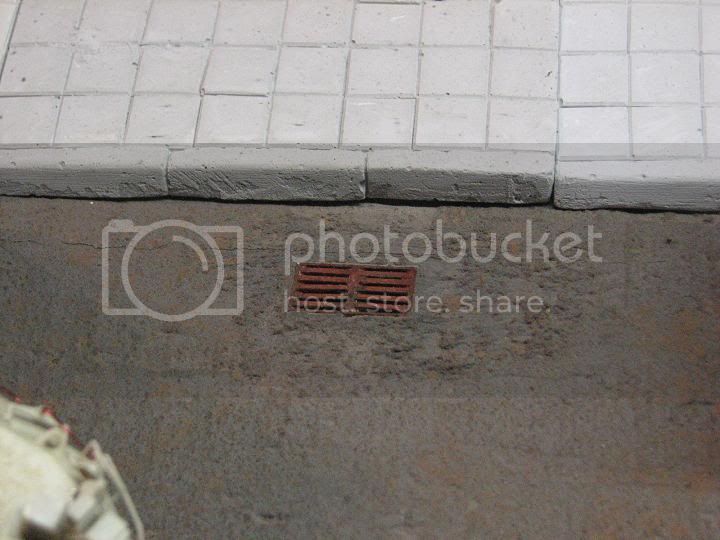
Once dry the two grates are installed in the street.
the parts all laid out, the angles face a particular way for a reason.
the frame built
the grate rails added (poorly lol)
building up in height to match street level (using scrap card)
All done !
Now to paint it. Once installed, the inside will be inaccesible.
I have a technique for painting metal objects that rust. I have described this in detail previously but not here. basically I use a patina to chemically rust the surface. The result is real rust. In a nutshell you paint on an iron oxide liquid suspension, the while wet, paint on an acid that attacks it. When dry it is very real rust! I did my MIG car with it, and most of the metal elements of the buildings have this ( the washmachines and fridge was painted using this and then using the salt technique to put the white over the top - the white goods have NO washes or drybrushing!).
So here is the patina in action. hard to photo. Painting the grates with the suspension,
they're painted and allowed to skin for a few minuites, the acid is seen in the tall bottle.
I pour some acid into a lid to paint from
the painted grates! Ina few hours when dry they will look much better.
The patina I sourced from a moulding and casting suplies shop. Its proper use is to paint ceramic masks or garden ornaments and then make them look old and rusty. Usually a copper patina is common for a green look.
I developed this technique over a few years after being unable to source blacken it in Australia, and found that solenious acid (also a patina) was a suitable replacement. Solenious acid is used in leadlighting to colour the solder that joins the bars. However while trying to source it, I encountered the two part patina (as used above) and figured it would work on plastic. solenious acid works wonders on fruil tracks - its backens them and the longer left in it causes a deep red rust colour - very convincing.
here are some examples of the two part patina.
Firstly a whole power loader from Aliens, as an abandoned and uparmoured custom version 100% rusted
next are the two whitegoods - 100% rusted with two part patina, then using the salt method, spraying white over the top - Note this has no washes or drybrushing.
Airconditioners same method
Once dry the two grates are installed in the street.
Adamskii
Joined: November 06, 2010
KitMaker: 537 posts
Armorama: 474 posts
Posted: Wednesday, January 26, 2011 - 12:25 AM UTC
Ok the next phase begins - laying the street
But first here are some shots of the MIG car rusted out using the two part patina, Sorry didnt post them before. I just took them, I couldnt find my earlier ones. Taking pictures of raw rust under fluro lighting at night is a bad mistake - everything looks washed or red. But you get the idea.
The car was posed on the street, by the way, so lets describe how we got there.
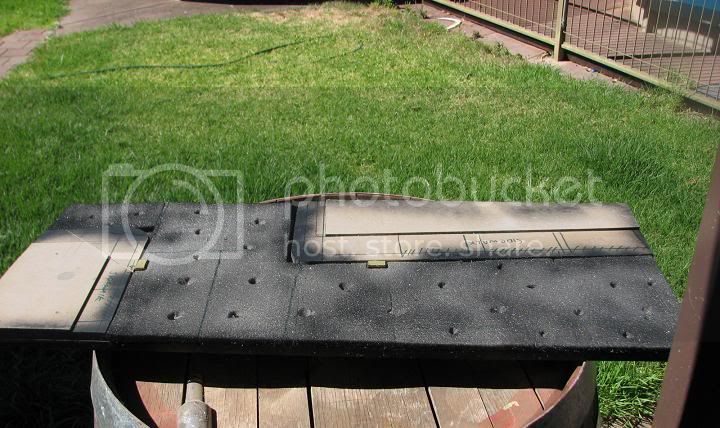
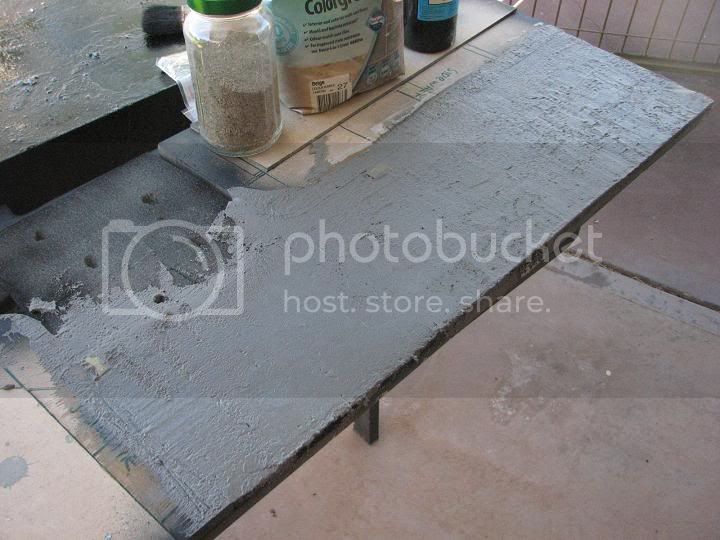
Firstly, I set up outside where lots of fresh air and sunlight. This screwed up some pictures but we will survive. Then I spray piant the street black to seal the foam a little, and to darken anything that may be seen through the cracks later.
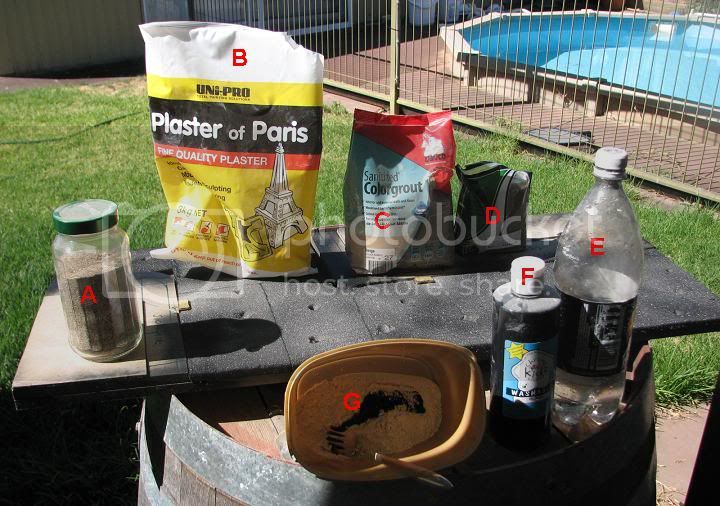
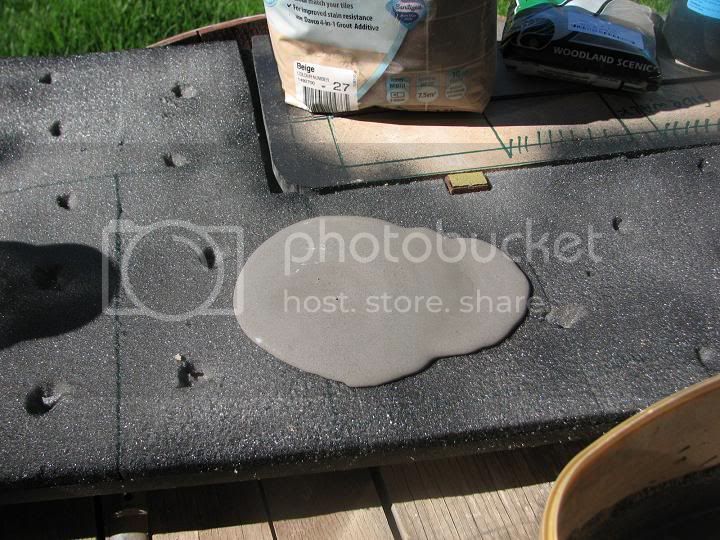
My recipe for bitumen:
A- 1mm seived natural gravel from a river bed (oven dried )
B- Plaster of Paris
C- Beige coloured Tile grout powder
D- Model railroad Ballast, fine (brown)
E- Water
F- Cheap black acrylic paint to dye the mix
G- A place to mix it , in this case an old ice cream tub.
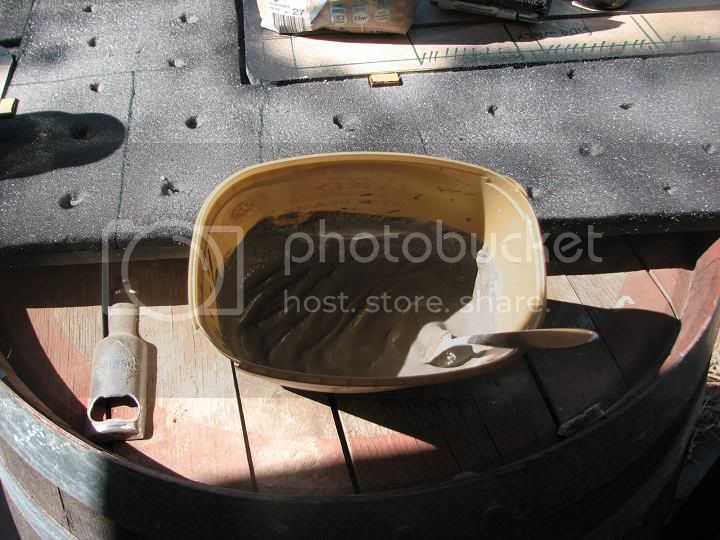
ratios? well Its a bit of this and a splash of that sort of affair. basically mix up some plaster as per instructions, I did about 200 grams, then maybe 50 mils of acrylic paint, the maybe 1/2 cup of gravel, 1/2 cup of ballast, 2 tablespoons of tile grout, topped up with water to keep it a slurry. I did not include a good squirt of aquadhere PVA adhesive, as suggested, As I did a test and it made the plaster too hard.
the slurry mixed - a nice concrete color too bad I want tar, but anyways,,
poured it on the road base. Small note here - I cut some holes in the road base to act as anchor plugs for the plaster shell. I dont want the shell lifting off in one big piece during transport.
spatula it out working quickly, keeping it smooth and thin
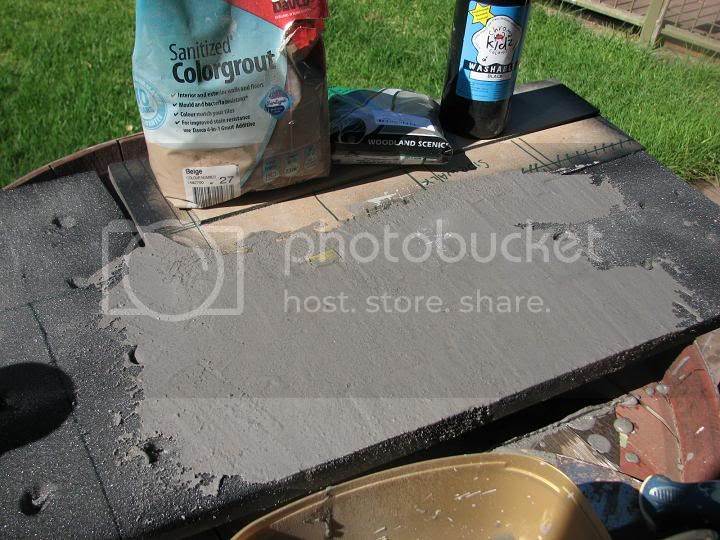
the base grows
the front road almost done
front done
turn the base around and do the back end
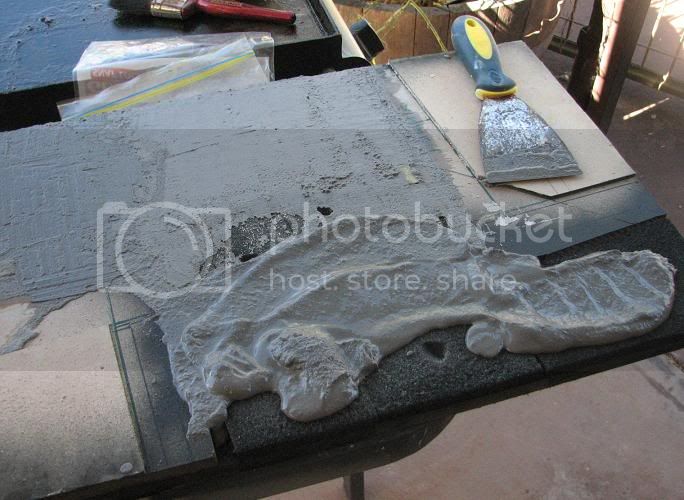
spatula it out working quickly again, using the gutters as reference for height.

I add some details like lines in the top where the real stuff would of been layed, also some slight depressions where gutters crossing the road would be, and fiddle with the surface texture so its not totally uniform.
front view
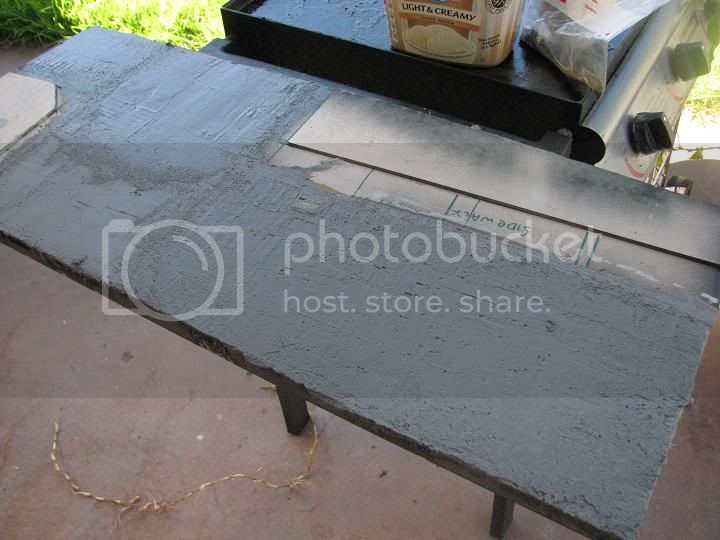
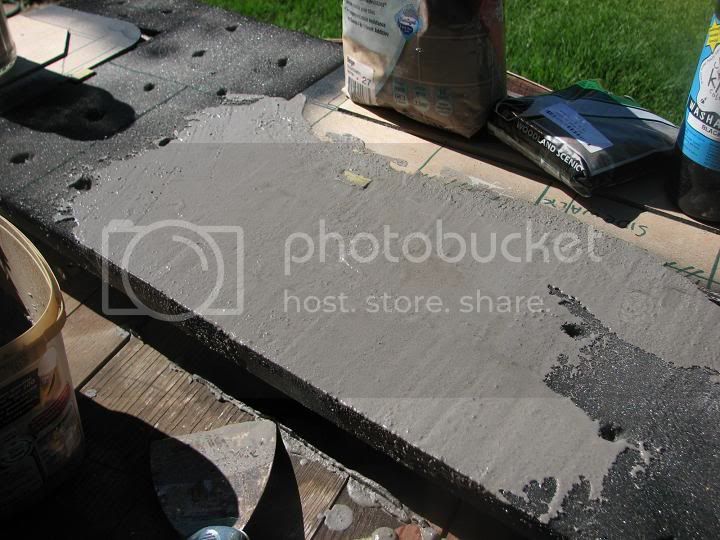
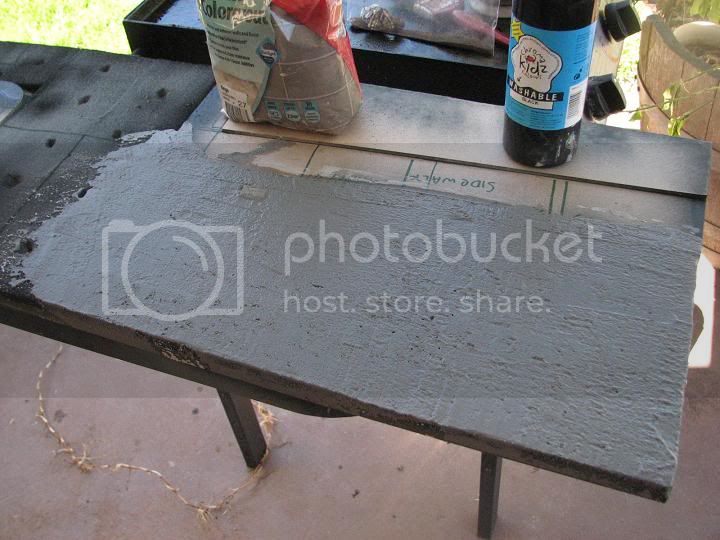
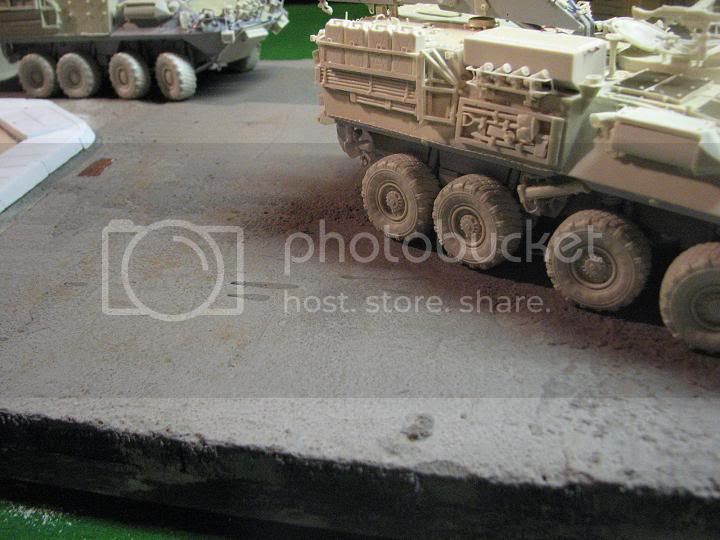
I then let it dry - my test sample took about an hour to dry - I am writing this about 5 hours after pouring the plaster and its still 'damp" - I think the Tile grout will take all of 24hours to set. Here are some posed shots with the sidewalks in place (but not glued or sanded to fit - lots work here yet)
some texture shots of the surface
And lastly I remove the masking tape from the stormwater grates and ...
What do you think ?
Now wait for it all to dry.. then I can sand the surface to get rid of imperfections and to simulate a worn surface, followed by cracking the shell and removing som sub sections, replastering them to look like repairs.
Adam
But first here are some shots of the MIG car rusted out using the two part patina, Sorry didnt post them before. I just took them, I couldnt find my earlier ones. Taking pictures of raw rust under fluro lighting at night is a bad mistake - everything looks washed or red. But you get the idea.
The car was posed on the street, by the way, so lets describe how we got there.
Firstly, I set up outside where lots of fresh air and sunlight. This screwed up some pictures but we will survive. Then I spray piant the street black to seal the foam a little, and to darken anything that may be seen through the cracks later.
My recipe for bitumen:
A- 1mm seived natural gravel from a river bed (oven dried )
B- Plaster of Paris
C- Beige coloured Tile grout powder
D- Model railroad Ballast, fine (brown)
E- Water
F- Cheap black acrylic paint to dye the mix
G- A place to mix it , in this case an old ice cream tub.
ratios? well Its a bit of this and a splash of that sort of affair. basically mix up some plaster as per instructions, I did about 200 grams, then maybe 50 mils of acrylic paint, the maybe 1/2 cup of gravel, 1/2 cup of ballast, 2 tablespoons of tile grout, topped up with water to keep it a slurry. I did not include a good squirt of aquadhere PVA adhesive, as suggested, As I did a test and it made the plaster too hard.
the slurry mixed - a nice concrete color too bad I want tar, but anyways,,
poured it on the road base. Small note here - I cut some holes in the road base to act as anchor plugs for the plaster shell. I dont want the shell lifting off in one big piece during transport.
spatula it out working quickly, keeping it smooth and thin
the base grows
the front road almost done
front done
turn the base around and do the back end
spatula it out working quickly again, using the gutters as reference for height.
I add some details like lines in the top where the real stuff would of been layed, also some slight depressions where gutters crossing the road would be, and fiddle with the surface texture so its not totally uniform.
front view
I then let it dry - my test sample took about an hour to dry - I am writing this about 5 hours after pouring the plaster and its still 'damp" - I think the Tile grout will take all of 24hours to set. Here are some posed shots with the sidewalks in place (but not glued or sanded to fit - lots work here yet)
some texture shots of the surface
And lastly I remove the masking tape from the stormwater grates and ...
What do you think ?
Now wait for it all to dry.. then I can sand the surface to get rid of imperfections and to simulate a worn surface, followed by cracking the shell and removing som sub sections, replastering them to look like repairs.
Adam

henkp

Joined: September 30, 2005
KitMaker: 1,080 posts
Armorama: 1,064 posts
Posted: Wednesday, January 26, 2011 - 12:48 AM UTC
just amazing love it gives me good ideas keep on the going
henk
henk

lestweforget
Joined: November 08, 2002
KitMaker: 2,832 posts
Armorama: 1,500 posts

Posted: Wednesday, January 26, 2011 - 04:20 AM UTC
Siiiiiiiiiiiiiick!!!! 
Lookin wild Adam, keep it up, fantastic subject matter if i might say so myself
Lookin wild Adam, keep it up, fantastic subject matter if i might say so myself

gogs007

Joined: February 03, 2007
KitMaker: 313 posts
Armorama: 285 posts

Posted: Wednesday, January 26, 2011 - 06:25 AM UTC
that looks amazing
charging_rhinos
Joined: June 16, 2010
KitMaker: 89 posts
Armorama: 76 posts
Posted: Wednesday, January 26, 2011 - 07:35 AM UTC
Simply incredible. I was on Armorama this morning, wondering how to get a nice road finish. Then I stumbled on this... I am speechless. I've just changed my diorama plans. The bar has been raised incredibly high with this one.
vonHengest
Joined: June 29, 2010
KitMaker: 5,854 posts
Armorama: 4,817 posts
Posted: Wednesday, January 26, 2011 - 08:21 AM UTC
I find your tutorial style build log both informative and enjoyable. Your explanations of the rust process and road creation were great, and I see now why you had the base and the grates cut so deep 

Spiderfrommars

Joined: July 13, 2010
KitMaker: 3,845 posts
Armorama: 3,543 posts
Posted: Wednesday, January 26, 2011 - 08:46 AM UTC
I've really been enjoing reading this tread...
An OUTSTANDING work indeed, i'm impressed
I've been learning and i can't wait to see it finished
Congrats
cheers
(i wonder...how much big is your house...If i tried to do a similar work in my place...i' would sleep in another house )
)
An OUTSTANDING work indeed, i'm impressed
I've been learning and i can't wait to see it finished
Congrats
cheers
(i wonder...how much big is your house...If i tried to do a similar work in my place...i' would sleep in another house
)Adamskii
Joined: November 06, 2010
KitMaker: 537 posts
Armorama: 474 posts
Posted: Thursday, January 27, 2011 - 02:18 AM UTC
Quoted Text
(i wonder...how much big is your house...If i tried to do a similar work in my place...i' would sleep in another house
Hmmm well my house is not that big I guess, but I do have an indoor computer room with a big desk that I use for kit assembly. But outside - wow what a mess I have made! I have tool shed that is converted into a small galley style studio for diorama work and its a huge mess from hundreds of plaster castings trying to get buildings right ( and then sanding and fitting etc), also I have a 3 car carport and one of them I use for my airbrushing and have my bandsaw and belt sander in there. Its kind of the carpentry area and paint area, it too is a mess from castings and sanding and mould making. Lastly I have a large outside games room, where I sort of do test fitting and the like (no glue allowed) on the 8ball table - mostly because the 8 ball table lights combined with the dozen small room lights makes for good photos, but yeah that too has mess everywhere.
If I lived in a unit or apartment - I would not be able to attempt such things....
Adam
Spiderfrommars
Joined: July 13, 2010
KitMaker: 3,845 posts
Armorama: 3,543 posts
Posted: Thursday, January 27, 2011 - 03:26 AM UTC
Quoted Text
If I lived in a unit or apartment - I would not be able to attempt such things....
Instead I live (fortunately on my own) in a 60 square meters flat and i work in a 9 square meters room....but one of these days i'll try to do something like this...probably i'm little bit crazy
Joking aside, congrats again. I'm waiting for your next steps
cheers
 |

WEB HOSTING BY


Copyright ©2021 Armorama and Kitmaker Network, a subsidiary of Silver Star Enterprises
All Rights Reserved. Please read our Conditions of Use and Privacy Policy.
All Rights Reserved. Please read our Conditions of Use and Privacy Policy.