Campaigns
Where Armorama group builds can be discussed, organized, and updates posted.
Get 'er Done Mk3
PantherF
Visit this Community
Indiana, United States
Joined: June 10, 2005
KitMaker: 6,188 posts
Armorama: 5,960 posts
Posted: Sunday, July 01, 2012 - 09:28 AM UTC
I wasn't sure of the scale as with today's kits and technology used in the finishing process, a picture can be so misleading.

Oh, and it is such a crap-shoot with getting those obscure brands but you seem to do very well with them so I think I'll look out for a few. Don't think I'll make a habit with 'em but a few of them would be cool to play with during the build.


~ Jeff
Bluestab
Visit this Community
South Carolina, United States
Joined: December 03, 2009
KitMaker: 2,160 posts
Armorama: 1,906 posts
Posted: Sunday, July 01, 2012 - 03:06 PM UTC
@Jeff T., Thanks. She still has some work coming her way though.

@Robert B., I know it's clean. As I put in my post my main goal was to get it put together and basically done. I'll probably pick it back up in a month or so and do some dry brushing and washes before I upload a final image to the campaign gallery.
imatanker
Visit this Community
Maine, United States
Joined: February 11, 2011
KitMaker: 1,654 posts
Armorama: 1,565 posts
Posted: Sunday, July 01, 2012 - 08:57 PM UTC
I am making good progress on My Sheridan build.I have the lower hull done(with out roadwheels)and will be starting the upper hull shortly.As soon as the gallery issues are squared away,I will post some pics.Jeff T.
FAUST
#130
Visit this Community
Noord-Holland, Netherlands
Joined: June 07, 2002
KitMaker: 8,797 posts
Armorama: 4,190 posts
Posted: Monday, July 02, 2012 - 01:23 AM UTC
@ Jeff I know exacly what you mean. When you see some of the Macro shots figure painters come up with you get the idea they painted a 1:1 replica instead of something 5 cm high.
And believe me.. chasing down the obscure and exotic is addictive. Once you got one you want two... and then you learn about another weird but nice looking vehicle. etc etc. And before you know it you ended up with a stash full of the obscure and exotic.

@ Alex
Sorry mate I probably misunderstood your guiding text with the pictures. Wasn't aware that weathering was another one of the following steps on hold for now. Some people like their tanks clean.

@ Jeff T
Looking forward to your Sheridan mate.
Bluestab
Visit this Community
South Carolina, United States
Joined: December 03, 2009
KitMaker: 2,160 posts
Armorama: 1,906 posts
Posted: Monday, July 02, 2012 - 04:01 AM UTC
@Robert B, No problem. I am just taking a break before finishing it up.

PantherF
Visit this Community
Indiana, United States
Joined: June 10, 2005
KitMaker: 6,188 posts
Armorama: 5,960 posts
Posted: Tuesday, July 03, 2012 - 07:27 AM UTC
No rain but extreme heat so a little painting was accomplished today.

That and on my 1/16th Panther too.


~ Jeff
didgeboy
Visit this Community
Washington, United States
Joined: September 21, 2010
KitMaker: 1,846 posts
Armorama: 1,509 posts
Posted: Thursday, July 05, 2012 - 03:25 AM UTC
Tried to upload this last week and just as I finished the site transfer started, woo hoo. So, here we go again. I started this project when I was 16 in 1986 (yes, really), before I had enough commonsense to know better. Armed with only some Xerox copies and one or two Tank Magazines that showed the Mk II, I attempted to make the "all new" Merkava Mk II before anyone else . . . yeah.

So I felt that this one would be appropriate for this campaign as it has been a project looming over me for too many years. Started the resurrection of this kit a few months ago. Here is the recap.

This is what started the whole project way back when:


Here is where I picked up the project back in April:


Here is where things have progressed to:


I have added the non skid with white glue and embossing powder, which having to do over again I would do something else. The white glue when diluted does not provide good adherence and tends to be prone to flaking when dry. The liquid cement tends to try quickly but is really sticky and can melt the embossing powder granules, so maybe hairspray next time?

The additional front road wheel was made from a cast of the Academy kits wheel assembly. My goal for this project originally was to scratch build the whole thing as there were no aftermarkets available back in the day and no other kit other than the original Tamiya. I am trying to keep that theme and do most of the conversions myself without the use of aftermarket products.

The road wheels are sprayed with tire black and the base colour which is going to be a greyish-green concrete colour, which, from my photos of the era, seem to be the colour of the vehicles that I am trying to represent. I still need to make the side skirts as the previous ones that I made years ago are not quite accurate, some parts might be salvageable.

Fun campaign and looking forward to seeing this and many of yours completed soon. Cheers.
heliman
Visit this Community
New York, United States
Joined: June 14, 2010
KitMaker: 702 posts
Armorama: 604 posts
Posted: Thursday, July 05, 2012 - 03:58 AM UTC
Love the work on your Merk!! The anti- skid looks good, very random

Mines stalled on the b/c armor..guess that why I shelved it before.

I just uploaded a ribbon for our campaign, hope everyone likes it.

Jeff
AlanL
Visit this Community
England - East Anglia, United Kingdom
Joined: August 12, 2005
KitMaker: 14,499 posts
Armorama: 11,675 posts
Posted: Thursday, July 05, 2012 - 04:03 AM UTC
Hi Damon,

Nice work.

Some progress on the Churchill


Al
AlanL
Visit this Community
England - East Anglia, United Kingdom
Joined: August 12, 2005
KitMaker: 14,499 posts
Armorama: 11,675 posts
Posted: Thursday, July 05, 2012 - 04:05 AM UTC

Quoted Text

@ Alex
Nice job on the Stug. Bit clean but a very nice paintjob. Great job

@ Jeff
Nice looking basecoat. Looking forward to the weathering.

@ Alan.
Not yet finished in that last run of pics but getting there. Check out the update below. Now she is finished.
Awesome work on that Churchill. Lots of paintwork with that interior but it will looks stunning once everything got their own color.

Okeydokey. I finished the mongrel. The first vehicle for me for this campaign. The Steyr 250. All the pigments have been flung and I started on a bit of groundwork (no pics of that yet). Here are the final vehicle pics.


Well That is it for no concerning this vehicle. The dio will come later in another topic. Up to the next vehicle. The Panhard 187

With friendly greetz

Robert Blokker


Hi Robert

neat
Petro
Visit this Community
Connecticut, United States
Joined: November 02, 2003
KitMaker: 984 posts
Armorama: 846 posts
Posted: Thursday, July 05, 2012 - 06:17 AM UTC
I "ve gotten washes and some dry brushing done on the interior of my 251.
I can't seem to locate my steering wheel though, at the moment.


SaxonTheShiba
Visit this Community
United States
Joined: February 01, 2009
KitMaker: 1,233 posts
Armorama: 557 posts
Posted: Friday, July 06, 2012 - 03:24 AM UTC
Damon.....great work on the Merkava.!!!!!!!!!!!!!!


Regards, Ian

mojo72
Visit this Community
Kuala Lumpur, Malaysia
Joined: September 05, 2010
KitMaker: 160 posts
Armorama: 130 posts
Posted: Friday, July 06, 2012 - 06:36 AM UTC
@Robert (Faust)- excellent work on the Steyr especially the weathering
@Alan (Alan L) - the detailing and the interior look great on the Churchill. Can't wait to see more
@Damon (didgeboy) - considering the age of the kit, you're certainly making good progress
@Jeff B (heliman)- the ribbon certainly gets my vote

Here is my progress so far:

After a base coat of olive drab, the tank is sprayed in yellow green, and lightly shaded with a mixture of buff. Last night it received a dark wash, and hopefully in the next few days, decals will be applied.


Below are a couple of shots of the diorama base


Regards
ArtyG37B
Visit this Community
British Columbia, Canada
Joined: August 13, 2009
KitMaker: 420 posts
Armorama: 416 posts
Posted: Friday, July 06, 2012 - 08:22 AM UTC

Quoted Text

the tank is sprayed in yellow green


Please Dude!!! it's not a tank!

Sorry it's the Arty Sgt Major in me. it is in fact a self-propelled Gun.

It is looking great though look forward to seeing it done with some weathering.
Naseby
Visit this Community
Slovakia
Joined: October 15, 2010
KitMaker: 825 posts
Armorama: 246 posts
Posted: Friday, July 06, 2012 - 10:49 AM UTC
@ Mojo72: The SPG looks great. Its a shame its not available as a clasic kit. It has sort of a WW1 feel to it.
Big-John
Visit this Community
Ohio, United States
Joined: August 12, 2010
KitMaker: 731 posts
Armorama: 711 posts
Posted: Saturday, July 07, 2012 - 09:37 AM UTC
Here’s my project for this campaign. I built this Tamiya M4 Sherman about 11 – 12 years ago. The sludge wash I put on it was really too heavy and made it come out really dark. I didn’t go any further with it and put it in storage.

Now my idea is to mix a very thin olive drab color and over spray the model hopefully using the dark wash as a pre shade.


FAUST
#130
Visit this Community
Noord-Holland, Netherlands
Joined: June 07, 2002
KitMaker: 8,797 posts
Armorama: 4,190 posts
Posted: Saturday, July 07, 2012 - 11:55 AM UTC
@ Damon
Allthough modern armor is not my cup of tea I always appreciate scratchwork. Great job on that Merkava. These tanks always have a bit of a scifi feeling to them.

@ Alan
Great job on that engine so far. Coming together really nicely.

@ Muhammad
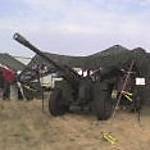
That is a cool looking vehicle and you have painted it very well. Love that shade of yellowish green. Will work brilliantly when you are going to weather it.
Forgive me my ignorance if I ask the following question but what is it? When I first saw the pictures I thought it was a warhammer tank with that huge barrel on top but when I saw the trailer I guessed it must be a 1:35 vehicle.
The dio base is already looking pretty cool. Well designed will make for a very attractive endresult.

@ Marc.
Looking forward to the pics. Did you find the steeringwheel? Always annoying when a piece gets MIA.

@ John
Nice built color is indeed a bit too dark but nothing you cannot fix with a bit of respraying.

I got an update as well. As the most important and cheapest part to get my Airbrush in working order again was not in stock I have to wait two more weeks. Really weird that 1 rubber ring is so important for the workings which means I won't be spraying anytime soon and some of my projects for this campaign are on a hold. So I went to one of those bargain shops and bought me a very cheap picture frame. Made a builtup with styrofoam and framed that with styrene.


Added some scenery details like a fence and telegraph pole from Mirage. A tree root. And a goat from Masterbox' Domestic animals set


Then with some spackle for filling the seams between plaster/gypsum boards I layd down a nice thick layer. Sprinkled some birdcage sand over it. Pressed the vehicle in it and with a tire from the scrapbox made ruts


Next up. The appearance of figures. I must have built this set 2 or 3 times through the years. I love it and it is in my opinion one of the best old timey dragon sets. Wehrmacht Infantry Barbarossa 1941. Good details good faces, nice poses.


You might notice I placed the front and back figure with one foot outside the dio. I wanted to create the idea that they were just passing through the scene as part of a longer column.


Aside from these four figures another three will appear as well as the crew of the Steyr stopping for a break during the march. Which will make it the crowdiest dio I ever made 7 figures... 8 if you count the goat
imatanker
Visit this Community
Maine, United States
Joined: February 11, 2011
KitMaker: 1,654 posts
Armorama: 1,565 posts
Posted: Saturday, July 07, 2012 - 08:23 PM UTC
Robert...Man,that looks nice,the figures walking off the base was a great idea.It gives a hint of motion to the scene.Way to bring one back from the almost dead Jeff T.
Petro
Visit this Community
Connecticut, United States
Joined: November 02, 2003
KitMaker: 984 posts
Armorama: 846 posts
Posted: Sunday, July 08, 2012 - 01:18 AM UTC
No Rob, i didn't find the steering wheel yet. It is holding up production.
FAUST
#130
Visit this Community
Noord-Holland, Netherlands
Joined: June 07, 2002
KitMaker: 8,797 posts
Armorama: 4,190 posts
Posted: Sunday, July 08, 2012 - 03:59 AM UTC
@ Jeff T
Thanks for the compliments. Yeah you are right with this almost like a phoenix rising from the ashes. But somehow to me a model is never finished untill it is on a base with some figures. At first wanted only three of the barbarossa figures in that corner but then I thought up the idea of walking through the scene and it worked pretty well giving indeed the idea of movement exactly as I envisioned it.

@ Marc
That is indeed annoying. Hope you will find it back soon.
mojo72
Visit this Community
Kuala Lumpur, Malaysia
Joined: September 05, 2010
KitMaker: 160 posts
Armorama: 130 posts
Posted: Sunday, July 08, 2012 - 08:00 AM UTC
@Ian(ArtyG37B) - I had a feeling I messed something up when writing the sentences. Doh. Thanks for correcting the description

@Naseby - I totally agree. If I'm not mistaken Italeri did release a Vietnam version many moons ago which is now OOP. However, from time to time you may come across one on Ebay

@Robert(Faust) - this kit is Italeri's M110 A2 203mm Self Propelled Gun which I have slightly modified for a Vietnam version. The cargo trailer is part of Tamiya's M151A2, and yes you're right, these are in 1:35th. Anyway, looking forward to see your completed diorama

Regards
spacewolfdad
Visit this Community
England - West Midlands, United Kingdom
Joined: May 23, 2010
KitMaker: 642 posts
Armorama: 593 posts
Posted: Monday, July 09, 2012 - 01:35 AM UTC
Hi Everyone,

I decided to get one of the models that have been languishing in my 'Hall of Shame' for a long time done. I chose the Trumpeter Jagdpanther, this was originally intended as a wargame piece and as such was build OOB except for the Revell tracks, I can't get on with the Trumpeter Vinyl ones. I also used a RB metal barrel as well. I thought I would use the model as a test piece for two new products from Games Workshop, their new 'Texture', Stirland Mud and their new 'Shade', Agrax Earthshade (formerly Devlan Mud, don't you just love these whacky names, they must have a department devoted to thinking them up.). The 'Texture' is basically a pot of 'mud' it is like mud, can be put on like mud, it can be built up and dries rock hard. It is designed for the bases of their figures, because, apparently, the younger modellers can't wait for the PVA glue to dry to get on with finishing and playing with their figures - bless em! I have to say that it works really well and is a good colour for a basic mud, they have other colours and all can be intermixed, I will be investigating this further. I would say it is a lot cheaper than pigment powders as a pot is £2.20 here in the UK and will do many models. Well worth a look. The 'Shade' is a new formulation of their old 'Washes' and has better flow properties apparently. I can honestly say it is an improvement and gives a nice finish around detail. Anyway here are the pictures and you can decide for yourselves....

The model as I had left it languishing in a drawer...


The two products I was testing out...


Mud!!


I applied the 'mud' around the lower side-skirts, on the running gear, rear hull and front hull.


I applied the 'shade' all over the vehicle as a wash...


Well that's it for now, I will be doing some localised pin washes and then dry brush everything to bring out the detail. The next thing will be to paint all the details and tracks, then some weathering and that will be it finished. I will be interested in your opinions for these two products, I am pleased with them, especially the 'mud'.

All the best,

Paul
Petro
Visit this Community
Connecticut, United States
Joined: November 02, 2003
KitMaker: 984 posts
Armorama: 846 posts
Posted: Monday, July 09, 2012 - 04:32 AM UTC
Paul, Judging by the pictures, I'd say the 2 products look really good. I really like the shade for a wash.
Big-John
Visit this Community
Ohio, United States
Joined: August 12, 2010
KitMaker: 731 posts
Armorama: 711 posts
Posted: Wednesday, July 11, 2012 - 11:07 AM UTC
A little progress on this one. I found a few seams that needed filled and scraped. I also removed the dry transfer stars that where on the sides of the turret by scrapping them with a No 11 blade and then buffing out the area with some steel wool.

Because of the repairs, my over spray coat had to be a little thicker than I originally wanted it to be to cover up the reworked areas. But this is fine since it’s all in fun anyway.

The paint has a deferent sheen where the stars were located, but I’m more than confident this will disappear as I apply the many layers of weathering.


Big-John
Visit this Community
Ohio, United States
Joined: August 12, 2010
KitMaker: 731 posts
Armorama: 711 posts
Posted: Saturday, July 14, 2012 - 06:52 AM UTC
Got the Future applied and decals on today. Markings are typical of a Sherman from the 7Th Armored Division around Aug of 44. Now the fun stuff begins.