Armor Between the Wars (official thread)
Ohio, United States
Joined: February 05, 2004
KitMaker: 545 posts
Armorama: 295 posts
Posted: Monday, December 31, 2012 - 06:18 AM UTC
Getting there! ...who knew Holidays with a 3 month old would be kind of time consuming!

I sprayed/fixed the brown. Next up is the tan and then a wash and decals. Might be a day or two late.

- Steve

Texas, United States
Joined: June 29, 2010
KitMaker: 5,854 posts
Armorama: 4,817 posts
Posted: Monday, December 31, 2012 - 08:24 AM UTC
Nathan: Not a problem, the photo is just fine

One of theses days I would like to try my hand at the Amusing Hobbies kit.
Steve: Don't worry about the time, just focus on finishing your build

Baden-Württemberg, Germany
Joined: September 14, 2012
KitMaker: 69 posts
Armorama: 69 posts
Posted: Tuesday, January 01, 2013 - 12:45 AM UTC

#298
Hong Kong S.A.R. / 繁體
Joined: August 08, 2002
KitMaker: 1,182 posts
Armorama: 665 posts
Posted: Tuesday, January 01, 2013 - 04:15 AM UTC
Pz.Kpfw.VI (Krupp) finished.
Texas, United States
Joined: June 29, 2010
KitMaker: 5,854 posts
Armorama: 4,817 posts
Posted: Wednesday, January 02, 2013 - 09:40 AM UTC
Jens: I don't have a problem with that, you are welcome to contact me once you have it finished the way you desire and we can add those photos to the gallery if you wish.
LM: If I saw that tank cleaned up like that for a promo gig I'd definitely want to enlist!
Ohio, United States
Joined: February 05, 2004
KitMaker: 545 posts
Armorama: 295 posts
Posted: Sunday, January 06, 2013 - 11:26 AM UTC
I managed to find some time to work with the air brush, and finish this one up! (a lot harder to do with a 3 month old than I had thought). Eventually, I'll weather it to match a base once I find a figure to go with it.
I sprayed the air-recognition marking on the turret, but the flag and "M" are decals from the kit. The hardest part of putting this together was getting the wheels to all line up with eachother and the tracks, and surprisingly, the radio antenna mounting. It ended up being most scratch-built since the kit parts did not line up with anything.
I really enjoyed adding the rivetts. Thanks to Jens T-26, I made that a top priority on detailing, and I think it added some great accuracy for just a little work. I also figured out my airbrush a bit more, and am ready to tackle some more projects with it soon!
Any comments, good or bad are welcomed! I'm always up for learning how to improve!
- Steve


Texas, United States
Joined: June 29, 2010
KitMaker: 5,854 posts
Armorama: 4,817 posts
Posted: Sunday, January 06, 2013 - 06:12 PM UTC
Great job Steve! Your airbrushing turned out really good, and you are definitely right about the rivets. I always enjoy watching people add them to their build and see the impact it makes. Regarding the wheels, you can always create a makeshift jig to help line them up while the glue sets. Those tracks seem like they would be a bit challenging to work with, but I know that the indy-links have their own difficulties with such a small tankette.
Baden-Württemberg, Germany
Joined: September 14, 2012
KitMaker: 69 posts
Armorama: 69 posts
Posted: Sunday, January 06, 2013 - 09:14 PM UTC
Whoaaa, Steve!
Turned out really good. Lightyears between the previous paintjob and the finished model. I am still impressed how you turned that crappy kit into a good looking tank model.
Louisiana, United States
Joined: May 19, 2007
KitMaker: 459 posts
Armorama: 421 posts
Posted: Monday, January 07, 2013 - 02:09 AM UTC
Steve,
It came out fantastic! The colors look great as does the weathering. Great job.
Irvin
Ontario, Canada
Joined: March 23, 2008
KitMaker: 2,847 posts
Armorama: 2,667 posts
Posted: Wednesday, January 09, 2013 - 05:17 AM UTC
Greetings and a Happy New Year to all!
There was very little time for modelling until this week and yesterday things took a negative turn with my NbFz. I had just about finished the red-brown camo when I decided to take a break and scour the Internet for more pictures of the beast while deployed in Norway. Something just wasn't right with the way it looked and I came to the conclusion that my Panzer Grey was just too dark when compared to most of the pictures I saw.
So, one step forward and four steps back. 
I decided and mixed up a more appropriate grey and sprayed it on to create a new base colour.
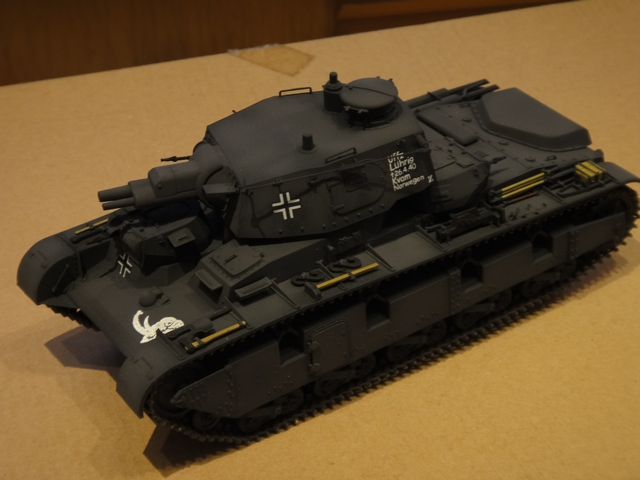
While the pictures don't show it well, I didn't evenly re-coat the entire tank but used the lighter colour to hi-light the larger flat panels. In person it has many shade variations of grey that I feel add to the overall "dusty" effect. It might just be me but I feel this new painting allows the details of the model to appear more pronounced. Here's how it stands as of this writing.


I managed to keep the spray fairly tight so as not to totally obscure certain detail areas (rubber on the wheels, tracks). Never the less, I will have to touch up a few areas and then start again on the second camo colour. Thank goodness (and our campaign leader) for the campaign extension.
Cheers,
Jan

Texas, United States
Joined: June 29, 2010
KitMaker: 5,854 posts
Armorama: 4,817 posts
Posted: Wednesday, January 09, 2013 - 04:44 PM UTC
I'll tell you a little bit about things taking a turn for the worse once I get a chance to finish up some things

I like the gray you are using this time around, and I'm really looking forward to seeing that little beast finished
Ontario, Canada
Joined: March 23, 2008
KitMaker: 2,847 posts
Armorama: 2,667 posts
Posted: Thursday, January 17, 2013 - 06:19 AM UTC
@vonHengest - Jeremy,
This thing is turning out to be a real learning experience, to say the least. I'm almost sorry that I didn't go for a pristine propaganda version.
**********************************************************************************************************************
After taking an afternoon to practice with my airbrush I finally decided to spray a lightened red-brown (r/b) camo this time around. It's really difficult to get a read from all the black and white pictures of the Norway machines but I obviously will need to tone the r/b colour down. At this point I am thinking of seeing what a "dusting" or two of a lightened grey over the camo areas might achieve.


I'm fairly happy with the pattern control with the airbrush but the camera shows the r/b colour moderately darker than what the Mk 1 eyeball sees.
Cheers,
Jan
Texas, United States
Joined: June 29, 2010
KitMaker: 5,854 posts
Armorama: 4,817 posts
Posted: Friday, January 18, 2013 - 11:54 AM UTC
It certainly is! I'm wondering if I should have gone with a 1/35 version myself.. Let's see how things are going by Jan 31, as I would like to close the campaign by then.
I also wanted to say that I have been very pleased by the completed entries in this campaign, as I'm sure the original creator will be as well. These have been some very challenging kits to work with, and I think that at least most of us pushed our skills and learned something new in the process

Baden-Württemberg, Germany
Joined: September 14, 2012
KitMaker: 69 posts
Armorama: 69 posts
Posted: Friday, January 18, 2013 - 08:36 PM UTC
Quoted Text
I think that at least most of us pushed our skills and learned something new in the process
This is certainly true for me. And since this campaign was such a positive experience I will be part of some more groupbuilds. Especially looking forward to the WWI campaign...
Ohio, United States
Joined: February 05, 2004
KitMaker: 545 posts
Armorama: 295 posts
Posted: Saturday, January 19, 2013 - 04:35 AM UTC
Thanks guys! This was a really fun build, and campaign. The communication between everyone was really helpful too! Thanks!
Ontario, Canada
Joined: March 23, 2008
KitMaker: 2,847 posts
Armorama: 2,667 posts
Posted: Saturday, January 19, 2013 - 09:11 AM UTC
A quick update. I took a suggestion made to me and decided to practice with some glaze/filter/wash (whatever?) and tested the effect on some cardboard. It looked pretty promising so I tried it on the tank. I used two separate types based first on a colour called Mud-Stone and the second with Buff at the proportion of about 5% paint and 95 % thinner.


It still needs some touch ups and then I'll start the details followed by the decals and final weathering.
Cheers,
Jan

Ontario, Canada
Joined: March 23, 2008
KitMaker: 2,847 posts
Armorama: 2,667 posts
Posted: Wednesday, January 23, 2013 - 05:47 AM UTC
With the end of the campaign fast approaching, I've put the "pedal to the metal" and engaged turbo boost.

As I dreaded, this beast is going to be a monster to paint/weather with all these complex contours and fine detail. It took an entire afternoon to touch up a few areas but most importantly, start on the suspension detailing/weathering. Still a fair amount to do but I hope to have both sides finished today and start on the upper hull.
I'm basing my desired end result on this picture.

Here's the progress at this point.


Cheers,
Jan

Ontario, Canada
Joined: March 23, 2008
KitMaker: 2,847 posts
Armorama: 2,667 posts
Posted: Thursday, January 24, 2013 - 07:42 AM UTC
Even though it might not look like it, quite a bit was done (and hours spent) on this miniature monster.
Both sides of the tank are pretty much done and the front hull decals are on and coated with clear coat.


I'm hoping to complete the rest of the hull body and top in the next day or two.
I've also started to apply the turret decals and this is turning into a marathon due to the huge size of the turret numbers. There are small detail protrusions where the numbers reside and it is taking volumes of Micro Set to try to settle this decals around. At last count I believe that I've applied at least a dozen coats of the setting solution. Sadly, the instructions call for the builder to cover these numbers with a grey just slightly lighter than the body colour. You'd think that Dragon could have provided alternate number decals for the camouflaged vehicles.


Although I see a light at the end of the tunnel, it's still somewhat faint.
Cheers,
Jan
Ontario, Canada
Joined: March 23, 2008
KitMaker: 2,847 posts
Armorama: 2,667 posts
Posted: Saturday, January 26, 2013 - 05:30 AM UTC
I think that the sides are finally done and so are the tracks. I used the Alex Clark method with Tamiya Acrylics for painting the latter. After painting the tools, the upper hull and fenders were started. From looking at wartime pictures the mufflers appear in many to be in pretty good condition, despite the fact that many modellers make them appear quite rusty. The instructions call for them to be painted a Burnt Iron which is very close to Tamiya X-10 Metallic Grey and this in turn needs to be suitably weathered to cut down on the shine.


The main turret has all its decals applied followed by a clear coat and then the first matt coating. Next up will be detailing the front further and then the rear. Thanks for looking.
Cheers,
Jan
Texas, United States
Joined: June 29, 2010
KitMaker: 5,854 posts
Armorama: 4,817 posts
Posted: Tuesday, January 29, 2013 - 03:53 PM UTC
Jan, you have done a lot of excellent work in such a small scale over this short amount of time. Keep posting your updates!
Ontario, Canada
Joined: March 23, 2008
KitMaker: 2,847 posts
Armorama: 2,667 posts
Posted: Wednesday, January 30, 2013 - 05:08 AM UTC
@Jeremy,
Not only has this taken the longest time but is also the
most complicated model (finishing and weathering wise) that I've ever had to deal with since my return to the hobby.
I think that I can safely say that it's
99% done. From the latest set of pictures, there's a few small things or points that need a touch more refinement.
This Final finishing involved pin washes for some shadows and detailing for highlights. A very trying aspect was the painting out of the turret numbers with a lightened German Grey paint. It is quite well documented that this was done with the tanks that were fielded in Norway as they felt that the large white letters provided a convenient aiming point for enemy guns.
Note that the following pictures are magnified quick shots taken to document the finishing process and determine what might need further attention.


Final pictures and gallery upload should occur in a few hours.
Comments or questions welcome!
Cheers,
Jan
Texas, United States
Joined: June 29, 2010
KitMaker: 5,854 posts
Armorama: 4,817 posts
Posted: Wednesday, January 30, 2013 - 05:21 AM UTC
Excellent Jan! And don't rush it, 99% is enough for me. Just get those final pics up in the gallery when you have time.
Ontario, Canada
Joined: March 23, 2008
KitMaker: 2,847 posts
Armorama: 2,667 posts
Posted: Wednesday, January 30, 2013 - 06:12 AM UTC
@Jeremy,
I am going to call my build
99.585% DONE!
It still *might* need a tweak or two before its ready to be entered in a show and I still need to come up with a properly prepared base. If anyone is interested in how it could eventually look or change, I have a Blog going at
NbFz Blog link.
I've posted a couple of images in the campaign gallery and here are a few others.


I wish that I'd kept track of all the hours I've struggled with this beast but at least I've kept notes on all the new processes that I've learned. Even my SWMBO is tickled about it's progress as she no longer has to hear the colourful language emanating from the work area.
Thanks for a GREAT campaign and in particularly for the extension.
Cheers,
Jan

Texas, United States
Joined: June 29, 2010
KitMaker: 5,854 posts
Armorama: 4,817 posts
Posted: Sunday, February 03, 2013 - 07:04 AM UTC
That's great to hear Jan, and I'm glad you enjoyed this campaign and found the extension useful!
With all of the oddities coming out in modern kit form, I'm thinking maybe we should have another one of these campaigns sometime around the end of the year? Give a chance for the manufacturers to come out with some more of them. Who knows, maybe we'll see a new FT-17?
Ontario, Canada
Joined: March 23, 2008
KitMaker: 2,847 posts
Armorama: 2,667 posts
Posted: Wednesday, February 06, 2013 - 06:41 AM UTC
Jeremy,
While I generally would like to do modern vehicles, the subject of this campaign led to some rather obscure and different looking subjects. The inter-war years saw some very diverse things being tried. As for the extension, it couldn't have happened at a better time for me as one unforeseen circumstance after another seemed to happen. :-(
The idea of a "Son of ABTW" sounds intriguing and I just so happen to have another multi-turreted offering in my stash. As far as an FT-17 goes, RPM makes about 8 or more different versions and also the H35 and R35 tanks as well as other inter-war years armour.
While I consider my build done as far as this campaign is concerned, I've continued to make minor alterations and am working on a base in its Blog. A teaser!

BTW, is the extension still in effect; any more builds due? Do you anticipate doing a campaign feature?
Cheers,
Jan